Quantcast
Channel: Developers » Visit CNX Software
Viewing all 2336 articles
Browse latest View live

STMicro SensorTile is a Tiny STM32 Module with Bluetooth 4.1 LE and Four Sensor Chips

$
0
0

STMicroelectronics SensorTile is a 13.5 x 13.5mm sensor board based on STM32L4 ARM Cortex-M4 microcontroller, a MEMS accelerometer, gyroscope, magnetometer, pressure sensor, a MEMS microphone, as well as a 2.4Ghz radio chip for Bluetooth 4.1 Low Energy connectivity for wearables, smart home, and IoT projects.

stmicro-sensortile

SensorTile hardware specifications:

  • MCU – STMicro STM32L476 ARM Cortex-M4 microcontroller@ up to 80 MHz with 128 KB RAM, 1MB flash
  • Connectivity – Bluetooth 4.1 Smart/LE via BlueNRG-MS network processor with integrated 2.4GHz radio compliant with
  • Sensors
    • LSM6DSM 3D accelerometer + 3D gyroscope
    • LSM303AGR 3D Magnetometer + 3D accelerometer
    • LPS22HB pressure sensor/barometer
    • MP34DT04 digital MEMS microphone
  • I/Os – 2x 9 half holes with access to UART, SPI, SAI (Serial Audio Interface), I2C, DFSDM, USB, OTG, ADC, and GPIOs signals
  • Debugging – SWD interface (multiplexed with GPIOs)
  • Power Supply Range – 2V to 5.5 V
  • Dimensions – 13.5 x 13.5 mm
SensorTile's Functional Block Diagram - Click to Enlarge

SensorTile’s Functional Block Diagram – Click to Enlarge

Software development can be done through a sets of APIs based on the STM32Cube Hardware Abstraction Layer and middleware components, including the STM32 Open Development Environment. The module is supported by Open Software eXpansion Libraries, namely Open.MEMS, Open.RF, and Open.AUDIO, with various example programs allowing you to get started. Several third-party embedded sensing and voice-processing projects also support the module. The module also comes pre-loaded with BLUEMICROSYSTEM2 firmware, and can be controlled with “ST BlueMS” app found on Apple Store and Google Play.

sensortile-kit

But the best way to get started is with SensorTile kit including SensorTile core module and:

  • STLCR01V1 cradle board with a footprint for SensorTile core board, HTS221 humidity and temperature sensor, a micro-SD card socket, a micro USB port, a lithium-polymer battery (LiPo) charger, and a SWD header.
  • A LiPo rechargeable battery and a plastic case for the cradle board, SensorTile module, and battery
  • STLCX01V1 Arduino UNO R3 compatible cradle expansion board with analog stereo audio output, a micro-USB connector for power and communication, a reset button and a SWD header.
  • A programming cable

I could not find a price for SensorTile core module, but STEVAL-STLKT01V1 SensorTile kit can be purchased for $80.85 directly on STMicro website or their distributors. Visit SensorTile kit’s product page for further information include hardware design files, quick start guide, software and firmware downloads, purchase links, and more.

Tweet STMicroelectronics SensorTile is a 13.5 x 13.5mm sensor board based on STM32L4 ARM Cortex-M4 microcontroller, a MEMS accelerometer, gyroscope, magnetometer, pressure sensor, a MEMS microphone, as well as a…


$59 RetroEngine Sigma Retro Game Console is Based on Orange Pi Lite Board (Crowdfunding)

$
0
0

2016 has been the year of retrogaming comeback with products like PocketCHIP, Nintendo NES Classic, GPD Win and quite a few other projects. There will soon be a new option with RetroEngine Sigma, an inexpensive Linux based retro-gaming console based on Allwinner H3 processor.

retroengine-sigmaRetroEngine Sigma fanless game console hardware specifications:

  • SoC – Allwinner H3 quad core Cortex A7 @ 1.2 GHz with an ARM Mali-400MP2 GPU up to 600 MHz
  • System Memory – 512 MB DDR3
  • Storage – 16 or 32GB micro SD card
  • Video & Audio Output – HDMI port
  • Connectivity – 802.11 b/g/n WiFi
  • USB – 2x USB 2.0 host ports, 1x micro USB OTG port
  • Misc – Programmable status LED, 2 user configurable buttons P1 & P2
  • Power Supply – 5V/2A via power barrel
  • Dimensions – 110 x 85 x 33.5 mm

The specifications look similar, so I went to my little list of Allwinner H3 boards, found the specs matches closely Orange Pi Lite board, and after checking the video and more picture, the ports also happen to be exactly in the same place… So it’s pretty sure the console is based on Shenzhen Xunlong’s Orange Pi Lite board, which is cool since there’s a good community support.

retrogame-sigma-armbianRetroGame developers leveraged that, and the console supports Atari 2600/7800, Sega Genesis, Nintendo NES / 64, Amstrad, Sega, and many more, and can be used as a mini computer and a media player with Kodi. It seems to have the same features as RetrOrangePi firmware based on Armbian plus Kodi and various game emulator.
[embedded content]

The mini console’s Indiegogo crowdfunding campaign has been very successfully so far as they’ve raised closed to $250,000 from over 3,000 backers. All early bird rewards are gone, but you can still pledge $59 for the “Speedy Backer” reward including a mini console with a 16GB micro SD card pre-loaded with the firmware, a power adapter, a dual stick analog controller, a micro USB card reader, and a Xmas voucher. The 32GB micro SD Deluxe version goes for $89, and adds a Bluetooth adapter, a Bluetooth game controller, and a HDMI cable. Shipping adds $7 to the US, and $15 to the rest of the world. Delivery is scheduled for April to June 2017, but you’ll first receive a Christmas Gift voucher.

orange-pi-lite-retro-gaming-console-kit

Tweet 2016 has been the year of retrogaming comeback with products like PocketCHIP, Nintendo NES Classic, GPD Win and quite a few other projects. There will soon be a new…

Junsun H552C Android 4.4 Car DVR and GPS Navigation System Comes with a 7″ Display

$
0
0

There are plenty of Android car systems for sale with DVR and/or GPS navigation capabilities on the net, but sometimes they lack some features, or come in a 2 DIN form factor, which is nice if you know how to disable your car dashboard, but it might be a little complicated if you don’t. An alternative is to get an Android rear view mirror, but obviously the display is much smaller, and it reduces the usable space on the rear view mirror to see what’s going on behind. However, this morning I’ve come across Junsun H552C Android 4.4 system with a 7″ display, rear and front cameras, and GPS navigation system that might be easier to install since it sits on top of the dashboard, and is selling for $118.54 on Dealextreme.

android-dvr-gps-navigation

Junsun H552C specifications:

  • Processor – Quad core CPU @ 1.3 GHz
  • System Memory – 1GB RAM
  • Storage – 16 GB flash (13.07GB available for apps and data) + micro SD slot up to 32GB
  • Display – 7″ touch screen display with 1920×1080 resolution
  • Camera – 2.0 Wide angle (170°) front camera for 1080p recording + external rear camera (140° angle) for 720p recording; simultaneous recording support; PiP display with both camera shown on display
  • Video – AV input
  • Audio – Built-in microphone and speaker
  • Connectivity
    • GPS ( SiRF Star III module) with built-in antenna
    • WiFi & Bluetooth 4.0
    • FM transmitter to output audio to car speaker
  • Navigation – Sygic maps for US and Canada
  • USB – 1x mini USB port
  • Sensor – G-Shock Sensor to automatically save the record video in case of collision
  • Battery – 8,000 mAh battery
  • Dimensions – 12 cm x 4.4 cm x 8.4 cm
  • Weight – 750 grams

Maps appear limited to North America, but descriptions on DX are often incorrect, and since the system is running Android 4.4, you should be able to install your own GPS navigation app.

android-car-dvr-gps-kitThe kit include the 7″ “car dvr system”, a power cable, the rear camera and cable to use while you drive in reverse gear / park your car, a USB data cable, a bracket for the dashboard, and a suction cup bracket in case you prefer to hook the system to your windshield, and a user’s manual.

junsun-rear-viewI could not find H552C on other website, but found the same model without model number on Junsun’s official Alipress store selling for $101.83 shipped. They provided some more information about support maps, and indicate that they will load Europe, North America, South America, Southeast Asia, or Middle East map depending on the country of the buyer. They also mention yearly map updates:

About the map, if you want to update the map, please contact us, we will upload it to the “Dropbox”, please do not download in other places, otherwise it will damage the original map. Update map time: once a year

Tweet There are plenty of Android car systems for sale with DVR and/or GPS navigation capabilities on the net, but sometimes they lack some features, or come in a 2…

Rockchip Introduces RK3228H and RK3228B Processors for IPTV/OTT TV Boxes

$
0
0

Rockchip has just tweeted about their RK3xxx processors family, and two new processors appear to have been included in the list with Rockchip RK3228H quad core Cortex A53 processor and RK3228B quad core Cortex A7 processor both supporting 4K video playback and ouput, as well as HDR.

rk3228h-rk3228bRockchip RK3228H has many of the same features as Amlogic S905X with a quad core Cortex A53 processor, an ARM Mali-T450 GPU, 4K H.265/H.264 video support, and HDR10/HLG, but it also adds something extra with a USB 3.0 interface.  RK3328B is lower end with its quad core A7 processor, but still supports H.265/H.264 up to 4K resolution, and include the usual interfaces such as HDMI, CVBS, and a Fast Ethernet PHY.

There may be more details on the press release, but the page won’t load for me right now.

Tweet Rockchip has just tweeted about their RK3xxx processors family, and two new processors appear to have been included in the list with Rockchip RK3228H quad core Cortex A53 processor…

Sonoff SC WiFi Environmental Monitor Sells for $20

$
0
0

ITEAD Studio has done some good job with their Sonoff home automation devices based on Espressif ESP8266 WiSoC, as they are affordable, working as advertised with default firmware, and hackable with our own. The company has now added a new model, which may or may not be as useful, with Sonoff SC environmental monitor device that detects current temperature, humidity, light intensity, air quality, and sound levels, and sends the data to eWeLink app installed on your Android or iOS phone.

sonoff-scYou may be thinking it can be used as a home assistant since it really looks like a speaker and include some sort of microphone, but the top of the device is probably used to let air and dust go through.

Sonoff SC specifications:

  • WiSoc – Espressif ESP8266 Tensilica L106 processor @ 80/160 Mhz with WiFi
  • MCU – Atmel ATMega328 MCU
  • Connectivity – 802.11 b/g/n WiFi
  • Sensors
    • Sharp GP2Y1010AU0F dust sensor to detect smoke and dust
    • DHT11 temperature and humidity sensor; Range: 0 to 100 °C
    • GM5528 photo-conductive resistance
    • Electrat condenser microphone
  • Power Supply – 5V via micro USB port

esp8266-environmental-monitor

The default firmware and eWelink app also allows to set various smart scenes to trigger other devices, for example if air quality is too poor, Sonoff SC could turn on a fan connected to Sonoff wirelesss switch, or lights could be turned on when it becomes dark.

eWelink Environmental Report Card

eWelink Environmental Report Card

But you don’t have to use the default firmware if you don’t want too, as Sonoff SC’s ATMega328 controller can be programed through the Arduino IDE if you want to change the firmware, while ESP8266 is used for WiFi only. You’ll find the schematics (PDF) and Arduino code in the Wiki.

If you are interested, you can purchase Sonoff SC for $19.90 on ITEAD Studio website with shipping adding $7.33 to $17 depending on selected shipping method.

Tweet ITEAD Studio has done some good job with their Sonoff home automation devices based on Espressif ESP8266 WiSoC, as they are affordable, working as advertised with default firmware, and…

VGA Output Hack on $2 PADI IoT Stamp & Other Realtek RTL8710AF Modules

$
0
0

It’s pretty amazing what you can do with those cheap WiFi modules coming from Espressif and Realtek. You may remember CNLohr getting ESP8266 to broadcast video to your TV though NTSC, and that was impressive. But developer kissste, who has been very active since the announcement of a $2 Realtek RTL8710 module, has now developed a VGA driver demo for Realtek Ameba WiFi SoCs, and successfully tested it on Pine64 PADI IoT Stamp.

Click to Enlarge

Click to Enlarge

Just like on ESP8266, there’s no hardware display block on RTL8710AF, RTL8711AF, and RTL8195AF SoCs, so instead he had to connect the signals to GPIOs with the video signal connected to GA1 via a resistor, H-Sync to GC2, and V-Sync to GA5. Video and H-Sync data is actually transfered over an SPI connection using DMA transfer for better performance. Normally the video signal for VGA is divided into red, green, and blue signal, so I understand he mixed all three into a single signal to output black or white on the display, and color is not possible at least not using 800×600 @ up to 63 Hz as possible in black & white.

Currently, the code just output some pre-defined characters once the board receives ATVG AT command, but you could modify the code – released on Github – to do whatever fancy stuff you want.

Tweet It’s pretty amazing what you can do with those cheap WiFi modules coming from Espressif and Realtek. You may remember CNLohr getting ESP8266 to broadcast video to your TV…

How to Use Sonoff POW ESP8266 WiFi Power Switch with MQTT and ThingSpeak

$
0
0

ITEAD Studio’s Sonoff is a family of cheap home automation products based on ESP8266 WiSoC, and I’ve already tested Sonoff TH16 wireless switch with a humidity and temperature sensor using the stock firmware and eWelink app for Android or iOS. It works, but up to recently it required a registration to a cloud service (the company will now allow use from the local network), and the source code is closed. So for the second device under review, namely Sonoff POW wireless switch with a power consumption monitor, I decided to install ESPurna firmware working on ESP8266 Sonoff devices and NodeMCU, as it’s open source, supports Sonoff POW natively, includes a web interface to control the device from the LAN, and includes an MQTT client.

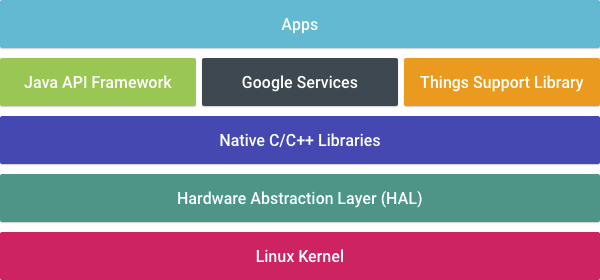
MQTT (pronounced Mosquitto) is a lightweight publish/subscribe messaging protocol used to control IoT sensors and devices, and it’s a popular method to gather data from client to a MQTT broker to push the data to the cloud or a local database.

iot-sensors-mqtt-cloud

So typically, you’d have a bunch of sensor nodes (like Sonoff devices) communicating over MQTT to an MQTT Broker in your local network, which could be an OpenWrt router or a Linux development board like a Raspberry Pi, which in turns gets the data the the cloud to services like AWS IoT, Xively, or ThingSpeak. It’s also possible to use Cloud services to control MQTT devices remotely through the MQTT broker.

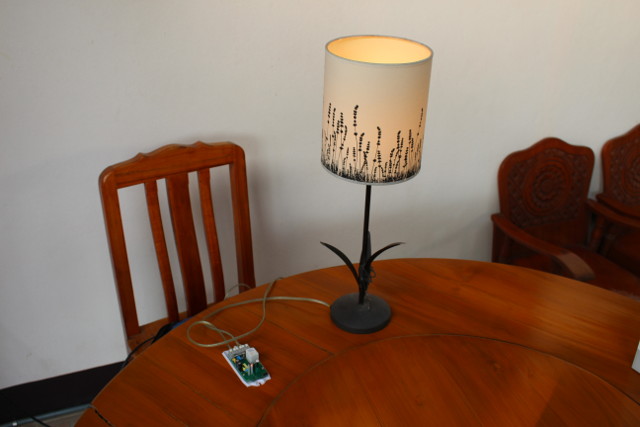
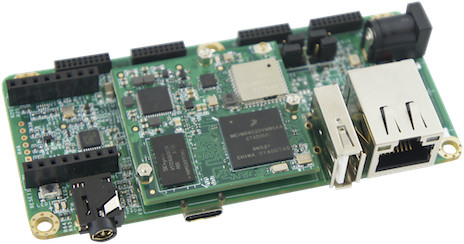
I eventually plan to use NanoPi NEO board to run both MQTT and ThingSpeak locally (not connected to the cloud) in order to monitor the power consumption of my small office, but since I’m all new to this, I’ve started experimenting by connecting a 30W light to Sonoff POW, and use a desktop computer running Ubuntu 16.04 for MQTT and ThingSpeak.
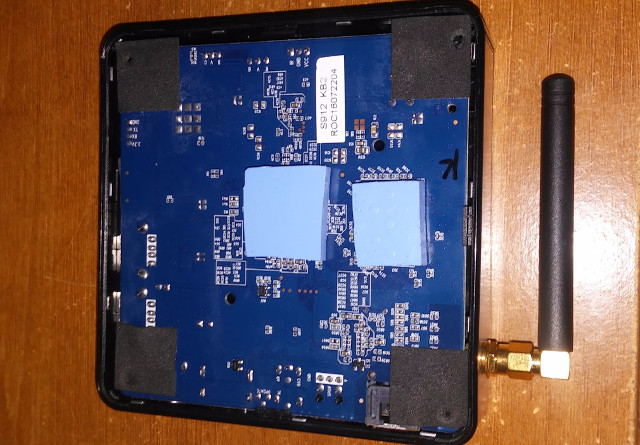
sonoff-pow-connection

Click to Enlarge

Click to Enlarge

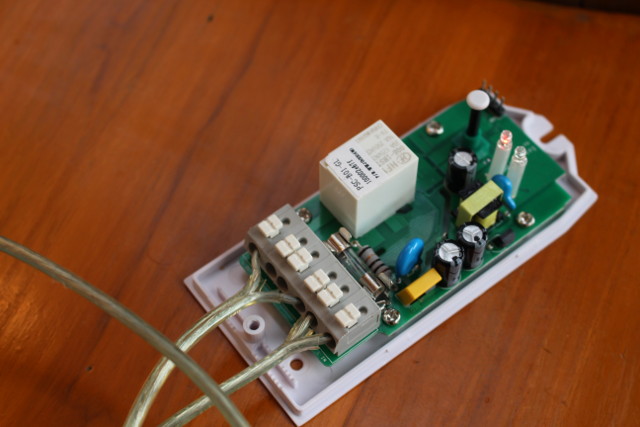
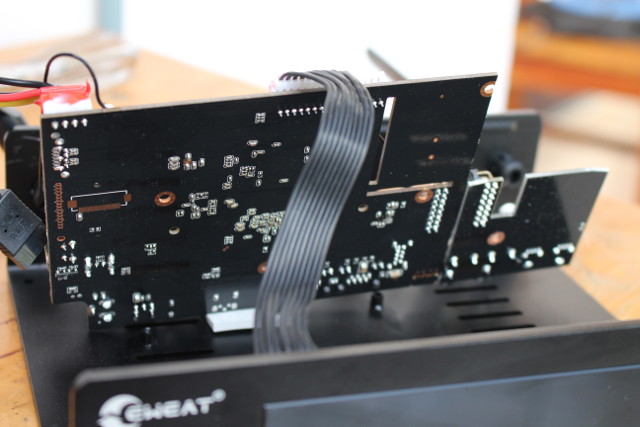
Since I’ve already installed ESPurna firmware to the device, I disconnected the USB to serial board (important since Sonoff POW board has a hot ground), and connected it to the mains (220V in my location). That means we already have an MQTT client which first I had to configure.

Click to Enlarge

Click to Enlarge

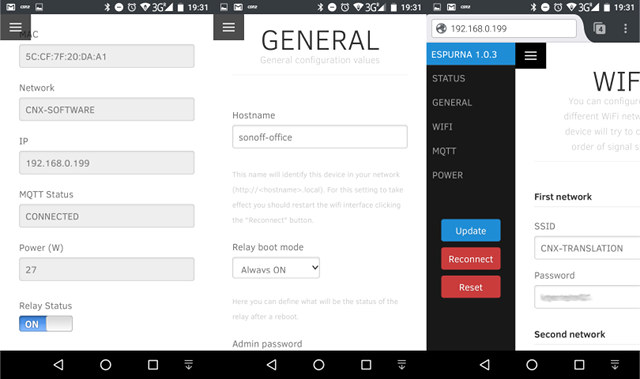
Since it was the first time I connected a load to the device, I went to ESPurna’s status menu to check power usage was reported, and my 30 Watts light bulb was drawing 27 Watts. Close enough. I changed the hostname to sonoff-office, and setup two SSID in order to connect Sonoff POW to my local network in client mode, instead of using it in Access Point mode by default. You’ll need to tap on Update each time you modify the settings. Since the SSID must be entered manually, please note that SSID are case sensitive, e.g. CNX-SOFTWARE is different from cnx-software.

Click to Enlarge

Click to Enlarge

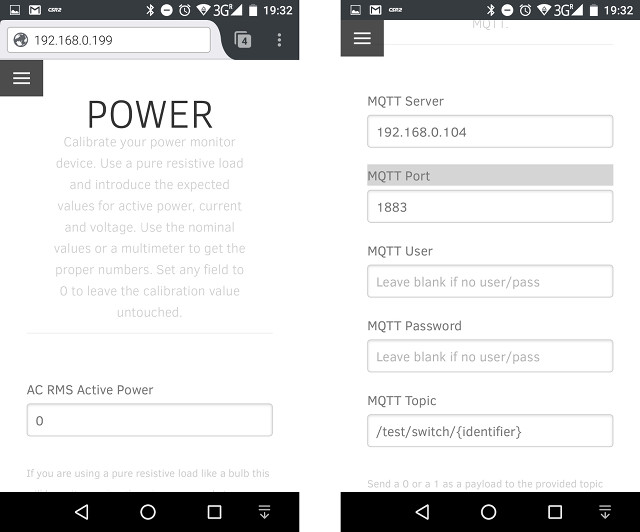
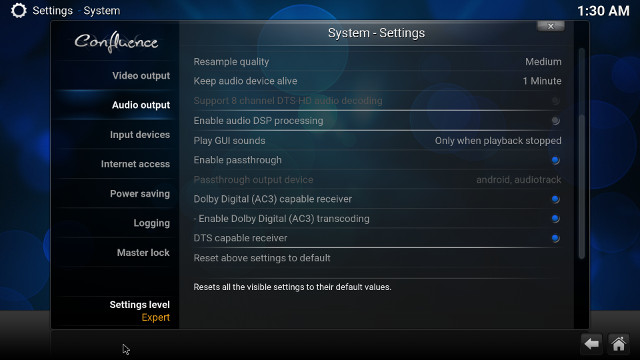
I wanted to calibrate the power using the 30W light bulb, so I entered 30W in AC RMS Active Power field, and tapped on Update, but the web interface reported “no changes”. I’m not sure how to use that part. Finally the most important part for this tutorial is to set the MQTT settings with MQTT IP address, and leaving other fields unchanged. However, you can change MQTT Topic field for example replacing /test/switch/{identifier} by /myiotstuff/{identifier}.

Now that our MQTT client is configured, I need to install an MQTT broker in Ubuntu:

1

sudo apt install mosquitto mosquitto-clients

mosquitto-clients is not really needed, but I’ll use it to test the MQTT broker a little later. Once you installed it, the MQTT Broker should already run automatically.

1

2

3

4

5

6

7

8

9

10

11

tail -f /var/log/mosquitto/mosquitto.log

1481340837: Saving in-memory database to /var/lib/mosquitto/mosquitto.db.

1481342637: Saving in-memory database to /var/lib/mosquitto/mosquitto.db.

1481344439: Saving in-memory database to /var/lib/mosquitto/mosquitto.db.

1481346240: Saving in-memory database to /var/lib/mosquitto/mosquitto.db.

1481348041: Saving in-memory database to /var/lib/mosquitto/mosquitto.db.

1481349842: Saving in-memory database to /var/lib/mosquitto/mosquitto.db.

1481351643: Saving in-memory database to /var/lib/mosquitto/mosquitto.db.

1481353443: Saving in-memory database to /var/lib/mosquitto/mosquitto.db.

1481355244: Saving in-memory database to /var/lib/mosquitto/mosquitto.db.

1481356155: New connection from 192.168.0.199 on port 1883.

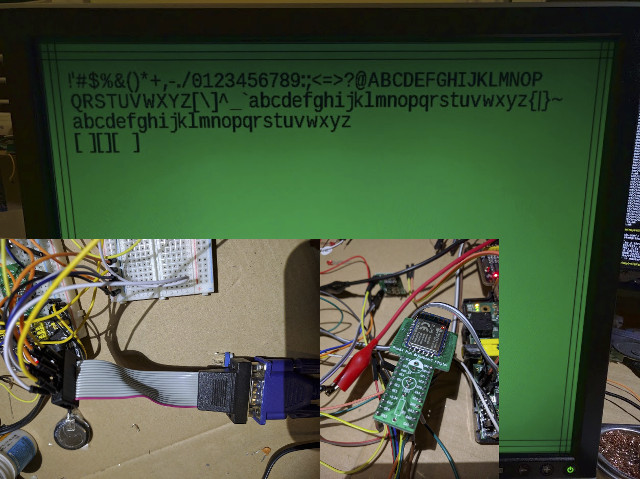
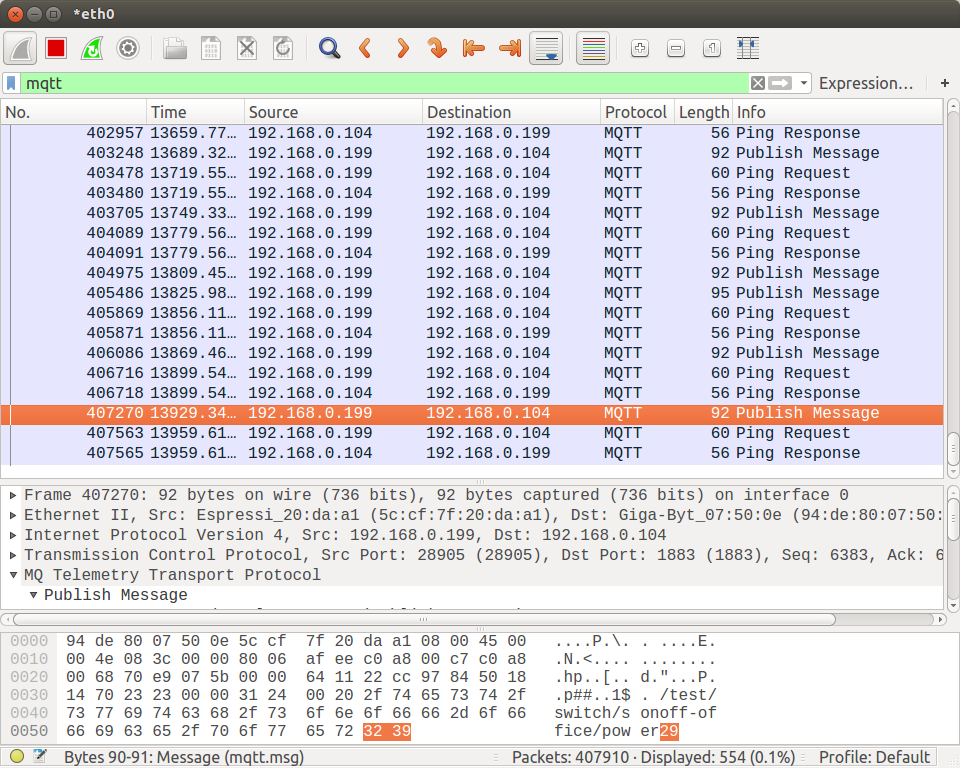
The last line of the log above shows a client connection from Sonoff POW. Now, we need to check the topic, and since ESPurna documentation is still work in progress, you could either check out the source code, or IMHO more fun, capture MQTT packet with tcpdump or Wireshark as I’ve done below.

Wireshark MQTT Capture - Click to Enlarge

Wireshark MQTT Capture – Click to Enlarge

Here we can see that Sonoff POW will send a Publich Message with the power level using the topic “/test/switch/sonoff-office/power29”.  “/test/switch” is the string we’ve defined in the web interface, “sonoff-office” the hostname we’ve given to Sonoff Pow, and “power29” indicates 29 Watts of power is currently used.

We can also start a client in Ubuntu 16.04 terminal window to check more MQTT topics with # wildcard for sonoff-office host:

1

2

3

4

5

6

7

mosquitto_sub -v -h localhost -t /test/switch/sonoff-office/#

/test/switch/sonoff-office/ip 192.168.0.199

/test/switch/sonoff-office/version 1.0.3

/test/switch/sonoff-office/fsversion 1.0.3

/test/switch/sonoff-office/heartbeat 1

/test/switch/sonoff-office/power 29

/test/switch/sonoff-office 1

We can use MQTT to get the IP address, firmware and file system version, hearbeat message, power use, and relay status (on or off).

It’s all good, but now we need to do something to draw the data, and possibly analyze it. I selected ThingSpeak for this purpose since it can be installed in the local network, or through their service in the cloud. By the end of my testing, I’ve noticed ThingSpeak has a new MQTT API, meaning it should be possible to connect your MQTT broker directly to it, but for this guide I use mqspeak instead as a bridge between MQTT and ThingSpeak. It may still be useful, as the open source version of ThingSpeak is not updated anymore, and lacks the MQTT API.

You’ll need Python 3 and pip3 to install mqspeak:

sudo apt install python3-pip

pip3 install upgrade pip

pip3 install mqspeak

Once it’s done, we’ll need to create a config files as explained on mqspeak’s github repo, and I created /etc/mqspeak.conf with the following content:

[power-consumption-broker]
Host = localhost
Port = 1883
Topic = /test/switch/sonoff-office/power

[relay-broker]
Host = localhost
Port = 1883
Topic = /test/switch/sonoff-office

[Channels]
Enabled = channel1

[channel1]
Id = <thingspeak-id>
Key = <thingspeak-writekey>
Type = thingspeak
UpdateRate = 15
UpdateType = blackout
UpdateFields = power-consumption-data

[power-consumption-data]
field1 = power-consumption-broker /test/switch/sonoff-office/power
#field2 = relay-broker /test/switch/sonoff-office

1

2

3

4

5

6

7

8

9

10

11

12

13

14

15

16

17

18

19

20

21

22

23

24

25

26

27

[Brokers]

Enabled = power-consumption-broker relay-broker

[power-consumption-broker]

Host = localhost

Port = 1883

Topic = /test/switch/sonoff-office/power

[relay-broker]

Host = localhost

Port = 1883

Topic = /test/switch/sonoff-office

[Channels]

Enabled = channel1

[channel1]

Id = <thingspeak-id>

Key = <thingspeak-writekey>

Type = thingspeak

UpdateRate = 15

UpdateType = blackout

UpdateFields = power-consumption-data

[power-consumption-data]

field1 = power-consumption-broker /test/switch/sonoff-office/power

#field2 = relay-broker /test/switch/sonoff-office

Brokers are used to configure MQTT broker IP address and port, as well as the topic(s) to subscribe to, while Channels take care of ThingSpeak configuration with the channel’s Id and write API key, update rate in seconds (15s minimum), update type (see github for details), and fields defined in your ThingSpeak’s channel(s), which will create later on. I wrote one broker for the power consumption topic, and other for the relay status. However, I eventually ignored the relay status, as it’s not updated often enough and cause ThingSpeak’s channel to only be updated when the relay changes status, even if there are power updates in the meantime. A workaround is to use two different channels for ThingSpeak.

mqspeak connects directly to api.thingspeak.com, so if you are using ThingSpeak cloud services, the next step is to register an account and setup one or more channels.

Extra Instructions for a local installation of ThingSpeak

However, if you’ve installed ThingSpeak in Ubuntu 16.04 or other Linux operating systems locally or on your own server, you’ll need to change the server in the source code, and reinstall mqspeak.

  1. Get the source code:

    git clone https://github.com/mqopen/mqspeak

    cd mqspeak

  2. Modify mqspeak/sending.py to replace api.thingspeak.com using HTTPS with localhost (or other IP address/URL where you’ve installed ThingSpeak) with HTTP:

    bodyEncoded = urllib.parse.urlencode(body)

    #        conn = http.client.HTTPSConnection(“api.thingspeak.com”, timeout = 30)

    conn = http.client.HTTPConnection(“localhost:3000″, timeout = 30)

    conn.request(“POST”, “/update”, bodyEncoded)

  3. Install mqspeak

    1

    sudo python3 setup.py install

An improvement would be to install a signed SSL certificate, like the one offered by LetsEncrypt and configure the rails server to use https instead. I have not setup ThingSpeak server to start automatically yet, so I have to start it manually for now:

cd <thingspeak-source-directory>

source ~/.rvm/scripts/rvm

rails server webrick

End of instructions specific to local installation.

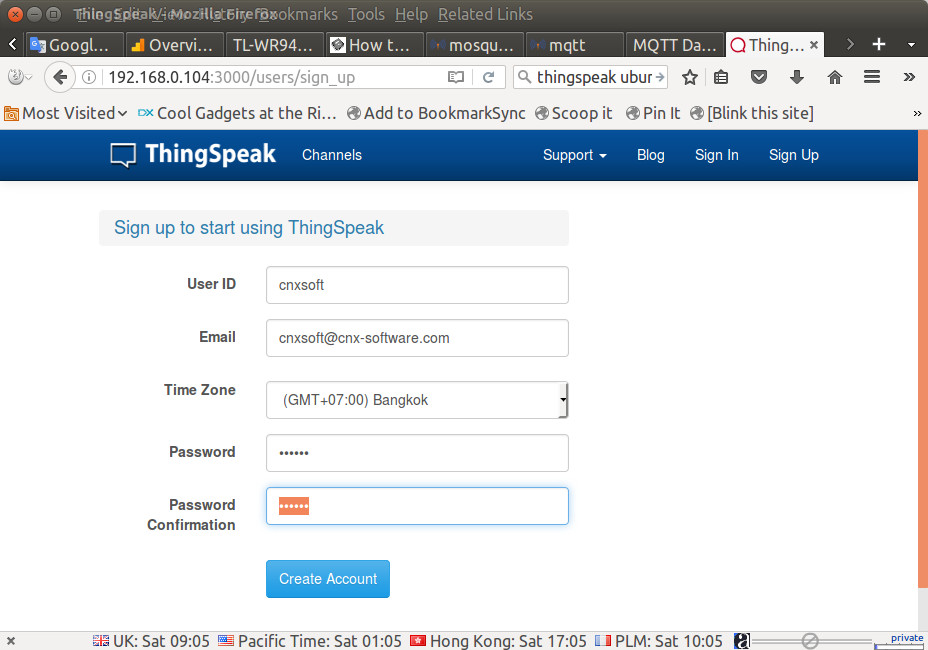
The instructions specific for the local installation of ThingSpeak are now done, and all instructions below are valid for both the local installation and cloud service. Now open a web browser, go ThingSpeak (cloud or local), and click on “Get Started Now” in order to register an account.

Click to Enlarge

Click to Enlarge

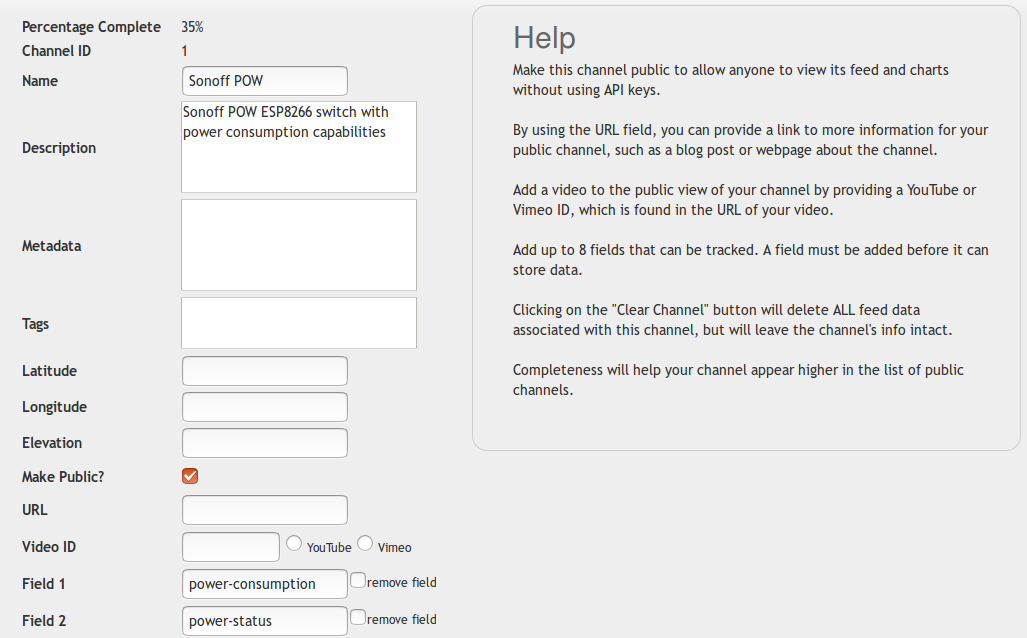
Once it is done, login and click on “New Channel”.

Click to Enlarge

Click to Enlarge

Give it a name, a description, create fields as needed, for example power-consumption and power-status, and click on Save Channel.  Update /etc/mqspeak.conf accordingly with the fields’ name, and channel Id.
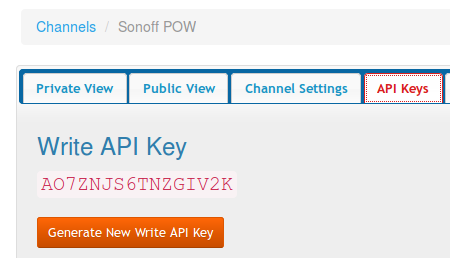
thingspeak-api-keyNow select API Keys tab to copy and paste the write API key into mqspeak.conf.

Now we can start mqspeak:

mqspeak -v log-stdout

Sending data to channel channel1 [Id: 1, Key: AO7ZNJS6TNZGIV2K]: [2016-12-11 12:13:45.094850] {<power-consumption-broker - localhost:1883: /test/switch/sonoff-office/power>: ‘0’}...

Channel channel1 [Id: 1, Key: AO7ZNJS6TNZGIV2K] response: 200 OK: 1

Sending data to channel channel1 [Id: 1, Key: AO7ZNJS6TNZGIV2K]: [2016-12-11 12:14:28.518688] {<power-consumption-broker - localhost:1883: /test/switch/sonoff-office/power>: ‘0’}...

Channel channel1 [Id: 1, Key: AO7ZNJS6TNZGIV2K] response: 200 OK: 2

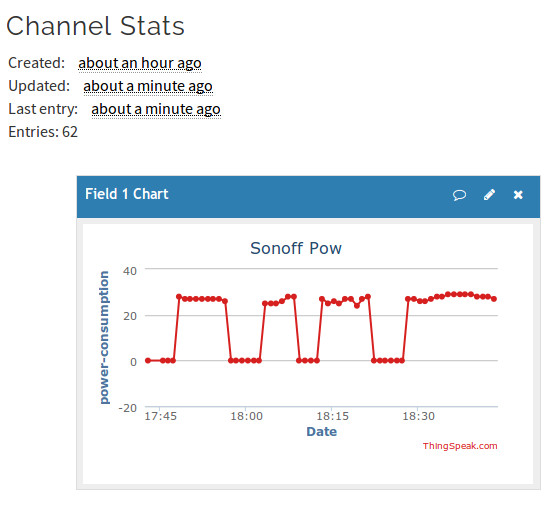
ESPurna firmware will send a power update every 60 seconds (this can be changed in code/src/pow.ino), so you’ll need a new message pop-up every 60 seconds with your channels Id and write API key. I’ve let it run for about one hour, and got the follow chart in ThingSpeak after turning on and off the lights from time to time.
thingspeak-power-consumptionThat’s pretty cool, so it only shows the current power in watt, and we’d probably want to get power consumption in kW/h per day, week and month at some time, and I have yet to study how to do that, Exporting the data to excel would be a workaround if this can not be handled in ThingSpeak. ThingSpeak.com (but not the open source version) offers some Matlab processing of the data, so that’d be another options.

The next steps would be to install MQTT and ThingSpeak in NanoPi NEO board, enable HTTPS in ThingSpeak, autostart rails server and mqspeak at boot time, make ESPurna firmware publish the “Power” topic more often than every 6 second, and find some way to generate useful kW/h consumption charts from the data stored in ThingSpeak within ThingSpeak, or but exporting the data.

Tweet ITEAD Studio’s Sonoff is a family of cheap home automation products based on ESP8266 WiSoC, and I’ve already tested Sonoff TH16 wireless switch with a humidity and temperature sensor…

Eweat R9 Plus Android TV Box and OpenWrt NAS Review – Part 1: Unboxing and Teardown

$
0
0

Zidoo X9S is getting some competition with Eweat R9 TV boxes based on the same Realtek RTD1295 processor with built-in SATA, Gigabit Ethernet, 4K VP9 and H.265, HDR, and USB 3.0. The company has three R9 models, and they sent me to top of the line R9 Plus with 2GB RAM, 16GB storage, a 3.5″ SATA bay, HDMI input, and dual Gigabit Ethernet ports for evaluation. I’ll start the first part of the review by checking out the hardware inside and out, before testing the firmware in the second part.

Eweat R9 Plus Unboxing

The device ships in a large package with a handle which can be convenient in brick and mortar shops since the whole package weights about 1.8 kilograms.eweat-r9-plus-packageThe package then contains a smaller package will all accessories: a 12V/2.5A power supply, a “Quickly User Guide” (sic.), a HDMI cable, and an IR remote control taking two AAA batteries.

Click to Enlarge

Click to Enlarge

You’ll also find the box packed between two polystyrene blocks. The device really feels of high quality thanks to its metal case.

Click to Enlarge

Click to Enlarge

It’s also much heavier than your typical TV box. The front panel include an LCD display and an IR receiver window, while you’ll notice the SATA bay door on the right.

eweat-r9-plus-sd-card

The other side has a USB 2.0 port, a recovery pinhole, an SD card slot, some ventilation holes, and a “don’t-think-out-it-this-will-void-your-warranty” sticker.

Click to Enlarge

Click to Enlarge

Bu the rear panel has all the cool goodies with two WiFi antennas, two more USB 2.0 host ports, four RCA connectors for stereo audio, coaxial S/PDIF and CVBS (composite), a USB type C port that can be used to connect storage devices or charge your phone, a USB 3.0 port, two Gigabit Ethernet ports, one HDMI 2.0 out port to connect to your TV, one HDMI 2.0 input port to record video from external sources, an optical S/PDIF port, the DC jack, and a mechanical power switch.

Click to Enlarge

Click to Enlarge

Inserting a hard drive is very easy. Pull the handle on the door, insert the hardware, and close the door and you’re done. If you want  to remove the drive, open the door and as we’ll see below a small arm is pushing the drive out. The SATA bay mechanism looks solid, and feels much better than the plastic key mechanism used in Cloud Media’s Popcorn Hour A-500, which I broke after two tries.

You can see how easy it is to insert the hard drive in the unboxing video below.

[embedded content]

Eweat R9 Plus Teardown

The hardware looks good out the outside, what about the inside? Let’s open it to find out. Remove the four sticky pad on the bottom of the case, and loosen the four screws.

Click to Enlarge

Click to Enlarge

Now you can lift the top cover, void the warranty, and have a closer look at the mechanical and thermal design of the device. The MAC address on the bottom of the device – 9C:F8:DB:xx:xx:xx – looks up to a company called Shenzhen Eyunmei Technology, who also manufactured the older M-195 TV box based on Realtek RTD1195 processor.

Click to Enlarge

Click to Enlarge

The metal top cover is connected to the SATA bay’s metal frame via two short thermal pad, and you can see the arm pushing the HDD out when your open the door in the bottom right of the photo.

Then I had to take a thinner screwdriver to loosen four more screws to remove the SATA bay mechanism, and checkout the board – named 1295-V4.0_161029 – itself.

Click to Enlarge

Click to Enlarge

Realtek RTD1295 quad core Cortex A53 processor is covered by a heatsink, and connected to a 16GB Toshiba THGBMBG7C2KBAIL eMMC flash, and two Micron MT40A512M16JY-083E (I used FBGA & Component Marking Decoder to find out) 8 Gbit DDR4 chips (16 Gbit = 2GB in total). Gigabit Ethernet connectivity is achieved via one RTL8211F PHY transceiver and two E-Con EG24S036S magnetic transformers (only one transceiver is required since Realtek RTD1295 SoC comes with one Gigabit Ethernet MAC/PHY),  and wireless connectivity is made possible through Realtek RTL8821AU USB 2.0 802.11ac and Bluetooth 4.0 LE also used in Zidoo X9S. There’s also a part reserved for a battery for the RTC, but Eweat decided not to populate it.

Click to Enlarge

Click to Enlarge

The front panel display is driven Titan Micro TM1628 LED Controller, just like the one on Zidoo X9S. You’ll need to loosen two more screws and two spacers attaching the board to the case, as well as the screw between the four RCA connectors on the rear panel to take the board out.

Click to Enlarge

Click to Enlarge

Some parts are glued, so I did not removed it completely, especially since there’s no much to be seen, except one expansion header,  a footprint for another connector, and another thermal pad between the bottom of the board and the case.

I’d like to thank Eweat for sending the device for review. Interested resellers and distributions may want to contact the company via the company’s website, while individuals can purchase Eweat R9 Plus for $175.99 plus shipping on Aliexpress.

Tweet Zidoo X9S is getting some competition with Eweat R9 TV boxes based on the same Realtek RTD1295 processor with built-in SATA, Gigabit Ethernet, 4K VP9 and H.265, HDR, and…


Linux 4.9 Release – Main Changes, ARM and MIPS Architectures

$
0
0

inus Torvalds released Linux 4.9 on Sunday:

So Linux 4.9 is out, and the merge window for 4.10 is thus open.

With the extra week for 4.9, the timing for the merge window is obviously a bit awkward, and it technically closes in two weeks on Christmas Day. But that is a pure technicality, because I will certainly stop pulling on the 23rd at the latest, and if I get roped into Xmas food prep, even that date might be questionable.

I could extend the merge window rather than cut it short, but I’m not going to. I suspect we all want a nice calm winter break, so if your stuff isn’t ready to be merged early, the solution is to just not merge it yet at all, and wait for 4.11. Just so you all know (I already bcc’d the main merge window suspects in a separate mailing last week, I’m just repeating myself here to avoid anybody being confused about timing).

Anyway, back to 4.9 itself.

I’m pretty sure this is the biggest release we’ve ever had, at least in number of commits. If you look at the number of lines changed, we’ve had bigger releases in the past, but they have tended to be due to specific issues (v4.2 got a lot of lines from the AMD GPU register definition files, for example, and we’ve had big re-organizations that caused a lot of lines in the past: v3.2 was big due to staging, v3.7 had the automated uapi header file disintegration, etc). In contrast, 4.9 is just big.

Admittedly a chunk of that is the new greybus staging support, but that really isn’t the bulk of it – it’s just another small detail in the overall “yes, v4.9 is big” picture.

Other than just the size, 4.9 looks fairly normal. A bit over two thirds drivers (staging, GPU and networking are the bulk of it, but it’s all over), with the rest looking fairly normal too: arch updates, documentation, generic networking, filesystems..

The shortlog (16k+ commits, with another 1100 merge commits to round things out) is obviously much too big to put here, and wouldn’t be legible anyway. So as is my wont, I’m appending just the log of my merges.

Linux 4.8 brought us an HDMI-CEC framework, a new kernel documentation system is now based on Sphinx, a user-space GPIO subsystem and tools, file systems improvements and more.

linux-4-9-changelogSome of the notable changes for Linux 4.9 include:

  • Greybus staging support. While Project Ara has been canceled, the code is still used in one Motorola phone, a Toshiba chip requires it, as well as other undisclosed users.
  • File systems improvements for CIFS (bug fixes, idsfromsid mount option, better reconnection handling), BTRFS (bug fixes), NFS (bug fixes and new features such as server-side copy), F2FS (bug fixed and performance improvements), EXT-4 (“Lots of bug fixes and cleanups”) , and XFS (iomap-based DAX infrastructure and XFS delalloc rework + bug fixes)
  • Improved security with virtually mapped kernel stacks, and memory protection keys
  • AMDGPU now supports older Radeon graphics cards, virtual display support, and improved reset.

Some interesting ARM architecture fixes and new features:

  • Allwinner:
    • Allwinner GR8 – Preliminary SoC support
    • Allwinner AXP209 PMIC – GPIO support
    • Allwinner A31 – SPDIF support
    • Allwinner A23/A33 and A31/A31s – sunxi-ng CCU driver
    • Allwinner A33 – Display Driver
    • Allwinner A64 – USB PHY support
    • Allwinner H3 – PWM support, I2C support
    • AXP806 PMIC – regulator support
    • AC100 RTC / codec IC – mfd driver, RTC driver
    • New boards and devices – Orange Pi PC Plus, Olimex A33-OLinuXino, Orange Pi Lite, Inet q972, Empire Electronix M712, Orange Pi Plus 2, Orange Pi Plus 2E, NanoPi NEO.
  • Rockchip:
    • PCI – Update Rockchip rk3399 host bridge driver DTS and resets
    • Rockchip RK808 PMIC driver
    • Rockchip DDR clks and rk3399 driver tweaks
    • phy driver for Rockchip usb2phy, internal PCIe PHY, and USB Type-C PHY on rk3399
    • update compatible strings for Rockchip efuse (RK3399)
    • Support for Tronsmart Orion R86 set-top-box (RK3368), Rockchip RK3288 Fennec reference board, Firefly RK3288 Reload platform
  • Amlogic
    • Network, clocks, and usb driver changes for meson-gxbb (S905)
    • Secure monitor firmware for Amlogic SoCs, and an NVMEM driver for the EFUSE based on that firmware interface
    • Amlogic 64-bit DT changes: added  USB host, I2C, SPI flash controller, PWM, mailbox, MHU, pinctrl: add pins for SPI, I2C, SDIO
    • Updates IR support for newer SoCs
    • net: new stmmac glue driver
  • Samsung
    • Added Samsung Exynos Low Power Audio driver (LPASS = Low Power Audio SubSystem)
    • samsung clk driver update: sound subsystem related clocks, addition of DRAM controller related clocks for exynos5420
    • Device Tree Update:
      • Enable HDMI on Arndale Octa board.
      • Update list of clocks for FIMC-IS block on Exynos4x12.
      • Remove skeleton.dtsi to fix DT compiler warning.
      • Cleanup of DT files
      • Allow compile testing of exynos-mct clocksource driver on ARM64.
      • Document Exynos5433 PMU compatible
      • Set chosen serial bitrate which allows proper serial output when bootloader does pass all the data in command line
  • Qualcomm
    • ASoC bug fix for simultaneous playback and capture
    • Added Qualcomm external bus interface 2 (EBI2), used in some mobile phone chips for connecting flash memory, LCD displays or other peripherals
    • Add a skeletal TSENS drivers for  MSM8916/MSM8996. TSENS is Qualcomms’ thermal temperature sensor device
    • Add MSM8916/APQ8016 display support
    • Updates for MSM8916 including TSCR, SMSM/SMP2P, and MBA reserve
    • Enable defconfig options for QDF2432
    • Added Qualcomm DragonBoard 820c single-board computer in 96boards form factor, LG Nexus 5 Phone
    • Device Tree Changes:
      • Rework dr_mode on APQ8064 and Nexus7
      • Add MSM8974 BLSP1 UART1 port
      • Add AP148 SATA mapping
      • Fixup MSM8660/MSM8064 SPMI/MPP IRQs
      • Add Nexus7 IMEM/reboot reason
      • Add Honami touchscreen support
      • Add TSENS support on MSM8974, APQ8064, and APQ8084
      • Add APQ8060 Dragonboard PM8058 LEDs
      • Rework VPH PWR REG for MSM8974
  • Mediatek
    • Add Mediatek thermal driver for mt2701
    • Driver for mt6577 auxdac found in mt2701, mt6577 and mt8173
    • Some DRM driver fixes
  • Other new ARM hardware or SoCs:
    • Marvell Armada 8040 development board, Netgear WNR854T router, Armada 395 SoC platform, GP board Armada 390 DB development board
    • ZTE ZX296718 STB SoC
    • SocioNext UniPhier LD11 TV SoC
    • Broadcom BCM958525er, BCM958522er, BCM988312hr, BCM958623hr and BCM958622hr reference boards for Northstar platform, Raspberry Pi Zero board
    • NXP i.MX 7 Warp7 reference board, Gateworks Ventana GW553x SBC, Technologic Systems TS-4900, and Engicam IMX6UL GEA M6UL computer-on-module, Inverse Path USB armory board
    • Renesas r8a7792/wheat and r7s72100/rskrza1 development boards
    • ST Microelectronics STi B2260 (96boards) single-board computer
    • TI Davinci OMAP-L138 LCDK Development kit, beagleboard-x15 rev B1 single-board computer

There has been a fair amount of MIPS changes in Linux 4.9 too, some of them are:

  • Various updated to MIPS core arch code –  generic DT-based board & Flattened Image Trees (.itb) support, per-device DMA coherence support, bug fixes for KVM, uprobes, c-r4k, ptrace and more
  • Octeon – Delete dead code and files, change to use all memory into use by default, add DTS for D-Link DSR-500N, etc…
  • Pistachio – Remove ANDROID_TIMED_OUTPUT from defconfig
  • TX39xx & TX49xx – Move GPIO setup from .mem_setup() to .arch_init(), convert to Common Clock Framework
  • txx9wdt – Add missing clock (un)prepare calls for CCF
  • BMIPS – Add PW, GPIO SDHCI and NAND device node names, add DT examples for BCM63268, BCM3368 and BCM6362, add support for BCM3368 and BCM6362, etc…
  • Code changes for PCI, CPC, GIC, SMP, USB host, cpuidle, fbdev, auxdisplay…
  • mt7620 -Delete unnecessary assignment for the field “owner” from PCI
  • BCM63xx -Let clk_disable() return immediately if clk is NULL
  • pm-cps – Change FSB workaround to CPU blacklist, Use MIPS standard lightweight ordering barrier and completion barrier, etc…
  • SEAD3 – Rewrite to use DT and generic kernel feature
  • Malta – Rewrite to use DT
  • Loongson1C – Add CPU support for Loongson1C, add board support, add defconfig, and add RTC support for Loongson1C board

The full list of changes can be found in Linux 4.9 changelog with comments only, generated using git log v4.8..v4.9 --stat. You’ll also find a more readable list of changes for Linux 4.9 once kernelnewbies.org is updated.

Tweet inus Torvalds released Linux 4.9 on Sunday: So Linux 4.9 is out, and the merge window for 4.10 is thus open. With the extra week for 4.9, the timing…

It’s Official: Selling Android TV Boxes with Piracy Add-ons/Apps Can Get You in Jail (in the UK)

$
0
0

A while ago, two persons in the United Kingdom decided it was a good idea to  setup a shop and sell Android TV boxes promising free access to premium content like the Premier League football matches with a one-time purchase of the hardware. Of course they did that with a TV box with some piracy add-ons and/or apps, and when The Premier League found out they brought a prosecution against the two.

android-tv-box-piracy-jailThe court case has been going on for several month, and the UK court has announced its verdict: The main accused was sentenced to four years in prison, while his associate pleaded guilty and received a two-year suspended prison sentence, both convicted for Conspiracy to Defraud.

That’s the first sentencing of IPTV boxes in England, and the Federation Against Copyright Theft (FACT)’d director declared that ” today’s result should send a hard-hitting message to anyone involved in selling illegally modified set-top boxes”. There’s no word to what will happen to customers of the boxes, which included individuals, but also businesses like pubs, but the article on Advanced Television appears to indicate the organization involved in the court case, FACT and the Police Intellectual Property Crime Unit (PIPCU) will focus on sellers rather than consumers.

Thanks to theguyuk forthe tip.

Tweet A while ago, two persons in the United Kingdom decided it was a good idea to  setup a shop and sell Android TV boxes promising free access to premium…

$24 Winkel Arduino Compatible Board Includes WiFi, Bluetooth, 2.4 GHz RF, and an RTC (Crowdfunding)

$
0
0

There are plenty of Arduino compatible boards with WiFi based on ESP8266 WiSoC going for around $5 to $10, and with ESP32 processor, we are starting to have $15 to $20 boards with both WiFi and Bluetooth, but while ESP-IDF SDK has been progressing nicely, some parts of Bluetooth functionality are still not implemented. Winkel board offers an interesting alternative by offering WiFi, Bluetooth, 2.4GHz ISM, and an RTC for $24.

winkelWinkel board specifications:

  • MCU – Microchip/Atmel ATmega128 MCU @ 16 MHz with 128KB flash memory, 4KB SRAM, 4KB EEPROM
  • Connectivity
    • WiFi 802.11 b/g/n via ESP12E module based on ESP8266
    • Bluetooth 2.0 + EDR via HC-05 module
    • RF Radio – NRF24l01 2.4 GHz ISM radio. (Note: It might be possible to use it for Bluetooth LE connection, see here and there).
  • I/Os (through both Atmel MCU and ESP8266)
    • 38x Digital I/Os
    • 7x PWM Digital I/Os
    • 8x Analog Inputs
  • USB – micro USB port for programming and power
  • Misc – DS3231 Real-Time Clock + CR2032 battery slot, a few LEDS, reset button, jumper for OTA mode, ISP header, optional MPU-6050 Gyro+accelerometer mount
  • Power Supply – 5 V
  • Dimensions – TBD
Click to Enlarge

Winkel Pinout Diagram – Click to Enlarge

Winkel board can be programmed with the Arduino IDE via a micro USB cable, but you could also program the Atmel MCU over Bluetooth, and ESP12 module over WiFi without any cable required, a must if you want to update your firmware while the board is already in a case or hard to access. Thanks to the company’s “Smart Opt system” individual components can be power on and off individually, so that unused module don’t draw power. Source code for the firmware and code samples can be found on github.

arduino-esp8266-rtc-hc05

Rishi Hegde of Mintbox Technologies informed me that the board has now been launched on CrowdSupply with the company aiming to raise at least $1080. A $21 early bird pledge should get you the board will all modules (the price will be $24 after the first 50 boards are gone), but if you only want the core boards, and add your own modules, you could also pledge $12 to get the board with Atmel ATMega128 MCU and a micro USB port only. Shipping is free to India and the US, but adds $9 to the rest of the world, with delivery expected in March 2017. More details may be available in Mintbox Technologies’ Winkel product page.

Tweet There are plenty of Arduino compatible boards with WiFi based on ESP8266 WiSoC going for around $5 to $10, and with ESP32 processor, we are starting to have $15…

Samlinking D240 Mediatek MT7620A Router Boards Support Two 4G LTE mini PCIe Modules, PoE for $38 and Up

$
0
0

Samlinking Technologies, a manufacturer of 4G WiFi integrated solution based in Shenzhen, has launched D240 router board powered by Mediatek MT7620A MIPS processor with 128MB RAM, 64 MB flash, four Fast Ethernet LAN ports, one Fast Ethernet WAN port with PoE, as well as two PCIe slots accepting 4G LTE modems.dual-lte-router-boardThree Samlinking D240 models are available with D240A1, D240A2, and D240A3 with different combination of LTE module, and 802.11 b/g/n and/or 802.11ac connectivity.

  • SoC – Mediatek MTK7620A MIPS processor @ 580MHz
    mt7620a-board-case

    Enclosure for D240 Board

  • System Memory – 128MB
  • Storage – 64MB flash + micro SD card slot
  • Connectivity
    • 802.11 b/g/n/ac up to 300, or 300 + 867 Mbps depending on model+ 2 u.FL connectors
    • 5x 100 Mbps Ethernet port (RJ45) with 4 LAN ports, 1 WAN port with PoE 802.3af
    • 2x PCIe slot with LTE Cat3 to Cat 6 modem cards
    • 2x SIM card slots
  • Serial – 1x 4-pin header
  • USB – 1x USB host port
  • Expansion – Footprints for Bluetooth, I2S, and UARTF/PCM
  • Misc – 9x LEDs, reset button, extra watchdog timer
  • Power – 12V via power barrel, or 802.3af PoE
  • Dimensions – 11 x 8.3 x 3 cm
  • Temperature Range – Operating: -20ºC to 70ºC; storage: -40ºC to 90ºC
  • Certifications – CE, RoHS, FCC Compliance

The board can run OpenWrt or a custom firmware. I’ve asked the company for more details about software and documentation, but only received information about the hardware…
mediatek-mt7620a-bluetooth-i2s-uart-pcm
D240A1 board is available now for $38 (sample price) plus shipping without any LTE modems, while D240A2 board sells with one LTE cat3/4 modem for $90, or a Cat6 modem for $150, and D240A3 comes with two LTE modems  (cat4+ cat6; up to 450 Mbps) for $220. Prices are cheaper for quantities over 500 pieces. There’s no online shop, so if you are interested you’d have to contact the company directly through their website.

Tweet Samlinking Technologies, a manufacturer of 4G WiFi integrated solution based in Shenzhen, has launched D240 router board powered by Mediatek MT7620A MIPS processor with 128MB RAM, 64 MB flash,…

Banana Pi BPI-M64 & BPI-M2 Ultra Boards PDF Schematics Published

$
0
0

SinoVoip has recently released PDF schematics for both of their Banana Pi boards, namely BPI-M64 board powered by Allwinner A64 processor, and BPI-M2 Ultra board based on the latest Allwinner R40 SoC with an on-chip SATA interface.

banana-pi-bpi-m2-ultra-schematicsFor most boards on the market, this should not be news, but SinoVoip does not always release schematics in a timely manner, so you may want to be noticed when it happens:

The clear benefit of BPI-M2 Ultra is the presence of a SATA connector NOT implemented via a slow USB 2.0 to SATA bridge, but instead directly through the SATA interface of the R40 quad core processor. As for BPI-M64 ($46), it can be compared to Pine64+ with 2GB RAM and a WiFi module ($39), and despite the higher price it does come with some benefits like adb over OTG working, it is equipped with an 8GB eMMC flash instead of just a micro SD card slot, and it’s powered by a separate power connector. Pine64+ comes with DDR3 memory, while BPI-M64 is fitted with LPDDR3, which should consume less power (Update: BPI-M64 comes with DDR3 memory too , the specs on Banana Pi website are wrong).

One the other side, there have been several instances – not to say many – where SinoVoip did  not take inputs from the community in order to fix bugs, and they’ve made some interesting decisions including using a 6-pin battery header on BPI-M2 Ultra, and are now unable to explain one of their customers where to source such type of battery or even just the connector [Update: Banana Pi will sell the connector soon]

Thanks to Jon and Thomas for the info.

Tweet SinoVoip has recently released PDF schematics for both of their Banana Pi boards, namely BPI-M64 board powered by Allwinner A64 processor, and BPI-M2 Ultra board based on the latest…

Android Things OS for the Internet of Things Supports Raspberry Pi 3, Intel Edition, and NXP Pico Boards

$
0
0

Google introduced Project Brillo a little over a year ago, an operating system based on Android, but with a smaller footprint optimized for Internet of Things applications. Brillo has now just become Android Things OS, with Google releasing a developer preview of Android Things working on Raspberry Pi 3, Intel Edison, and NXP Pico boards.

android-things-architecture

Android Things Software Architecture

The company has also updated the Weave platform to simplify connection of all types of devices to the cloud, and interaction with services like the Google Assistant. The Weave Device SDK currently supports schemas for light bulbs, smart plugs, switches, and thermostats, with more type of device supported in the future, as well as a mobile app API for both Android and iOS.

Using an Android based OS instead of a pure Linux OS should make it easier for Android app developers to create smart devices thanks to the use of familiar Android APIs and Google Services. The workflow is pretty similar to creating mobile apps, with development being done within Android Studio and you’d connect to the target board through adb. One difference is the the Things Support library that provides a peripheral I/O API for interfaces such as GPIOs, PWM, I2C, SPI and UART as well as a user driver API  used to allow apps to inject hardware events in to the Android framework.

nxp-pico-board

NXP Pico Board with TechNexion PICO-i.MX6UL SoM

If you’d like to get started, get one of the three supported boards, and get the Android Things developer preview. You may also been interested in Weave and Google Cloud platform sites to respectively control capable device such as Philips Hue and Samsung SmartThings, and get your data into the cloud. Some sample code is also available on AndroidThings’ github account, and you may want to subscribe to  Google’s IoT Developers Community on Google+ for support and discussions. NXP also has a higher end Android IoT platform equipped with more I/Os and ports called VVDN Technologies Argon i.MX6UL development board.

Tweet Google introduced Project Brillo a little over a year ago, an operating system based on Android, but with a smaller footprint optimized for Internet of Things applications. Brillo has…

Avantek H270-T70 384-core ARM Server Powered by Cavium ThunderX SoCs Can Be Bought Online

$
0
0

ARM servers have been around for a while, but usually it’s pretty hard to buy for individuals, and developer’s boards such as LeMaker Cello are never in stock, probably because the project has been canceled or suffered from further delays. However, if you have some uses for ARM servers and the cash that goes with it, Avantek Computer (UK) is selling some ARM based servers starting from an 1U Rack with a quad core Annapurna Alpine AL5140 processor up to Avantek H270-T70 with a 2U rack equipped with multiple Cavium ThunderX SoCs providing 384 ARMv8 cores to play with.

cavium-thunderx-arm-server-rackAvantek H270-T70 server key features and specifications:

  • SoCs – 8x Cavium ThunderX CN8890 processors with 48 custom ARMv8 cores each
  • System Memory – 64x DDR4 ECC slots for up to 8TB memory
  • Storage – 16x 2.5” hot-swappable HDD/SSD bays
  • Connectivity – 8x 40GbE QSFP+ fiber ports (Cortina CS4343 controllers)
  • Power Supply – 1600W 80 PLUS Platinum redundant PSU
  • 2U Rack System with 4 nodes with front access to the node trays

The server is compliant with ARM’s Server Base System Architecture (SBSA) and Server Base Boot Requirements (SBBR), which means you can load any compliant OS on the server such as Red Hat Enterprise Linux Server, SUSE Linux Enterprise Server 12, FreeBSD 11 and others.

64-bit-arm-server-for-saleSo I went through the check out process for Avantek 384 core server and I could go until the process payment step without issues, except I had to use a UK address. However, I did not press the “Place Order” button since 1. I don’t actually have a UK address (a forwarder could provide that), and 2. I don’t feel like spending around 15,000 GBP (~$19,000 US) for the system, plus whatever is needed for the hard drives and memory :). If your budget is also restrained, but would like a ThunderX server, you can opt to get Avantek 32-core 1U rack system for about 1,500 GBP (~$1900 US) and up.

Thanks to Sander for the tip.

Tweet ARM servers have been around for a while, but usually it’s pretty hard to buy for individuals, and developer’s boards such as LeMaker Cello are never in stock, probably…


Arduino MKRZero is a Smaller Arduino Zero Board

$
0
0
Home > Atmel AVR, Hardware > Arduino MKRZero is a Smaller Arduino Zero Board

Arduino MKRZero is a Smaller Arduino Zero Board

Arduino Zero was unveiled over two years ago with an Atmel SAMD21G18  ARM Cortex M0+ MCU in Arduino Uno Rev.3 form factor, the company has now launched Arduino MKRZero with the same MCU but using the much smaller Arduino MKR1000 form factor.

mkrzeroArduino MKRZero specifications:

  • MCU – Atmel/Microchip SAMD21 32-bit ARM Cortex M0+ MCU @ 48 MHz with 32 KB SRAM, 256 KB flash (8KB for bootloader)
  • External Storage – micro SD slot
  • Digital I/O Pins – 22x GPIOs with 12x PWM, UART, SPI, and I2C, 8x external interrupts
  • Analog Pins – 7x analog inputs (8/10/12-bit ADC), and 1x analog output (10-bit DAC)
  • DC Current per I/O Pin – 7 mA
  • USB – 1x micro USB port for power and programming
  • Debugging – USB via Atmel’s Embedded Debugger (EDBG) on-board debugger, and JTAG
  • Misc – reset button, 1x LED (pin 32), 32.768 kHz RTC
  • Power
    • 5V via micro USB port or Vin pin
    • Battery connector for LiPo battery (3.7V, 700mAh minimum)
    • 5V and 3.3V pins can support up to 600 mA
    • I/O Operating Voltage – 3.3V
  • Dimensions – MKR1000 board form factor

arduino-mkrzeroThe board can be programmed with the Arduino IDE or Arduino Web Editor, and the board is fully open source hardware (Eagle CAD) like all other official Arduino boards. You’ll find relevant info and documentation on the product page.

Arduino MKRZero can be purchased now for $21.90 or €20.90 plus tax and shipping on Arduino store.

Tweet Arduino Zero was unveiled over two years ago with an Atmel SAMD21G18  ARM Cortex M0+ MCU in Arduino Uno Rev.3 form factor, the company has now launched Arduino MKRZero…

YokaTV KB2 Review – Amlogic S912 TV Box with 32 GB Flash

$
0
0

CNXSoft: This is another review by Karl about Amlogic S912 based YokaTV KB2 TV box.

Introduction

Today we will be looking at Videostrong YokaTV KB2. Below are the specs from Videostrong website.

yokatv-kb2-specifications

This is my first S912 device so I had high expectation. I have been using it for quite some time now with no major issues. I received approximately 6 OTA updates since I started testing and some welcome updates have come.

yokatv-kb2-package

Click to Enlarge

Click to Enlarge

Click to Enlarge

Click to Enlarge

Build

When I receive a box first thing I do is take it apart and check out the inside. I was excited when I found out it had 32 gig of storage. It is not too common.

yokatv-kb2-bottom-case

Click to Enlarge

Click to Enlarge

Then when I opened the box I was really happy to see an antenna that wasn’t soldered on. Makes it easy to add a different one. +1 for KB2. Then I noticed the heat sink. It seemed a little small. I was right, it runs warm.

Click to Enalrge

Click to Enlarge

Simple Mod

First thing to do: get this baby running cooler. When stressing the box, the temperature got over 80+°C a couple times. It ran between 70 and 75 °C on average before the mod. The case is mostly plastic except the bottom cover. Bingo! A couple squares of 5mm thermal pads between the board and the bottom of the case and thermal issues are gone.

yokatv-kb2-thermal-hack

I started SetCPU and ran the built-in stress test, it tops out around 72 °C, and quickly cools after stopping the test. I put a square approximately where the CPU is and while I had it open, where the memory is although I don’t think it is necessary. After the mod, the box runs about 60 deg Celsius.

Antutu

For this test I use SetCPU to set the Min and Max frequency for the CPU to 1.5 GHz which is the max for this processor. It will give the best score.

yokatv-kb2-antutu

Network Test

I am not sure why my WiFi was slow on the tests below. I don’t have an AC access point yet. The best I have is N, maybe that is the cause. Some friends over on Freaktab are getting some really good speeds on AC with this box. I might have damaged something when I opened the box.

Below are the results but take them with a grain of salt. I do a simple file transfer test of a large movie with optimum conditions for WiFi then one in more real world scenario.  

5ghz 3ft from NAS to internal SD

kb2-5ghz-wifi-nas-to-flash

2.4ghz 3ft from NAS to internal SD

kb2-2-4ghz-wifi-nas-to-flash

Gigabit Ethernet from NAS to internal SD (This is as fast as my NAS can transfer)

kb2-gbe-nas-to-flash

Next is more real world where AP’s have more obstruction.

5ghz 30ft from NAS to internal SD

kb2-5ghz-wifi-nas-to-flash-30feet2.4ghz 30ft from NAS to internal SD

kb2-2-4ghz-wifi-nas-to-flash-30feetSome More Benchmarks and Info

Click to Enlarge

Click to Enlarge

Click to Enlarge

Click to Enlarge

Apps

I’ve used several apps and only Netflix and Direct Now had some issues:

  • Sling TV
  • Netflix (SD) – Stopped working after updating the app
  • Kodi
  • Chrome – Chrome works really well. I open a bunch of heavy URL’s and it performs excellent. Nothing scientific here. Go to several sites that I visit daily and I felt no lag.
  • Plex
  • Emby
  • HDHomeRun
  • Crackle
  • DirectTV Now – Worked with some hacking
  • Player-MediaCenter App – I will admit it has been a while since I tested out this app. It acts as a DLNA receiver and Airplay receiver. I didn’t have much luck in the past but I tested on my one Apple device the screen mirroring worked.

At some point Netflix stopped working. Keep getting few seconds of video then error 0013 “Sorry, we could not reach the Netflix service….” Not sure if it is Netflix update or box update that caused the issue. I went back and did some more testing to narrow the issue down. If I reverted back to the Netflix that came pre-installed I had no issue.

DirectTV Now is a new service in the US. With some persistence I was able to get it running. Video wasn’t perfect but neither was it on any devices I tested. It was surprising that it plays better on KB2 then Nvidia Shield. It is mostly watchable but stutters some. It is new so hopefully ATT will get this fixed soon. I had to do a couple things to get it working. After Googleing and a lot of experimenting I used 2 apps from play store: Hide My Root and Fake GPS. I also had to make 2 build.prop changes: ro.build.type=userdebug to ro.build.type=user and ro.build.tags=test-keys to ro.build.tags=release-keys. I tried on a couple different boxes after figuring this out and seems to work universally.

Remote Control

The remote is big but there is a built in app that is pretty convenient. There are 4 color coded buttons on the remote that you can customize to launch the apps that you want through an app on the box. There is also a dedicated app button that brings up a listing of all the apps. Everything else is pretty standard. You can also program the remote to turn your TV on and off through a learning feature. But alas I still prefer either an air mouse or touchpad with full keyboard.

yokatv-kb2-remote-control-configuration

Status Bar

Thank the gods…there is an option to turn the navigation buttons at the bottom of the screen off and on in Android settings…It is about a 50/50 split for people that like them and those that don’t. This was the first box that I have tested that gives the user an option.

Click to Enlarge

Click to Enlarge

Audio Passthrough

All the below tests worked. I set Android to SPDIF. I tested with latest SPMC 16.4.2 and Kodi 16.1. Turned on pass-through DTS and AC3 and all the videos below worked with no clipping. I have a 5.1 system. If I didn’t have the AC3 ticked I would get no audio on some. First box with 100% working that I have tested on stock firmware.

yokatv-kb2-kodi-audio-pass-through-settings audio-file-list-dts-dolby-truehd4K Video

4k testing went well. I was able to play all videos smoothly with one player or another that it was supposed to play. Below are the test results. This box does not play 4k H.264 video @ 60fps per sec, so stutter is expected. Kodi and derivatives play best with amcodec turned off. The box ships with Kodi 17 beta but since it is beta, it is not very stable. I uninstalled it, and tested with Kodi 16.1 from the Play Store instead. I am not sure why 4k 8bit H.265 works better with amcodec turned on. I found the same results on S905x boxes. For the testing, I wanted to find the best overall solution and that is Kodi with amcodec turned off.

Test File Name With Amcodec Without Amcodec MX Player
23.976fps (in MP4) GoPro Epic Russian Wingsuit in 4K good
24fps (in MP4) SPRING 4K (ULTRA HD) good
25fps (in MP4) Burj Khalifa Pinnacle BASE Jump – 4K good
29.970fps, 51Mbps (hdmkv’s iPhone 6S 4K clip) iphone6s_4k good
59.940fps (in MKV) samsung_seven_wonders_of_the_world_china_uhd-DWEU wont play stutter stutter
60fps (in MP4) COSTA RICA IN 4K 60fps (ULTRA HD) w Freefly Movi wont play good
H264, up to 30fps Sony_Alpha_7R_II_video-test-4K good
H264, 50-60fps linkin_park_ultra-hd wont play stutter stutter
H265 8bit, up to 30fps LG_4K_View-the-Feeling good stutter good
H265 10bit, up to 30fps Samsung_UHD_Dubai good
H265 10bit, 50-60fps Samsung_UHD_7Wonders_of_the_World_Italy good
UltraHD HDR 10bit HEVC, 24fps Exodus_UHD_HDR_Exodus_draft good
VP9 The Curvature of Earth 4K 60FPS good not as good best

Alternate Firmware

Super Celeron has put together a nice modification of the latest stock firmware from 11/23. He cleaned up the firmware and made some adjustments to boot to bring idle down to about 1% and got auto frame rate switch working. See full changelog.

So to get 100% working pass-through and auto frame rate switching after installing the firmware above, as well as SPMC version 16.5.2. Codec acceleration is a little muddy at times. 4K files work best with amcodec off, and anything less work best with amcodec on. Below are my settings.

yokatv-kb2-custom-firmware-automatic-frame-rate-switching yokatv-kb2-custom-firmware-audio-pass-through yokatv-kb2-custom-firmware-video-codecsConclusion

I had this box for a while now and used it as my main box and it has performed really well. Consistent updates from Videostrong is much needed in the box world. I hope it continues. Gigabit Ethernet performed really well. Pass-through working 100% is fantastic and will make a lot of people happy. Video support in Kodi is really good. VP9 support is not 100% but MX player gives everyone an option if they have movies in that format.

I would like to thank Videostrong for sending a review sample. YokaTV KB2 can be purchased on Gearbest, Geekbuying, and Aliexpress for about $68.

Tweet CNXSoft: This is another review by Karl about Amlogic S912 based YokaTV KB2 TV box. Introduction Today we will be looking at Videostrong YokaTV KB2. Below are the specs…

ReflowR is a $99 SMT Reflowing Tool for Makers and Students

$
0
0

You can solder SMT components to your custom board by hand, but it would be much faster if you could get a reflow tool instead to “bake” your board after placing the components. ReflowR SMT reflowing tool offers just that in a small and affordable form factor.

reflowr

Some people have tried to use DIY solutions to bake their board, but results may vary. ReflowR has been specifically designed to heat PCB offering constant results. It supports reflow, rework, MSD bake, or rework pre-bake, and follows JEDEC reflow profiles. You can also add a WiFi extension to monitor the tool from your smartphone and set the temperature profile. Two version are available:

  • Smart ReflowR – Compact 600W system for for makers and learners.
  • Large ReflowR – Larger 1200W system for professionals

reflowr-reflowing-tools

“STEM Inspiration kits” are also offered without a ReflowR kit, but with multiple components, solder paste, a few PCBs, tweezers, and more for people to get started with electronics and SMT reflow soldering. The video below shows how it works, and how you can adjust the components while baking.
[embedded content]

The project was successfully funded on Indiegogo last month, but the campaign is now in “In demand” mode, and you can purchase Smart ReflowR for $99, Large ReflowR for $179, and the STEM inspiration kits for $19 and up. Shipping is included in the price, and delivery is scheduled for January 2017.

Tweet You can solder SMT components to your custom board by hand, but it would be much faster if you could get a reflow tool instead to “bake” your board…

Quectel SC20 Smart LTE Modules with WiFi, BLE and GPS Run Android 5.1

$
0
0

Google may just have released Android Things operating systems for IoT applications, but its big brother – Android – has already gotten into some other IoT systems such as Quectel SC20 module powered by a Qualcomm processor and supporting LTE, WiFi, Bluetooth LE, and GNSS functions.

quectel-sc20Quectel SC20 comes in different flavors to cater for various markets, but all module share most of the same specifications:

  • SoC – Unnamed Qualcomm processor
  • System Memory – TBD
  • Storage – 8GB flash
  • Cellular Connectivity – FDD LTE, TDD LTE, TD-SCDMA, EVDO/DCMA, WCDMA, and GSM; antenna: MIMO 2×2, supports Rx-diversity
  • Other Wireless Connectivity
    • WiFi – 2.4GHz 802.11b/g/n (SC20-CE/-W); Dual band 802.11a/b/g/n/ac (SC20-E/-A/-AU/-J)
    • Bluetooth 2.1+EDR/3.0/4.1 LE
    • GNSS – GPS, GLONASS, and BeiDou
  • Interfaces
    • LCD – 4x lanes MIPI-DSI, 1.5Gbps each, HD (720p) @ 60fps
    • Camera – MIPI-CSI, up to 1.5Gbps per lane, supports two cameras
      • 2-lane MIPI_CSI for rear camera, up to 8MP
      • 1-lane MIPI_CSI for front camera, up to 2MP
    • Touch Panel Capacitive-screen
    • USB 2.0 Device High Speed, 480Mbps
    • 2x USIM 1.8V/3V
    • 25x GPIO, 3x I2C, 2x high-speed UARTs
    • SDIO – 1x SDIO 3.0, 4bit SDIO
    • PWRKEY
    • 4 pads for antennas: main, diversity, GNSS, Wi-Fi/BT
    • 3x ADC (BAT_SNS, BAT_THERM, ADC)
  • Audio – MP3, AAC, AAC+, eAAC, AMR-NB, – WB, G.711, WMA 9/10 Pro
  • Video
    • Encode – 30fps 720p (H.264), 30fps WVGA (MPEG-4/VP8)
    • Decode – 30fps 720p (H.264/MPEG-4/VP8/H.265 DivX4/5/6), 30fps WVGA (H.263)
  • Dimensions – 40.5 x 40.5 x 2.8mm
  • Weight – ~9.6 grams
  • Temperature Range – Operating: -40°C ~ +85°C
  • Compliance – CCC/CE/FCC/GCF/PTCRB/AT&T/ACMA RCM/Verizon (Many still work-in-progress)

I first found about the module, as SinoVoip showcased some pictures of their next BPI-SC20 board using Quectel SC20-CE, but they did not provide other details.

banana-pi-bpi-sc20Nevertheless it was easy enough to find Quectel SC20 product page listing all the specs above, plus details about LTE, WCDMA, etc… bands, Rx/Tx power levels, and more. Six models of the module will be available: SC20-W with WiFi and BLE only, as well as country or zone specific variants: SC20-CE, SC20-J,  SC20-AU, SC20-A, and SC20-E with different supported cellular bands and standards.

The company is also said to have an evaluation board with a display and two cameras, with the processor used part of – or similar to – Qualcomm Snapdragon 200 series.

Tweet Google may just have released Android Things operating systems for IoT applications, but its big brother – Android – has already gotten into some other IoT systems such as…

Compress & Decompress Files Faster with lbzip2 multi-threaded version of bzip2

$
0
0

Bzip2 is still one of the most commonly used compression tools in Linux, but it only works with a single thread, and I’ve been made aware that lbzip2 allows multi-threaded bzip2 compressions which should lead to much better performance on multi-core systems.

Tar with lbzip2 on a 8-core Processor - Click to Enlarge

Tar with lbzip2 on an 8-core Processor – Click to Enlarge

lbzip2 was not installed by default in my Ubuntu 16.04 machine, but it’s easy enough to install:

1

sudo apt install lbzip2

I have cloned mainline linux repository on my machine, so let’s see how long it takes to compress the directory with bzip2 (one core compression):

real 9m22.131s
user 7m42.712s
sys 0m19.280s

time tar cjf linux.tar.bz2 linux

real    9m22.131s

user    7m42.712s

sys    0m19.280s

9 minutes and 22 seconds. Now let’s repeat the test with lbzip2 using all 8 cores from my AMD FX8350 processor:

real 2m32.660s
user 7m4.072s
sys 0m17.824s

time tar cf linux2.tar.bz2 linux use-compress-program=lbzip2

real    2m32.660s

user    7m4.072s

sys    0m17.824s

2 minutes 32 seconds. Almost 4x times, not bad at all. It’s not 8 times faster because you have to take into account I/Os, and at the beginning the system is scanning the drive, using all 8-core but not all full throttle. The files were also stored in a hard drive, so I’d assume the performance difference should be even more noticeable from an SSD.

We can see both files are about the same size as they should be:

ls -l

total 4377472

drwxrwxr-x 25 jaufranc jaufranc       4096 Dec 12 21:13 linux

-rw-rw-r  1 jaufranc jaufranc 2241648426 Dec 16 10:17 linux2.tar.bz2

-rw-rw-r  1 jaufranc jaufranc 2240858174 Dec 15 20:50 linux.tar.bz2

I’m not exactly sure why there’s about 771 KB difference as both tools offer the same compression.

That was for compression. What about decompression? I’ll decompress the lbzip2 compressed file with bzip2 first:

real 2m49.671s
user 2m46.500s
sys 0m13.068s

time tar xf linux2.tar.bz2 -C linux-bzip2

real 2m49.671s

user 2m46.500s

sys 0m13.068s

2 minutes and 49 seconds. Now let’s decompress the bzip2 compressed file with lbzip2:

real 0m45.081s
user 3m14.732s
sys 0m10.088s

time tar xf linux.tar.bz2 use-compress-program=lbzip2 -C linux-lbzip2

real    0m45.081s

user    3m14.732s

sys    0m10.088s

45 seconds! Again the performance difference is massive.

If you want tar to always use lbzip2 instead of bzip2, you could create an alias:

1

alias tar=‘tar –use-compress-program=lbzip2′

Please note that this will cause a conflict (“Conflicting compression options”) when you try to compress files using -j /–bzip2 or -J, –xz options, so instead of tar, you may want to create another alias, for example tarfast.

lbzip2 is not the only tool to support multi-threaded bzip2 compression, as pbzip2 is another implementation. However, one report indicates that lbzip2 may be twice as fast as pbzip2 to compress files (decompression speed is about the same), which may be significant if you have a backup script…

tkaiser also tested various compression algorithms (gzip, pbzip2, lz4, pigz) for a backup script for Orange Pi boards running armbian, and measured overall performance piping his eMMC through the different compressors to /dev/null:

gzip -c:            10.4 MB/s  1065 MB

pbzip2 -1 -c:       15.2 MB/s  1033 MB

lz4 - -z -c -9 -B4: 18.0 MB/s  1276 MB

pigz -c:            25.2 MB/s  1044 MB

pigz zip -c:      25.2 MB/s  1044 MB

pigz looks the best solution here (25.2 MB/s) compared to pbzip2 (15.2 MB/s). lbzip2 has not been tested, and could offer an improvement over pigz both in terms of speed and compression based on the previous report, albeit actual results may vary depending on the CPU used.

Tweet Bzip2 is still one of the most commonly used compression tools in Linux, but it only works with a single thread, and I’ve been made aware that lbzip2 allows…

Viewing all 2336 articles
Browse latest View live