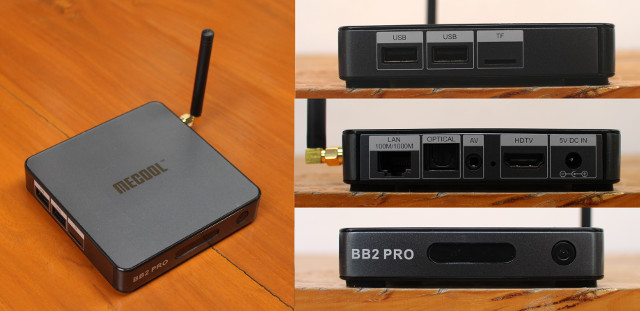
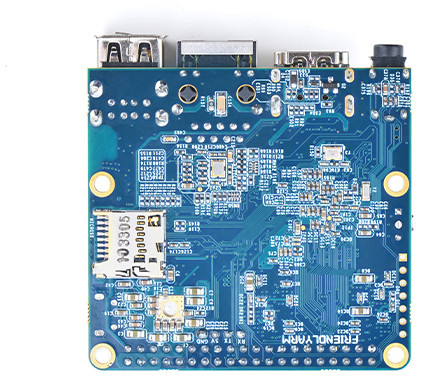
Eweat R9 Plus is a device powered by Realtek RTD1295 SoC combining main functions: Android 6.0 TV box, OpenWrt NAS/router, and HDMI recorder thanks to its HDMI input port. It competes directly with Zidoo X9S which has the same features, except while Zidoo X9S has no internal SATA bay and your 2.5″ hard drive just hang outside the box, Eweat R9 Plus comes with an internal 3.5″ SATA bay that makes it much neater on your furniture… We’ve already seen that in the first part for review “Eweat R9 Plus unboxing and teardown“, and I was impressed by the hardware, but the software is even more important, and that’s what I’m going to check out in the second and final part of this review.
First Boot, First Impressions and Setup.
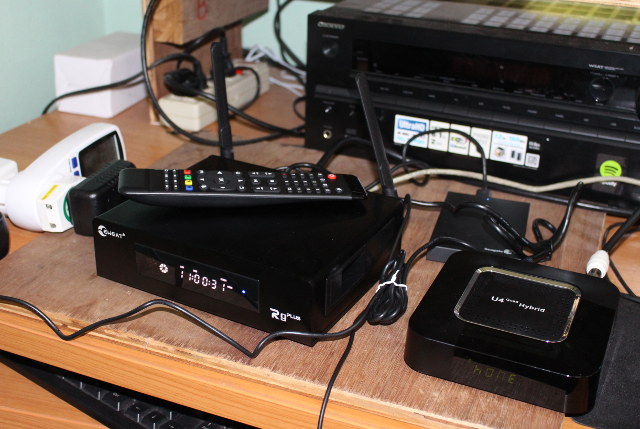
I’ve first inserted a 1TB 3.5″ SATA drive in the device, and then I connected an extra USB 3.0 hard drive, HDMI and Ethernet cables, two USB dongles for MINIX NEO A2 Lite air mouse and Tronsmart Mars G01 gamepad, and a USB keyboard to take screenshots, as well as U4 Quad Hybrid Android TV box to the HDMI input.
![Click to Enlarge]()
Click to Enlarge
Connect the power, press the mechanical power switch on the back, and the device will boot, typically in about 40 seconds, to the main launcher. There’s no setup wizard like in Zidoo X9S, so you’d have to change configuration separately.
![Click to Enlarge]()
Click to Enlarge
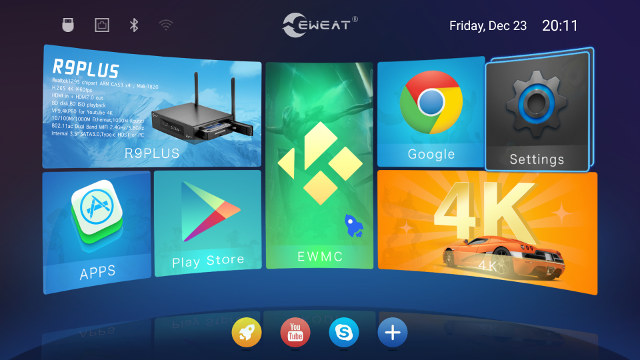
The top left corner includes status icons for USB, Ethernet, Bluetooth, and WiFi, and the top right corner shows the current date and time. The first time the time and date were not correctly update, and I did not get any IP address from my router… That’s because I connected the Ethernet cable to the WAN port, but once I connected it to the LAN port, everything worked fine. It’s just WAN and LAN markings are not quite correct…. Let’s go back to the launcher with 7 large icons, the “R9 Plus” icon is linked to Chrome browser (so we have two Chrome links), apps to the list of apps, EWMC links to Kodi 16.1, and 4K to the local file browser/media player. We also have 3 shortcuts on the botton that can be customized to your needs. Sadly, there’s no status nor notifications bars which can be a pain in some use cases. The small blue “rocket” on the of EWMC icon, is actually the mouse cursor (red in reality, but the screenshot app turns that blue).
![Click to Enlarge]()
Click to Enlarge
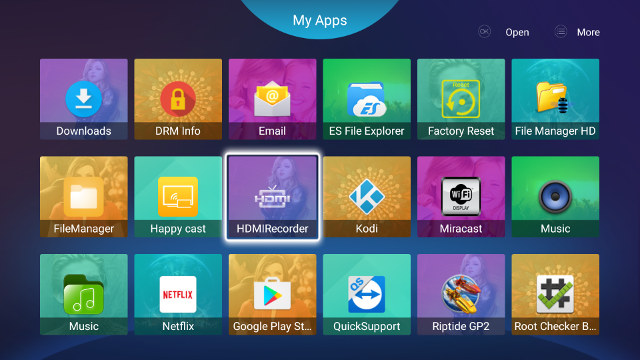
The system comes with a bunch of apps including Netflix, HDMIRecorder, and QuickSupport, and I could install my own without any issues using Google Play and Amazon Underground.
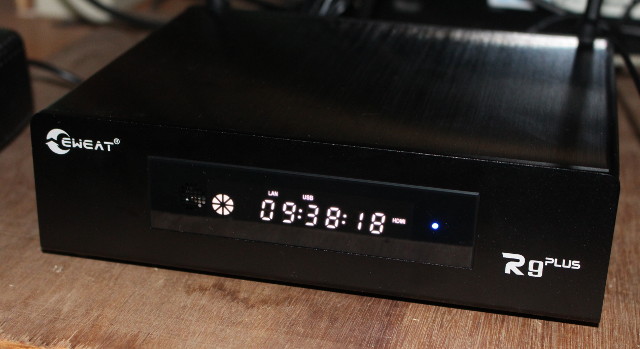
![eweat-r9-plus-display]() The front panel display on the unit is a little more useful than most, as it will show the current time of the day when not playing videos or music, and instead display the current video time with 4K video player, but not Kodi, while playing media files.
The front panel display on the unit is a little more useful than most, as it will show the current time of the day when not playing videos or music, and instead display the current video time with 4K video player, but not Kodi, while playing media files.
If you are interested to find out more about the settings, I invite you to check the Settings section of Zidoo X9S review, as Eweat R9 Plus has basically the same settings, except only “Auto 1080p24” option is available in the Display section, Deep Color Mode (AUTO, 12-bit, 10-bit, OFF) is gone, and the Playback section is missing together with “Auto 29.97/59.94 Hz”, “Force SD audio”, “Enable low performance mode (less buffer for playback)”.
I could set the resolution (“TV System”) to 3840x2160P @ 60Hz without any issues, but I’ve noticed the video output will sometimes fall back to 720p or 1080p after a power cycle. I could not find any option to adjust overscan either, so I had some black zone on all edges of my TV. Those are issues, but the latter at least should be easy to fix via firmware upgrades.
Once I found that LAN is actually WAN, and WAN is LAN, I had no troubles at all with Ethernet and WiFi, and OpenWrt options are also exactly the same as on Zidoo X9S.
You only get 9.31GB of the 16GB in Android because some part is reserved to OpenWrt, but it still more than the 8.91GB I had on X9S. In theory it should be plenty enough, but after a day or two of use, my internal storage was completely full, despite not installing that many apps.
![android-storage-full]() Eventually I found that since my 1TV hard drive had millions of files, Android’s “Media Storage” activity had created two very large databases. Disabling Media Storage fixed the issue, and after clearing the data from “Media Storage” I had close to 8GB free. Alternatively you can add an empty .nomedia files in the directory you do not want to system to scan, for example the root of the harddrive if you don’t want it to scan anything.
Eventually I found that since my 1TV hard drive had millions of files, Android’s “Media Storage” activity had created two very large databases. Disabling Media Storage fixed the issue, and after clearing the data from “Media Storage” I had close to 8GB free. Alternatively you can add an empty .nomedia files in the directory you do not want to system to scan, for example the root of the harddrive if you don’t want it to scan anything.
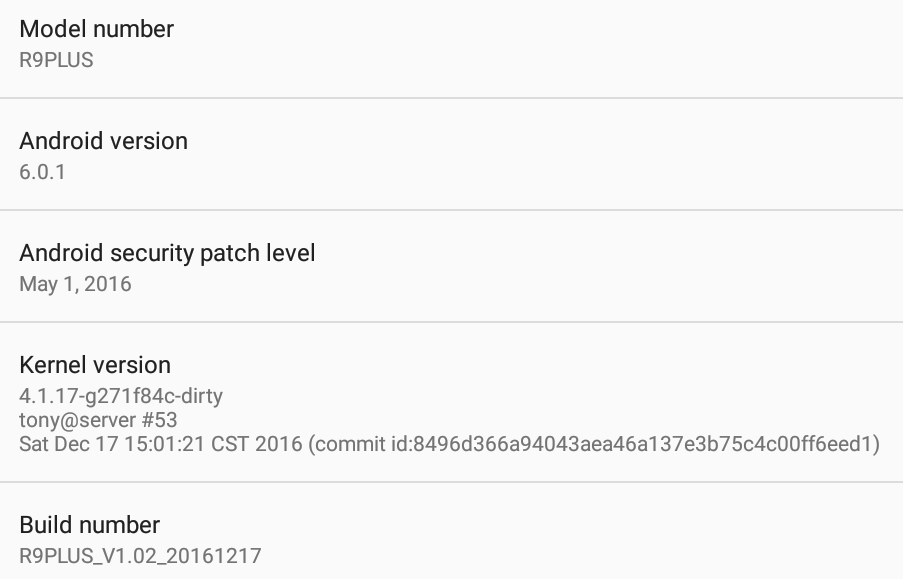
Going into the About device section, we can see “R9Plus” model runs Android 6.0.1 on top of Linux 4.1.17.
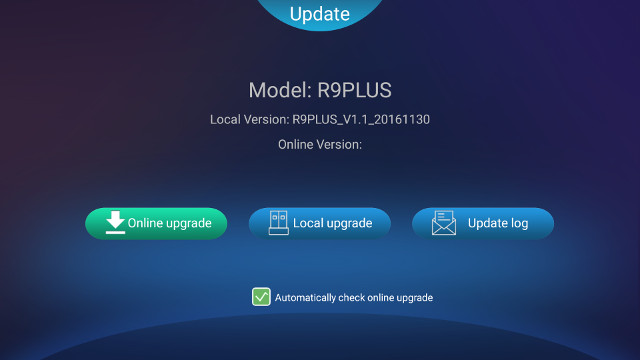
![about-device-r9plus]() The firmware is rooted, and OTA firmware update is done with SystemUpdate app, and I could upgrade from R9PLUS_V1.1_20161130 version to R9PLUS_V1.02_20161217 version which I used in most of the review. I had to disconnect the USB drive, or the update will fail. You can leave the SATA drive inside the box during firmware upgrades.
The firmware is rooted, and OTA firmware update is done with SystemUpdate app, and I could upgrade from R9PLUS_V1.1_20161130 version to R9PLUS_V1.02_20161217 version which I used in most of the review. I had to disconnect the USB drive, or the update will fail. You can leave the SATA drive inside the box during firmware upgrades.
![eweat-r9-plus-firmware-update]() The update went well, and did not mess with my settings, apps, and media files.
The update went well, and did not mess with my settings, apps, and media files.
The included IR remote worked fine up to 10 meters, but I’d really wish higher end devices such as R9 Plus would ship with an air mouse by default. I had to jungle between the IR remote control and MINIX NEO A2 Lite air mouse quite often depending on the app I used. Realtek apps such as HDMIRecorder, 4K media player, and File Manger may work better with the infrared remote control.
Eweat R9 Plus firmware is stable and responsive, but there are a few small bugs here and there that should be fixed, like the lack of screen scale option, video output resolution set by the user is not always used after a reboot, there’s no status nor notification bars, etc… I’d also wish such higher-end systems would come with an air mouse with keyboard by default to be able to fully control the TV box with a single remote.
Power Consumption and Temperature
Power control support is basic with only on or off, no standby or reboot, but the power consumption numbers are OK, albeit a little higher than Zidoo X9S, maybe because of the 3.5″ SATA drive instead of 2.5″ SATA drive:
- Power off (SATA HDD) – 0.3 Watt
- Idle (SATA HDD) – 9.2 Watts
- Power off + SATA & USB HDD – 0.3 Watt
- Idle + SATA & USB HDD – 11.2 to 12 Watts
- SATA HDD (Copy file to SAMBA share) + Play 4K video from USB HDD + miniDLNA in the background – 18 to 19 Watts
If you has a drive with many files, miniDLNA – enabled in OpenWrt settings as DMS (Digital Media Server) – will take a lot of CPU and I/O resources, so if you don’t need it, make sure to disable it. Idle power consumption numbers are with DMS disabled.
While there’s no standby mode, we’ve seen with Zidoo X9S that standby mode is not that useful as networking and drives are all turned off. It’s just must faster to boot than from power off mode. Most cheap Android TV boxes cannot handle more than one USB hard drive, but Eweat R9 Plus had no troubles with a SATA hard drive and a USB 3.0 drive. It might be possible to add yet another USB 3.0 drive, as the power supply has a 30 Watts capacity.
It’s no surprise that with a large metal case, the device stays relatively cool at all times. The maximum temperatures measured with an IR thermometer on the top and bottom of the device were 35 and 37 °C respectively after Antutu benchmark, and 40 and 50 °C after playing Riptide GP2 for 15 minutes.
Video & Audio Playback with Kodi 16.1 and 4K App, Antutu Video Tester, and DRM Support
R9 Plus comes with Kodi 16.1 (EWMC) and 4K app to browse and play media files with the internal player. So I’ve started by testing 4K videos with both. Bear in mind that while Realtek RTD1295 supports 10-bit HEVC/H.265 up to 60 fps @ 4K, H.264 is limited to 24 Hz, which will be a problem with you shot 4K H.264 30 fps videos with a camera or your smartphone, and 4K VP9 @ 60 fps is supposed to be supported, and with DDR4 memory I had hope some progress may be made here, but unfortunately the limit is really 30 fps, which could be an issue with some (downloaded) YouTube videos. Out of Specs videos are prefixed with OoO.
|
Kodi 16.1 |
4K App |
| OoO – HD.Club-4K-Chimei-inn-60mbps.mp4 (H.264, 30 fps) |
Not smooth |
Not smooth, although better than Kodi |
| sintel-2010-4k.mkv (H.264, 24 fps, 4096×1744) |
Not smooth |
OK |
| Beauty_3840x2160_120fps_420_8bit_HEVC_MP4.mp4 (H.265) |
1st try: 1 second and exit
2nd try: OK |
OK |
| Bosphorus_3840x2160_120fps_420_8bit_HEVC_MP4.mp4 (H.265) |
1st try: 1 second and exit
2nd try: OK |
OK |
| Jockey_3840x2160_120fps_420_8bit_HEVC_TS.ts (H.265) |
1st try: 1 second and exit
2nd try: OK |
OK |
| MHD_2013_2160p_ShowReel_R_9000f_24fps_RMN_QP23_10b.mkv (10-bit HEVC) |
OK |
OK |
| phfx_4KHD_VP9TestFootage.webm (VP9) |
OK |
OK |
| BT.2020.20140602.ts (Rec.2020 compliant video; 36 Mbps; 59.97 Hz) |
Not perfectly smooth |
OK |
| OoO – big_buck_bunny_4k_H264_30fps.mp4 |
Not smooth at all |
Not smooth |
| OoO – big_buck_bunny_4k_H264_60fps.mp4 |
Not smooth at all, and artifacts |
Not smooth, audio delays |
| Fifa_WorldCup2014_Uruguay-Colombia_4K-x265.mp4 (4K, H.265, 60 fps) |
1st try: Still image (first frame) + audio
2nd try: OK |
OK |
| Samsung_UHD_Dubai_10-bit_HEVC_51.4Mbps.ts (10-bit HEVC / MPEG-4 AAC) |
OK |
OK |
| Astra-11479_V_22000-Canal+ UHD Demo 42.6 Mbps bitrate.ts (10-bit H.265 from DVB-S2 stream) |
1st try:plays a few frame, then freezes, audio still playing
2nd try: OK |
OK |
| OoO – 暗流涌动-4K.mp4 (10-bit H.264; 120 Mbps) |
1fps, audio cuts |
Can’t play |
| OoO – Ducks Take Off [2160p a 243 Mbps].mkv (4K H.264 @ 29.97 fps; 243 Mbps; no audio) |
Not smooth |
Slow motion |
| tara-no9-vp9.webm (4K VP9 YouTube video @ 60 fps, Vorbis audio) |
Unwatchable, and many audio cuts |
Not smooth audio cuts |
| The.Curvature.of.Earth.4K.60FPS-YT-UceRgEyfSsc.VP9.3840×2160.OPUS.160K.webm (4K VP9 @ 60 fps + opus audio) |
Not smooth at all, some audio cuts |
Not smooth, no audio |
For some reasons Kodi 16.1 will fail to start playing some videos the first time, but play them the second time. Just like on Zidoo X9S – but worse – Kodi 16.1 implementation is not as good as the internal player, so for best user experience you’d have to use the 4K player. Automatic refresh rate switching works with 4K app, with 23.975/24Hz, 25 Hz, 29.97 Hz and 59.94 Hz with the latest firmware. It does not work at all with Kodi.
For so the audio tests, I’ve stopped using Kodi, and only used 4K app with PCM 2.0 downmixing and audio pass-through via HDMI.
| Audio Codec in Video |
PCM 2.0 Output |
HDMI Pass-through |
| AC3 / Dolby Digital 5.1 |
OK |
Audio OK (DD 5.1), but wrong aspect ratio |
| E-AC-3 / Dolby Digital+ 5.1 |
OK |
OK (DD 5.1) |
| Dolby Digital+ 7.1 |
OK |
OK (Dolby D+ 7.1) |
| TrueHD 5.1 |
OK |
OK (TrueHD 5.1) |
| TrueHD 7.1 |
OK |
OK (TrueHD 7.1) |
| Dolby Atmos 7.1 |
OK |
TrueHD 7.1 |
| DTS HD Master |
OK |
OK (DTS-HD MSTR) |
| DTS HD High Resolution |
OK |
OK (DTS-HD HR) |
| DTS:X (not supported by Onkyo TX-NR636) |
OK |
DTS-HD MSTR |
So HDMI audio pass-through is working very well, and I did not experience some of the audio cuts I had on Zidoo X9S with Onkyo TX-NR636 receiver. Those may have been fixed since Zidoo X9S review however.
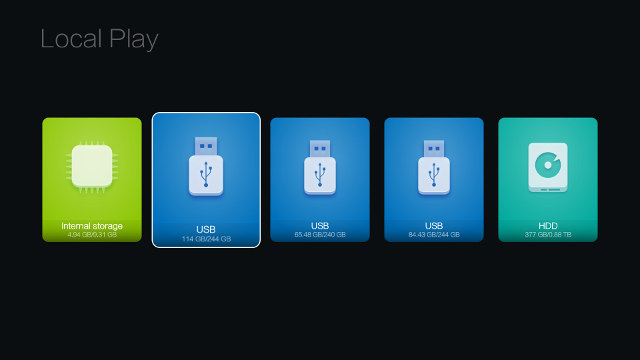
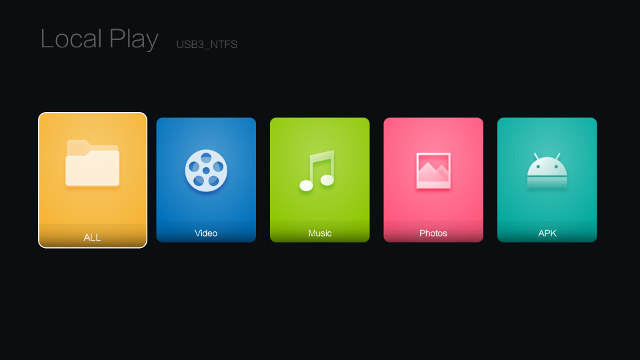
Below are a few screenshots from 4K video app starting with the list of storage devices/partitions…
![Click to Enlarge]()
Click to Enlarge
… the menu available once you’ve selected a storage device…
![Click to Enlarge]()
Click to Enlarge
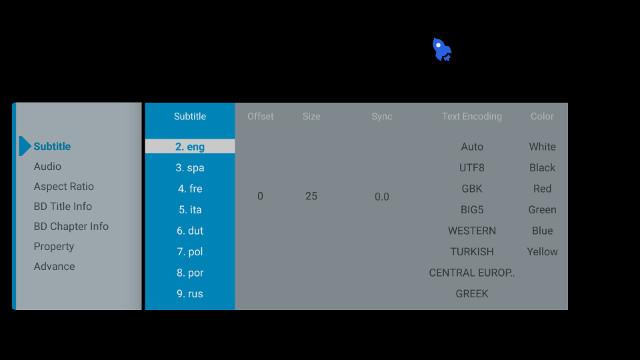
.. and subtitle options while playing a video.
![Click to Enlarge]()
Click to Enlarge
I’ve also quickly tested Blu-ray ISOs (Sintel and Amat videos) and both could play. Finally, I play a 2-hour 1080p video to make sure the system can play a full movie, which I does.
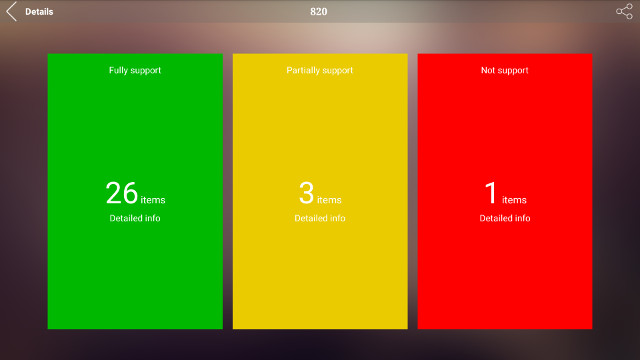
Antutu Video Tester score (820 points) is a little lower than on Zidoo X9S (888).
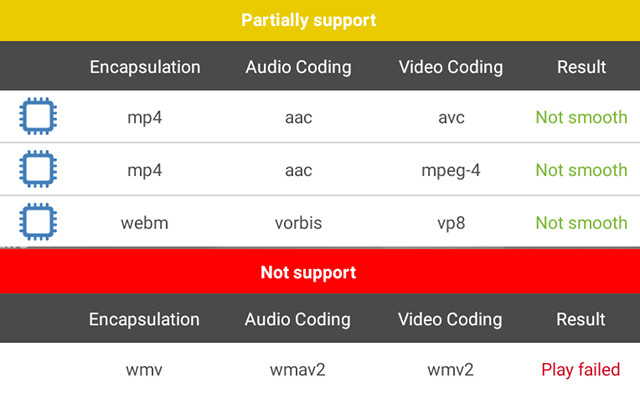
![eweat-r9-plus-antutu-video-tester]() But the videos that failed are exactly the same:
But the videos that failed are exactly the same:
![zidoo-x9s-antutu-video-tester-results]() DRM info crashed each time, just like on X9S, so there’s problably no DRM support at all.
DRM info crashed each time, just like on X9S, so there’s problably no DRM support at all.
HDMIRecorder App
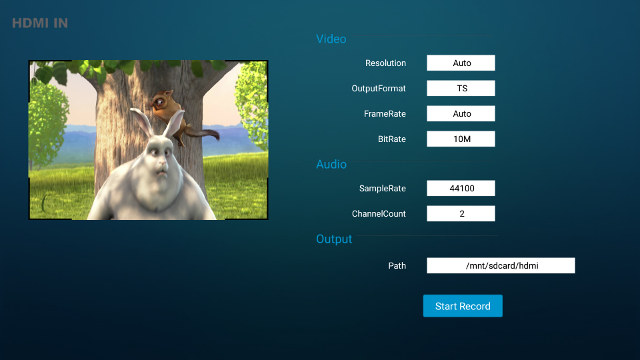
Eweat R9 Plus HDMIRecorder, as its name implies, allows you to record video from an HDMI input source. It can record up to 1080p @ 30 fps using H.264 codec in TS or MP4 container format, with a bitrate up to 10Mbit/s.
![Click to Enlarge]()
Click to Enlarge
It will also record audio, and you can select the output with the “Path” field. It will create a new “hdmi” directory to store the recorded videos.
![Click to Enlarge]()
Click to Enlarge
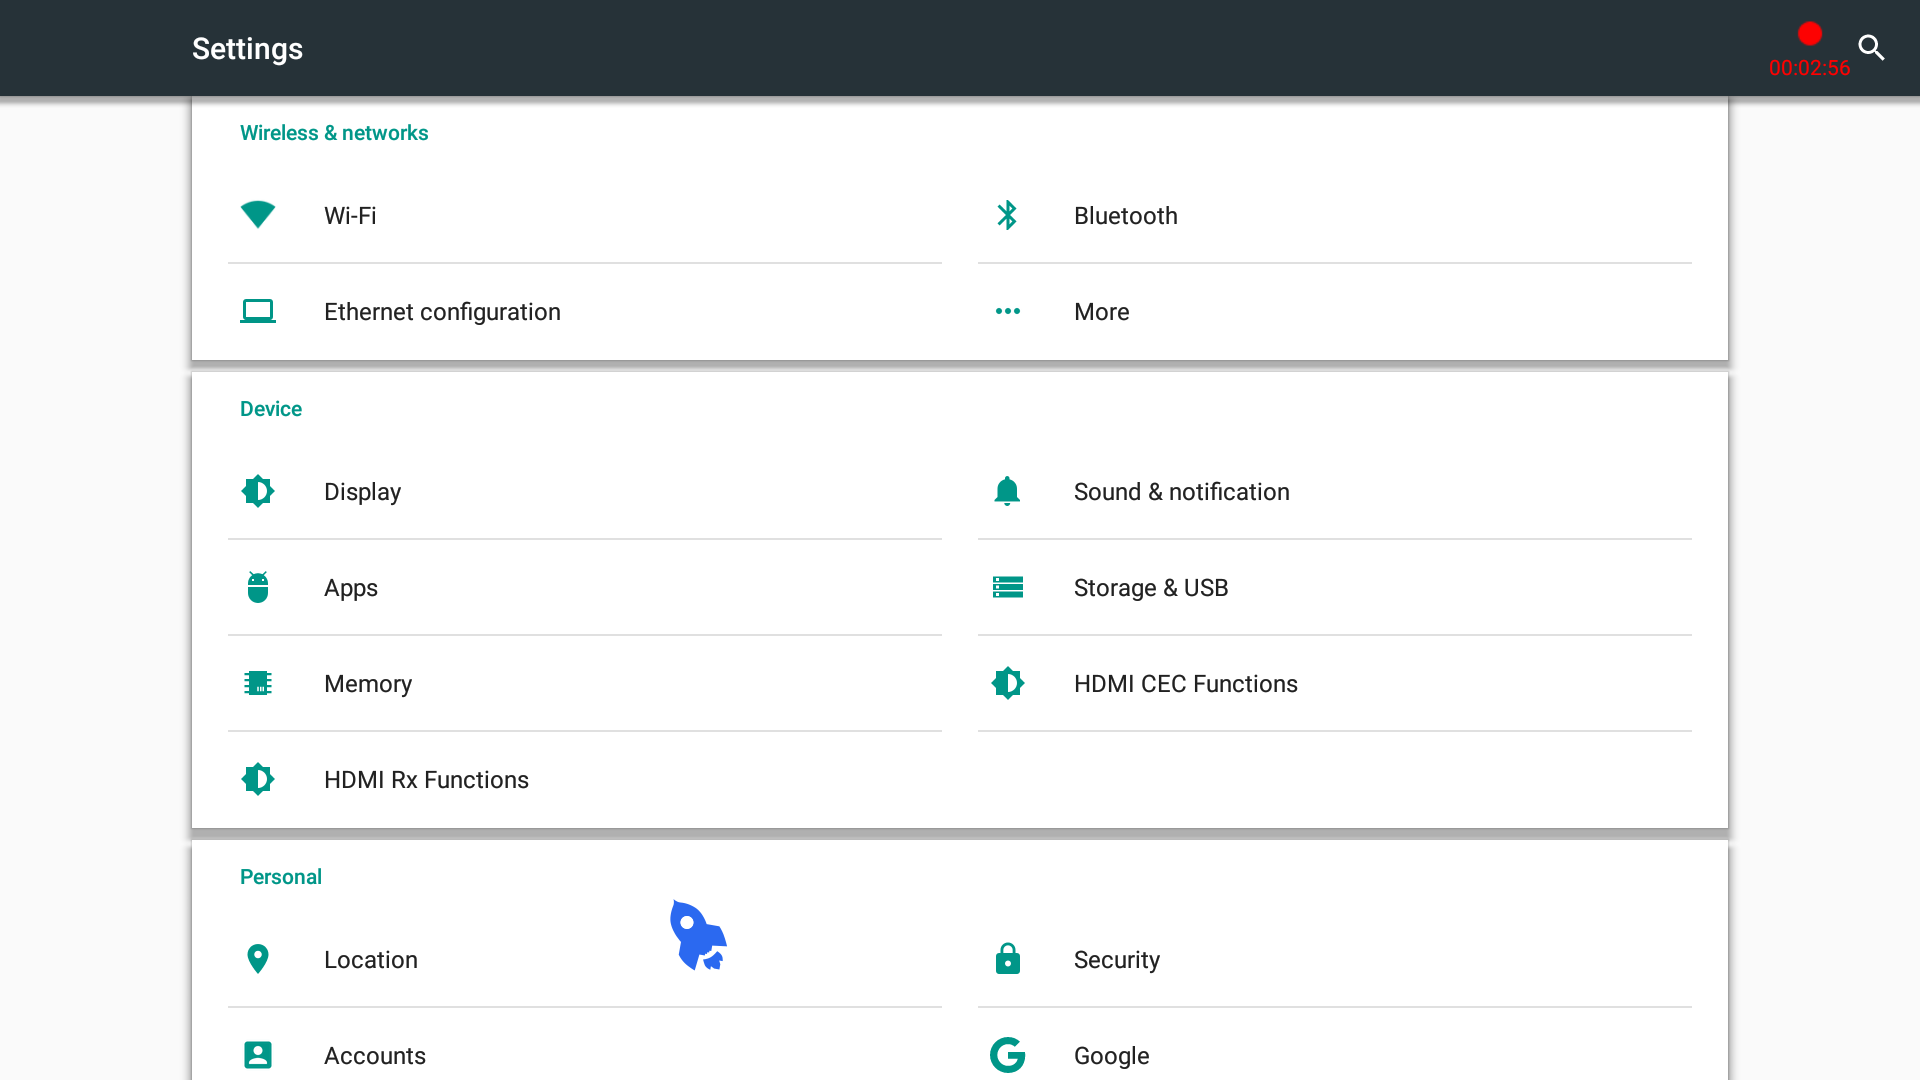
Once recording has started, it will work in the background (see recording info in the top right corner below) and you can browse the web, watch other videos, and so on during recording.
![Click to Enlarge]()
Click to Enlarge
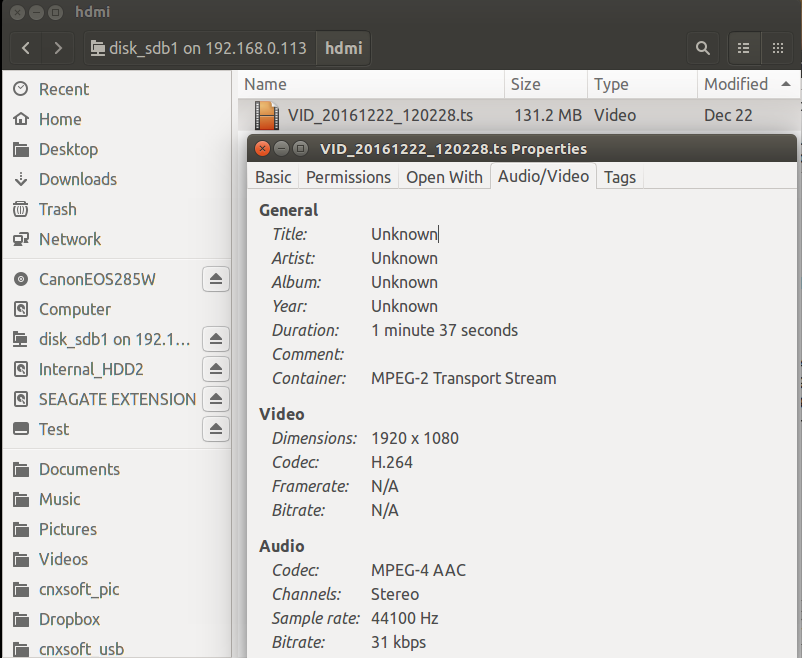
I could then connect to the device via SAMBA, and play with the recorded video with both Totem player ad VLC in my Ubuntu 16.04 computer.
![Click to Enlarge]()
Click to Enlarge
That part works fine, and looks similar to Zidoo HDMI In app, however it lacks some goodies like PiP support and UDP broadcasting found in Zidoo X9S. So if so those functions are important to you, Zidoo X9S clearly has an edge of Eweat device here.
OpenWrt and NAS functions
If you want to learn more about settings up OpenWrt on Eweat R9 Plus, I’ll redirect you to OpenWrt and NAS functions section of Zidoo X9S review as all features are identical.
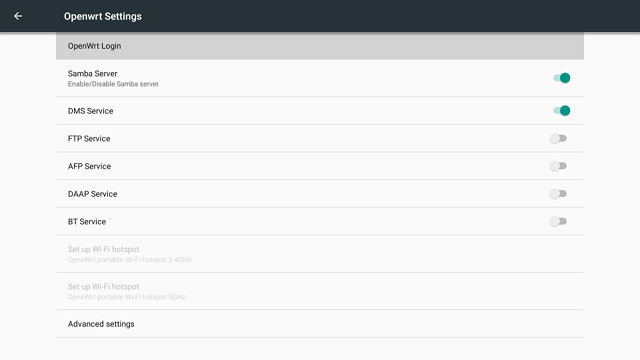
You can control OpenWrt manin function in Android settings…
![eweat-r9-plus-openwrt]()
… and fine tune OpenWrt settings through LuCi web interface.
![Click to Enlarge]()
Click to Enlarge
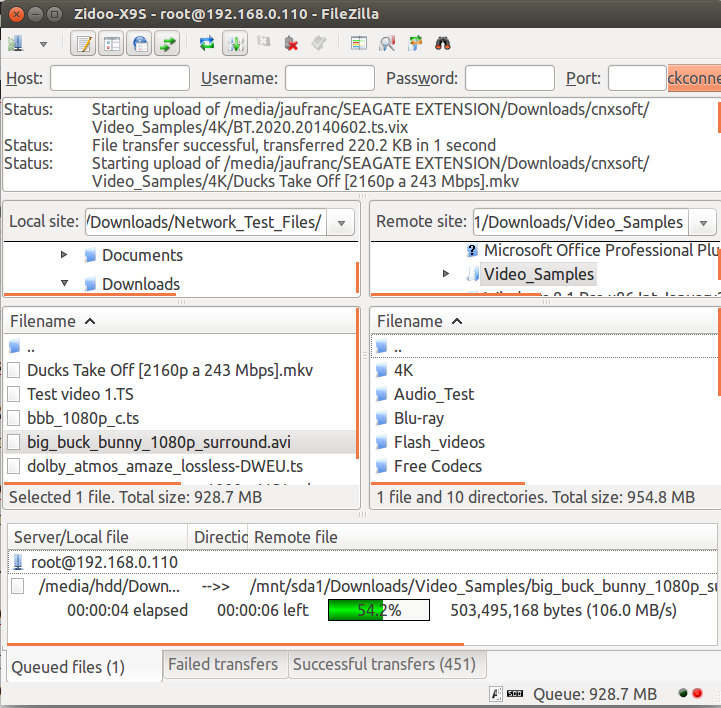
I tested SAMBA, FTP, and Bittorrent. Performance on Eweat R9 Plus was very good with FTP transfer at ~105 MB/s, and 40 MB/s for SAMBA file copy to the internal SATA, very similar to Zidoo X9S with respectively about 90 MB/s and 50 MB/s.
![Click to Enlarge]()
Eweat R9 Plus FTP Transfer – Click to Enlarge
![eweat-r9-plus-samba-transfer]()
Eweat R9 Plus SAMBA Transfer
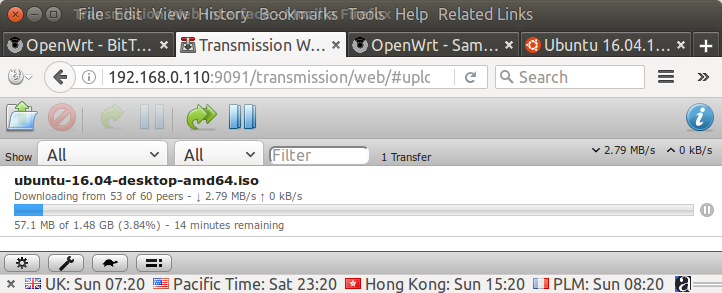
Contrary to my experience with Zidoo X9S, BitTorrent worked just fine and the transfer quickly saturated my 20 Mbps Internet connection.
![eweat-r9-plus-bittorrent]() Bear in mind that firmware evolves overtime and it’s quite possible Zidoo has already fixed the issue.
Bear in mind that firmware evolves overtime and it’s quite possible Zidoo has already fixed the issue.
This time I also tested OpenWrt opkg system manager to see if it would work. After connecting to the device through ssh, I tried to update the packages and it failed miserably:
|
|
opkg update
Downloading http://downloads.openwrt.org/chaos_calmer/15.05/rtd1295/mnas_emmc/packages/base/Packages.gz.
wget: server returned error: HTTP/1.1 404 Not Found
Downloading http://downloads.openwrt.org/chaos_calmer/15.05/rtd1295/mnas_emmc/packages/base/Packages.sig.
wget: server returned error: HTTP/1.1 404 Not Found
Signature check failed.
Remove wrong Signature file.
Collected errors:
* opkg_download: Failed to download http://downloads.openwrt.org/chaos_calmer/15.05/rtd1295/mnas_emmc/packages/base/Packages.gz, wget returned 1.
* opkg_download: Failed to download http://downloads.openwrt.org/chaos_calmer/15.05/rtd1295/mnas_emmc/packages/base/Packages.sig, wget returned 1.
|
So if you want to install packages, you’d probably have to build them yourself, or copy and install opkg packages built for ARM architecture manually.
WiFi Performance
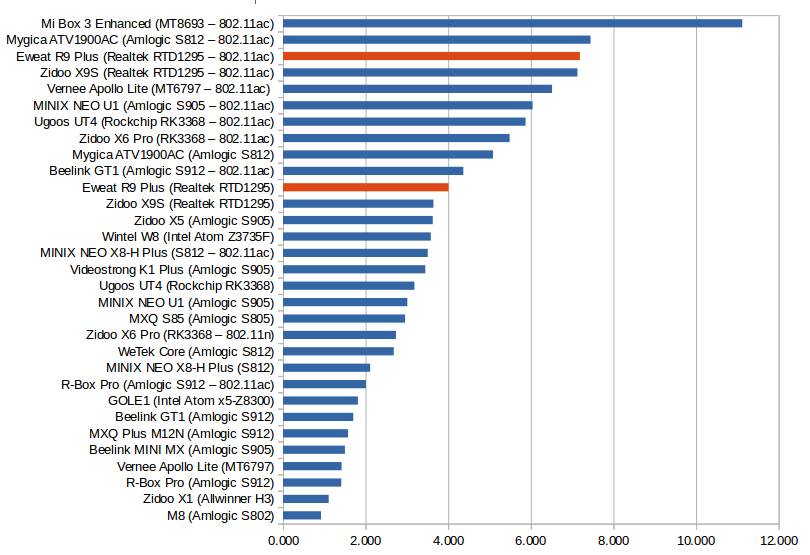
We’ve already seen Gigabit Ethernet works perfectly above with transfers at 105 MB/s through FTP basically saturing the Gigabit Ethernet bandwidth, so I’ll only focus on WiFi in the network performance section. Eweat R9 Plus has excellent WiFi performance with both 802.11n @ 2.4 GHz, and 802.11ac (433 Mbps), roughly matching Zidoo X9S equally good performance.
![Throughput in MB/s - Click to Enlarge]()
Throughput in MB/s – Click to Enlarge
All you need to know is that Eweat R9 Plus is one of the top devices for WiFi for all devices I’ve tested over the year.
Miscellaneous Tests
Bluetooth
I could pair Vernee Apollo Lite Android smartphone with “Realtek Bluetooth”, however once I started transferring files from my phone to the device, I either got the message “Unfortunately Bluetooth has stopped”, and when lucky, the transfer was initiated with Eweat R9 Plus showing an overlay message reading “”Incoming file from another device, please confirm…”. That’s all good but since there’s no notification bar, and no pop-up window, I had no idea where to confirm the transfer, and it eventually time out. I could not test Bluetooth Low Energy, because all my device are either broken or lost.
Bluetooth is not completely useless however, as I could get Sixaxis to work with my PS3 BT gamepad clone, and I paired X1T Bluetooth earbuds successfully, and listen to a YouTube video.
Storage
Eweat R9 Plus could mount NTFS, EXT-4, and NTFS partitions on a 1 TB USB 3.0 Seagate expansion harddrive with only BTRFS failing to be recognized. A FAT32 micro SD could also be mounted in read/write mode, as well as my SATA drive formatted with NTFS.
| File System |
Read |
Write |
| NTFS |
OK |
OK |
| EXT-4 |
OK |
OK |
| exFAT |
OK |
OK |
| BTRFS |
Not mounted |
Not mounted |
| FAT32 |
OK |
OK |
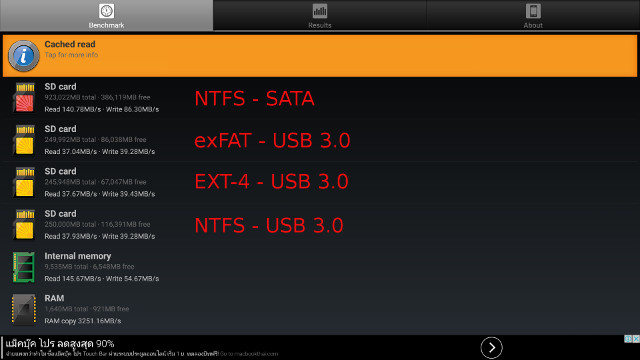
A1SD bench app shows excellent sequential read and write for the SATA interface, a decent performance for all supported file systems through USB 3.0:
![Click to Enlarge]()
Click to Enlarge
- USB 3.0 + NTFS – Read: 37.93 MB/s – Write: 39.28 MB/s
- USB 3.0 + EXT-4 – Read: 37.67 MB/s – Write: 39.43 MB/s
- USB 3.0 + exFAT – Read: 37.04 MB/s – Write: 39.28 MB/s
- SATA + NTFS – Read: 140.78 MB/s – Write: 86.30 MB/s
Eweat R9 Plus looks faster than Zidoo X9S using SATA + NTFS, but bear in mind that the hard drive used was different, so it may explain the difference. However, Zidoo was quite better for USB 3.0 using EXT-4 and NTFS, but quite poor for exFAT, which R9 Plus appears to support well.
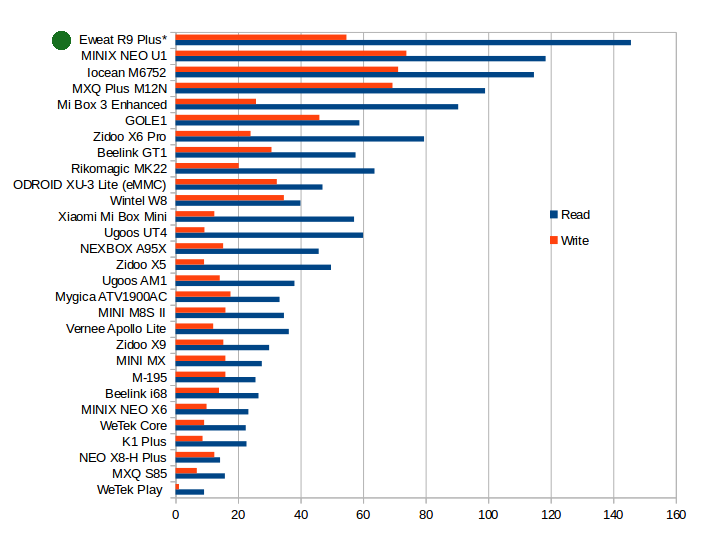
![Read and Write Speed in MB/s - Click to Enlarge]()
Read and Write Speed in MB/s – Click to Enlarge
I also measured internal storage performance, but unfortunately A1SD bench reported “Cached Read”, so the read speed is not valid. The write speed of about 55 MB/s is however, and this is quite good. The actual read speed in the chart below should be lower than 140+ MB/s, but usually read speed is faster than write speed, so performance should still be good.
![Read and Write Speeds in MB/s - Click to Enlarge]()
Read and Write Speeds in MB/s – Click to Enlarge
Gaming
I played Candy Crush Saga with the air mouse, and Beach Buggy Racing (with max quality) using a gamepad, and both games played perfectly well. Then I switched to Riptide GP2, again with maximum resolution settings. It’s started begin playable – but not quite 60fps – just like on Amlogic S905/S912 TV boxes, and Zidoo X9S, but then I noticed the image would freeze from time to time, and after a race was completed, it may have a 10 seconds black screen before going to the main menu. So I checked the CPU usage in OpenWrt (SSH terminal), and notice miniDLNA with a high CPU usage. So I disabled DMS in Android’s OpenWrt settings, miniDLNA stopped running, and I could play the game for 15 minutes more without issues, nor performance degradation over time.
Eweat R9 Plus Benchmarks
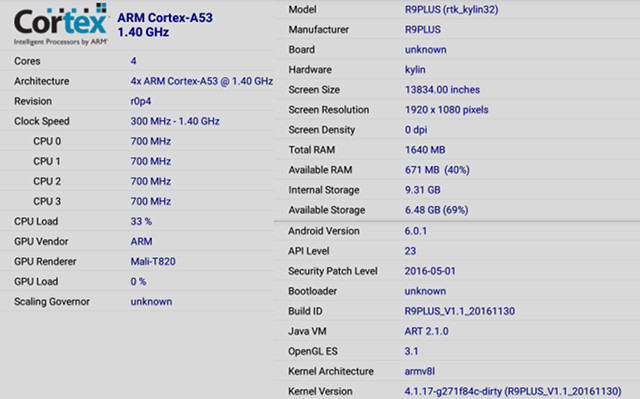
Let’s start with CPU-Z.. R9PLUS (rtk_kylin32) model with a quad core Cortex A53 processor @ 1.4 GHz and a Mali-T820 GPU, so no surprise here.
![Click to Enlarge]()
Click to Enlarge
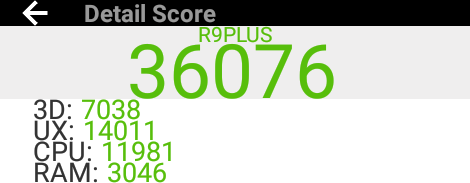
The device reached 36,076 points in Antutu 6.2 against 34,976 points for Zidoo X9S Antutu score.
![eweat-r10-plus-antutu]()
There are a few potential explanations for the small difference: 1. R9 Plus firmware is more recent, 2. it’s winter here (~ 22 °C), and 3. R9 Plus has DDR4 ram instead of DDR3 RAM. However the strange thing is that R9 Plus RAM score is 3,046 points, but Zidoo X9S got 3,960 points which does not make any sense.
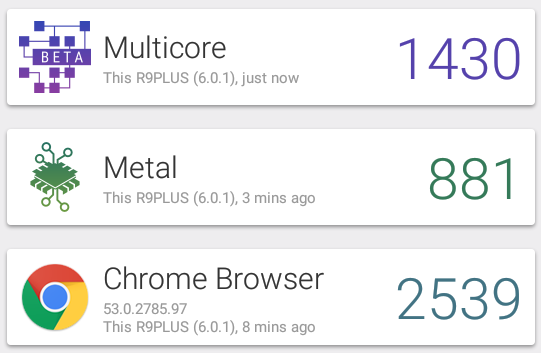
![eweat-r9-plus-vellamo]()
Vellamo 3.x scores are pretty similar with R9 Plus getting 1,430, 881 and 2,539 points for respectively multicore, metal, and Chrome Browser benchmarks, against 1,457, 831 and 2,638 points for Zidoo X9S. So it looks like DDR4 memory does not help for any benchmarks, including 3Dmark’s Ice Storm Extreme.
![Click to Enlarge]()
Click to Enlarge
4,359 points for Eweat R9 Plus against 4,574 for X9S.
Conclusion
Eweat R9 Plus is a solid device, and I really like the internal 3.5″ SATA bay, internal and external storage, as well as networking performance is really outstanding too. However I would have wished the firmware to have fewer bugs, and just like for Zidoo X9S, Realtek RTD1295 SoC has some limited 4K capabilities when it comes with H.264 and VP9. Getting the optimal performance may require some tweaks like disabling some server services.
PROS
- Responsive and stable Android 6.0 firmware
- 4K app plays 4K H.265 videos very well with automatic frame rate switching, and HDMI audio pass-through for Dolby TrueHD and DTS HD audio
- Excellent Ethernet and WiFi performance
- Excellent internal and SATA storage performance, and good USB 3.0 performance
- NTFS, EXT-4, exFAT, and FAT32 file systems are well supported
- HDMI Input (up to 4K60 input) with video recording up to 1080p30 (4K input is also supported but record at 1080p30 max)
- OpenWrt NAS functions such as SAMBA, FTP, and BitTorrent running at the same time as Android, as well as router functions thanks to its two Gigabit Ethernet ports
- Proper power handling with power off, standby, and reboot, and low power consumption in off/standby modes. The provided 36W power supply also allows the connection of multiple hard drives.
- Dolby & DTS audio licenses are included, so audio will work in any apps
- OTA Firmware update
- Good hardware design with internal 3.5″ SATA bay
CONS (and bugs):
- Realtek RTD1295 VPU limitations:
- 4K H.264 up to 24 fps which will be an issue for 4K videos recorded with some actions cameras (GoPro/Xiaomi Yi) and smartphones
- 4K VP9 up to 30 fps, as 60 fps is not well supported. This will be an issue for some 4K videos downloaded from YouTube
- Kodi 16.1 (EWMC) is not really working that well with many 4K videos not playing smoothly (even those within specs) and automatic frame rate not working. So 4K app is recommended
- No DRM support (DRM info app will crash)
- HDMI input works, but does not include features like picture-in-picture and UDP broadcasting found in Zidoo X9S
- You’ll probably have to use both the include IR remote control AND a air mouse or other input device to fully use the device. A air mouse specifically designed for the box would be a plus.
- Scale screen option missing in firmware, so I had black edges on my TV the whole time (should be easy to fix with firmware update)
- No option for status and notifications bars
- Bluetooth file transfer is unreliable (crash) and there’s no way to confirm file transfer (related to notification bar above)
- Tweaks may be needed (e.g. disable Media Storage and DMS) for optimal performance if you have a hard drive with many files.
- The system will not always remember the video output set by the user (e.g. 4K 60 Hz set, but falls back to 1080p or 720p).
Eweat also lacks a community forum like Zidoo, but as long as they keep firmware updates rolling, it may or may not matter to you. Overall, Eweat R9 Plus is also a good device combining 4K TV box, OpenWrt NAS, and HDMI recording functions. Whether that’s right for you depends on your requirements and budget.
The manufacturer sent me the review sample directly. Distributors can inquire the company to purchase in quantities, but if you just need one or a few you can purchase it on Aliexpress for $175.99 plus shipping (about $200) on Aliexpress.
Merry Christmas to all!
Tweet Eweat R9 Plus is a device powered by Realtek RTD1295 SoC combining main functions: Android 6.0 TV box, OpenWrt NAS/router, and HDMI recorder thanks to its HDMI input port….
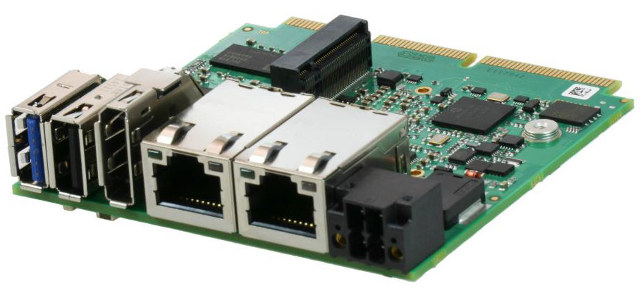
 RevolutionPI RevPi Core specifications: