Quantcast
Channel: Developers » Visit CNX Software
Viewing all 2336 articles
Browse latest View live

LeMaker HiKey 96Boards Board Sells for $29.70 (Promo)

$
0
0

You’d think Cyber Monday should be over by now, but ITEAD Studio still has a clearance with real 70% discount, as 96Boards hardware compliant LeMaker Hikey board is now sold for just $29.70 instead of the usual $99 price.

96boards-discountA quick reminder of the specifications:

  • SoC – HiSilicon Kirin 620 octa core Cortex A53 processor @ 1.2 GHz with ARM Mali-450MP4 GPU
  • System Memory – 2 GB LPDDR3 @ 800 MHz
  • Storage – 8GB eMMC + micro SD slot
  • Video Output / Display – HDMI up to 1080p, MIPI-DSI interface
  • Connectivity – 802.11 a/b/g/n Wi-Fi, Bluetooth 4.1 LE (WL1835MOD module)
  • USB – 2x USB 2.0 host ports, 1x micro USB OTG
  • Camera – MIPI CSI interface
  • Debugging – UART header), unpopulated 10-pin JTAG header (back)
  • Expansion headers
    • 40-pin LS (Low Speed) Expansion connector – UART, I2C, 12x GPIOs, SPI, PCM, PWM, SYS_DCIN, 1.8V, 5V, and GND,
    • 60-pin HS (High Speed) Expansion connector – SDIO, MIPI_DSI, MIPI_CSI, I2C, USB 2
  • Misc – Power button, jumper for power/boot/user, LEDs for Wi-Fi/Bt, and 4x User LED
  • Power Supply – 8-18V @ 3A as per 96Boards specs via 4.5/1.7mm power jack. Hi6553V100 PMU
  • Dimensions – 85 x 55 mm

You’ll be able to run Android and Debian images provided by Linaro. The board is also one the rare development board to be officially supported by AOSP.

You may also be interested in LeMaker Guitar quad core ARM Cortex A9 board sold for $13.50 with 1GB RAM.

Thanks to Nanik for the tip.

Tweet You’d think Cyber Monday should be over by now, but ITEAD Studio still has a clearance with real 70% discount, as 96Boards hardware compliant LeMaker Hikey board is now…


$59 HiFive1 Arduino Compatible Board is Powered by Sifive Open Source RISC-V MCU (Crowdfunding)

$
0
0

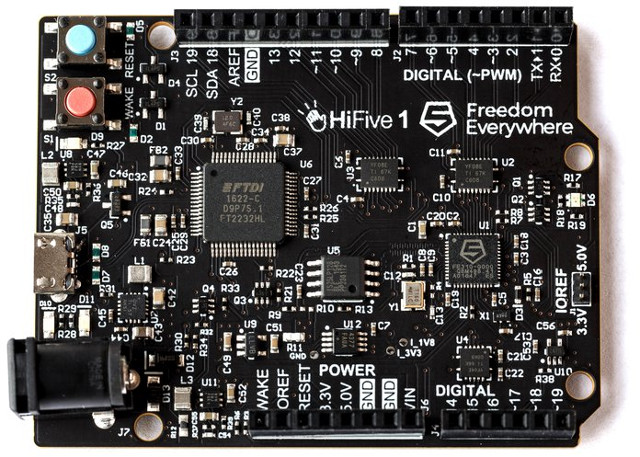
Royalty-free RISC-V instruction sets has been getting in the news in the last few years with various MMU designs from companies or projects like lowRISC, PULPino, and SiFive, and recently there are been rumors that Samsung may use RISC-V in their future IoT SoCs. Many projects are still in progress, and while you can get involved in OnChip Open-V MCU crowdfunding campaign to their get the MCU or a development board, the cost for the MCU ($49) and development board ($99) is a little on the high side, and delivery is expected in 2018 for most rewards. SiFive appears to have a more interesting open source RISC-V solution with HiFive1 Arduino compatible board going for $59 and slated to ship between December 2016 and February 2017.

HiFive1 Board

HiFive1 Board

HiFive1 development board specifications:

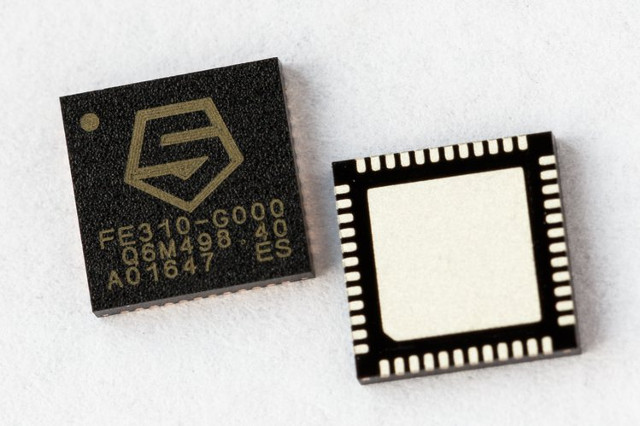
  • MCU – SiFive Freedom E310 (FE310) 32-bit RV32IMAC processor @ up to 320+ MHz (1.61 DMIPS/MHz)
  • Storage – 128 Mbit SPI flash
  • I/Os
    • 19x Digital I/O Pins
    • 19x external interrupt pins
    • 1x external wakeup pin
    • 9x PWM pins
    • 1/3 SPI Controllers/HW CS Pins
    • I/O Voltages –  3.3V or 5V supported
  • USB – 1x micro USB port for power, programming and debugging
  • Power Supply – 5 V via USB or 7 to 12V via DC Jack; Operating Voltage: 3.3 V and 1.8 V
  • Dimensions – 68 mm x 51 mm
  • Weight – 22 g

sifive-fe310

The company’s Freedom SDK with the RTL files for Freedom E310 (and U500) MCUs will allow you to actually play and/or modify the MCU on an FPGA platform, which can be useful for education or if you want to create your own MCU based on SiFive design. If you don’t have the know-how the company’s “chips-as-a-service” offering can customize FE310/U500 MCU to meet your needs.

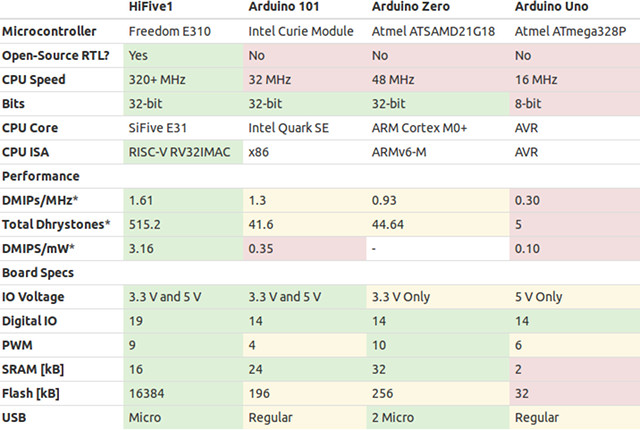
 Most users will probably just program the board with the Arduino IDE, and many of the usual development tools have already been ported to RISC-V architecture. The processor is also quite faster than our typical Arduino, being about 10 times faster than Intel Curie and Atmel SAMD21G18 used in respectively Arduino 101 and Arduino Zero.

hifive1-vs-arduino

Power efficiency (@ 200 MHz) appears to be much higher compared to Atmel AVR and Intel Quark. However, based on ARM Cortex M0 product brief (I could not find data for M0+), 10DMIPS/mW can be achieved using 180ULL process, and 75 DMIPS/mW with 65LP process.

If you are interested, you can get the board on Crowdsupply with the HiFive1 devkit going for $59 and shipping in February 2017, but if you want to have a piece of history, you may consider HiFive1 Founder Edition for $79 with SiFive Founding Team’s Signature on the silkscreen and shipping at the end of December 2016. Shipping is free to the US, and $15 to the rest of the world.

RISC-V could be a serious competitor to ARM and MIPS in the MCU/IoT space in the years ahead, as it’s royalty-free, and the RISC-V foundation has many players including some heavy weights such as Google, AMD, Microsemi, Qualcomm, Nvidia and more…

Thanks to noone for the tip.

Tweet Royalty-free RISC-V instruction sets has been getting in the news in the last few years with various MMU designs from companies or projects like lowRISC, PULPino, and SiFive, and…

You Can Buy AirPods-like Wireless Bluetooth Stereo Earbuds for $16 and Up

$
0
0

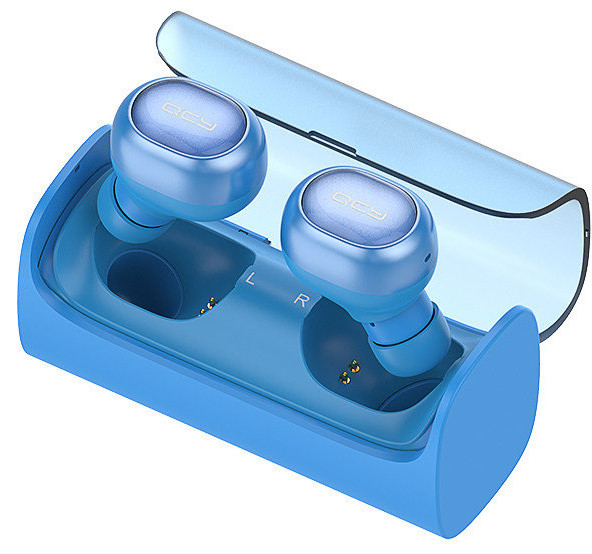
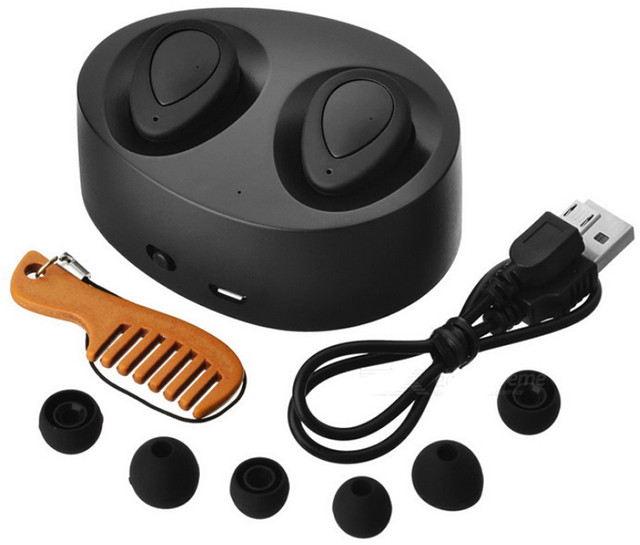
Most Bluetooth headsets on the market actually come with some sort of wire or holding mechanism, which may not always be convenient, for example I can’t use mine comfortably while lying down on the bed. But that to electronics miniaturization, companies have recently started to offer truly wireless Bluetooth earbuds, including Apple’s yet-to-be available $159 Airpods. This morning I noticed two similar products in new arrivals list, first with $59.99  QCY Q29 mini Earburds on GeekBuying, and then even cheaper, but not quite as good looking (and likely not so good sounding), “FreeStereo Twins Wireless Bluetooth v4.1 In-Ear Headset w/ Mic” on DealExtreme going for just $22.25 including shipping.

qcy-q29-earbudsLet’s start with QCY Q29 earbuds specifications:

  • Connectivity – Bluetooth 4.1 with HFP, HSP, A2DP, AVRC protocols support; up to 5-10 meter range
  • Built-in Microphone
  • Charging port – pogo on earbuds, micro USB to storage/charging box
  • Battery – 45mAh for up to 12 hours per charge; Charging time: one hour
  • Dimensions – Earbud: 17 x 25 x 29mm
  • Weight – 5.3 grams per earbud

QCY Q29 earphones ship with three pairs of silicon earcups, a charging cable, a charging box, and an English manual. You’ll be able to answer/reject call, lsiten to music, and all the things you’d normally do with a Bluetooth headset. The earbuds are also available on other shops such Banggood (now with 18% discount coupon), and Amazon US where you can also buy individual earbud for $13.5 in case you lose one. Reviews are generally positive on Amazon, but one person did mention that “Was ok but don’t stay in the ear well“, so I’m not sure it’s suitable for running for example…

cheap-airpods-clone

The cheaper noname version shown above with all accessories has a shorter battery life:

  • Connectivity – Bluetooth 4.1 with support for SP / HFP / A2DP / AVRCP; up to 10 meter range
  • Embedded Microphone
  • Charging port – pogo on earbuds, micro USB to charging dock
  • Battery – LiPo battery for up to 3 hours talk time, 5 hours music , 55 hours in standby mode; Charging time: 3 hours
  • Misc – Not waterproof
  • Dimensions – Earbud: 2.7 cm x 1.8 cm x 2.7 cm
  • Weight – 9 grams per earbud

The earbuds also ship with three pairs of silicon earcups, a charging cable, a charging dock, and an user’s manual in English and Chinese.

You’ll also find various “true wireless stereo earbuds” on Aliexpress for various prices, and one pair that could be interesting is X1T earbuds selling for $15.99 and up.

x1t-true-wireless-earphone

Tweet Most Bluetooth headsets on the market actually come with some sort of wire or holding mechanism, which may not always be convenient, for example I can’t use mine comfortably…

NXP Modular IoT Gateway Supports Thread, Zigbee, NFC, Bluetooth and WiFi Connectivity

$
0
0

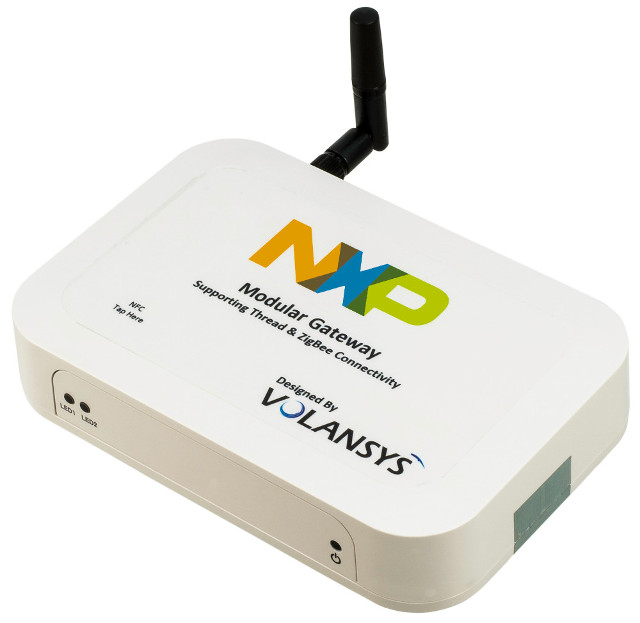
NXP has just announced a modular IoT gateway solution for large node networks (>= 250 nodes) based on Volansys i.MX6UL system-on-module, supporting wireless communications protocols such as Thread, ZigBee, NFC through add-on modules, on top of Wi-Fi and Bluetooth 4.1.

nxp-modular-iot-gatewayNXP Modular IoT Gateway specifications:

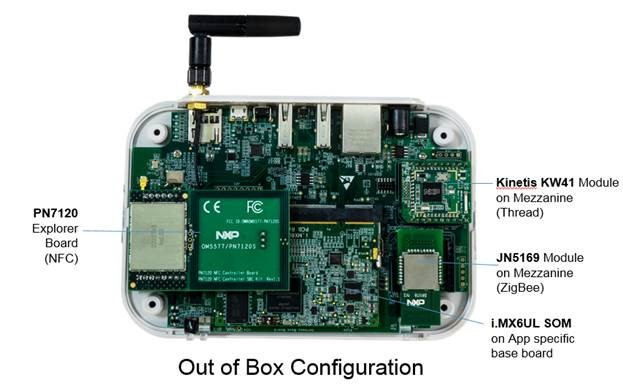
  • SoM – Volansys i.MX6UL 200-pin SO-DIMM module with:
    • SoC – NXP i.MX 6UL ARM Cortex A7 processor @ 528 MHz
    • System Memory – 256MB to 1GB DDR3L  RAM
    • Storage – 1GB to 4GB NAND flash, optional 4GB to 16GB eMMC flash, EEPROM for device info
    • PMIC, Mbit Ethernet PHY
  • Wireless Connectivity Expansion Modules:
    • PN7120 explorer board for NFC
    • Kinetis KW41 module for Thread support
    • JN5169 module for Zigbee support
    • 2x MikroBUS headers
  • Baseboard connectors / features:
    • Storage – 1x micro SD slot
    • Connectivity – 1x 10/100M Ethernet port, Murata WiFi 802.11 b/g/n & Bluetooth 4.1 + EDR module with external antenna connector
    • USB – 2x USB 2.0 host port, 1x micro USB OTG ports,
    • Debugging – 1x micro-USB port for debugging, JTAG connector
    • Misc – RTC, LEDs, user switch (for power on/off and NFC), and reset pinhole
  • Power Supply – 5V/3A
  • Dimensions & Weight – TBD
  • Certifications – FCC/CE/IC

nxp-iot-gateway-board

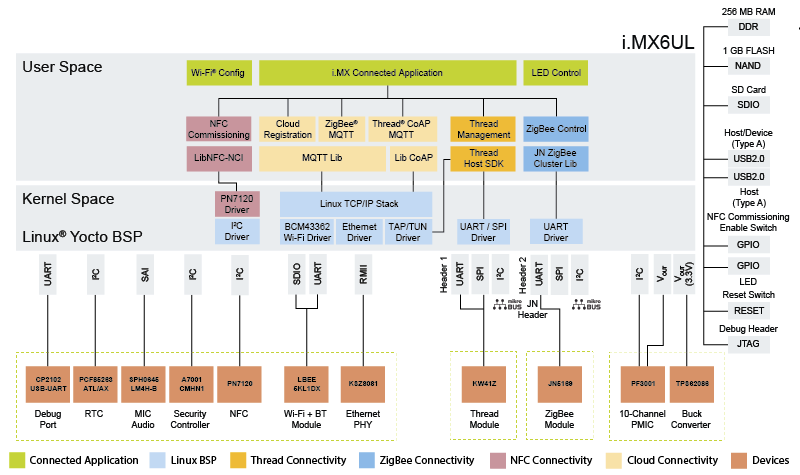
So you can select your own i.MX6UL module with the amount of memory and storage needed, and add wireless modules as needed to match your requirements. Volansys is also planning for LoRaWAN and Sigfox modules in the future. Beside the hardware, the gateway and modules all come with various software stack and documentation: A Yocto Linux BSP with drivers, an MQTT client library, a Thread Linux host software SDK, Thread and Zigbee device controller, registration with the cloud, and more. The companies also provide an Android app to manage the gateway, and firmware for Thread Kinetis KW4x end device. Alternative operating systems supported include OpenWRT and Brillo.

nxp-modular-iot-gateway-block-diagram

NXP Modular IoT Gateway is available now for $269 with the default configuration, and you’ll find more details with documentation and datasheets as well as a purchase link on NXP Modular Gateway product page and Volansys website.

Via HackerBoards

Tweet NXP has just announced a modular IoT gateway solution for large node networks (>= 250 nodes) based on Volansys i.MX6UL system-on-module, supporting wireless communications protocols such as Thread, ZigBee,…

reMarkable 10.3″ Digital Notepad and e-Reader is Designed to Feel Like Paper

$
0
0

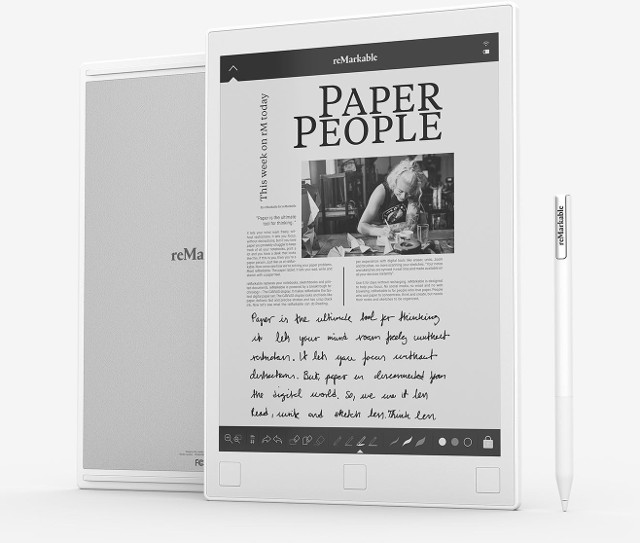
If you like to take notes with pen and paper, but would prefer a digital solution to store your note, there are already some solutions like Boogie Board and Rocketbook, but reMarkable offers much more that the other two with a 10.3″ E-Ink touchscreen display and pressure sensitive pen capable of detecting 2048 levels of pressure sensitivity, it allows to read books as any e-readers, and also write your own notes on a blank piece of “paper” or existing digital documents, drawing sketches, and save & share the results. The whole user experience is supposed to feel as if you were reading and writing on paper.

remarkable-digital-notepadreMarkable tablet specifications:

  • SoC – ARM Cortex A9 processor @ 1 GHz (Likely NXP i.MX6 series processor since they support EPD interfaces)
  • System Memory – 512 MB DDR3L
  • Storage – 8GB internal storage good for around 100,000 pages
  • Display – 10.3″ monochrome digital paper “CANVAS” capacitive touch display based on E-Ink Carta technology with 1872×1404 resolution (226 DPI); plastic cover to make it virtually unbreakable; Paper-like surface friction; sunlight readable
  • Connectivity – WiFi
  • USB – 1x micro USB port for charging
  • Battery – 3000 mAh battery good for several days
  • Dimensions –  256 x 177 x 6.7mm
  • Weight – ~350 grams

The included “Marker” pen does not require any battery nor pairing or setup, comes with a high-friction pen tip, with the device able to detect tilt and 2048 levels of pressure sensitivity. The tablet runs Codex Linux based operating system optimized for low-latency e-paper displays, and currently supports PDF and ePUB documents, with more formats planned. Notes and documents can be transfered over WiFi to your devices or the cloud through an app currently available for Mac OS, iOS, Windows 8 and 10 and Android.

[embedded content]

The video is convincing, but pricing may put many people off, as reMarkable is now available for pre-order for $379 with a folio cover and a Marker pen, and shipping expected for August 2017. Once the pre-order period is over the retail price will go up to $529 for the tablet only with the Marker and the folio cover an extra $79 each. This tablet is only really useful if you buy the pen, unless you limit yourself to the e-Reader function…

Via Liliputing

Tweet If you like to take notes with pen and paper, but would prefer a digital solution to store your note, there are already some solutions like Boogie Board and…

Hack Autonomous Driving into Your Car with Open Source Hardware Comma Neo and Open Pilot Software

$
0
0

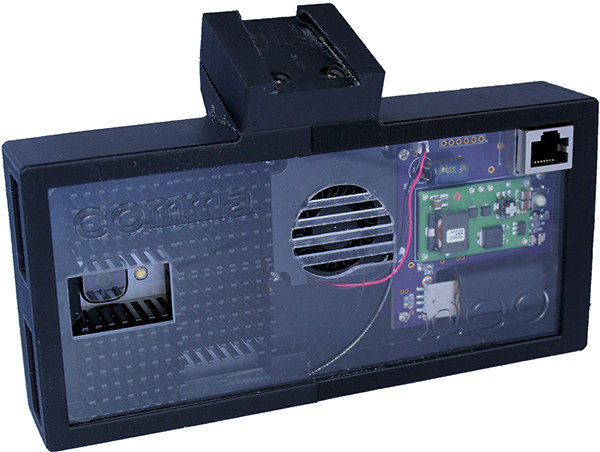
George Hotz setup Comma.ai company and worked on a commercial project called Comma One to add autonomous driving to some car models, but then the US highway authorities started to ask questions and promised ever increasing fines if he could not comply with some specific safety regulations/requirements, and eventually he decided to cancel the project due to the regulatory burden. A few weeks passed since the cancellation, and he has now released Open Pilot auto-pilot software and Comma NEO a work-in-progress open source hardware platform connecting to Qualcomm Snapdragon 820 powered OnePlus 3 smartphone to run the software.

Comma NEO

Comma NEO

The system is said to implement “Adaptive Cruise Control (ACC) and Lane Keeping Assist System (LKAS) for Hondas and Acuras”, and performs about the same as “Tesla Autopilot at launch, and better than all other manufacturers”.

Open Pilot currently only supports the Acura ILX 2016 with AcuraWatch Plus and the Honda Civic 2016 Touring Edition, but since the software is open source, it should be possible to adapt it to other Honda and Acura models with some tinkering, and other car manufacturers could also be added to the list but would require much more work. The system leverages the cars’ cruise control system which becomes disabled at lower speed, so self-driving only works at higher speeds, 18+ mph or 25+ mph depending on the car’s model.
[embedded content]
The video above should be using Open Pilot software, but I’m unclear which exact hardware it is using (Comma One or Comma NEO).

The software also has the following disclaimer “THIS IS ALPHA QUALITY SOFTWARE FOR RESEARCH PURPOSES ONLY. THIS IS NOT A PRODUCT. YOU ARE RESPONSIBLE FOR COMPLYING WITH LOCAL LAWS AND REGULATIONS. NO WARRANTY EXPRESSED OR IMPLIED”. But if it does not bother you, George has put together a step by step guide showing exactly how to buy all parts (~$700) from 6 different shops, solder the components to NEO Rev A board, wire and test the board, and assemble the case.

Via Arstechnica and Nanik.

Tweet George Hotz setup Comma.ai company and worked on a commercial project called Comma One to add autonomous driving to some car models, but then the US highway authorities started…

Seagate Duet Portable Hard Drive Automatically Syncs with Amazon Cloud Drive

$
0
0

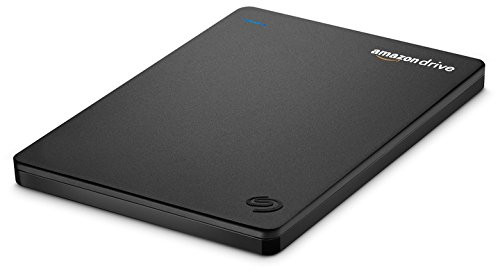
Seagate has announced the launch of Seagate Duet 1TB portable hard drive with auto-sync to Amazon Cloud Drive, so that your data is always backed in the cloud. If you use the drive to backup data, that means you’ll have a extra backup copy in the cloud, which could be useful if the drive fails just when you want to back it up (it happened to me), or somehow your house burns down…

seagate-amazon-driveAnother advantage is that if you forget to take your drive with you, the data will be accessible from anywhere with an Internet connection from Amazon Cloud service. It connects through your Mac or PC’s USB 3.0 port, and sync files to the cloud after an initial setup with your Amazon account. Once the setup is done, you can use the drive as you’d normally do, and files will automatically be backed up in the cloud. The Amazon Drive mobile app will allow people to access their files from phones or tablets running Android or iOS operating system.

I guess it should be possible to set this up yourself with a normal drive too, but this just makes it a little easier. It should be slightly cheaper if you intended to use Amazon Drive, as Seagate Duet is available for pre-order $99.99 on Amazon (US customers only), and comes with one year of Amazon Drive Unlimited Storage ($59.99 value) for new US Amazon Drive customers, as well as a two-year limited warranty from Seagate.

Via Liliputing and AFTVnews

Tweet Seagate has announced the launch of Seagate Duet 1TB portable hard drive with auto-sync to Amazon Cloud Drive, so that your data is always backed in the cloud. If…

Mediatek Introduces Helio X23 and X27 Processors with Faster Clocks, Better Camera Support, Lower Power Consumption

$
0
0

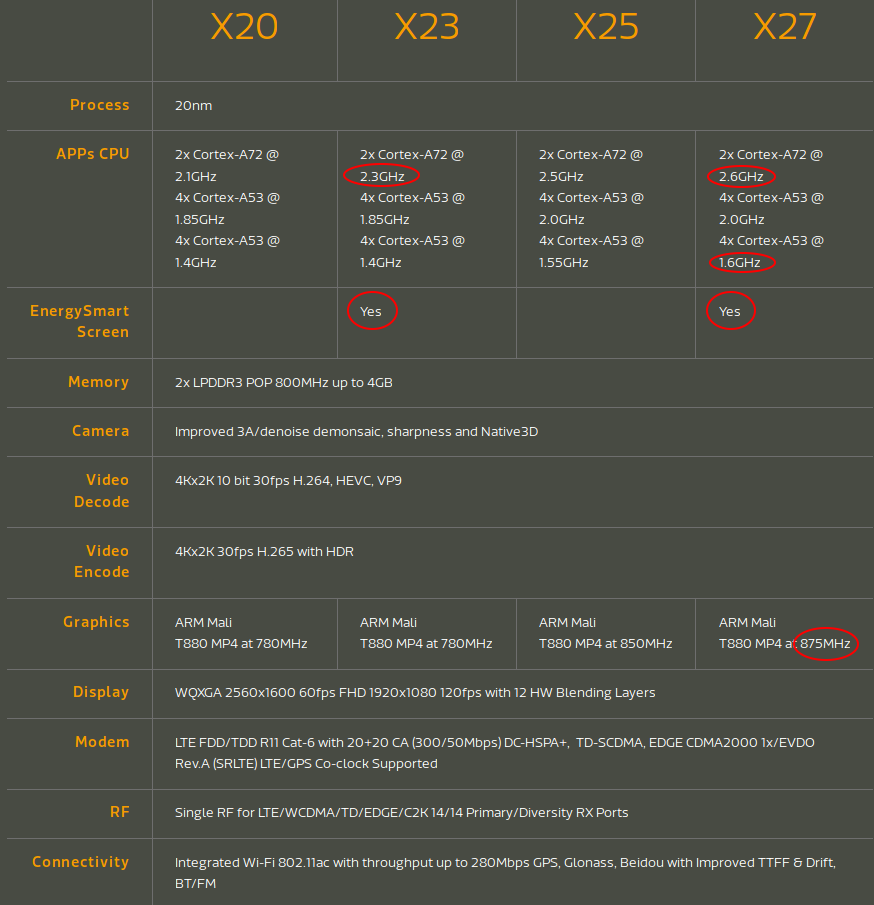
Mediatek has just announced upgrades to their Helio X20 and X25 deca-core processors with respectively Helio X23 and X27 boasting higher CPU and GPU frequencies, higher camera quality, as well as lower power consumption thanks to MiraVision EnergySmart Screen power-saving technology.

Click to Enlarge

Click to Enlarge

The two new processor still feature MediaTek tri-cluster deca-core architecture with two ARM Cortex A72 cores, four ARM Cortex A53 core, and 4 more low power Cortex A53 cores, but Helio X23  Cortex A72 cores’ max CPU frequency increased from 2.1 GHz to 2.3 GHz, and Helio  X27 got a small boost to 2.6 GHz for the Cortex A72 cores (vs 2.5 GHz) and 1.6 GHz for the low power Cortex A53 cluster, as well as a higher frequency ARM Mali-T880 MP4 GPU at 875 MHz instead of 850 MHz for Helio X25.

MediaTek Helio X23 and X27 also support dual camera photography with the upgraded MediaTek Imagiq image signal-processing solution integrating color and mono cameras and depth-of-field applications into a single ISP.

MiraVision EnergySmart Screen technology modifies the display parameters based on the on-screen content and ambient light in order to deliver up to 25% reduction in display power consumption. The processors also integrate an Envelope Tracking Module dynamically adjusting the output voltage based on signal strength from the power amplifier for an average of 15% reduction in power consumption during peak output.

The company did not give any specific availability for smartphones powered by MediaTek Helio X23 and X27, except it will be available “soon”.  You’ll find a few more details on Mediatek Helio X20 series product page.

Tweet Mediatek has just announced upgrades to their Helio X20 and X25 deca-core processors with respectively Helio X23 and X27 boasting higher CPU and GPU frequencies, higher camera quality, as…


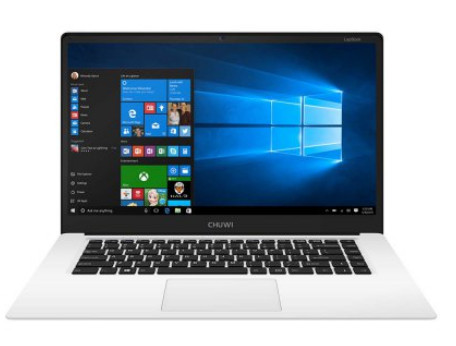
CHUWI LapBook 14.1″ Full HD Laptop is Powered by Intel Celeron N3450 Apollo Lake Processor

$
0
0
Home > Hardware, Intel Celeron, Windows 10 > CHUWI LapBook 14.1″ Full HD Laptop is Powered by Intel Celeron N3450 Apollo Lake Processor

CHUWI LapBook 14.1″ Full HD Laptop is Powered by Intel Celeron N3450 Apollo Lake Processor

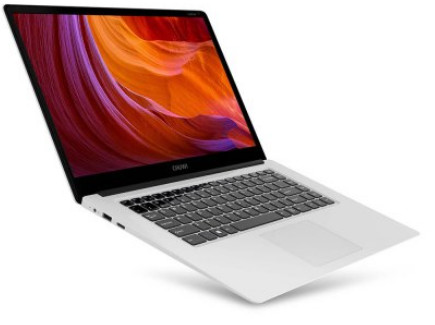
We’ve already seen Voyo Vbook A1 Apollo Lake laptop based on Intel Celeron N3450 SoC going for pre-order a couple of weeks ago, but its has a 11.6″ display only, and I prefer to use larger screens when I need a laptop as it’s less of a shock when switching from my 39″ TV screen connected to my desktop computer. CHUWI LapBook offers just that with many of the same specifications as Voyo laptop, but with a 14.1″ display instead, and a little less storage & battery capacity.

chuwi-lapbookCHUWI LapBook laptop specifications:

  • SoC – Intel Celeron N3450 quad core “Apollo Lake” processor @ 1.1 GHz / 2.2 GHz (Burst frequency) and 12 EU Intel HD graphics 500 @ 200 MHz / 700 MHz (Burst freq.); 6W TDP
  • System Memory – 4GB DDR3L
  • Storage – 64 GB eMMC flash + micro SD slot up to 128 GB
  • Display – 14.1″ IPS screen with 1920 x 1080 (FHD) resolution
  • Video Output – 1x micro HDMI port
  • Audio – HDMI, 3.5mm audio jack, built-in stereo speakers and microphone
  • Connectivity – 802.11 b/g/n WiFi, and Bluetooth 4.0.
  • Camera – 2.0MP front-facing camera
  • USB – 1 x USB 2.0 host port, 1 x USB 3.0 port
  • Power Supply – 12V DC / 2A
  • Battery – 9,000 mAh Polymer Li-ion battery good for about 4 hours video playback.
  • Dimensions – 32.92 x 22.05 x 2.05 cm
  • Weight – 1.74 kg

intel-apollo-lake-laptopThe laptop ships with a power supply and a user’s manual, and comes pre-loaded with Windows 10 Home. The Windows license (if any) may not be 100% compliant with Microsoft’s Windows 10 discount license hardware requirements since the storage device where the OS is installed has over 32 GB capacity. AFAIK, Linux support is uncertain at this stage for Apollo Lake hardware.

GearBest has the laptop listed on Arrival Notice with a $292.89 price tag, but actual price could be a little lower, especially once coupons come in play.

Via AndroidPC.es

Tweet We’ve already seen Voyo Vbook A1 Apollo Lake laptop based on Intel Celeron N3450 SoC going for pre-order a couple of weeks ago, but its has a 11.6″ display…

How to Build and Flash ESPurna Open Source Firmware to Sonoff POW Wireless Switch

$
0
0

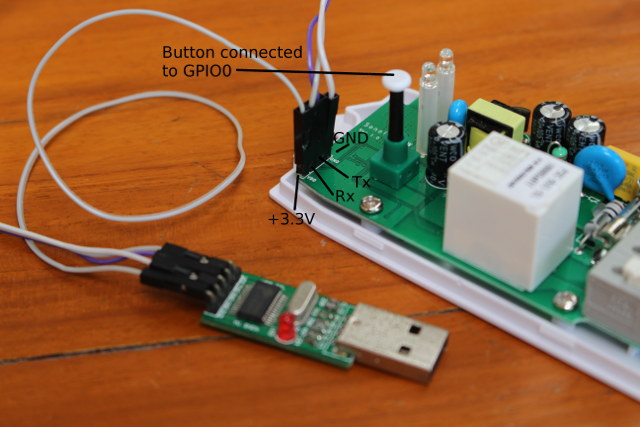
ITEAD Studio Sonoff family is comprised of various inexpensive ESP8266 WiFi power switch, and the company sent me two of their latest CE certified models with Sonoff TH16 + external temperature & humidity probe, and Sonoff POW to measure power consumption. I checked the hardware is the first part of the review, and used Sonoff TH16 to control a water pump with the stock firmware and Ewelink Android app in the second part. It works reasonably well, but it relies on the cloud, so if you lose your Internet connection or the service closed, you can’t control the relay manually anymore. Luckily, the UART pins are exposed on Sonoff switches so you can solder a 4-pin header and connect a USB to TTL to flash your own firmware.

Click to Enlarge

Click to Enlarge

Please don’t connect Sonoff devices to the mains when programming them, it’s very dangerous, instead the USB to TTL board will power the system, and will allow you to program the board safely. Later you’ll be able to update the firmware, if needed, over the network.

The next step is to select the firmware you want to use, and I’ve been advised two firmware for ESP8266, namely ESPurna specifically designed for Sonoff devices, and ESPEasy with a larger community of users. The latter may be usable to control the relay, but it has yet to support HLW8012 chip used to measure power consumption in Sonoff POW, so I decided to go with ESPurna.

That’s the description of the firmware from its bitbucket page:

ESPurna (“spark” in Catalan) is a custom C firmware for ESP8266 based smart switches. It was originally developed with the ITead Sonoff in mind. Features:

  • Asynchronous WebServer for configuration and simple relay toggle with basic authentication
  • Communication between webserver and webclient via websockets with secure ticket check
  • Flashing firmware Over-The-Air (OTA)
  • Up to 3 configurable WIFI networks, connects to the strongest signal
  • MQTT support with configurable host and topic
  • Manual switch ON/OFF with button (single click the button)
  • AP mode backup (double click the button)
  • Manual reeset the board (long click the button)
  • Visual status of the connection via the LED
  • Alexa integration (Amazon Echo or Dot) by emulating a Belkin WeMo switch
  • Support for automatic over-the-air updates through the NoFUSS Library
  • Support for DHT22 sensors
  • Support for the HLW8012 power sensor present in the Sonoff POW
  • Support for current monitoring through the EmonLiteESP Library using a non-intrusive current sensor (requires some hacking)
  • Command line configuration

I could not find firmware release for ESPurna, but Xose Pérez – the developer – has provided some basic instructions to build and flash the firmware to Sonoff. Those are not really detailed however, and it took me nearly a full day to successfully build and flash the firmware to Sonoff POW, mostly because I was not quite familiar with most of the tools used. So I’ve reproduced the step I went through in Ubuntu 16.04, and hopefully this can help people getting things done more quickly.

Let’s retrieve the source code, and enter the code directory first:

sudo apt install git

git clone https://bitbucket.org/xoseperez/espurna

cd espurna/code

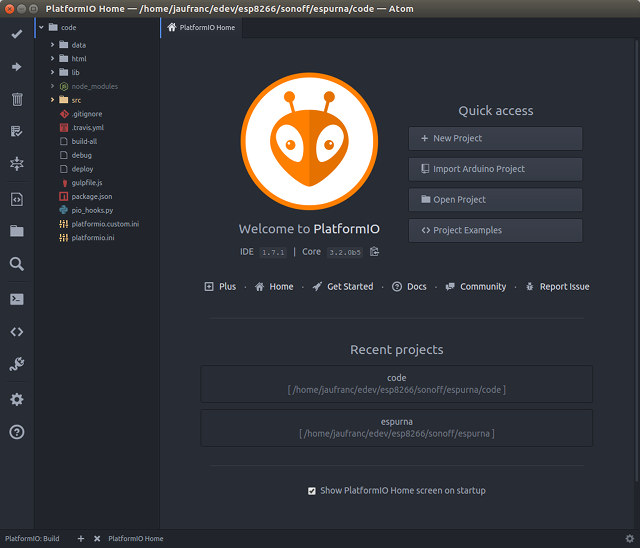
You can build the project with PlatformIO or the Arduino IDE. The instructions are for PlatformIO so that’s what I used. There are two ways to build the code with the project wither using Platform IDE for Atom and the command line, or simply using the command line. With insights, I ended up using the command line, but I’ll show both methods.

Setup PlatformIO IDE for Atom to build ESPurna

First, you’ll need to download PlatformIO IDE for Atom for your operating systems, and install it. For Ubuntu 16.04, I selected “Download .deb” for Linux and installed it through through Ubuntu Software program. Alternatively, after download, you can install it from the command line:

1

sudo dpkg -i platformio-atom-linux-x86_64.deb

You can now start Atom program in Ubuntu dash, select Open Project, and browse for espurna/code directory to load the project we’ve just gotten from Bitbucket.

Click to Enlarge

Click to Enlarge

The tick button on the top left corner is to build the project, and the right button just under is to upload the firmware to the target board. But if we try to build the firmware now it will fail with an error about “espressif8266_stage”. That’s because we need to install Espressif 8266 (Stage) development platform. First we need to enable Developer mode in the IDE by going to the top menu to select PlatformIO->Settings->PlatformIO IDE, and checking “Use development version of PlatformIO“.

platformio_core_enable_development_version

Click to Enlarge

Now install PlatformIO shell commands from either a system Terminal, or PlatformIO IDE terminal (PlatformIO->Terminal->New Terminal):

sudo ln -s /home/jaufranc/.atom/packages/platformio-ide/penv/bin/platformio /usr/local/bin/platformio

sudo ln -s /home/jaufranc/.atom/packages/platformio-ide/penv/bin/pio /usr/local/bin/pio

and finally install ESP8266 development platform:

1

platformio platform install https://github.com/platformio/platform-espressif8266.git#feature/stage

At this point you can click on the tick icon to build the default “node-debug” environment, a build output window will show in the IDE, and quickly disappear if the build is successful.

Setup PlatformIO via Command Line to Build ESPurna

If instead we want to use the command line we can install the latest pip version, the developer version of PlatformIO, and the staging version of ESP8266 development platform:

sudo apt install python-pip

sudo pip install upgrade pip

sudo pip install -U https://github.com/platformio/platformio/archive/develop.zip

platformio platform install https://github.com/platformio/platform-espressif8266.git#feature/stage

You can check the build environment is set properly by running the following command in espurna/code directory:

1

pio run -e node-debug

It will automatically download, build and install all dependencies and build for “node-debug” firmware for NodeMCU board. If it is successful, it will end as follows:

================================== [SUMMARY] ==================================
Environment node-debug [SUCCESS]
Environment node-debug-ota [SKIP]
Environment sonoff-debug [SKIP]
Environment sonoff-debug-ota [SKIP]
Environment sonoff-pow-debug [SKIP]
Environment sonoff-pow-debug-ota [SKIP]
Environment slampher-debug [SKIP]
Environment slampher-debug-ota [SKIP]
Environment s20-debug [SKIP]
Environment s20-debug-ota [SKIP]
Environment ac-device [SKIP]
Environment washer-device [SKIP]
Environment studio-lamp-device [SKIP]
Environment living-lamp-device [SKIP]
========================= [SUCCESS] Took 91.21 seconds =========================

1

2

3

4

5

6

7

8

9

10

11

12

13

14

15

16

17

18

19

20

21

22

23

Linking .pioenvs/node-debug/firmware.elf

Calculating size .pioenvs/node-debug/firmware.elf

text       data        bss        dec        hex    filename

377725      12108      31520     421353      66de9    .pioenvs/node-debug/firmware.elf

Building .pioenvs/node-debug/firmware.bin

========================= [SUCCESS] Took 91.20 seconds =========================

================================== [SUMMARY] ==================================

Environment node-debug              [SUCCESS]

Environment node-debug-ota          [SKIP]

Environment sonoff-debug            [SKIP]

Environment sonoff-debug-ota        [SKIP]

Environment sonoff-pow-debug        [SKIP]

Environment sonoff-pow-debug-ota    [SKIP]

Environment slampher-debug          [SKIP]

Environment slampher-debug-ota      [SKIP]

Environment s20-debug               [SKIP]

Environment s20-debug-ota           [SKIP]

Environment ac-device               [SKIP]

Environment washer-device           [SKIP]

Environment studio-lamp-device      [SKIP]

Environment living-lamp-device      [SKIP]

========================= [SUCCESS] Took 91.21 seconds =========================

So I find the command line option much more easy and straightforward.

Build ESPurna for Sonoff POW

However, we are not using NodeMCU board here, but Sonoff POW, and there are two environments defined just for that:

  • sonoff-pow-debug – Build firmware to flash over serial
  • sonoff-pow-debug-ota – Build OTA firmware to upgrade the firmware over the network

The parameters for each environment are all defined in platformio.ini. First we need to build sonoff-pow-debug environment:

1

pio run -e sonoff-power-debug

But it failed with an error message related to hlw8012 library:

Compiling .pioenvs/sonoff-pow-debug/FrameworkArduino/Stream.o

/media/hdd/edev/esp8266/sonoff/espurna/code/src/pow.ino:13:21: fatal error: HLW8012.h: No such file or directory

#include <HLW8012.h>

^

compilation terminated.

I reported the issue on Bitbucket, but the main developer could not reproduce the issue. Eventually I found out that it could be a PlatformIO bug, as the system does not recursively checking for includes outside of main.ino. So I added <hlw8012.h> in the main.ino as follows:

#include <Arduino.h>

#include “config/all.h”

#ifdef SONOFF_POW

#include <HLW8012.h>

#endif

and the build could complete:

….

Linking .pioenvs/sonoff-pow-debug/firmware.elf
Calculating size .pioenvs/sonoff-pow-debug/firmware.elf
text data bss dec hex filename
347600 10284 31296 389180 5f03c .pioenvs/sonoff-pow-debug/firmware.elf
Building .pioenvs/sonoff-pow-debug/firmware.bin
========================= [SUCCESS] Took 3.49 seconds =========================

================================== [SUMMARY] ==================================
Environment node-debug [SKIP]
Environment node-debug-ota [SKIP]
Environment sonoff-debug [SKIP]
Environment sonoff-debug-ota [SKIP]
Environment sonoff-pow-debug [SUCCESS]
Environment sonoff-pow-debug-ota [SKIP]
Environment slampher-debug [SKIP]
Environment slampher-debug-ota [SKIP]
Environment s20-debug [SKIP]
Environment s20-debug-ota [SKIP]
Environment ac-device [SKIP]
Environment washer-device [SKIP]
Environment studio-lamp-device [SKIP]
Environment living-lamp-device [SKIP]
========================= [SUCCESS] Took 3.49 seconds =========================

1

2

3

4

5

6

7

8

9

10

11

12

13

14

15

16

17

18

19

20

21

22

23

24

25

26

27

28

pio run -e sonoff-power-debug

[Sat Dec  3 10:27:22 2016] Processing sonoff-pow-debug (build_flags: -g -Wl,-Tesp8266.flash.1m256.ld -DDEBUG_PORT=Serial -DSONOFF_POW, lib_deps: DHT sensor library, Adafruit Unified Sensor, Time, ArduinoJson, ESPAsyncTCP, ESPAsyncWebServer, AsyncMqttClient, ESPAsyncUDP, Embedis, NtpClientLib, OneWire, DallasTemperature, https://bitbucket.org/xoseperez/justwifi.git, https://bitbucket.org/xoseperez/nofuss.git, https://bitbucket.org/xoseperez/hlw8012.git, https://bitbucket.org/xoseperez/emonliteesp.git, https://bitbucket.org/xoseperez/fauxmoESP.git, https://github.com/jccprj/RemoteSwitch-arduino-library, lib_ignore: FauxmoESP, ESPAsyncUDP, platform: espressif8266, board: esp01_1m, framework: arduino, extra_script: pio_hooks.py)

....

Linking .pioenvs/sonoff-pow-debug/firmware.elf

Calculating size .pioenvs/sonoff-pow-debug/firmware.elf

text       data        bss        dec        hex    filename

347600      10284      31296     389180      5f03c    .pioenvs/sonoff-pow-debug/firmware.elf

Building .pioenvs/sonoff-pow-debug/firmware.bin

========================= [SUCCESS] Took 3.49 seconds =========================

================================== [SUMMARY] ==================================

Environment node-debug              [SKIP]

Environment node-debug-ota          [SKIP]

Environment sonoff-debug            [SKIP]

Environment sonoff-debug-ota        [SKIP]

Environment sonoff-pow-debug        [SUCCESS]

Environment sonoff-pow-debug-ota    [SKIP]

Environment slampher-debug          [SKIP]

Environment slampher-debug-ota      [SKIP]

Environment s20-debug               [SKIP]

Environment s20-debug-ota           [SKIP]

Environment ac-device               [SKIP]

Environment washer-device           [SKIP]

Environment studio-lamp-device      [SKIP]

Environment living-lamp-device      [SKIP]

========================= [SUCCESS] Took 3.49 seconds =========================

Since we’ve already changed the code, you may also consider changing “#define ADMIN_PASS  fibonacci” in code/src/config/general.h to use a different default password. The password can also be changed in the web interface, but this makes sure you won’t have a device somewhere with the default password common to most users.

Flashing Firmware to Sonoff POW

Now that we’ve made sure the firmware could build, it’s time to flash it to the device.

First we need to setup some udev rules to allow flashing over serial:

sudo wget https://raw.githubusercontent.com/platformio/platformio/develop/scripts/99-platformio-udev.rules -O /etc/udev/rules.d/99-platformio-udev.rules

sudo service udev restart

Now connect the USB to TTL to a USB port on your computer, press the button (connected to GPIO0) on Sonoff POW for several seconds until both LEDs are off to make sure you are in bootloader mode, and start flashing with:

[Sat Dec 3 11:42:13 2016] Processing sonoff-pow-debug (build_flags: -g -Wl,-Tesp8266.flash.1m256.ld -DDEBUG_PORT=Serial -DSONOFF_POW, lib_deps: DHT sensor library, Adafruit Unified Sensor, Time, ArduinoJson, ESPAsyncTCP, ESPAsyncWebServer, AsyncMqttClient, ESPAsyncUDP, Embedis, NtpClientLib, OneWire, DallasTemperature, https://bitbucket.org/xoseperez/justwifi.git, https://bitbucket.org/xoseperez/nofuss.git, https://bitbucket.org/xoseperez/hlw8012.git, https://bitbucket.org/xoseperez/emonliteesp.git, https://bitbucket.org/xoseperez/fauxmoESP.git, https://github.com/jccprj/RemoteSwitch-arduino-library, lib_ignore: FauxmoESP, ESPAsyncUDP, platform: espressif8266, board: esp01_1m, framework: arduino, extra_script: pio_hooks.py)
——————————————————————————–
Verbose mode can be enabled via `-v, –verbose` option
Converting main.ino
Collected 41 compatible libraries
Looking for dependencies…
Library Dependency Graph
|– <DHT sensor library> v1.3.0
| |– <Adafruit Unified Sensor> v1.0.2
| | |– <WProgram>
| |– <WProgram>
|– <Adafruit Unified Sensor> v1.0.2
| |– <WProgram>
|– <Time> v1.5
| |– <WProgram>
|– <ArduinoJson> v5.7.2
|– <ESPAsyncTCP> v1.0.0
|– <ESPAsyncWebServer>
| |– <ESPAsyncTCP> v1.0.0
| |– <ArduinoJson> v5.7.2
| |– <ESP8266WiFi> v1.0
| |– <Hash> v1.0
|– <AsyncMqttClient> v0.5.0
| |– <ESPAsyncTCP> v1.0.0
|– <Embedis> v1.2.0
|– <NtpClientLib>
| |– <WProgram>
| |– <Time> v1.5
| | |– <WProgram>
| |– <ESP8266WiFi> v1.0
|– <OneWire> v2.3.2
| |– <WProgram>
|– <DallasTemperature> v3.7.7
| |– <OneWire> v2.3.2
| | |– <WProgram>
|– <Hash> v1.0
|– <JustWifi> v1.1.0
| |– <ESP8266WiFi> v1.0
|– <ESP8266WiFi> v1.0
|– <ESP8266mDNS>
| |– <ESP8266WiFi> v1.0
|– <HLW8012> v0.1.0
|– <DebounceEvent>
|– <EEPROM> v1.0
|– <ArduinoOTA> v1.0
| |– <ESP8266WiFi> v1.0
| |– <ESP8266mDNS>
| | |– <ESP8266WiFi> v1.0
Compiling .pioenvs/sonoff-pow-debug/src/main.ino.o
Looking for upload port…
Auto-detected: /dev/ttyUSB0
Uploading .pioenvs/sonoff-pow-debug/firmware.bin
Uploading 362032 bytes from .pioenvs/sonoff-pow-debug/firmware.bin to flash at 0x00000000
…………………………………………………………………….. [ 22% ]
…………………………………………………………………….. [ 45% ]
…………………………………………………………………….. [ 67% ]
…………………………………………………………………….. [ 90% ]
……………………………. [ 100% ]
========================= [SUCCESS] Took 41.19 seconds =========================

================================== [SUMMARY] ==================================
Environment node-debug [SKIP]
Environment node-debug-ota [SKIP]
Environment sonoff-debug [SKIP]
Environment sonoff-debug-ota [SKIP]
Environment sonoff-pow-debug [SUCCESS]
Environment sonoff-pow-debug-ota [SKIP]
Environment slampher-debug [SKIP]
Environment slampher-debug-ota [SKIP]
Environment s20-debug [SKIP]
Environment s20-debug-ota [SKIP]
Environment ac-device [SKIP]
Environment washer-device [SKIP]
Environment studio-lamp-device [SKIP]
Environment living-lamp-device [SKIP]
========================= [SUCCESS] Took 41.19 seconds =========================

1

2

3

4

5

6

7

8

9

10

11

12

13

14

15

16

17

18

19

20

21

22

23

24

25

26

27

28

29

30

31

32

33

34

35

36

37

38

39

40

41

42

43

44

45

46

47

48

49

50

51

52

53

54

55

56

57

58

59

60

61

62

63

64

65

66

67

68

69

70

71

72

73

74

75

76

77

78

pio run -t upload -e sonoff-pow-debug

[Sat Dec  3 11:42:13 2016] Processing sonoff-pow-debug (build_flags: -g -Wl,-Tesp8266.flash.1m256.ld -DDEBUG_PORT=Serial -DSONOFF_POW, lib_deps: DHT sensor library, Adafruit Unified Sensor, Time, ArduinoJson, ESPAsyncTCP, ESPAsyncWebServer, AsyncMqttClient, ESPAsyncUDP, Embedis, NtpClientLib, OneWire, DallasTemperature, https://bitbucket.org/xoseperez/justwifi.git, https://bitbucket.org/xoseperez/nofuss.git, https://bitbucket.org/xoseperez/hlw8012.git, https://bitbucket.org/xoseperez/emonliteesp.git, https://bitbucket.org/xoseperez/fauxmoESP.git, https://github.com/jccprj/RemoteSwitch-arduino-library, lib_ignore: FauxmoESP, ESPAsyncUDP, platform: espressif8266, board: esp01_1m, framework: arduino, extra_script: pio_hooks.py)

Verbose mode can be enabled via `-v, verbose` option

Converting main.ino

Collected 41 compatible libraries

Looking for dependencies...

Library Dependency Graph

| <DHT sensor library> v1.3.0

|   | <Adafruit Unified Sensor> v1.0.2

|   |   | <WProgram>

|   | <WProgram>

| <Adafruit Unified Sensor> v1.0.2

|   | <WProgram>

| <Time> v1.5

|   | <WProgram>

| <ArduinoJson> v5.7.2

| <ESPAsyncTCP> v1.0.0

| <ESPAsyncWebServer>

|   | <ESPAsyncTCP> v1.0.0

|   | <ArduinoJson> v5.7.2

|   | <ESP8266WiFi> v1.0

|   | <Hash> v1.0

| <AsyncMqttClient> v0.5.0

|   | <ESPAsyncTCP> v1.0.0

| <Embedis> v1.2.0

| <NtpClientLib>

|   | <WProgram>

|   | <Time> v1.5

|   |   | <WProgram>

|   | <ESP8266WiFi> v1.0

| <OneWire> v2.3.2

|   | <WProgram>

| <DallasTemperature> v3.7.7

|   | <OneWire> v2.3.2

|   |   | <WProgram>

| <Hash> v1.0

| <JustWifi> v1.1.0

|   | <ESP8266WiFi> v1.0

| <ESP8266WiFi> v1.0

| <ESP8266mDNS>

|   | <ESP8266WiFi> v1.0

| <HLW8012> v0.1.0

| <DebounceEvent>

| <EEPROM> v1.0

| <ArduinoOTA> v1.0

|   | <ESP8266WiFi> v1.0

|   | <ESP8266mDNS>

|   |   | <ESP8266WiFi> v1.0

Compiling .pioenvs/sonoff-pow-debug/src/main.ino.o

Looking for upload port...

Auto-detected: /dev/ttyUSB0

Uploading .pioenvs/sonoff-pow-debug/firmware.bin

Uploading 362032 bytes from .pioenvs/sonoff-pow-debug/firmware.bin to flash at 0x00000000

................................................................................ [ 22% ]

................................................................................ [ 45% ]

................................................................................ [ 67% ]

................................................................................ [ 90% ]

..................................                                               [ 100% ]

========================= [SUCCESS] Took 41.19 seconds =========================

================================== [SUMMARY] ==================================

Environment node-debug              [SKIP]

Environment node-debug-ota          [SKIP]

Environment sonoff-debug            [SKIP]

Environment sonoff-debug-ota        [SKIP]

Environment sonoff-pow-debug        [SUCCESS]

Environment sonoff-pow-debug-ota    [SKIP]

Environment slampher-debug          [SKIP]

Environment slampher-debug-ota      [SKIP]

Environment s20-debug               [SKIP]

Environment s20-debug-ota           [SKIP]

Environment ac-device               [SKIP]

Environment washer-device           [SKIP]

Environment studio-lamp-device      [SKIP]

Environment living-lamp-device      [SKIP]

========================= [SUCCESS] Took 41.19 seconds =========================

Success! Great. If you have your own firmware to flash it may be useful to know the actual command used to flash the firmware was:

1

esptool -vv -cd ck -cb 115200 -cp “/dev/ttyUSB0″ -cf .pioenvs/sonoff-pow-debug/firmware.bin

Building and Flashing the ESPurna filesystem

Wait! We’ve just flashed the firmware, isn’t it all? Nope, as the webserver files are stored in another partitions, and compressed in a single index.html.gz file for better performance. The exact reasons why are further explained here.

We’ll need Node.js and gulp command line client:

sudo apt install npm nodejs nodejs-legacy

sudo npm install npm@latest -g

sudo npm install global gulp-cli

Now inside espurna/code folder , we can check if building the file systems works with two commands:

npm install

gulp

Here my successful gulp attempt:

1

2

3

4

5

6

7

8

9

10

11

[17:18:02] Using gulpfile ~/edev/espurna/code/gulpfile.js

[17:18:02] Starting ‘clean’...

[17:18:02] Finished ‘clean’ after 4.83 ms

[17:18:02] Starting ‘files’...

[17:18:02] Starting ‘inline’...

[17:18:06] Finished ‘files’ after 3.59 s

[17:18:06] Finished ‘inline’ after 3.59 s

[17:18:06] Starting ‘buildfs’...

[17:18:06] Finished ‘buildfs’ after 151 μs

[17:18:06] Starting ‘default’...

[17:18:06] Finished ‘default’ after 22 μs

Finally, we can run the following (which also runs the two commands above) to flash the file system to the board, after entering bootloader mode by pressing the button:

[Sat Dec 3 12:12:07 2016] Processing sonoff-pow-debug (build_flags: -g -Wl,-Tesp8266.flash.1m256.ld -DDEBUG_PORT=Serial -DSONOFF_POW, lib_deps: DHT sensor library, Adafruit Unified Sensor, Time, ArduinoJson, ESPAsyncTCP, ESPAsyncWebServer, AsyncMqttClient, ESPAsyncUDP, Embedis, NtpClientLib, OneWire, DallasTemperature, https://bitbucket.org/xoseperez/justwifi.git, https://bitbucket.org/xoseperez/nofuss.git, https://bitbucket.org/xoseperez/hlw8012.git, https://bitbucket.org/xoseperez/emonliteesp.git, https://bitbucket.org/xoseperez/fauxmoESP.git, https://github.com/jccprj/RemoteSwitch-arduino-library, lib_ignore: FauxmoESP, ESPAsyncUDP, platform: espressif8266, board: esp01_1m, framework: arduino, extra_script: pio_hooks.py)
——————————————————————————–
Verbose mode can be enabled via `-v, –verbose` option
before_build_spiffs([“.pioenvs/sonoff-pow-debug/spiffs.bin”], [“data”])
gulp buildfs
[12:12:07] Using gulpfile /media/hdd/edev/esp8266/sonoff/espurna/code/gulpfile.js
[12:12:07] Starting ‘clean’…
[12:12:08] Finished ‘clean’ after 4.5 ms
[12:12:08] Starting ‘files’…
[12:12:08] Starting ‘inline’…
[12:12:10] Finished ‘files’ after 2.98 s
[12:12:10] Finished ‘inline’ after 2.98 s
[12:12:10] Starting ‘buildfs’…
[12:12:10] Finished ‘buildfs’ after 94 μs
Building SPIFFS image from ‘data’ directory to .pioenvs/sonoff-pow-debug/spiffs.bin
/index.html.gz
/images/check.png
/favicon.ico
/fsversion
Looking for upload port…
Auto-detected: /dev/ttyUSB0
Uploading .pioenvs/sonoff-pow-debug/spiffs.bin
Uploading 262144 bytes from .pioenvs/sonoff-pow-debug/spiffs.bin to flash at 0x000BB000
…………………………………………………………………….. [ 31% ]
…………………………………………………………………….. [ 62% ]
…………………………………………………………………….. [ 93% ]
……………. [ 100% ]
========================= [SUCCESS] Took 31.08 seconds =========================

================================== [SUMMARY] ==================================
Environment node-debug [SKIP]
Environment node-debug-ota [SKIP]
Environment sonoff-debug [SKIP]
Environment sonoff-debug-ota [SKIP]
Environment sonoff-pow-debug [SUCCESS]
Environment sonoff-pow-debug-ota [SKIP]
Environment slampher-debug [SKIP]
Environment slampher-debug-ota [SKIP]
Environment s20-debug [SKIP]
Environment s20-debug-ota [SKIP]
Environment ac-device [SKIP]
Environment washer-device [SKIP]
Environment studio-lamp-device [SKIP]
Environment living-lamp-device [SKIP]
========================= [SUCCESS] Took 31.08 seconds =========================

1

2

3

4

5

6

7

8

9

10

11

12

13

14

15

16

17

18

19

20

21

22

23

24

25

26

27

28

29

30

31

32

33

34

35

36

37

38

39

40

41

42

43

44

45

46

47

pio run -t uploadfs -e sonoff-pow-debug

[Sat Dec  3 12:12:07 2016] Processing sonoff-pow-debug (build_flags: -g -Wl,-Tesp8266.flash.1m256.ld -DDEBUG_PORT=Serial -DSONOFF_POW, lib_deps: DHT sensor library, Adafruit Unified Sensor, Time, ArduinoJson, ESPAsyncTCP, ESPAsyncWebServer, AsyncMqttClient, ESPAsyncUDP, Embedis, NtpClientLib, OneWire, DallasTemperature, https://bitbucket.org/xoseperez/justwifi.git, https://bitbucket.org/xoseperez/nofuss.git, https://bitbucket.org/xoseperez/hlw8012.git, https://bitbucket.org/xoseperez/emonliteesp.git, https://bitbucket.org/xoseperez/fauxmoESP.git, https://github.com/jccprj/RemoteSwitch-arduino-library, lib_ignore: FauxmoESP, ESPAsyncUDP, platform: espressif8266, board: esp01_1m, framework: arduino, extra_script: pio_hooks.py)

Verbose mode can be enabled via `-v, verbose` option

before_build_spiffs([“.pioenvs/sonoff-pow-debug/spiffs.bin”], [“data”])

gulp buildfs

[12:12:07] Using gulpfile /media/hdd/edev/esp8266/sonoff/espurna/code/gulpfile.js

[12:12:07] Starting ‘clean’...

[12:12:08] Finished ‘clean’ after 4.5 ms

[12:12:08] Starting ‘files’...

[12:12:08] Starting ‘inline’...

[12:12:10] Finished ‘files’ after 2.98 s

[12:12:10] Finished ‘inline’ after 2.98 s

[12:12:10] Starting ‘buildfs’...

[12:12:10] Finished ‘buildfs’ after 94 μs

Building SPIFFS image from ‘data’ directory to .pioenvs/sonoff-pow-debug/spiffs.bin

/index.html.gz

/images/check.png

/favicon.ico

/fsversion

Looking for upload port...

Auto-detected: /dev/ttyUSB0

Uploading .pioenvs/sonoff-pow-debug/spiffs.bin

Uploading 262144 bytes from .pioenvs/sonoff-pow-debug/spiffs.bin to flash at 0x000BB000

................................................................................ [ 31% ]

................................................................................ [ 62% ]

................................................................................ [ 93% ]

................                                                                 [ 100% ]

========================= [SUCCESS] Took 31.08 seconds =========================

================================== [SUMMARY] ==================================

Environment node-debug              [SKIP]

Environment node-debug-ota          [SKIP]

Environment sonoff-debug            [SKIP]

Environment sonoff-debug-ota        [SKIP]

Environment sonoff-pow-debug        [SUCCESS]

Environment sonoff-pow-debug-ota    [SKIP]

Environment slampher-debug          [SKIP]

Environment slampher-debug-ota      [SKIP]

Environment s20-debug               [SKIP]

Environment s20-debug-ota           [SKIP]

Environment ac-device               [SKIP]

Environment washer-device           [SKIP]

Environment studio-lamp-device      [SKIP]

Environment living-lamp-device      [SKIP]

========================= [SUCCESS] Took 31.08 seconds =========================

Now that’s done.

A Quick look at ESPurna Web Interface

ESPurna firmware and filesystem has now been flashed to Sonoff POW. But does it work?

Click to Enlarge

Click to Enlarge

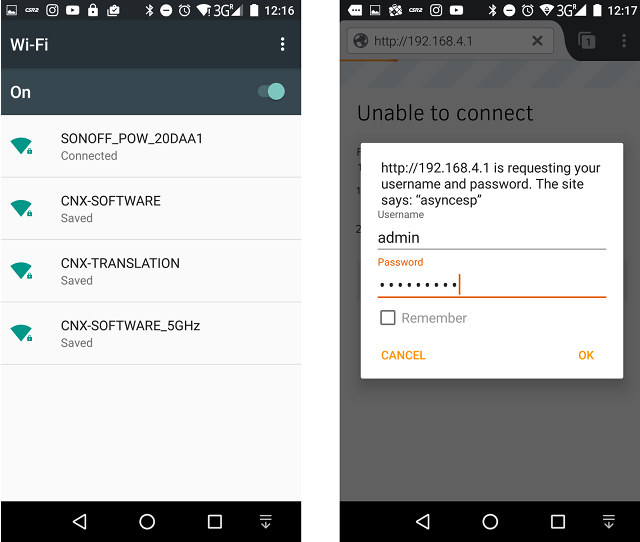
I can see a new SONOFF_POW_XXXXX access point, so that does look good. I can connect using the default password “fibonacci”, then go to my web browser to access http://192.168.4.1, and login again with admin/fibonacci credentials.

Click to Enlarge

Click to Enlarge

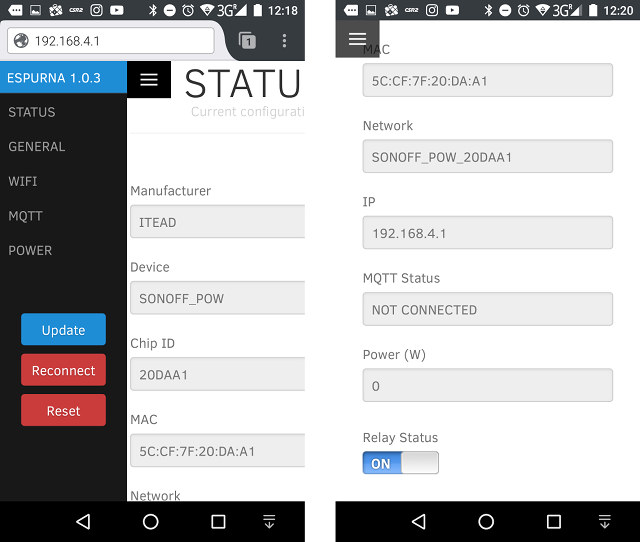
ESPURNA 1.03 interface goes to the status menu first, and there I can turn on and off the relay remotely, and check the power consumption in watts, which remains at 0 watt since I have not connected it to the mains yet. It’s also possible to turn the relay on and off with the button, and there an option to select whether to turn on or off the relay at boot time, which is great since I need it on at all times.

The web interface also allows you to change general parameters including the hostname and password, as well as enable or disable the HTTP API (disabled by default). The WiFi section is used to connect to up to 3 wireless routers, the MQTT section lets you configure an MQTT (Mosquito) broker, and the power section is used to calibrate the power monitoring device.

If you just intend to check the current power consumption and turn on and off the switch with your phone, you don’t have to do anything else. But I’d like to find some ways to draw daily, weekly, monthly charts of my office power consumption using either MQTT or the HTTP API. I’ll have to study how to do that, and that will hopefully be the topic of my next post about Sonoff POW.

Sonoff POW can be purchased on ITEAD Studio for $10.50 plus shipping, but is currently out of stock with the company manufacturing a third batch soon.

Tweet ITEAD Studio Sonoff family is comprised of various inexpensive ESP8266 WiFi power switch, and the company sent me two of their latest CE certified models with Sonoff TH16 +…
Hisense A2 Android Smartphone Coming Soon with AMOLED and E-Ink displays

$
0
0
Home > Android, Hardware, Qualcomm Snapdragon > Hisense A2 Android Smartphone Coming Soon with AMOLED and E-Ink displays

Hisense A2 Android Smartphone Coming Soon with AMOLED and E-Ink displays

Yotaphone popularized dual display smartphones with your standard color display on the front panel complemented with an always-on E-Ink display on the rear panel that consumes less power, and even shows the latest screen update (e.g. your plane ticket) when the battery is depleted. The latest model – Yotaphone 2 – was launched in 2014, but for whatever there has not been an update since,  and companies appear to be clearing their stock with for example GearBest selling it for $119.99 shipped. However, even if the company never produces a Yotaphone 3, other have reproduced the design with the latest being Hisense A2 samrtphone whose specs have recently been published on TENAA (China equivalent of the FCC).

hisense-a2Preliminary specifications for Hisense A2 smartphone:

  • SoC – Qualcomm Snapdragon 430 octa-core processor @ 1.4 GHz with Adreno 505 GPU
  • System Memory – 4GB LPDDR3
  • Storage – 64GB internal storage + micro SD slot
  • Displays
    • Front – 5.5″ AMOLED capacitive touchscreen display with Full HD (1920×1080) resolution
    • Rear – 5.17″ E-Ink capacitive touchscreen display with qHD (960×540) resolution
  • Cameras – 16MP rear camera with LED flash; 5MP front-facing camera
  • Cellular Connectivity – GSM, CDMA, TD-SCDMA, TD-LTE, LTE FDD, WCDMA, CDMA 2000; dual SIM dual standby
  • Wireless Connectivity – WiFi, Bluetooth, and GPS
  • USB – 1x micro USB 2.0 port
  • Battery – 3,000 mAh
  • Dimensions – 157.25 x 76.8 x 8.4 mm
  • Weight – 190 grams

The phone runs Android 6.0.1 with some custom skins. Since it has passed TENAA certifications should be launched very soon in China.

Via Liliputing, PhoneRadar

Tweet Yotaphone popularized dual display smartphones with your standard color display on the front panel complemented with an always-on E-Ink display on the rear panel that consumes less power, and…

Firefly-RK3399 Rockchip RK3399 Development Board Launched on Kickstarter for $139 and Up

$
0
0

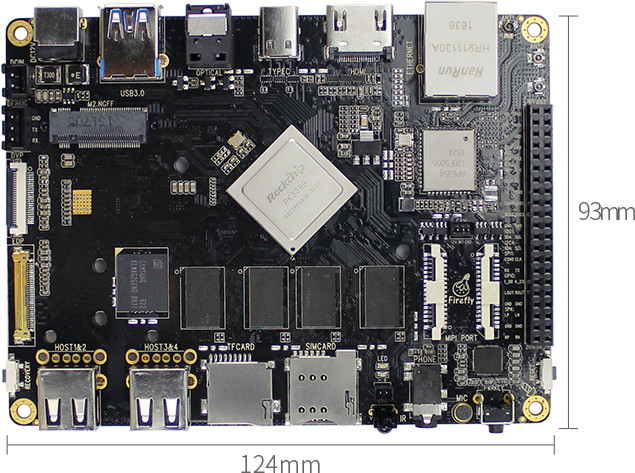
Firefly-RK3399 is the first, and for now the only one, development board equipped with the latest Rockchip RK3399 hexa-core Cortex A72 & A53 processor. It’s just not available yet, but the board has now been launched on Kickstarter where it is offered for $139 to $199 depending on options.

rk3399-development-board

Firefly-RK3399 board specifications:
  • SoC – Rockchip RK3399 hexa-core big.LITTLE processor with dual core ARM Cortex A72 up to 2.0 GHz and quad core Cortex A53 processor with ARM Mali-T860 MP4 GPU with OpenGL 1.1 to 3.1 support, OpenVG1.1, OpenCL and DX 11 support
  • System Memory
    • Standard – 2 GB DDR3
    • Plus devkit – 4 GB DDR3
  • Storage
    • Standard – 16 GB eMMC flash, micro SD card, M.2 socket
    • Plus devkit – 32 GB eMMC flash, micro SD card, M.2 socket
  • Video Output & Display Interfaces
    • 1x HDMI 2.0 up to 4K @ 60 Hz
    • 1x DisplayPort (DP) 1.2 interface up to 4K @ 60Hz (via USB type C connector)
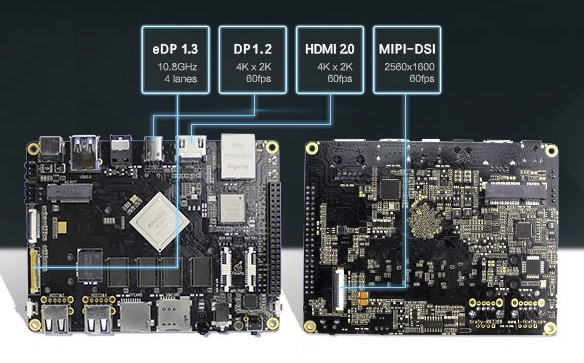
    • 1x eDP 1.3 (4-lanes @ 10.8 Gbps)
    • 1x MIPI DSI interface up to 2560×1600 @ 60 Hz
  • Video Decode – 4K VP9 and 10-bit H.265 video codec support up to 60 fps
  • Audio
    • Via HDMI or DisplayPort
    • 3.5mm headphone jack with stereo audio output and mic input
    • optical S/PDIF
    • 1x LINE Out and 1x speaker via GPIO header; Speaker: 1.5W or 2.5 W per channel for respectively 8Ω or 4Ω speakers
    • Built-in microphone
    • I2S output and input interface up to 8 channels
  • Connectivity – Gigabit Ethernet (RJ45) port using RTL8211E transceiver, WiFi 802.11ac 2×2 MIMO and Bluetooth 4.1 (AP6354 module)
  • USB – 2x USB 2.0 host ports, 1x USB 3.0 port, 1x USB 3.0 type C port
  • Camera
    • 2x MIPI CSI interfaces up to 13MP or 2x 8MP
    • 1x DVP camera interface up to 5MP
  • Debugging – 3-pin serial header
  • Expansion
    • 42-pin GPIO female header with access to 1x I2S, 2x ADC, 2x I2C, 1x SPI, 2x GPIO, 1x LINEOUT, 1x SPEAKER
    • 1x mini PCIe for LTE, 1x PCIe 2.1 M.2 slot B-key (2x PCIe, SATA, USB 2.0, USB 3.0, HSIC, SSIC, Audio, UIM, I2C)
    • SIM card slot
  • Misc – RTC battery header; power & user LEDs; power, reset and recovery buttons; IR receiver
  • Power Supply – 12V/2A DC (5.5×2.1mm barrel connector)
  • Dimensions – 12.4 x 9.3 mm (8-layer PCB)
  • Weight – Board: 89 grams; board + cooling fan and heatsink: 120 grams

The company will provide Android 6.0.1 and Ubuntu 16.04 firmware images for the board, including a dual boot image. There are also work-in-progress documentation and placeholder links to Android SDK and schematics in the product page which will hopefully soon link to the actual documents and files, as well as a work-in-progress Wiki. It may also be worth monitoring the company’s  Github account.

firefly-rk3399-boardThe company aims to raise $50,000 from the crowdfunding campaign, and you’d have to pledge $139 to get “Firefly-RK3399 Development Kit” with 2GB RAM, and 16GB flash together with a 12V/2A power adapter, a USB Type C adapter, a USB to UART serial board, a USB cable, and a a cooling fan (I assume with an heatsink). After the 50 first pieces, the price goes up to $159, and if you want the “Plus development kit” with 4GB RAM and 32GB flash, you’d need to pledge $199 instead. Shipping adds $5 to $30 depending on the destination country, and delivery is planned for March 2017.

Tweet Firefly-RK3399 is the first, and for now the only one, development board equipped with the latest Rockchip RK3399 hexa-core Cortex A72 & A53 processor. It’s just not available yet,…

Full Specifications for Intel Apollo Lake NUC Mini PC’s NUC6CAYB Board Released

$
0
0

Intel unveiled Intel NUC6CAYS & NUC6CAYH NUCs to be powered by Intel Celeron “Apollo Lake” Jxxx processors, but at the time we did not have the full technical specifications. The company has now published a 66-page technical product specification for NUC6CAYB board used in both mini PCs.

intel-apollo-lake-nuc-connectorsIntel NUC Board NUC6CAYB specifications:
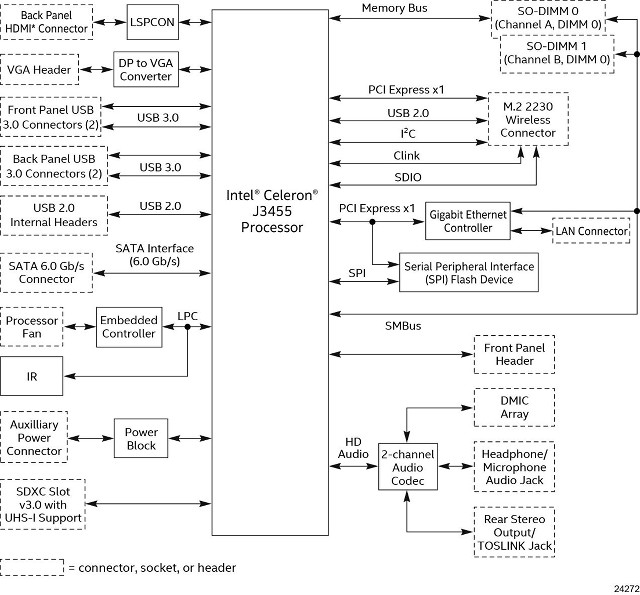
  • SoC – Intel Celeron J3455 quad core processor @ 1.5 GHz to 2.3 GHz (burst) with 12EU Intel HD graphics 500 @ 250 to 700 MHz supporting DirectX 9.3/10/11.1/12, OpenCL 1.2, OGLES 3.0, OpenGL 4.3 (10W TDP)
  • System Memory – 2x DDR3L-1600/1833 SO-DIMM supporting up to 8GB DDR3L-1866 in total
  • Storage – 32GB eMMC flash (Sandisk, Hynix or Samsung depending on your luck), 2.5″ SATA3 bay for hard drives up to 9.5mm thick, SDXC slot with UHS-I support
  • Video Output –
    • HDMI 2.0 (4K @ 60 Hz) with HDMI CEC via MegaChips MCDP2800-BCT DisplayPort 1.2a to HDMI 2.0 Level
      Shifter/Protocol Converter
    • VGA via ITE IT6516BFN DisplayPort to VGA bridge
  • Audio – Up to 7.1 channels via HDMI, 3.5mm headset jack, 3.5mm rear speaker/TOSLINK combo jack; digital microphone (DMIC) array; Realtek ALC283 HD Audio codec
  • Video Capabilities
    • Video Decode – H.265/HEVC @ Level 5.1, H.264 @ Level 5.2, MPEG2, MVC, VC-1, WMV9, JPEG, VP8 and VP9 formats
    • Video Encode – H.265/HEVC @ Level 4, H.264 @ Level 5.2, JPEG, MVC, VP8 and VP9 formats
    • Content Protection – High-Bandwidth Digital Content Protection (HDCP) 1.4/2.0 and PAVP 2.0.
  • Connectivity – Gigabit Ethernet (Realtek RTL8111HN), Intel Wireless AC-3168 M.2 module for 802.11ac 1×1 WiFi up to 433 Mbps and Bluetooth 4.2 with internal antennas
  • USB – 2x USB 3.0 ports on the front panel (yellow one for charging other devices even when the NUC is powered off), 2x rear USB 3.0 ports, 2x internal USB 2.0 ports via header; 1x USB port reversed for M.2 2230 type E module
  • Expansion – 1x M.2 Module supporting M.2 2230 cards (key type E) (prepopulated with Intel Dual Band Wireless-AC 3168 module)
  • Misc – Consumer Infrared (CIR), Kensington key lock hole, hardware monitoring subsystem based on ITE IT8987D embedded controller (voltage, temperature, fan control)
  • Power Supply – 12 to 19V DC input
  • Dimensions – Board: 101.6 x 101.6mm; NUC: 151 x 111 x 51 (plastic casing with inner metal structure)
Intle Apollo Lake NUC Block Diagram - Click to Enlarge

Intle Apollo Lake NUC Block Diagram – Click to Enlarge

The board will be used in NUC6CAYH Kit with power adapter, no memory, no eMMC, no OS, as well as NUC6CAYS Kit with power adapter, preinstalled with 2GB 1600MHz SO-DIMM, and 32GB eMMC with Microsoft Windows 10 Home.

The specifications mention that Microsoft Windows 10 Home and Microsoft Windows 10 Pro operating systems are supports, and that “other operating system (OS) support may be available”. It’s very likely Linux be supported, and if you plan to run Linux the barebone kit is probably more suitable albeit you’ll lose the eMMC flash, and instead would have to install the OS on a SATA SSD or hard drive.

The other things that’s unclear right now are the price and availability for the new NUCs, but the wait should be almost over.

Via Liliputing and NUC Blog

Tweet Intel unveiled Intel NUC6CAYS & NUC6CAYH NUCs to be powered by Intel Celeron “Apollo Lake” Jxxx processors, but at the time we did not have the full technical specifications….

$46 TS100 Digital Programmable Soldering Iron is Controlled by STMicro STM32 MCU

$
0
0

I’m now using a $4 soldering iron which works most of the time for what I’m doing, but sometimes it does not seem to heat quite fast enough which may cause problems. I’m not soldering that often, so I did not think about getting a better one, but I’ve just come across an TS100 digital & programmable soldering iron with a OLED display showing the current temperature, and controlled by an STMicro STM32F103T8U6 micro-controller.

ts100-soldering-iron

The soldering iron also includes an accelerometer which allow the soldering iron to know when you are using it, so the temperature drops if it is inactive for over 5 minutes (sleep mode), and after 10 minutes of inactivity, the soldering iron automatically turns off.

TS100 soldering iron key specifications:
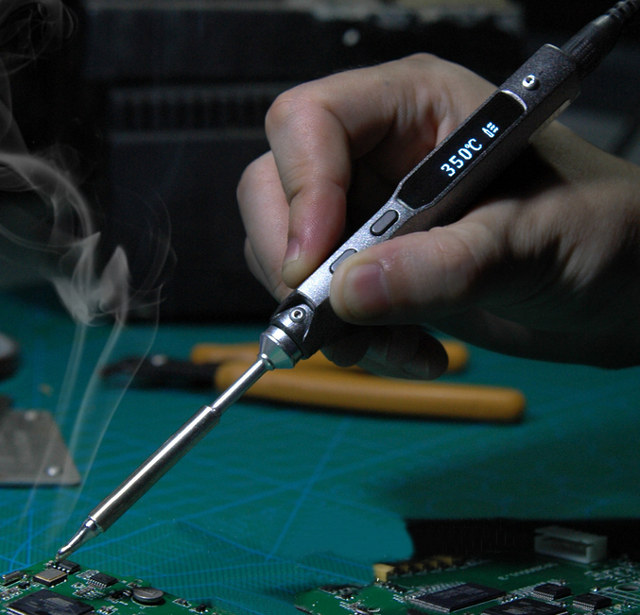
  • OLED Display
  • USB – 1x micro USB port for configuration
  • Temperature Range – 100 to 400 °C; 15 seconds to heat to 300 °C @ 19V; Sleep mode temp: 200 °C (default)
  • Power – 65 Watts (max @ 24V); 40W using 19V power supply
  • Supported Tips – TS-D24, TS-K, TS-BC2, TS-B2
  • Misc – 2x buttons to adjust temperature, calibrate temperature, and enter DFU (firmware update) mode
  • Power Supply – 12 to 24 V via DC5525 connector (an old laptop power supply will work provided it has a 5.5/2.5mm jack)
  • Dimensions – 96 x 16.5 Φ mm for operating unit, 72+33 mm x 5 mm Φ for heating unit
  • Weight – 33 grams

If you connect the TS100 to you computer via its USB port, you’ll be able to change config.txt to adjust default settings like temperature, temperature steps, sleep time, and so on, as well as change the boot logo, and update the firmware.

TS100 is also listed on Tindie where you’ll find a user’s manual, schematics, and source code for your STM32 soldering iron. The manufacturer also has a forum mostly in English, where people exchange ideas, and for example they released a firmware for left handed people.

I discovered the soldering iron thanks to a video by Andreas Spiess comparing irons of different price points: a 30-years old Weller Magmastat, Aoyue 968 A+, two cheaper soldering irons, namely 907 constant temperature soldering iron and Mustool MT223 not-so-adjustable temperature electric soldering iron, and of course TS100.
[embedded content]

For each soldering iron, he tested the actual power draw during heating, whether the set temperature (360°C) is the actual temperature, heating speed, heat transfer, and showing special features of each iron. The video is really interesting to watch, but if you don’t have time that’s the summary at the end.

soldering-iron-comparison-tableTS100 performed really well for the price, although there’s about a 30 °C delta between the set and real temperature. I really like small form factor, fast heating and automatic power off feature. I’m pretty sure it will solve the issue I had with my $4 iron, so I was convinced an bought TS100 on Banggood for $45.55. I’ll use a laptop power supply to power it up, but if you don’t have a spare one DSY404-19V-2 power supply is recommended, and sells for $22.02 on Banggood.

Thank you Nanik!

Tweet I’m now using a $4 soldering iron which works most of the time for what I’m doing, but sometimes it does not seem to heat quite fast enough which…

Hardkernel ODROID-VU8C is 8″ LCD Display and Case Kit for ODROID C1+ and C2 Boards

$
0
0

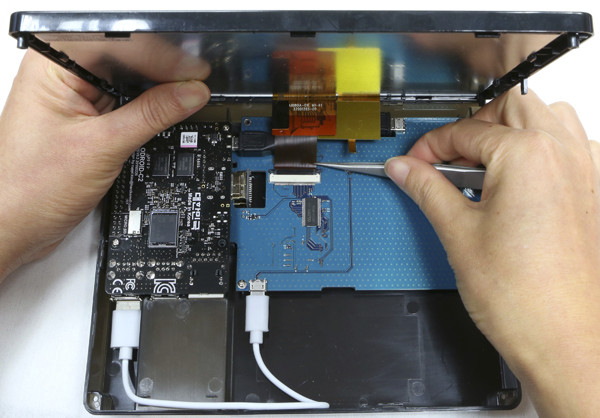
While it’s quite easy to find displays for development boards, they do not always come with a case, so you’d have to make your own. One easier option for the Raspberry Pi boards is the official Raspberry Pi 7″ LCD touch screen Display, plus RS Premium touchscreen case that selling for $132 in total including Raspberry Pi 3 board. But Hardkernel has now launched their own ODROID-VU8C 8″ Touch Display Shell Kit compatible with ODROID-C1+ and ODROID-C2 boards.

odroid-vu8cSpecifications and Kit Contents:

  • 8-inch TFT-LCD with 1024×768 resolution (4:3 ratio)
  • 10 finger capacitive touch input
  • Back-light brightness control with ODROID GPIO PWM
  • Viewing angle : Left 75, Right 75, Up 75, Down 75 degree
  • Screen Dimensions : 189 x 149 x 29 mm
  • Viewable screen size : 162 x121.5 mm (active area)
  • Power Supply – 5V/4A DC to power barrel (powering both the LCD and ODROID ARM Linux board)
  • Power consumption – 700mA/5Volt (Only LCD and display controller)
  • Plastic bottom case
  • DVI to LVDS Converter board
  • HDMI dual gender board
  • 8 x 3.5mm screws; 2port jumper cable
  • Cables – Micro-to-Micro USB Cable (approx. 8cm), Micro-to-TypeA USB Cable (approx. 20cm)

odroid-8-inch-display-assemblyYou’ll have to provide your own ODROID-C1+ or ODROID-C2 board, micro SD card or eMMC module, and assemble the kit. Bear in mind that after assembly, it’s not possible, or rather not convenient, to remove the micro SD card or eMMC module. It works with both Android and Linux operating system, but you’ll have to make sure you use a recent version of the firmware (Linux 3.10.80-128 or higher) and change boot.ini file to 1024×768 (60Hz) resolution (setenv m “1024x768p60hz”) and DVI mode (setenv vout_mode “dvi”). The hardware design is interesting as they’ve used a DVI to RGB converter and a RGB to LVDS converter, instead of just a DVI to LVDS converter, maybe because it’s hard to find?

ODROID-VU8C Block Diagram

ODROID-VU8C Block Diagram

If you still want to access the 40-pin GPIO header in the panel, you can do so easily through the “cutting line ”  on the case.

ODROID-VU8C sells for $90 on Hardkernel website, to which you’d need to add about $32/$40 for ODROID-C1+/C2 board, and shipping. If you’re based in North America, it will be better to purchase the kit from Ameridroid instead, Alternatively the company has other 5″ and 7″ display solutions for their board, but AFAIK there’s no specific case.

Tweet While it’s quite easy to find displays for development boards, they do not always come with a case, so you’d have to make your own. One easier option for…


First Intel Apollo Lake J3455/J4205 Processor Benchmarks & Video Tests

$
0
0

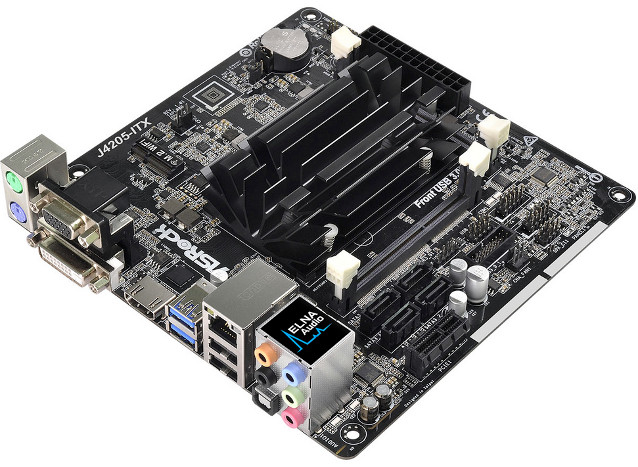
Many products powered by Intel Apollo Lake processors have already been announced, but few are actually shipping, and I have yet to get one here. However, AndroidPC.es got hold of ASRock J4205-ITX and J3455-ITX motherboards powered by respectively a Pentium J4205 quad core processor and a Celeron J3455 quad core processor, run a few benchmarks, and tested videos in Windows 10 on the motherboards with Kodi 17 and MPC-HC.

ASRock J4205-ITX Motherboard

ASRock J4205-ITX Motherboard

Let’s have a look at some of the benchmarks to better understand of what we can expect from Apollo Lake desktop processors.

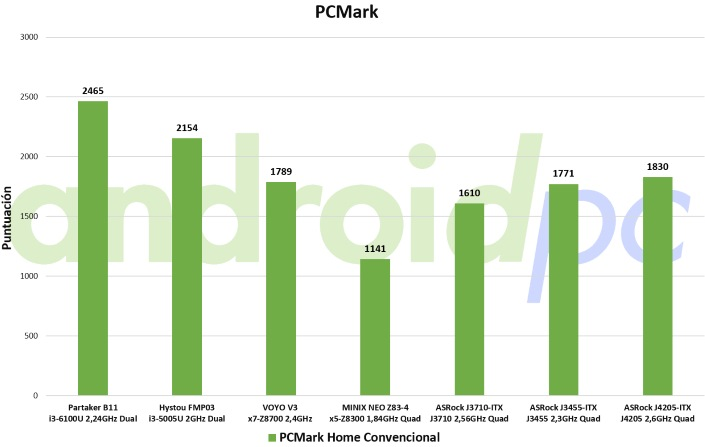
pcmark-apollo-lake-processorFirst there’s not that much of a difference between Celeron J3455 (1,771 points) and Pentium 4205 (1,830 points) in PCMark Home Convetional benchmark, however you should clearly feel a boost in performance compared to systems with Intel Cherry Trail x5-Z8300 processor (1,141), and the score is getting fairly close to a mini PC with an Intel Core i3-5005U dual core / four thread processor (15 Watt TDP).

apollo-lake-benchmark-3dmark

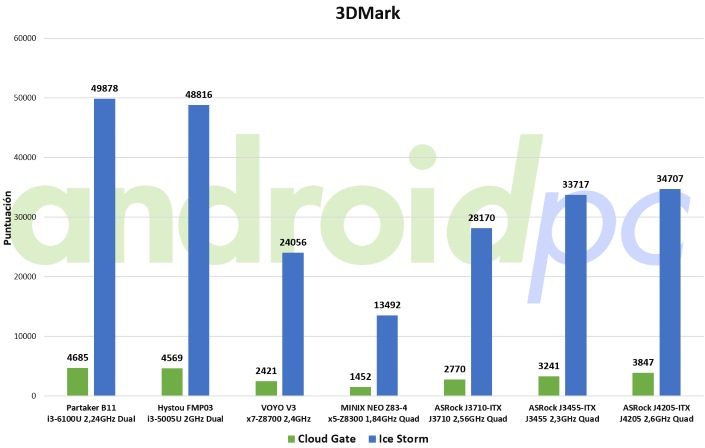
If we look at 3D graphics performance, there are even more contrasts between various machines / processors. There’s a really big leap between MINIX NEO Z83-4 with x5-Z8300 processor and both Apollo Lake motherboards (150 to 165% better 3D performance), but on the other hand there’s a noticeable gap (almost 50%) between Intel HD 5500 graphics found in Core-i3 processors and Intel HD 500/505 graphics used in J3455 and J4205 processors.

AndroidPC guys also ran other benchmarks such as Cinebench, games fps, and so on, and I invite you to read their review (in Spanish) if you want to find out more. However, since there was some confusion about 10-bit HEVC and VP9 support, it’s interesting to also check out the video test results.

1080p “standard”
MPC-HC KODI 17
MPEG2 / MP2 2.0 – 6.6Mbps OK OK
MPEG4 / MP3 2.0 – 7.6Mbps OK OK
H264 / AAC 2.0 – 7.2Mbps OK OK
VC1 / WMA3 2.0 – 8.6Mbps OK OK
VP8 / VORBIS 2.0 – 7.8Mbs OK OK
1080p  – Higher bitrate 
Birds – H264 / No audio – 40Mbps OK OK
Samsung Oceanic Life – H264 – AC3 2.0 – 40Mbps OK OK
4K Videos
Skyfall – H264 / AAC 2.0 – 10Mbps OK OK
Timelapse – H264 / AAC 2.0 – 43Mbps OK OK
H.265/VP9 Videos
Tears of steel – HEVC 8bit / AAC 2.0 – [email protected] – 17Mbps OK OK
Beauty – H265 – HEVC 8bit / No audio – [email protected] (recorded @ 120 fps) – 12Mbps Skipped frames OK
Samsung UHD Dubai – HEVC 10bit / AAC 2.0 – [email protected] – 51Mbps Skipped frames OK
Google test – VP9 Youtube OK OK

So all videos can play in Kodi 17 even 4K 10-bit H.265 videos and VP9 videos, however MPC-HC appears to have issues with some H.265 videos. Both ASRock motherboards support HDMI 2.0 with up to 4K @ 60 fps, but none of the 4K H.265 videos had a framerate over 30 fps, so this would have to be tested. HDMI audio pass-through was not so great, as it only worked for Dolby Digital 5.1, not but TrueHD or DTS HD, possibly because the boards are equipped with a DisplayPort to HDMI 2.0 converter which could introduce issues.

There are some Linux benchmarks (Phoronix) for ASRock J4205-ITX board, but currently limited to C-Ray.

Tweet Many products powered by Intel Apollo Lake processors have already been announced, but few are actually shipping, and I have yet to get one here. However, AndroidPC.es got hold…

Nordic Semi Unveils nRF52840 Bluetooth 5 Ready SoC and Development Kit

$
0
0

Nordic Semiconductor nRF52xx Bluetooth and 2.4 GHz solutions are very often found in development kits and low power devices such as wearables, and it’s no surprise that the company introduced a new nRF52840 SoC supporting Bluetooth 5, the new standard promising twice the range, and four times the speed of BLE 4.x, as well as ANT, 802.15.4, 2.4GHz proprietary, and NFC connectivity.

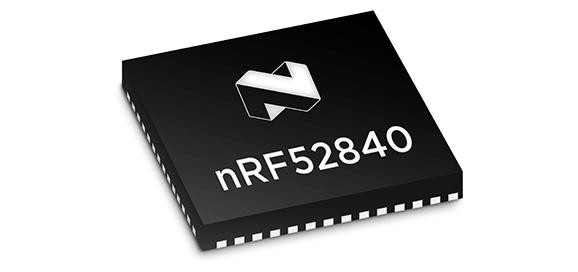
nrf52840Nordic Semi nRF52840 key features and specifications:

  • MCU – 32-bit ARM Cortex-M4 @ 64 MHz with with FPU
  • Memory & Storage – 256 KB RAM, 1MB Flash
  • Connectivity
    • Bluetooth 5-ready multiprotocol radio
    • Bluetooth 5 data rate support: 2 Mbps, 1 Mbps, 500 kbps, 125 kbps
    • 104 dB link budget for Bluetooth low energy
    • -96 dBm sensitivity for Bluetooth low energy
    • Programmable output power from +8 dBm to -20 dBm
    • NFC-A tag on chip
    • Single-ended antenna output (on-chip balun)
  • I/Os
    • USB – Full-speed 12 Mbps USB controller
    • SPI up to 32 MHz
    • Quad SPI up to 32 MHz
    • PPI — Programmable peripheral interface
    • EasyDMA
    • 12 bit/200 ksps ADC
  • Security – ARM Cryptocell CC310 cryptographic accelerator, 128 bit AES/ECB/CCM/AAR coprocessor
  • Power Supply –  1.7 V to 5.5 V; individual power management for all peripherals; regulated supply for external components up to 25 mA

nRF52840 is “on-air-compatible with nRF51, nRF24L and nRF24AP Series”, and target advanced wearables, IoT, and interactive entertainment devices (remote controls / controllers).

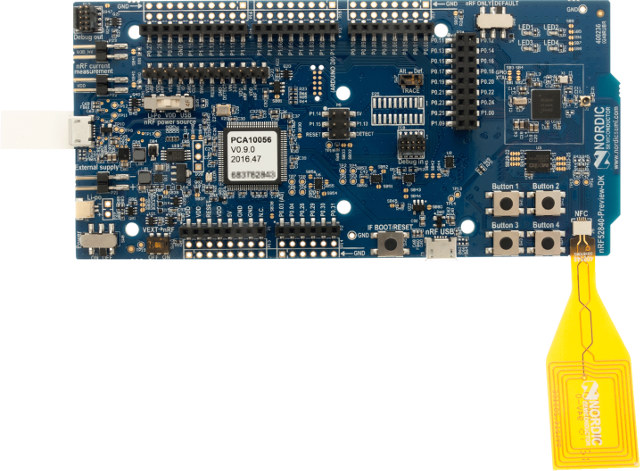
nRF52840 Preview Development Kit - Click to Enlarge

nRF52840 Preview Development Kit – Click to Enlarge

The company has also launched nRF52840 Preview Development Kit to get started with evaluation and development.  The development board is hardware compatible with Arduino Uno Rev. 3 to allow the use of common Arduino shields, and also includes 4 LEDs and 4 buttons, all programmable by the user. It supports Bluetooth 5, Bluetooth low energy, ANT, 802.15.4 and 2.4GHz proprietary using the latest S140 SoftDevice software stack, as well as NFC thanks to an external antenna included in the kit.  The kit is compatible with Nordic Software Development Toolchain using Keil, IAR and GCC, and can be programmed & debugging with Segger J-Link OB.

Samples and the development kit are available now at an undisclosed price. You’ll find more details about the nRF52840 Bluetooth 5 SoC and development kit on the product page.

Tweet Nordic Semiconductor nRF52xx Bluetooth and 2.4 GHz solutions are very often found in development kits and low power devices such as wearables, and it’s no surprise that the company…

How to Install ThingSpeak in Ubuntu 16.04

$
0
0

Last week-end I installed ESPurna open source firmware with MQTT server on Sonoff POW WiFi switch, and the next step is find a way to draw power consumption charts in some web based interface. We could do this in the IoT cloud with services like Xively or ThingSpeak, but since one of the goals of replacing the default firmware was not to rely on a proprietary cloud based solution, I decided to find a way to draw those chart in a local server, and it so happens that ThingSpeak is also open source with the code available on Github. Hardware platforms like NanoPi NEO / NEO Air, or Orange Pi Zero boards appear to be particularly well suited for the task of running an MQTT broker and Thingspeak, but at first I wanted to install ThingSpeak in my own Ubuntu 16.04 computer to have a try.

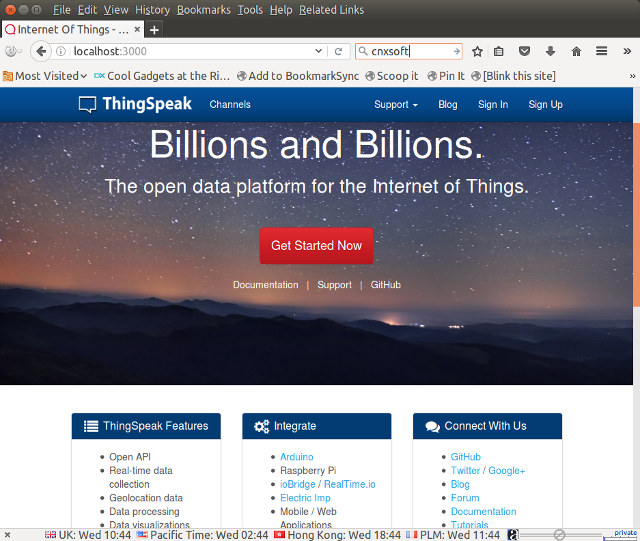
Click to Enlarge

Click to Enlarge

As you can see from the screenshot above I manage to do it, but it requires a bit more efforts than expected, as the project has not been updated since 2015, and does not work out of the box with the latest operating system.

I used various resources on the web including the instructions on Github, as well as this ThingSpeak script for Ubuntu 14.04, and a few other resources.

First we have to make sure Ubuntu 16.04 is fully upgraded:

sudo apt update

sudo apt dist-upgrade

Now we can install dependencies, Ruby 2.1.0, and Bundle:

1

2

3

4

5

6

sudo apt-get -y install build-essential mysql-server mysql-client libmysqlclient-dev libxml2-dev libxslt-dev git-core curl rubygems

gpg2 keyserver hkp://keys.gnupg.net recv-keys 409B6B1796C275462A1703113804BB82D39DC0E3

curl -L https://get.rvm.io | bash -s stable

source ~/.rvm/scripts/rvm

rvm install ruby 2.1.0

gem install bundler

Once this is done, we can get ThingSpeak source code and install it:

git clone https://github.com/iobridge/thingspeak.git

cd thingspeak

bundle install

This looked successful so I moved on to data configuration and creation:

cp config/database.yml.example config/database.yml

rake db:create

Sadly it starts with an error:

rake aborted!

Bundler::GemRequireError: There was an error while trying to load the gem ‘mysql2′.

Gem Load Error is: uninitialized constant Mysql2::Client::SECURE_CONNECTION

So I checked mysql2 version and upgraded it to see if it would fix the issue:

bundle update mysql2

bundle show mysql2
/home/jaufranc/.rvm/gems/ruby-2.1.0@thingspeak/gems/mysql2-0.4.5

rake db:create
Specified ‘mysql2′ for database adapter, but the gem is not loaded. Add `gem ‘mysql2’` to your Gemfile.

1

2

3

4

5

6

7

8

9

10

bundle show mysql2

/home/jaufranc/.rvm/gems/ruby-2.1.0@thingspeak/gems/mysql2-0.3.16

bundle update mysql2

bundle show mysql2

/home/jaufranc/.rvm/gems/ruby-2.1.0@thingspeak/gems/mysql2-0.4.5

rake db:create

Specified ‘mysql2′ for database adapter, but the gem is not loaded. Add `gem ‘mysql2′` to your Gemfile.

The previous error is gone, but only to be replaced by a new one…

Finally, I found out (can’t find where anymore) that I had to edit Gemfile in thingspeak directory, and add an older version to mysql2:

1

gem ‘mysql2′, ‘~> 0.3.18′

Let’s update mysql2, and try to create the databases again:

bundle show mysql2
/home/jaufranc/.rvm/gems/ruby-2.1.0@thingspeak/gems/mysql2-0.3.21

rake db:create
thingspeak_development already exists
Mysql2::Error: Access denied for user ‘thing’@’localhost’ to database ‘thingspeak_test': CREATE DATABASE `thingspeak_test` DEFAULT CHARACTER SET `utf8` COLLATE `utf8_unicode_ci`

1

2

3

4

5

6

7

8

bundle update mysql2

bundle show mysql2

/home/jaufranc/.rvm/gems/ruby-2.1.0@thingspeak/gems/mysql2-0.3.21

rake db:create

thingspeak_development already exists

Mysql2::Error: Access denied for user ‘thing’@‘localhost’ to database ‘thingspeak_test’: CREATE DATABASE `thingspeak_test` DEFAULT CHARACTER SET `utf8` COLLATE `utf8_unicode_ci`

Damn a permission error. I could not find a proper fix, so at this point the title of the post should possibly become “How NOT to install Thingspeak in Ubuntu 16.04”, as although it will work, the steps below makes the installation insecure since I simply give full databases’ access to thing user. But that will do since I’ll only use it in my LAN, and maybe somebody will point to a secure solution to the issue.

Copyright (c) 2000, 2016, Oracle and/or its affiliates. All rights reserved.
Oracle is a registered trademark of Oracle Corporation and/or its
affiliates. Other names may be trademarks of their respective
owners.

Type ‘help;’ or ‘h’ for help. Type ‘c’ to clear the current input statement.

mysql> GRANT ALL PRIVILEGES ON *.* TO ‘thing’@’localhost’ WITH GRANT OPTION;
Query OK, 0 rows affected (0.00 sec)

mysql> commit;
Query OK, 0 rows affected (0.00 sec)

mysql> exit;
Bye

1

2

3

4

5

6

7

8

9

10

11

12

13

14

15

16

17

18

19

20

21

mysql -u root -p

Enter password:

Welcome to the MySQL monitor.&nbsp; Commands end with ; or g.

Your MySQL connection id is 25

Server version: 5.7.16-0ubuntu0.16.04.1 (Ubuntu)

Copyright (c) 2000, 2016, Oracle and/or its affiliates. All rights reserved.

Oracle is a registered trademark of Oracle Corporation and/or its

affiliates. Other names may be trademarks of their respective

owners.

Type ‘help;’ or ‘h’ for help. Type ‘c’ to clear the current input statement.

mysql> GRANT ALL PRIVILEGES ON *.* TO ‘thing’@‘localhost’ WITH GRANT OPTION;

Query OK, 0 rows affected (0.00 sec)

mysql> commit;

Query OK, 0 rows affected (0.00 sec)

mysql> exit;

Bye

This time I can create the databases for Thingspeak:

1

rake db:create

So now we can go to the next step to load the database with some data required by Thingspeak to work:

1

rake db:schema:load

Great! Yet another error:

create_table(“active_admin_comments”, {:force=&gt;true})

rake aborted!

ActiveRecord::StatementInvalid: Mysql2::Error: All parts of a PRIMARY KEY must be NOT NULL; if you need NULL in a key, use UNIQUE instead: CREATE TABLE `active_admin_comments` (`id` int(11) DEFAULT NULL auto_increment PRIMARY KEY, `namespace` varchar(255), `body` text, `resource_id` varchar(50) NOT NULL, `resource_type` varchar(50) NOT NULL, `author_id` int(11), `author_type` varchar(255), `created_at` datetime, `updated_at` datetime) ENGINE=InnoDB

After spending a while for a solution I eventually found it in Rails Github with the reason being that MySQL 5.7 used in Ubuntu 16.04 does ot allows for NULL key.

We’ll need to create config/initializers/abstract_mysql2_adapter.rb file with:

# config/initializers/abstract_mysql2_adapter.rb

class ActiveRecord::ConnectionAdapters::Mysql2Adapter

  NATIVE_DATABASE_TYPES[:primary_key] = “int(11) auto_increment PRIMARY KEY”

end

Then we need add the following line at the end of config/environment.db

1

require File.expand_path(‘../../lib/patches/abstract_mysql_adapter’, __FILE__)

and run the command again:

1

rake db:schema:load

Success! Finally…

The final step is to start the server:

1

2

3

4

5

6

7

8

rails server webrick

=> Booting WEBrick

=> Rails 4.0.5 application starting in development on http://0.0.0.0:3000

=> Run `rails server -h` for more startup options

=> Ctrl-C to shutdown server

[2016-12-07 17:43:04] INFO&nbsp; WEBrick 1.3.1

[2016-12-07 17:43:04] INFO&nbsp; ruby 2.1.0 (2013-12-25) [x86_64-linux]

[2016-12-07 17:43:04] INFO&nbsp; WEBrick::HTTPServer#start: pid=17187 port=3000

Now start your web browser and you can access your local Thingspeak installation @ http://localhost:3000.
I’ll now have to study a little more about Thingspeak, install MQTT, as well as one of the MQTT to Thingspeak bridges available on the web, and see if I can plot power consumption data there.

Tweet Last week-end I installed ESPurna open source firmware with MQTT server on Sonoff POW WiFi switch, and the next step is find a way to draw power consumption charts…

Qualcomm Starts Sampling of Qualcomm Centriq 2400 ARM Server SoC with Up to 48 ARMv8 Cores

$
0
0
Home > Debian, Hardware, Linux, Processors, Qualcomm Centriq > Qualcomm Starts Sampling of Qualcomm Centriq 2400 ARM Server SoC with Up to 48 ARMv8 Cores

Qualcomm Starts Sampling of Qualcomm Centriq 2400 ARM Server SoC with Up to 48 ARMv8 Cores

Qualcomm has announced commercial sampling of Qualcomm Centriq 2400 series server SoC built with 10nm FinFET process technology and featuring up to 48 Qualcomm Falkor custom ARMv8 CPU cores “highly optimized to both high performance and power efficiency, and designed to tackle the most common datacenter workloads”.

qualcomm-centriq-2400-series-soc

Qualcomm Datacenter Technologies demonstrated the new processor in a Live demo showing Apache, Spark, Java, and Hadoop on Linux running on a SBSA compliant server powered by Qualcomm Centriq 2400 processor, but the company did not provide any further technical details or preliminary benchmark results for the solution.

The Qualcomm Centriq 2400 processor series is now sampling to select customers and is expected to be commercially available in H2 2017. That’s about all we know from the press release. However, Linaro have been working on Qualcomm Technologies QDF2432 based board for several months with support for Debian 8.x ‘Jessie’ and CentOS 7 operating systems, as well as Hadoop and OpenStack. It’s not 100% clear if this is indeed related to Centriq 2400, albeit the name QDF2432 seems to indicate so, and it would probably have started on some FPGA board to simulate Centriq 2400 (32-core?) processor, unless they had engineering samples for nearly a year. There’s also a basically empty page on Centos.org for “Qualcomm QDF2432 Server Dev Platform”. It’s close to impossible to find much details since those things are developed under NDAs.

Tweet Qualcomm has announced commercial sampling of Qualcomm Centriq 2400 series server SoC built with 10nm FinFET process technology and featuring up to 48 Qualcomm Falkor custom ARMv8 CPU cores…

SDMC DV8219-LTE Android TV Box Comes with a Built-in 4G LTE Modem

$
0
0
Home > AMLogic, Android, Hardware > SDMC DV8219-LTE Android TV Box Comes with a Built-in 4G LTE Modem

SDMC DV8219-LTE Android TV Box Comes with a Built-in 4G LTE Modem

Most users connect their TV boxes to the Internet through WiFi or Ethernet, but in some specific use case, such as digital signage in mass transport or in remote locations, it might be useful to get access to cellular networks. We’ve seen a few Android TV boxes with a built-in 3G modem in the past including CS918S and MBX-3G, but the former is based on the rather old Allwinner A31s processor, and the latter did not raise enough found on Indiegogo. But there’s nothing new, as SDMC DV8219-LTE is a more recent TV box powered by Amlogic S905X processor and running Android 6.0, equipped with a 4G LTE modem.

android-tv-box-lte-modem-sim-cardSDMC DV8219-LTE TV box specifications:
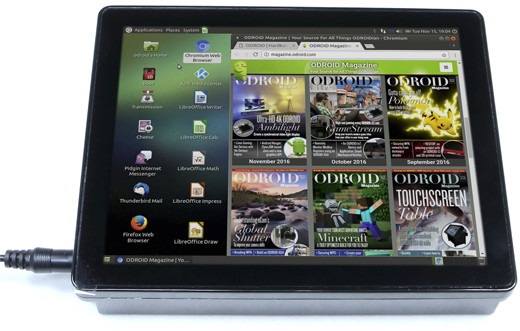
  • SoC – Amlogic S905X quad core Cortex A53 processor @ up to 1.5 GHz with a Mali-450MP GPU
  • System Memory – 1GB DDR3 SDRAM (2GB as option)
  • Storage – 8GB eMMC flash (4 to 64GB as option) + micro SD card slot
  • Video Output – HDMI 2.0a with CEC / HDCP2.2, 3.5mm AV port
  • Audio Output – HDMI, AV, optical S/PDIF
  • Connectivity
    • 10/100M Ethernet port
    • 802.11 b/g/n WiFi (Dual band optional)
    • Optional Bluetooth 4.0
    • Built-in 4G Module:
      • FDD-LTE ( B1/B3/B8), TDD-LTE (B38/B39/B40/B41), WCDMA/HSPA+ (B1/B8), TD-SCDMA (B34/B39), CDMA 1x/EVDO, GSM.
      • Throughput – LTE up to 150/50Mbps; WCDMA: 42/5.76 Mbps; TD-SCDMA: 4.2/2.2 Mbps
      • Max. Transmitter Power – Class 3 for LTE, WCDMA, and CDMA
      • Standard 6-pin SIM card interface
  • USB – 2x USB 2.0 ports, 1x micro USB OTG port
  • Misc – IR expansion port; IR receiver; power, IR, and network LEDs; power key
  • Power Supply – 5V/2A
  • Dimensions – 120 x 120 x 28 mm
  • Temperature Range – 0~40℃ (operating)

amlogic-tv-box-4g-modemThe box will ship with an IR remote control, a user’s manual, a power adapter, and an HDMI cable. What we don’t know is the price of the device, but interested parties should be able to inquire the company via the manufacturer’s product page.

Via AndroidPC.es

Tweet Most users connect their TV boxes to the Internet through WiFi or Ethernet, but in some specific use case, such as digital signage in mass transport or in remote…

Viewing all 2336 articles
Browse latest View live