Quantcast
Channel: Developers » Visit CNX Software
Viewing all 2336 articles
Browse latest View live

Aceberry S500 is a $30 Actions Semi S500 Development Board Comprised of a Module and a Baseboard

$
0
0

For some hard-to-explain reasons, Actions Semi S500 processor seems to be a popular choice for makers of boards, although I don’t think it has really been a success with hobbyists and makers so far. After ActDuino S500, LeMaker Guitar, Lemon Pi, Allo SPARKY, and Roseapple Pi boards, here comes another S500 quad core Cortex A9 development board with Aceberry S500 that’s quite inspired by LeMaker Guitar as seen by its baseboard and module design.
Aceberry_S500_Board

Aceberry S500 board preliminary specifications:

  • SoC – Actions Semi S500 quad core Cortex A9r4 processor @ 1.6GHz with PowerVR SGX544 GPU @ 500 MHz
  • Memory – 1 GB DDR3
  • Storage – 8GB eMMC or NAND flash (16 and 32GB optional), SPI NOR flash
  • Video Output – HDMI, and LCD connector
  • Audio – HDMI, headset jack, digital output (RCA).
  • Video Codec – H.265 (HEVC) and Ultra HD (4K*2K) video playback. Encoding up to 1080p@60fps.
  • Connectivity – 10/100M Ethernet, 802.11 b/g/n WiFi + Bluetooth 4.0 (Realtek RTL8723BS)
  • USB – 2x USB 2.0 host ports, 1x USB 3.0 OTG port
  • Camera –  Camera interface
  • Expansion Header – 1x header for GPIOs, 1x header for camera, 1x header for external display
  • Sensors – G-sensor
  • Power Supply – ATC2603C PMU;
  • Power Consumption – 0.004 to 2.4 Watts (not sure under what kind of load…)
  • Dimensions – 67.6x40x4.5mm (for module)
  • Weight – 11 grams (for module)
Aceberry S905 SoM vs LeMaker Guitar SoM (Click to Enlarge)

Aceberry S905 SoM vs LeMaker Guitar SoM (Click to Enlarge)

The module itself using the same 204-pin SODIMM edge connector, but the layout is quite different, and the module integrates WiFi and Bluetooth 4.0, a G-Sensor, and an SPI NOR flash. The board is said to support Linux 3.10, Ubuntu 14.04 and Android 5.0.

[embedded content]

The board is made by ShenZhen Steed Technology, and is said to sell for $30. Details are lacking at the moment, and there’s no AceBerry S500 product page on the company website.

Via Notebook Italia


$15 pcDuino3 Nano Lite Board Includes Gigabit Ethernet and a Real SATA Port

$
0
0

I often read people complain about the lack of SATA and Gigabit Ethernet on devices, and following up a discussion on a recent post about QNAP TAS-168 and TAS-268 NAS, I was made aware that pcDuino3 Nano board had a little brother without NAND Flash, nor an IR receiver that’s currently selling for $15 on Amazon US.

pcDuino3_Nano_LitepcDuino3 Nano Lite board specifications are exactly the same as the other version minus the stricken-through items:

  • SoC – AllWinner A20 dual core ARM Cortex A7 @ 1.0 GHz with Mali 400MP2 GPU
  • System Memory – 1GB DRAM
  • Storage – 4GB NAND Flash, SATA connector and microSD card slot (up to 32GB)
  • Video Output – HDMI 1.4 with HDCP support
  • Audio Out – 3.5mm analog audio interface
  • Connectivity – Gigabit Ethernet
  • USB – 2x USB host, 1x USB OTG
  • Expansion Headers – Arduino UNO extension interface with 14xGPIO, 2xPWM, 6xADC, 1xUART, 1xSPI, 1xI2C.
  • Camera – MIPI camera support
  • Misc – IR receiver
  • Power – 5V, 2000mA
  • Dimensions – 91.4mm x 53.3mm

pcDuino3_Nano_Lite_BoardIn case you wonder if it is yet another of those boards with a USB to SATA chip, then no it is not has SATA is natively supported by Allwinner A20 processor, and transfer rates of over 40MB/s should be achievable in both directions for a NAS based on this board. The company provides Ubuntu 12.04 and Android 4.2 for the board, but you could also run Armbian based on Debian Jessy, Debian Wheezy, or Ubuntu Trusty, which support both the legacy Linux 3.4 kernel, and a more recent Linux 4.2 kernel if you don’t need audio support, nor video hardware decoding.

If you don’t live in the US, or don’t fell like using a US shipping forwarder, you’ll have to pay more, and what should be the normal price, as pcDuino3 Nano Lite sells for $34.99 + shipping on Linksprite.

Thanks to for the tip!

Cube iwork8 Ultimate 8″ Tablet Powered by Intel Atom x5-Z8300 Sells for $89

$
0
0

While Intel Atom X5 mini PCs such as Tronsmart Ara X5 are selling well above $100, you can now pickup Cube iwork8 Ultimate tablet for just under $90 on GearBest [Update: Coupon IWORK8HI save a dollar more or so] with the same processor, memory, and storage, and adding an 8″ touchscreen, two cameras, and a battery, while losing Ethernet, and the convenience of full-sized USB and HDMI ports.

Cube_iwork8_UltimateCube iwork8 Ultimate tablet specifications:

  • SoC – Intel Atom x5-Z8300 “Cherry Trail” quad core processor @ 1.44 GHz / 1.84 GHz with Intel Gen8 HD graphics.
  • System Memory – 2 GB RAM
  • Storage – 32 GB eMMC flash + micro SD slot up to 32 GB
  • Display – 8.0″ touchscreen display; 1280×800 resolution; 5-point multitouch
  • Video Output – micro HDMI port
  • Audio – HDMI, built-in microphone and dual speakers (although I can only see one speaker on the picture), 3.5mm headphone jack
  • Connectivity – 802.11 b/g/n Wi-Fi, and Bluetooth 4.0
  • USB – 1x micro USB port
  • Camera – 1x 2.0MP rear camera, 1x 2.0MP front-facing camera
  • Sensors – Gravity sensor
  • Misc – Power, Home and volume buttons; charging indicator
  • Battery – 3,300mAh battery
  • Power Supply – 5V via micro USB port
  • Dimensions – 213.38 x 127.09 x 9.8mm
  • Weight – 339g

The tablet comes pre-loaded with Windows 10 with English and Chinese languages, and other languages can be downloaded from the operating system as needed. It ships with a USB cable and charger. I have not found any independent reviews of the tablet yet, but you could still have a look at GearBest presentation video.

[embedded content]

So how come there’s such a big price difference? First, tablets with screens smaller than 9″ get a free Windows 10 license, while mini PCs will have to pay an extra $15 to $25 extra to get this privilege. Of course, if you buy an Intel mini PC with an unlicensed version of Windows, FreeDOS or Linux distributions (not fully working), price will drop by the same amount. I’ve also read that Intel is keen on gaining market share in the tablet market, so they offer better deals or even to some extend sponsor Windows 10 tablets. Finally, it’s quite possible the tablet are sold in much higher volumes, leading to lower prices.

Beside GearBest, the tablet can also be found for less than $90 on Banggood and GeekBuying, with Aliexpress sellers being a little more expensive for now.

Thank you Ian!

Unboxing and Teardown of Eny EM95 4K Android TV Box with Front Panel LCD Display

$
0
0

Eny EM95 was first unveiled in early July, as the flow of Android TV boxes based on Amlogic S905 started. Eny Technology has now sent me a sample of this device with the typical 1GB RAM and 8GB Flash, but it adds an LCD display on the front panel. Today, I’ll take a few photos of the device, and open it to find more details about the hardware.

Eny EM95 TV Box Unboxing

I received the device by DHL in a colorful retail package referring to EM95 as a Quad core Smart TV box, with some specs on the back, which I already listed in my first post.

EM95_Package
The media player ships with a 5V/2A power supply, an IR remote control with IR learning function requiring two AAA batteries, an HDMI cable, and a user’s manual in English.

Click to Enlarge

Click to Enlarge

The style of the box it’s pretty neat, and I usually like device with an easily accessible power button on the top.

Click to Enlarge

Click to Enlarge

The front panel has the LCD display with 4-digit for time and some simple text, as well as icons for CVBS, HDMI, USB, CARD, APPS and SETUP.  One of the side features a full-sized SD card slot, and three USB 2.0 host ports, while the rear panel comes with a 5V power jack, optical S/PDIF, HDMI 2.0 and AV (composite) output, and a Gigabit Ethernet port.

Eny EM95 Teardown

You can leave the four rubber pads alone to open the device, and instead slide a sharp and rigid plastic tool to open the device.

EM95_Open_Case
The heatsink is large than on other low cost Amlogic S905 devices I’ve reviewed, but I’m quite not sure the M9 metallic plate attached to the botto, is useful for cooling as it is not connected at all with any component of the board, nor the heatsink. The WiFi antenna is glued on top of the LCD display.
EM95_Heatsink
I’ve loosen the two screws holding the board to the case to have a closer look.

Click to Enlarge

Click to Enlarge

Eny has gotten used to include low-end NAND flash is many of their devices, so I’m pleasantly surprised to find Samsung KLM8G1WEPD-B031 eMMC 5.0 flash has been used in EM95 to provide 8GB internal storage. I can’t find the full details about this exact part number but KLM8G1WEMB-B031 has theoretical read and write speeds of  100MB/s and 6MB/s. So while apps and boot should be relatively fast, some slowdowns may occur while using the firmware, for example while installing apps, or copying files in the background. Amlogic S905 SoC is also coupled for two NANYA NT5CB256M16DP-EK DDR3 chips (512+512MB RAM). Wireless connectivity is achieved with Ampak AP6212 module supporting 802.11 b/g/n and Bluetooth 4.0. Other chips include Genesys GL850G USB hub, and for Gigabit Ethernet Reatel RTL8211F transceiver and GST5009M magnetics are used.

The board is named S9 V1.1, and you’ll find the 4-pin UART console on the top right of the board, as well as 9-pin header to connect the LCD display.

Click to Enlarge

Click to Enlarge

There’s not much to see on the back of the board, except for a sticker with a MAC address whose prefix C4:4E:AC redirects to the usual Shenzhen Shiningworth Technology, as with other Eny devices.

I’d like to thanks Eny Technology for sending a sample, and distributors or resellers can contact Eny for purchasing in quantities via EM95 product page. So far, I could only find the device for sale on of Aliexpress seller for $53.42 including shipping.

I’m not sure I’ll have time to review EM95, but I’ve found a video (date July 15th) showing it has the same launcher and settings as Beelink MINI MX, so I’d expect performance to be very similar.

[embedded content]

SMA-Q e-Paper Smartwatch Unboxing and Details

$
0
0

When I first discovered SMA-Q smartwatch, I really found it interesting with its always-on color e-Paper display, Bluetooth 4.0 connectivity, heart rate monitor, and promise of 30-day battery life (standby) for just $56. GearBest send me one sample so that I can have a close look at this interesting smartwatch and fitness tracker. I’ll start by unboxing the watch, and checkout some details that were unclear in the specifications.

I received it in a retail package that calls it SMA WATCH-Q instead of SMA-Q watch with a link to the official website.

Click to Enlarge

Click to Enlarge

On one side we’ll get the specifications, all in Chinese, but even if you can read, it’s clear the watch supports Bluetooth 4.0 and Android 4.4+ IOS7.0+ as announced in the specs, and we also learned a 150mAh battery is included, and it’s compliant with IP65 ingrees protectin ratings meaning it’s “protected from total dust ingress and low pressure water jets from any direction”. But I’ll come to that later. I’m not sure what 80mA means here (power consumption?).

Click to Enlarge

Click to Enlarge

On the back of the package we’ve got some information about the capabilities of the device including call notification, anti-lost feature, activity tracking. HRM, a Sharp Color LCD, and so on.

Click to Enlarge

Click to Enlarge

The watch comes with a user’s manual in Chinese and English, and a USB cable with a magnetic end to charge the watch.

Click to Enlarge

Click to Enlarge

Before checking out the watch itself, let’s see some useful part of the user’s manual.

SMA-Q_watch_buttons_descriptionThe first page of the manual descript the four buttons on the watch: Back & Power On/Off button on one siode, and Up, Down, and confirm button on the other side. There’s no touchscreen, so you’ll have to use the button to control the user interface.
SMA-Q_Android_iOS_appThen there’s a link to download the Android / iOS app, and I’ll go through it in details with an Android smartphone in the full review.

SMA-Q_Watch_SpecificationsThe specifications clarifies what “IP65”, and “30-meter water resistant” means: “cannot swimming and shower”. Apparently 30-meter water resistant is an old “standard” used in watches meaning it’s not really waterproof… and Wikipedia explains it:

a watch marked 30 metres water resistant cannot be expected to withstand activity for longer time periods in a swimming pool, let alone continue to function at 30 metres under water. This is because the test is conducted only once using static pressure on a sample of newly manufactured watches.

As a side note, Vidonn X5 activity tracker was also rated IP65, and I had to problems while taking shower for over a year, but obviously you are taking the risk of damaging your device if you do so…

Back to the watch itself.

SMA-Q_Watch_Magnetic_Charging_HRM

On the back we’ve got the magnetic charging connector on the left, and the heart rate sensor in the center of the watch. For what it’s worth, It has two small “holes” instead of one on No1. D3 smartwatch which was placed close to the side, and did not work very well, i.e. did not work at all.

SMA-Q-Watch_back_buttonOn of the left side of th watch, you’ve got the back button, which also acts as power on/off and backlight button, and on the right side, the up, down and OK buttons.

SMA-Q_Watch_Up_Down_OK_buttons

SMA-Q smartwatch is neither very small not big, and I think it should be suitable for both men and women.

SMA-Q_Watch_on_wrist

However, if you have large wrists, the watchband might be a little short, as I had just 3 holes left on mine.

SMA-Q_Watchband_LenghtIt’s also clearly shorter than No.1 D3 smartphone’s band, and the screen is also smaller. The metal part is said to be made of stainless steel.

SMA-Q_vs_No1_D3_Smartwatch_640px

SMA-Q Watch vs No.1 D3 Watch

Normally at this stage, I would try to teardown the watch, but I could not find any safe way to open the watch without risking to affect this waterproofness, so it might be something I try after the review. Instead, I went to charge the watch.

SMA-Q_Watch_ChargingThe magnetic end of the USB cable can only be plugged in one direction, but you can’t do it wrong as the magnets will prevent you from plugging it in the wrong direction. At first, I tried to charge it via the USB port of my computer, but as nothing showed up on the screen, I started the watch.

SMA-Q_Smartwatch_Color_e-paper_displayThe first thing that confused me was that the screen was so dim, but I quickly found out that e-Paper displays behave exactly the opposite of OLED displays when it comes to visibility, and work like paper or an old-fashioned digital watch: you can’t see anything in the dark, but it’s very clear in bright light. And since my office is quite dark, I could not see clearly the display, but the left button also triggers a backlight which makes the watch readable in the dark. The screen looks much brighter on the picture above because of my camera flash. Anyway, I still and no indication that the battery was charging so I switch to a 5V/2A charger, and charging started…

SMA-Q_smartwatch_battery_levelSo I’ll test all features of this smartwatch including heart rate monitor, smartphone synchronization, and battery life over the next week or two weeks, before publishing a full review of SMA-Q watch.

GearBest sent the device for review, so if you are interested you can consider purchasing from them for $55.90 including shipping. beside Black color, the watch is also available in Khaki, blue and red for the same price. Other e-retailers listing the watch include Tinydeal ($59), Amazon US ($75), and Dealsmachine ($49.99 + shipping).

Why Do UL and CE Certifications Matter For Anything That Connects to the Mains (110V/220V) ?

$
0
0

I’ve been featuring a few cheap automation appliances such as Orvibo Wiwo S20 WiFi smart socket or lately Sonoff & Slampher WiFi and RF switch and lightbulb adapter, and people mentioned that Wiwo S20 socket was unlikely to be compliant with CE up to 10A since it lacked the ground pin, and I was also informed that Sonoff & Slampher was probably not compliant with UL certifications. Why does not matter? The picture below may give a clue…

House_in_FireUL and CE certifications are used to make sure the device complies with safety regulations, and in some case make also improve reliability, as in UL compliant power supplies will feature inexpensive TVS device to protect against thunder. And if you think you are covered because you have an house insurance, it’s quite likely it will be void if the on-site expert find a non-compliant device on the site of the fire.

What’s complicated is that there are many UL standards depending on the device your use, and it’s also difficult to verify the validity of the UL/CE certifications, as manufacturers can easily print a fake UL or CE (which may also mean China Export) to show the device is certified.  You could also ask the sellers to provide a UL and CE certifications, but you’ll need to know which one is required for your device, and then make sure it has not been forged.

Recently, hoverboards have made the news in the US, as some have been found to be unsafe, and Amazon even asked customers to throw out unsafe hoverboards and promised to refund them, as both the charger and battery were found to unsafe.

Non-compliant Hoverboard After Explosion during Charging.

Non-compliant Hoverboard After Explosion during Charging.

The Verge provided some more insights to which UL safety standard were ignored:

Amazon just sent out a notice to all “hoverboard” sellers to “provide documentation demonstrating that all hoverboards you list are compliant with applicable safety standards, including UN 38.3 (battery), UL 1642 (battery), and UL 60950-1 (charger).”

UN 38.3 is not a UL, but a UN standard for transporting Lithium batteries where 8 tests are carried out. UL 1642 is specific to user or technician replaceable Lithium batteries with up to 5 grams Lithium,  while UL 60950-1 standard applies to “mains-powered or battery-powered information technology equipment, including electrical business equipment and associated equipment, with a RATED VOLTAGE not exceeding 600 V”. So there’s no way consumers can be aware of those themselves, so they’ll have to trust their seller on that one, and although even Amazon could not guarantee the safety of the products, at least they have now taken measures to mitigate the issues.

What’s the cost of UL certification for manufacturers? I’ve been told it costs $5,000 or more depending of UL requirements for your products, so while it should be no big deal for more expensive products, you may understand why manufacturers of cheap devices ($5, $40, $20) may think it may not be necessary, especially since UL is not a legal requirement.  Another option is to go with ETL certification that is supposed to be much cheaper, and also make sure the devices are safe to use. The difference between UL and ETL is explained on that blog:

UL and ETL are both what is called Nationally Recognized Testing Laboratories (NRTL). NRTLs are in place to provide independent safety and quality certifications on products. Electrical appliances typically require their certification (especially 240V appliances). UL develops the testing standards and tests to them. ETL tests to UL standards. In order for an inspector to sign off on permitted installation for an EVSE, the National Electric Code requires the EVSE be NRTL listed (in the US that is ETL or UL).  ClipperCreek does use both laboratories; the selection of which laboratory depends on which company provides the best value for their service that we can then in turn pass on to our customers.

CS-40 Wall MountThose safety certifications are very important for high power device such as electrical appliances, and you should definitely ask the seller for safety certifications before purchasing such devices, but even non-compliant smartphone charger may be an issue with one woman electrocuted while using an allegedly fake charger with her iPhone.

Thanks to Jon for the article idea, various links and insight.

ADBoard 3G/4G Digital Signage Board is Powered by Allwinner A83T Octa-Core Processor

$
0
0

MQMaker officially launched their WiTi router board earlier this week, but the company has also introduced ADBoard, an octa-core board specifically designed for digital signage with a connector for LVDS display including backlight, an RTC with backup battery, and a mini PCIe connector for 3G/4G connectivity combined with a SIM card slot.

ADBoardADBoard specifications:

  • SoC – Allwinner A83T octa-core ARM Cortex-A7 @ 2.0 GHz with PowerVR SGX544MP GPU @ 700 MHz supporting OpenGL ES 2.0/1.1, OpenCL 1.1, and DX 9.3.
  • System Memory – 1 GB DDR3
  • Storage – 16 GB eMMC + micro SD slot
  • Display Interfaces / Video Output
    • HDMI up to 1080p60 with HDCP 1.2 and CEC support connector
    • LVDS connector, LCD backlight control header and capacitive touch panel header
  • Audio – HDMI, 3.5mm audio output, speaker connector, microphone connector
  • Connectivity – Gigabit Ethernet, 802.11 b/g/n Wi-Fi and Bluetooth 4.0
  • USB – 1x USB 2.0 host port, 1x USB 2.0 OTG port (full size), and 2x USB 2.0 headers on-board
  • Serial – 3x UART headers
  • Other Expansion Headers/Connectors
    • 1x mini PCIe slot for 3G/4G modem and SIM card slot
    • 1x SPI, 1x I2C headers
    • 1x keys header, 1x IR receiver + LED header
  • Misc – Power switch, U-boot button, fan header
  • Power Supply – 12V input for board, LCD power header, header with 12V/5V output?.
  • Dimensions & Weight – N/A

Digital_Signage_Board_SIM_CardThe board is said to run Android 4.4, but there’s very little other information, probably because it’s not been designed as a community board, but instead for companies who may need integrate such board in large LVDS displays such as in retail locations, or possibly connected them in smaller one as in their bus fleet to monetize with targeted advertisement.

The board sells for $89 plus shipping on Aliexpress, and according to the product page the price drops to $69 when ordering 100 pieces or more. Allwinner 83T has also been used in Banana Pi BPI-M3 board for a while, and I’ve been informed about another similar digital signage DS-830 V3.0 board by a company called SMDT (Smart Device Tech), which also integrates a mini PCIe slot for 3G/4G modem, and most of the same features as the ADBoard, however, all information is only in Chinese language.

Intrinsyc Introduces Qualcomm Snapdragon 820 Cortex-A72-Class Development Board, SoM and MDPs

$
0
0

While there’s already an healthy choice of ARMv8 development board such as LeMaker Hikey, or Qualcomm DragonBoard 410c, all those platforms are based on the lower end Cortex A53 64-bit ARM core, and ARM Cortex A57, let alone Cortex A72, boards are much more difficult to find, as they are much pricier and/or have limited availability. Intrinsyc may have released the first (somewhat) affordable and accessible Cortex-A72-class development board with Open-Q 820 development kit comprised of a SoM and a baseboard, as well as smartphone and tablet mobile development platforms (MDPs) based on Qualcomm Snapdragon 820 quad core Kryo processor. While Kryo is a custom ARMv8 designed by Qualcomm, and not exactly a Cortex A72 core, both have similar performance, as shown in Snapdragon 820 Antutu and Kirin 950 Antutu results.

Open-Q_820_Cortex_A72_Development_Board

Open-Q 820 Development Kit (Display Optional)

Open-Q 820 board specifications:

  • SoC – Qualcomm Snapdragon 820 quad core Kryo cores with 2x cores @ up to 2.2GHz, and 2x cores @ up to 1.6GHz, an Adreno 530GPU, an Hexagon 680 DSP, and a 14-bit Spectra ISP.
  • System Memory – 3GB LPDDR4 @ 1866 MHz (PoP)
  • Storage – 32GB UFS 2.0 Flash, micro SD slot
  • Display/Video Out
    • 1x HDMI 2.0 up to 4086×2160 @ 60 fps
    • 2x MIPI-DSU 4-lane up to 2560×1600 (single port), or 4096×2160 (dual port) @ 60 fps
    • Optional 4.5″ FWVGA (854×480) touch display
  • Audio
    • 1x 3.5mm ANC jack for headset
    • 20-pin audio input header with 3x analog in, 3x digital in
    • 20-pin audio output header with 5x analog out 1x digital out
    • Qualcomm WCD9335 audio codec
  • Connectivity – 802.11 b/g/n/ac 2×2 MU-MIMO, Bluetooth 4.1 (QCA6174), Qualcomm IZat Gen 8C GPS (WGR7640)
  • Camera – 3x MIPI-CSI  4-lane, dual ISP, up to 25MP. Optional 13MP camera module
  • USB – 1x micro USB 3.0 host, 1x micro USB 2.0 OTG, 2x USB 2.0 host ports.
  • Debugging – 1x UART debug via USB micro-B port
  • Expansion
    • 8x DIO with pins configurable as I2C, SPI, UART, or GPIO
    • 1x mini-PCIe v1.2, 1x PCIe X1 slot v2.1
  • Power Supply – 12V DC
  • Dimension – Baseboard: 170 x 170mm; SoM: 82 x 42mm

Open-Q_820_Devkit_DescriptionThe company provides support for Android 6.0 Marshmallow for the board. Documentation is quite limited right now with only product briefs for the board and the SoM, but the company claims users will receive product documentation and access to complimentary tools and software updates.

Beside Open-Q 820 development kit, Intrinsyc also offers a smartphone MDP with a 6.2″ QHD display, and a tablet MDP with a 10.1″ 4K UHD (3840 × 2160) multi-touch display. Both will support 802.11ac with Qualcomm MU | EFX MU-MIMO technology, Blueooth 4.1, USB 3.0, and Qualcomm IZat location service. The tablet MDP has also has tri-band support, and supports multi-gigabit 802.11ad (11ad) Wi-Fi.

Intrinsyc Open-Q 820 development kit appears to be available now for $599 plus tax and shipping, the Tablet MDP for $999,  and the smartphone MDP will be $799, but it’s not quite ready for sale yet, and shipping is scheduled for December 31, 2015.

Via Linux Gizmos


Amlogic S905M and S912 Processors To Support 4K VP9, HDMI 2.0a, Built-in DAC and More

$
0
0

I had heard some news that Amlogic S912 was delayed, and even possibly canceled, while talks about a new S908 processor surfaced recently with support for VP9 up to 4K resolution. We now have some more details as I’ve received some more information about Amlogic product roadmap, and S908 should be renamed S905M.

Amlogic S905 Amlogic S908 / S905M Amlogic S912
CPU Quad core Cortex A53 @ up to 2.0 GHz Quad core Cortex A53 @ up to 1.5 GHz
GPU Penta-core Mali-450 up to 750 MHz Low power multi-core GPU
Memory 16/32-bit DDR3/3L, LPDDR2/3
Up to 2GB, DDR2133
Dual 32-bit DDR3/3L, LPDDR2/3
Up to 4GB, DDR1600
Storage NAND Flash@BCH60
eMMC 5.0, SD, Nor Flash
Video Decoding 4Kp60 10-bit HEVC, 4Kp30 H.264 4Kp60 10-bit HEVC, VP9
4Kp30 H.264
Video Encoding H.264, 1080P@60fps H.265, 1080P@60fps
Ethernet 10/100/1000 RGMII 10/100/1000 RGMII, 10/100M PHY
Audio DAC N/A Built-in
USB 2.0 3.0 and 2.0
TV Output 4K2K HDMI 2.0, CVBS 4K2K HDMI 2.0a, CVBS
HDR N/A HDR10 Dolby Vision, HDR10
DTV Ts in
Products 4K HDMI dongle, OTT/IP-STB Cost effective low power 4K HDMI dongle, OTT/IP-STB High-end 4K OTT/IP-STB, gaming box

While Amlogic S905 and S905M will have a hard-limit to 2GB RAM, S912 will support dual channel memory and up to 4GB RAM. The two new processors will also support 4K VP9 video decoding, feature a DAC, HDMI 2.0a, support for HDR10 media profile and/or Dolby Vision. Both will also an embedded 10/100M PHY which will bring the cost down for devices with Fast Ethernet. Amlogic S912 will also support USB 3.0 interface and H.265 video encoding up to 1080p60. The document did not reveal the details about the GPU used in the two new processor, but it’s clear Amlogic S912 will have a powerful one good enough to be used in Android gaming console, and there have been some clues that S912 GPU could be Mali-T830 in the past.

Amlogic S9xx DRM Secure OS

Amlogic S9xx DRM Solution with TrustZone and Secure OS

The company has also improved DRM support in their latest processors, including S905 itself, with support for Google Widewine Level 1 & 3, Verimatrix Standard and Advanced, Microsoft Playready 2.0 (TVP and non TVP), Internet Marlin 1.7, and Vudu DRM. DRM is enabled thanks to “Secure OS”, but it’s not needed for the most basic DRM solutions such as Widewine Level 3, Verimatrix Standard, and  PlayReady 2.0 Non-TVP. So as we’ve seen recently that most Amlogic S905 TV box lack DRM support, a firmware upgrade should be enough to enable these, but any DRM scheme that requires Secure OS is likely impossible on devices that have not been flashed with Secure OS at the factory.

Amlogic S905M will come before Amlogic S912, but so far I don’t have exact ETA for either processors, so we’ll need to be patient.

How to Upgrade SMA-Q Smartwatch Firmware

$
0
0

I’ve started testing SMA-Q smartwatch, and so far I’ve had lots of issues with Bluetooth connectivity. The watch can rarely pair with my Android smartphone, and I was unable to enable features like Anti-lost and Sedendary alerts as the app would always report there was no connection. The company has sent me instructions to upgrade the firmware, and it seems to have improved things a little.

So first you need to install SMA Services app by scanning the QR code on the user’s manual, or download the apk by following this link. Once this is done you can register, or skip registration. Now go to Setting, and select Connect watch.

Click to Enlarge

Click to Enlarge

You should see a circle as on the left side above reading Searching watch, then Bluetooth Connecting, before seeing a message the connection was successful. You’ll probably them want to tap on Upgrade app, before tapping on Firmware upgrade (local version 1.0.0) which will show the screenshot in the middle. Simply press the right button (meaning OK), and the third screenshot will appear. At this stage, turn off your watch by pressing the back button for a few seconds, then press the Confirm (middle right) and back button simultaneously until a rainbow like pattern shows in the screen of the watch. Now press the right button (meaning start), the watch screen should turn red, and the app should show the progress of the file transfer.

SMA-Q_Watch_Firmware_UpdateYou’ll get a success message in the watch once the transfer is complete, and the watch screen will stay red. Now press the back button to turn on the watch. You should be able to connect to the watch (be patient as it may easily take 20 to 30 seconds), and notice the firmware has been upgraded to 1.2.2, or whatever version is available at the time of the update.

Click to Enlarge

Click to Enlarge

After the upgrade I was also able to enable Anti-lost and Sedentary, which I had never manged to do with the older firmware. I’ll see how it goes…

You can also watch the embedded video below which shows the whole process of updating the firmware and pairing the watch and the phone.

[embedded content]

TI SimpleLink CC1310 Wireless MCU Promises 20 Km Range, 20-Year Battery Life on a Coin Cell

$
0
0

Some LPWAN standards such as SigFox, LoRa, or nWave allows for transmission of data at low bitrate over several kilometers, and I’ve very recently featured Microchip’s LoRa modules and motes in this blog. So when Texas Instruments sent their December 2015 newsletter entitled Wireless MCU spans 20 km on a coin cell, I decided to have a look, and the company’s CC1310 wireless Cortex-M3+M0 MCU based on a proprietary sub GHz technology also claims to last 20-year on a coin cell for applications such as grid communication infrastructure and heat and water meters.

TI CC1310 MCU Block Diagram

TI CC1310 MCU Block Diagram

SimpleLink CC1310 key features:

  • Microcontroller – ARM Cortex-M3 @ up to 48 MHz with up to 128KB programmable flash, 8KB DRAM for cache/general purpose, 20KB Ultralow Leakage SRAM
  • Sensor Controller – Ultralow power and autonomous; 16-Bit Architecture; 2KB of Ultralow Leakage SRAM for code and data
  • RF core
    • Cortex M0 core with 4KB RAM, and ROM
    • Data rate – 4000 kbps (Max)
    • Receiver Sensitivity – –124 dBm using long-range Mode, –110 dBm at 50 kbps
    • Selectivity: 52 dB; Blocking performance: 90 dB; programmable output power up to +14 dBm
    • Single-ended or differential RF Interface
    • Suitable for systems targeting compliance with ETSI EN 300 220, EN 303 131, EN 303 204 (Europe); FCC CFR47 Part 15 (US); ARIB STD-T108 (Japan)
    • Wireless M-Bus and IEEE 802.15.4g PHY
  • Peripherals
    • All digital peripheral pins can be routed to any GPIO
    • 4x general-purpose timer modules – 8x 16-Bit or 4x 32-Bit Timers, PWM each
    • 12-Bit ADC, 200 ksamples/s, 8-Channel Analog MUX
    • Continuous Time Comparator
    • Ultralow Power Clocked Comparator
    • Programmable Current Source
    • UART, 2× SSI (SPI, MICROWIRE, TI), I2C
    • I2S
    • Real-Time Clock (RTC)
    • AES-128 security module, True Random Number Generator (TRNG)
    • Support for eight capacitive sensing buttons
    • Integrated Temperature Sensor
  • External System
    • On-Chip Internal DC-DC Converter
    • Few External Components
    • Integration with SimpleLink CC1190 range extender
  • Power Supply – 1.8 to 3.8V
  • Power Consumption
    • Active mode – Rx: 5.5 mA; Tx (+10 dBm): 12.9 mA; MCU: 48.5 CoreMark/mA; Sensor Controller @ 24 MHz: 0.4 mA + 8.2 µA/MHz
    • Sensor Controller woken up once per second performing one 12-Bit ADC sampling: 0.85 µA
    • Standby: 0.6 µA (RTC running and RAM and CPU retention)
    • Shutdown: 185 nA (Wakeup on external events)
  • Packages – 7-mm × 7-mm RGZ VQFN48 (30 GPIOs); 5-mm × 5-mm RHB VQFN48 (15 GPIOs); 4-mm × 4-mm RSM VQFN48 (10 GPIOs)
Connected Water Meter Block Diagram

Connected Water Meter Block Diagram

Software and development tools include reference designs for Different RF configurations, packet sniffer PC Software, Sensor Controller Studio, SmartRF Studio, SmartRF Flash Programmer 2, IAR Embedded Workbench for ARM, Code Composer Studio as well as development kits such as SimpleLink sub-1 GHz CC1310 development kit bundle comprised of one  CC1310EMK-7XD-7793 evaluation module kit with  two boards with the wireless MCU and RF layout (779 to 930 MHz) with two antennas, and two SMARTRF06EBK  evaluation board that is the  motherboard for the CC1310 evaluation module, and equipped with an on-board XDS100v3 debugger, LCD, buttons, LEDs, debugger and sensors.

SimpleLink CC1310 Evaluation Module Kit

SimpleLink CC1310 Evaluation Module Kit

TI CC1310 MCU is selling for $2.50 to $3.98 per unit for 1K orders, and the development kit is available for $299 + shipping. More details can be found on Texas Instruments SimpleLink CC1310 and CC1310 development kit product pages.

[embedded content]

SimpleLink Battery-less Power Switch Leverages RF & Energy Harvesting Technologies

$
0
0

SimpleLink may be the name used by Texas Instruments for their wireless MCU family, but there’s also a Chinese company called SimpleLink Technology that develops wireless smart home solutions including battery-less power switches that communicate over sub GHz band to receivers using energy harvested from pressing the button(s) on the switch.

SimpleLink_Self-powered_SwitchThey have different models with 1 to 4 buttons, and round and square shapes. Let’s have a look at SIM1010-K1 specifications:

  • Switch Type – Push-Button; operating force: 7N; typical total travel: 4mm
  • Number of Keys – 1 gang
  • Power Mode: Self-Powered
  • Control Distance – Up to 30 meters indoor (works though walls), 100+ meters outdoor
  • Frequency Bands – 433/315/868/915MHz
  • Lifetime – >200,000 times
  • Connectivity – SimpleLink (most probably entirely unrelated to TI SimpleLink);  +10dBm Tx power
  • Operating Temperature: -25~70℃
  • Operating Humidity: 0~95%RH
  • Dimensions – Ф 70 x 15.5 mm
  • Weight – 44g

That self-powered wireless switch will prevent the need to install cables between the switch and the electrical appliance or light, and communicate with SIM1010-R receiver featuring the following:

  • Voltage Range – 100V-240V, 50/60Hz
  • Sensitivity – -116dBm
  • Controlled Power – Up to 2000W (LED MAX: 200W)
  • Dimensions – Ф48×H25mm
  • Weight – 35g
SimpleLink Receiver Connection Diagram

SimpleLink Receiver Connection Diagram

They can also provide the Simplelink self-powered module independently. The video below shows how it all works:

Since I’ve been made aware that UL/CE safely certifications might be important for this type of item, I asked the company about the receiver UL or ETL certifications to which they replied:

Because different country require different certification.

We are applying CE and RoHs certification for basic use, other certification not have now.

We most do OEM order, use customers’ brand, they will do the certification themselves.

Also have some customers do not require certification. ( if not use in big project, to normal customers most do not concern certification )

So it looks like the product has not been independently tested for safety. It does not mean it’s not safe, it just means we don’t know.

Provided you are confident the product won’t be confiscated by the customs due to a potential SimpleLink trademark infringement, and a lack of safety certification, you can purchase a kit of comprised of a switch and receiver for $50 on Aliexpress, and they also have kits with one receiver and multiple switches. More versions can be found on SimpleLink website.

DietPi is Lightweight, Easy to Use Debian Based Distribution for Raspberry Pi, ODROID, and Orange Pi Boards

$
0
0

DietPi_LogoRaspberry Pi, Hardkernel ODROID, and Orange Pi are some of the most popular and cost effective development boards on the market today, and one British developer, going under Fourdee nickname, has released a lightweight distribution called DietPi working for all Rasbperry Pi boards, ODROID-C1(+), ODROID-XU3/XU4, and Orange Pi PC, with Orange Pi 2 and Orange Pi Plus support coming soon, as well as a VMWare virtual machine also available for evaluation.

The compressed downloads are about 80 to 100MB depending on the target, the image that can be dump with dd or Win32DiskImager requires a 1GB or greater micro SD card as the image itself is about 500MB large, Internet access (Ethernet or Wifi), and optionally a USB Drive to allow installation on a USB drive for better performance, which of course does not apply if you have an eMMC module with your ODROID board.

The image also contains some scripts to easily configure the system (DietPi-Config), or  install programs (DietPi-Software) such as LXDE desktop environment, Kodi, Transmission bitTorrent server and so on. Some options will be specific to some boards, as for example Kodi won’t run properly on Orange Pi boards for now.
DietPi-Software

Other notable scripts include DietPi-Backup, DietPi-Sync to duplicate directories, DietPi-Nice to assign priority levels to programs, and DietPi-Update System that automatically checks for updates, and install them from the network. You can also customize the level of logging with DietPi-Rramlog in order to optimize performance, and WiFi support is built-in in the image, and configurable with DietPi-Config.

DietPi-ConfigThe operating system has its own website, but to get started quickly you’d better go to Download DietPi image | Getting started forum thread. You can also visit DietPi Github repository to check out the Bash scripts used in DietPi images. You may also be interested in seeing how it compares to Raspbian Lite.

Via Peter Scargill

GeekBox TV Box Unboxing and Development Kit Assembly Guide

$
0
0

GeekBox is both an Android TV box based on Rockchip RK3368 octa-core processor, and a Linux development kit thanks to the CPU module inside the device, a baseboard and various accessories. The company has sent me a review sample, as well as the accessories currently available. So today, I’ll have a look at the box, and show how to connect everything together.

GeekBox TV Box Unboxing

I’ve received two carton boxes via DHL, one with GeekBox itself, and the other with some accessories.

GeekBox_PackageYou could use GeeBox has a TV box, and forget about its development attributes, as the device comes with the usual accessories include a case, an HDMI cable, an infrared remote control, and a 5V/2A power supply.

Click to Enlarge

Click to Enlarge

I was really surprised by how small it was compared to other 64-bit ARM TV boxes recently launched on the market, and looks very much like a small router with its two antennas.
GeekBox_TV_Box
When you look the user’s manual, you quickly realized the GeekBox is targeting… Geeks, as it shows the actual board and description of the external and internal interfaces and ports.

Click to Enlarge

Click to Enlarge

You’ll get all of this if you buy the GeekBox, but you may want to add Landingship baseboard and some add-on boards to your purchase to have some more fun.

LandingShip and Geekbox’ Add-ons

Some GeekBuying sent me the second box with a Landingship carrier board (aka baseboard) with four spacers and nuts, and two black screws for 2.5″ SATA drives, as well as a CR2032 battery, a cooling fan, and a USB to TTL debug board with 3 wires for GND, Tx and Rx.

Click to Enlarge

Click to Enlarge

The Landingship feature a large MXM3 connector for GeekBox module, a 3x 20-pin expansion header, as well as MIPI-CSI, DVP, and Display headers. All ports are on the back with a 3.5mm audio jack, optical S/PDIF, USb port, IR receiver, and a power jack.

Click to Enlarge

Click to Enlarge

We’ll also find a buzzer, two microphone on each side of the battery, 4 user buttons,  and a battery slot for RTC on the top of the board. There are only two noticeable chips on the board: JM20329 USB to SATA bridge, and ESS318 audio codec.

Click to Enlarge

Click to Enlarge

On the back of the board, we’ll find the GPIO header pin description, as well as the SATA connector for 2.5″ SSD or hard drive.

GeekBox Teardown

Before we can play with the development board, we need to open GeekBox to take out the board by pulling out the two WiFi antennas, and loosen two screws that hold the board/module to the plastic case.

Click to Enlarge

Click to Enlarge

We can now have a clear look at GeekBox system-on-module with two USB 2.0 host ports, Gigabit Ethernet, HDMI 2.0 port, and the 5V power jack. Rockchip RK3368 SoC is covered by a small heatsink, and coupled with Samsung KLMAG2WEPD-B031 eMMC 5.0 flash with 16GB capacity and 150/12MB read and write sequential speed, as well as Samsung K4E6E304EE-EGCE LPDDR3 chip (2GB RAM).

Click to Enlarge

Click to Enlarge

Gigabit Ethernet is handled by the ubiquitous Realtek RTL8211F transceiver and GST5009M magnetics, while Ampak AP6354 wireless module takes care of 802.11ac WiFi up to 867 Mbps and Bluetooth 4.1 connectivity, and so both wired and wireless networking performance should really be good. Rockchip RK808 PMIC takes care of power management. There are also some connectors and headers on the board for display and touchscreen, RTC battery, and UART console as well as button for power, reset and firmware update.

Click to Enlarge

Click to Enlarge

There’s no much to see on the other side of the board except the micro USB OTG port, and the micro SD card.

GeekBox and Landingship Assembly guide

Connect the add-on boards to the module and the module to Landingship baseboard is pretty straightforward, but there are still a few useful tips to learn.

From bottom to top on GeekBox module, we’ve got the RTC, fan and serial connector where you can insert the wires of the corresponding module…
GeekBox_RTC_Fan_Serial_Connectors

So you end-up having an actively cooled board with a real-time clock, and some hardware for debugging, that you can use without a baseboard.

GeekBox_RTC_Fan_SerialOnce the 7.9″ touch screen display is available, you’ll also be able to connect it to the Display and TP connectors of the GeekBox SoM without additional hardware. There’s no direct way to secure the fan on top of the heatsink, so you may want to either use some hot glue or double-sided sticky tape to hold it in place.

If you plan to connect a 2.5″ hard drive or SSD to the Landingship baseboard, that’s the first thing that you should do because of the location of screw holes and spacers may prevent an easy installation later on.GeekBox_Landingship_HDD_SSDYou’ll need to secure the SATA drive with the two black screws provided with the spacers and nuts.

Landingship_SATA_screwsNow you can insert the four spacers in the holes at the corner of the board, and tighten them with the nuts. The next step is to peel off the protective tape on GeekBox module’s MXM3 edge connector, before inserting the module into the MXM3 socket on the Landingship at an angle, pushing it down, and tightening it with the two screws that held Geekbox in its own case. Now put back the WiFi antennas in the module, and you’re done.

Click to Enlarge

Click to Enlarge

Click to Enlarge

Click to Enlarge

LandingShip_SSD If you prefer a more visual unboxing and assembly guide instead, please watch the video below.

[embedded content]

GeekBuying kindly send me GeekBox and accessory kit for review, and GeekBox sells for $109.99 shipped on their website, where you’ll also find Landingship for $29.99, the RTC battery for $4.99, the fan for $8.99, and the USB to TTL debug board for $1.99. You’ll get a slightly better deal if you combine all these on GeekBox page, as the complete kit I received sells for $154.55 as a bundle. Another interesting item that I did not receive is the 7.9″ touchscreen display with 2048×1536 resolution going for $69.99.

There are quite a few things to experiment with GeekBox, such as using a standard Android TV box, running Rockchip Light Biz OS desktop operating system, or instead transforming it into an Ubuntu mini PC and/or playing with its I/O capabilities. I’ll probably start with Light Biz OS…

Texas Instruments Introduces Entry level Sitara AM3351 Cortex-A8 Processor

$
0
0

Texas Instruments Sitara AM335x processor are designed by industrial applications, and found in develompent board such as BeagleBone Black or BeagleBone Green, and the company has recently launched the new Sitara AM3351 Cortex A8 processor without 3D GPU, no PRU just like AM3352, but they’ve also canned the two CAN interfaces (sorry, I had to) in order to bring the cost lower, while keeping the processor software and pin-to-pin compatible with other AM335x processors available in 13×13 mm package.

Click to Enlarge

Click to Enlarge

TI Sitara AM3351 CPU clock will also be limited to 300 MHz to 600 MHz with respectively AM3351BZCE30 and AM3351BZCE60 parts. It will only come with one Gigabit Ethernet port instead of up to two ports of other members of the family that are produced in 15x15mm package, and temperature range is limited to 0 to 90 C. Other features remain the same, and the processors will support TI-RTOS, Linux, Android, and Windows Embedded CE like its big brothers.

Texas Instruments Sitara AM3351 processor is available now with pricing starting at $5.70 in 1k quantity. More details can be found in the product page.


$15 Microchip Curiosity Development Board Supports 8-bit PIC Microcontrollers

$
0
0

I’ve just found out Microchip had introduced Curiosity development board a little while ago, in order to let students and others experiment with their 8-bit PIC DIP MCUs, and including MikroElectronika Mikrobus footprint, an interface for Microchip RN4020 module to add Bluetooth Low Energy, as well as other headers and some extra features like buttons, and a potentiometer.

Microchip_CuriosityMicrochip Curiosity board specifications:

  • MCU – PIC MCU socket for 8, 14, and 20-pin micro-controllers with PIC16F1619 pre-installed.
  • Expansion
  • USB – USB mini-B connector
  • Misc – Master Clear Reset button, potentiometer, LEDs, mTouch button, push button
  • Power Supply
    • 5V via USB
    • 9V using an external power supply (footprints only)
    • 3.3V to 5V external power supply via TP3 and TP4 pins
  • Dimensions – N/A

There are over 160 MikroElektronika Click boars on the market now, but only seven are listed with code samples for Curiosity board. Documentation includes a Quick Start Guide, product brief, and user’s manual. MPLAB Code Configurator and MPLAB X v3.05 or later can be used to program the board and develop your project, with the free graphical tools available for Windows, Linux, and Mac OS X.

MPLAB_X_IDE_Curiosity

Microchip Curiosity board normally sells for $20, but the coupon EOY2015DT will bring that down to $15 + shipping and taxes. More details can be found on the development board’s product page.

GeekBox and Landingship Android Overview and Benchmarks

$
0
0

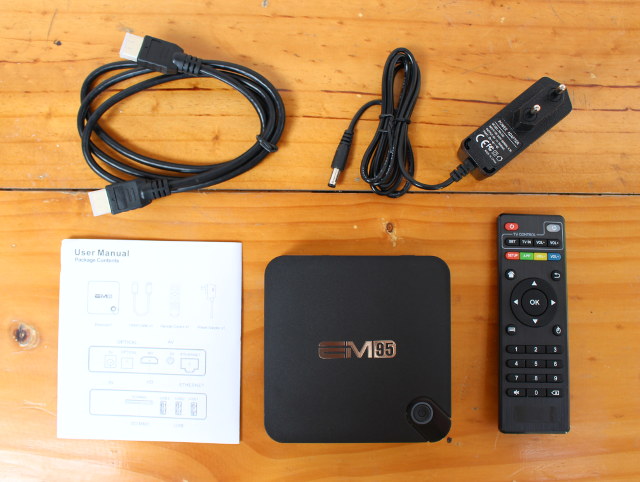
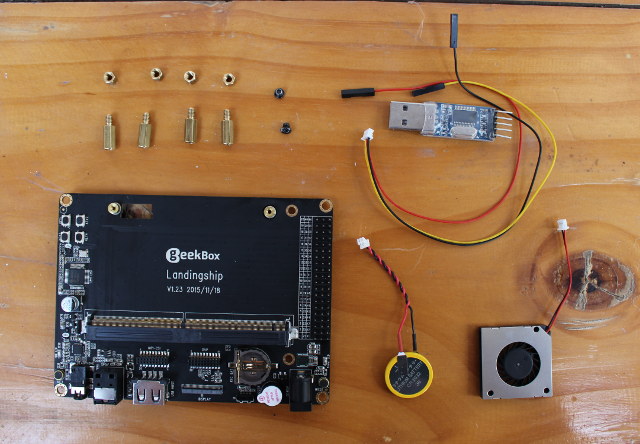
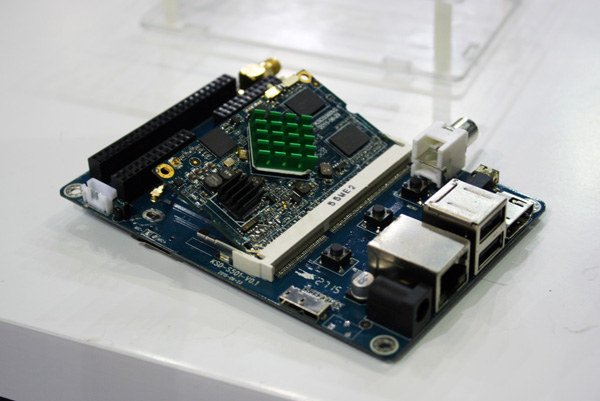
This week-end I checked out GeekBox TV box, and Landingship baseboard, explained how to connect the two together and install various optional accessories such as an RTC battery and a cooling fan. GeekBox comes pre-loaded with Android 5.1 + Ubuntu dual boot image, and as I’ve already reviewed other Rockchip RK3368 TV boxes, and GeekBox is also a development platform, I’ll simply run several benchmarks on GeekBox, as well as test SATA performance with an SSD connected to Landingship carrier board in Android, before checking out the Linux part a little latter.
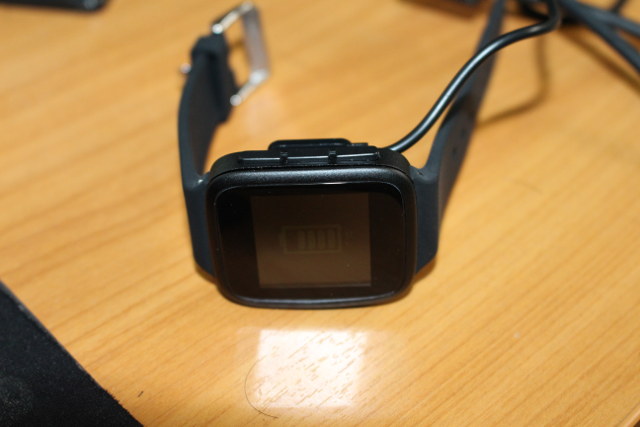
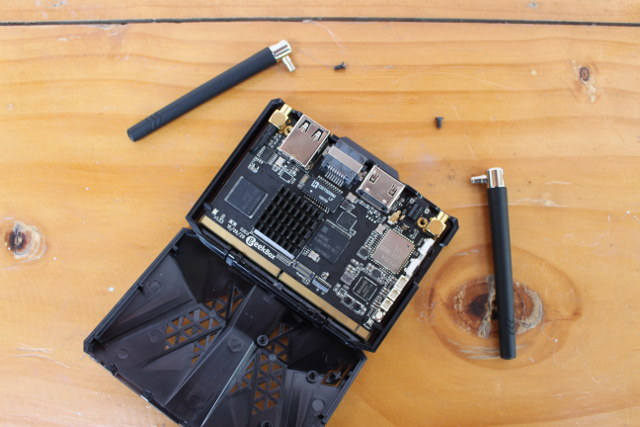
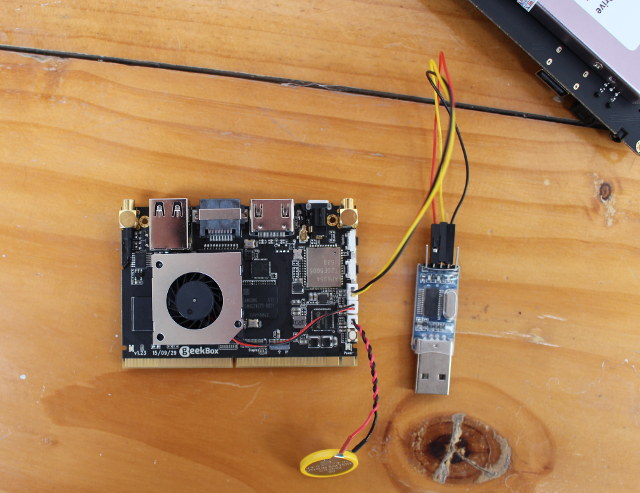
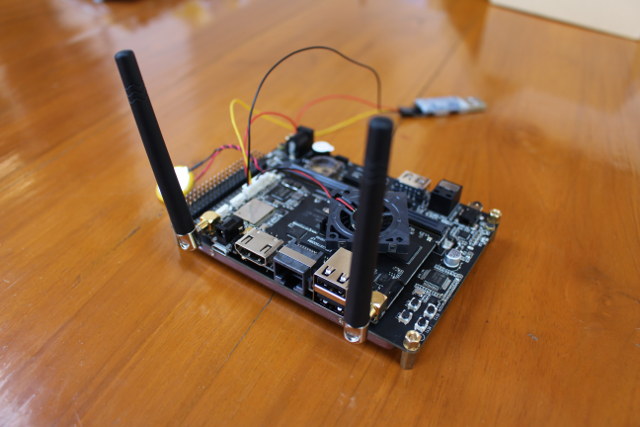
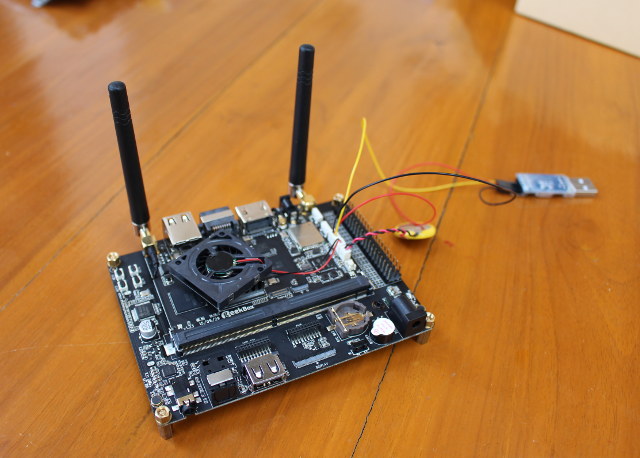
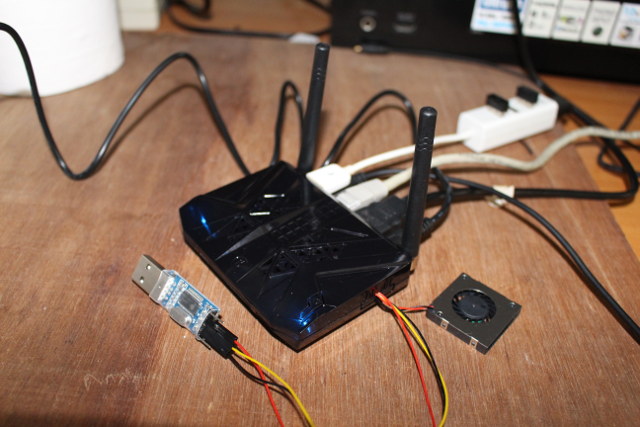
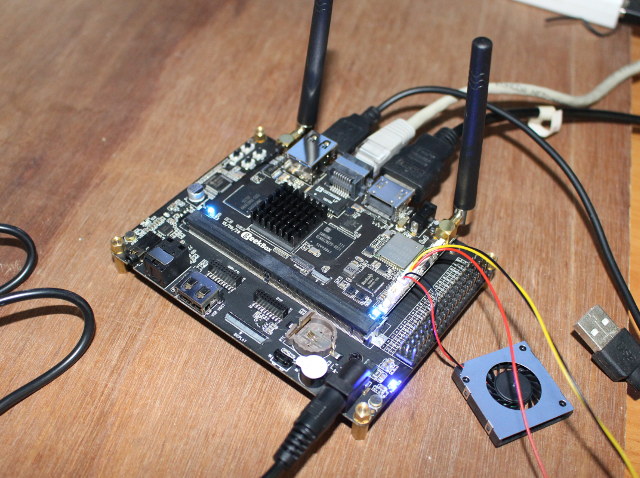
GeekBox_RunningThat’s no quite how you want to place the fan, but I wanted to show the USB to TTL debug board and other wires can be connected with the case closed. This allowed me to easily check whether the fan was spinning during testing, and it never did… According to one forum post, the temperature currently needs to reach 80 C for the fan to spin, so I may not have pushed the device enough for this.

First Boot and User Interface

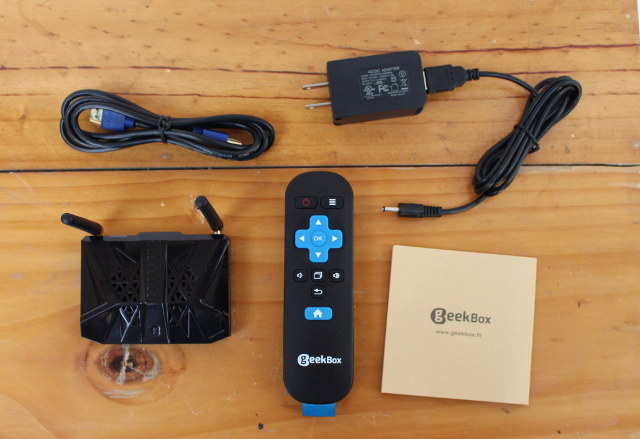
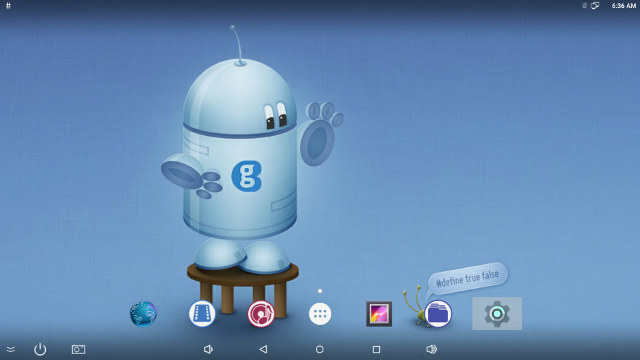
Geekbox is very small, so you won’t quite connect as many cables and devices as usual since it simply has less ports, so I did not connect a USB hard drive this time. Once you connect the power nothing will happen, and this is normal, as you need to press the power button on the front right to turn it on. You should quickly see two blue LEDs turn on, and within 25 seconds have access to the home screen.

Click for Original Size

Click for Original Size

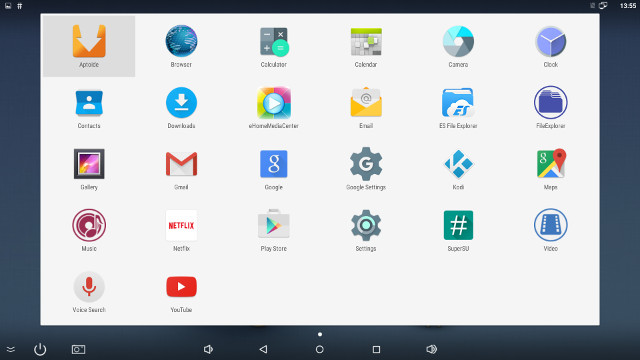
The system automatically detected LG 42UB800T 4K UHD television and set the video output to 2160p @ 60Hz, but as usual the user interface resolution is 1920×1080.GeekBox_Default_AppsGeekBox is also a ready to ue Android TV box with Google Play Store, Kodi, YouTube and Netflix apps pre-installed. Since the firmware supports both Linux and Android, only about 10GB of the flash is accessible in Android with a smallish 1.91GB “internal storage” partition for apps, and a 8.18GB “NAND Flash” partition for data.
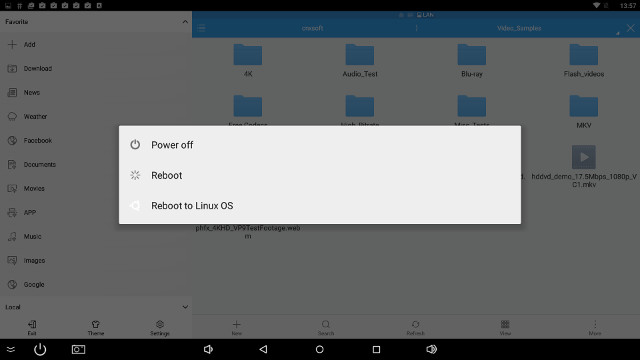
GeekBox_Dual_Boot_MenuIf you press the power button on the remote for about 2 seconds, you’ll find the power menu with Power off, Reboot, and Reboot to Linux OS.

GeekBox CPU-Z

CPU-Z is still not aware of Rockchip RK3368 processor, detect the eight cores still clocked at
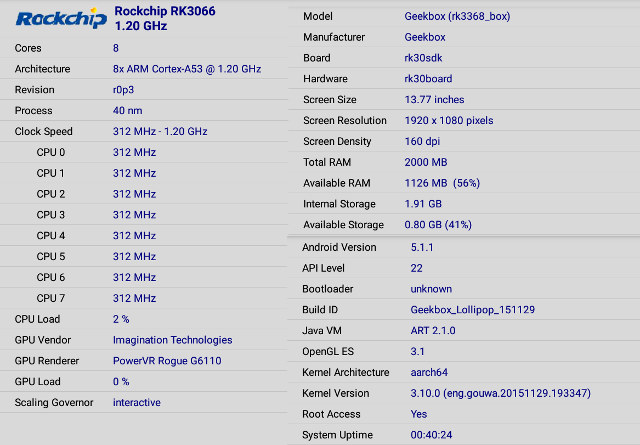
GeekBox_CPU-ZAndroid 5.1.1 is running on top of Linux 3.10, just like on other RK3368 devices like Zidoo X6 Pro. The firmware is rooted, and kernel is a 64-bit one (Aarch64).

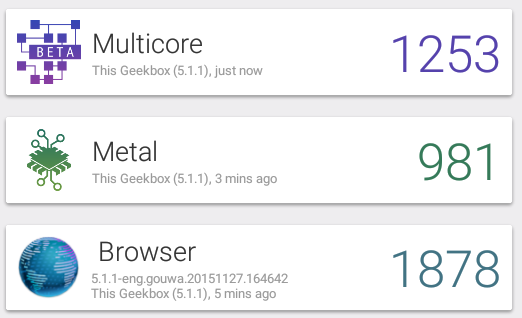
Antutu 6.0 Benchmark

Antutu 6.0 is the new release of the popular benchmark, and it’s the first time I run it on a Rockchip RK3368 platform.
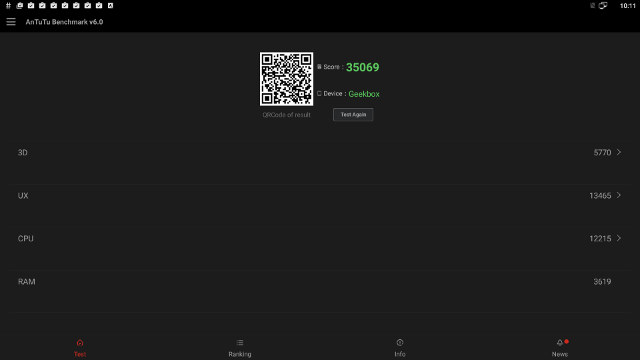
GeekBox_Antutu_6.0Interestingly enough, the 35,069 points score in Antutu 6.0 with Geekbox is quite similar to the score (34,171 points) in Beelink i68 and Antutu 5.7.1. You can get the detailed results for GeekBox here, where you’ll see that contrary to Amlogic S905 SoC with a weaker GPU, the PowerVR G6110 GPU in RK3368 managed to complete Marooned 3D graphics test. However, Amlogic S905 TV boxes are still found to be slightly faster in Antutu 6.0 with 36,741 points for Tronsmart Vega S95 Telos, and for MINIX NEO U1 media hub.

Vellamo 3.2 Benchmark

I’ve also run Vellamo 3.2 to have a better comparison with some other Android TV boxes.
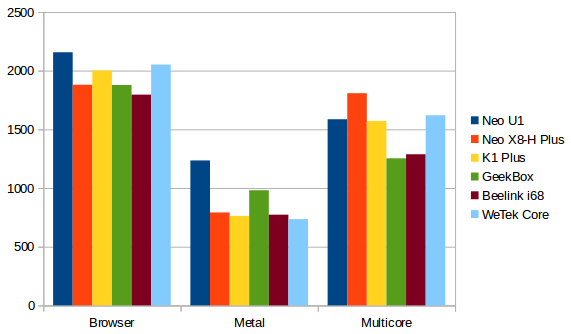
GeekBox_Vellamo_3.2The comparison chart shows the Browser results are pretty much equivalent between devices based on Amlogic S812 / S905, and Rockchip RK3368, while somehow Rockchip octa-core processor features lower in the multicore scale. and MINIX NEO U1 has a non-negligible edge for the Metal score.

Vellamo_TV_Box_ComparisonAll devices are running Android 5.1, except MINIX NEO X8-H Plus with an Android 4.4 firmware at the time of the review.

WiFi and Ethernet Performance

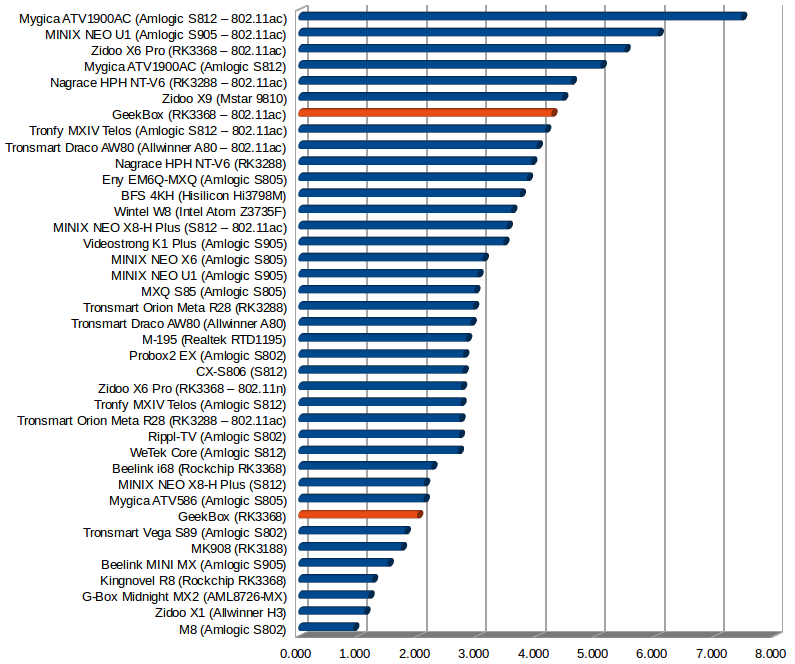
I’ll test WiFi 802.11n @ 2.4GHz, and WiFi 802.11ac by transferring a file between SAMBA and the internal storage, while using iperf to test full duplex performance of the Gigabit Ethernet port.

802.11n (130 Mbps connection) throughput was a little disappointing @ 1.99 MB/s or less than average, but 802.11ac (468 Mbps connection in Android settings) was relatively decent @ 4.25 MB/s (34 Mbps), although we may have expected more out of AP6354 867 Mbps WiFi module, and something closer to Mygica ATV1900AC or MINIX NEO U1 performance. For some reasons, the upload speed was much faster (39 seconds on average) than the download (about 1 minute 30 seconds), and if download speed was equivalent to upload speed, GeekBox would have had a similar throughput as ATV1900AC TV box.

Throughtput in MB/s (Click to Enlarge)

Throughtput in MB/s (Click to Enlarge)

I’ve run iperf -t 60 -c server_ip -d to test Gigabit Ethernet throughput in both directions, and Geekbox does work, although performance is not outstanding. At least the transfer does not collapse on one side of the transfer, and the Ethernet performance is similar to other RK3368 devices.

Throuthgput in Mbps

Throughput in Mbps

iperf output:

1

2

3

4

5

6

7

Client connecting to 192.168.0.105, TCP port 5001

TCP window size:  298 KByte (default)

[  6] local 192.168.0.104 port 50719 connected with 192.168.0.105 port 5001

[ ID] Interval       Transfer     Bandwidth

[  6]  0.0-60.0 sec  3.85 GBytes   551 Mbits/sec

[  4]  0.0-60.0 sec  4.46 GBytes   638 Mbits/sec
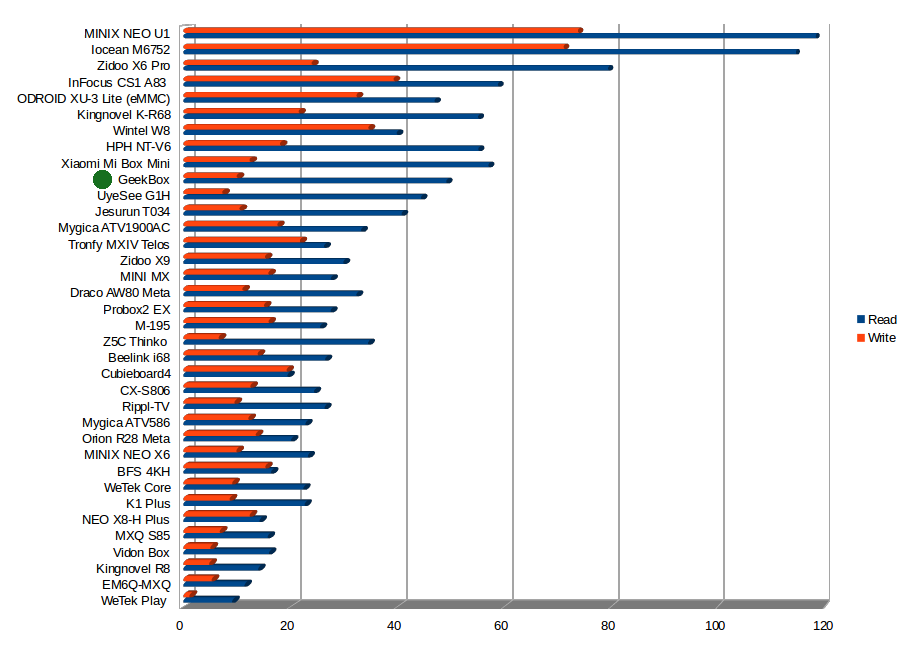
Storage Performance

I’ve started by running A1 SD Bench on the 8.18 GB internal storage partition, where the read and write speeds were respectively 49.22MB/s and 10 MB/s. That’s above average, but I would have wished an eMMC with a faster write speed to have been included with an RK3368 device selling for a premium.

Read and Write Speed in MB/s (Click to Enlarge)

Read and Write Speeds in MB/s (Click to Enlarge)

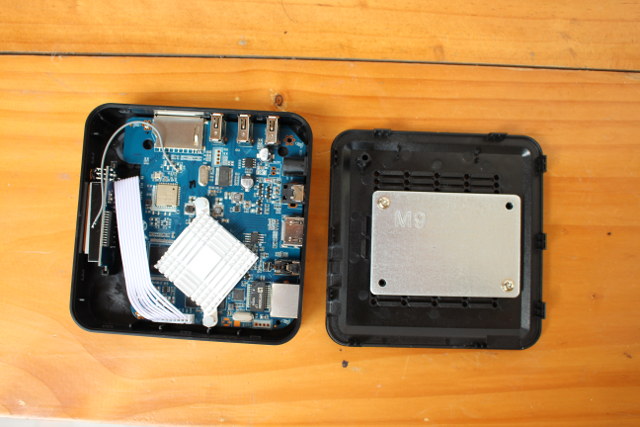
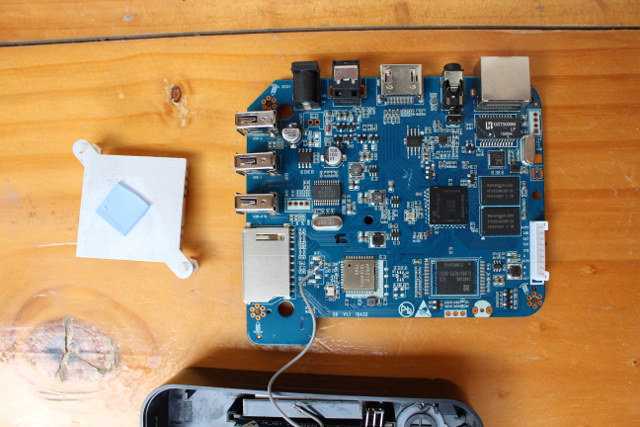
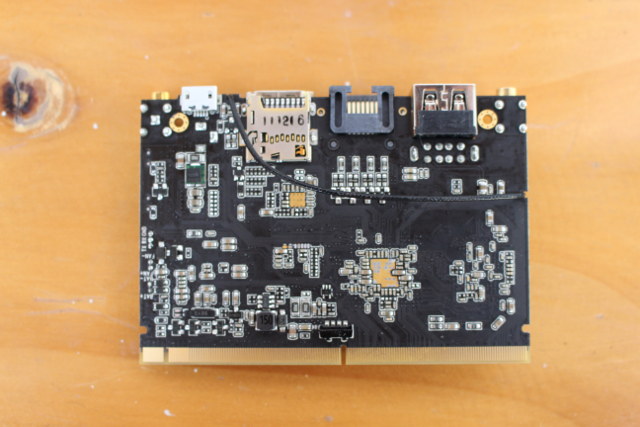
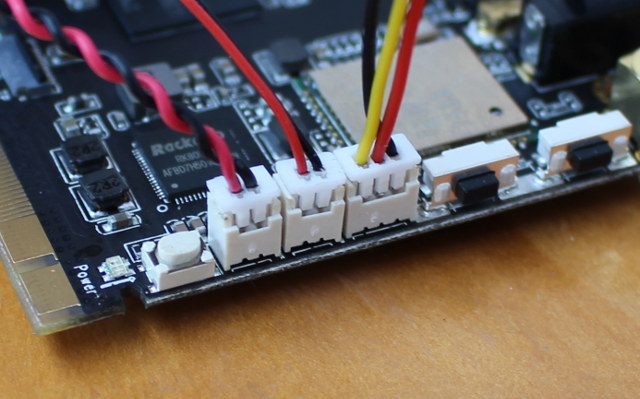
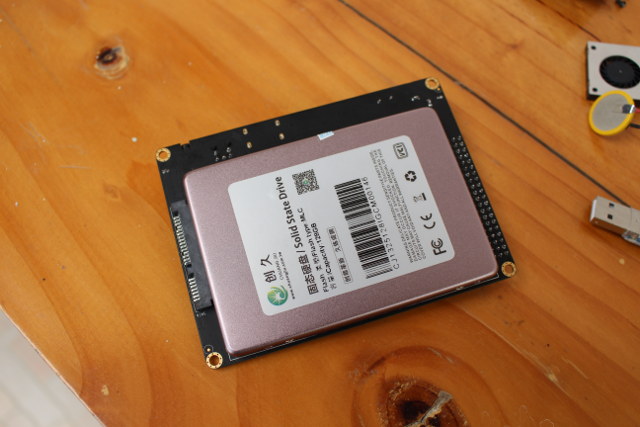
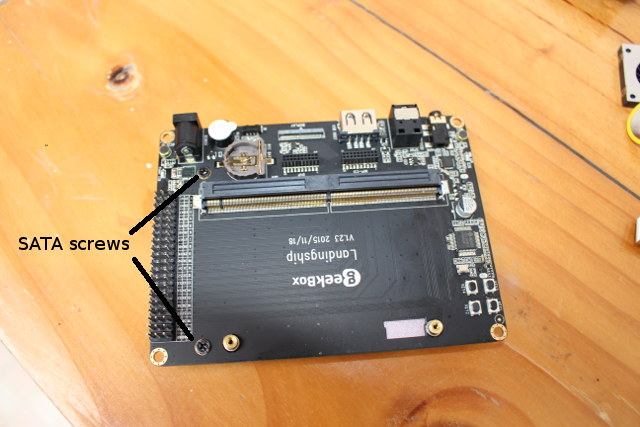
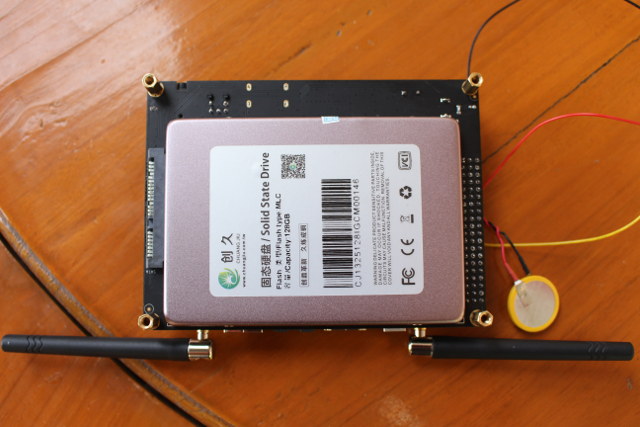
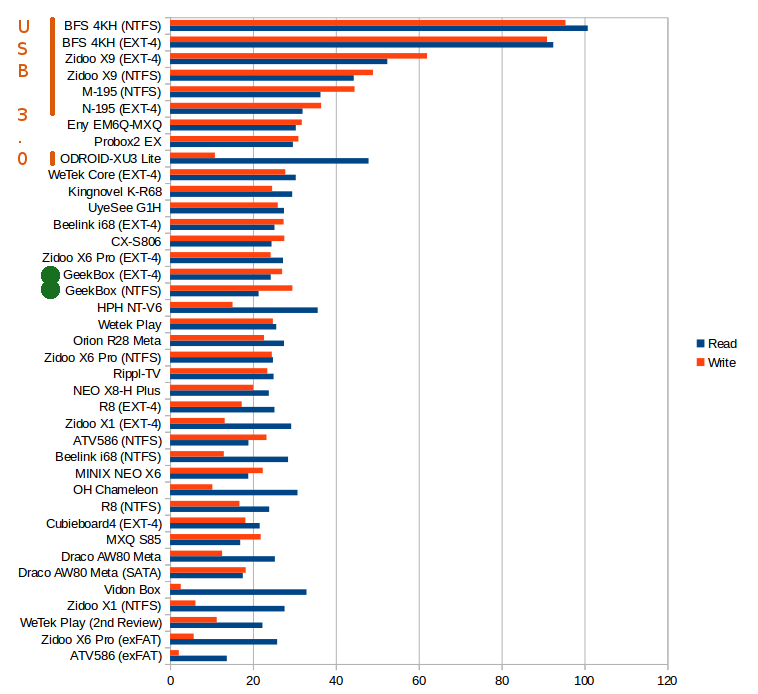
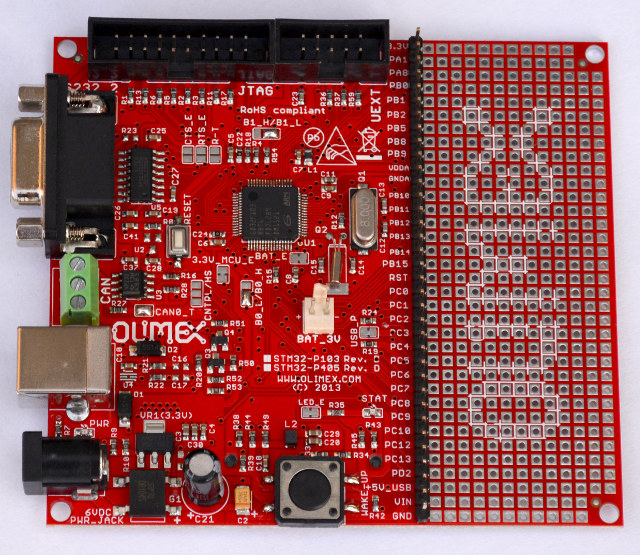
I’ll skip, direct USB performance simply because Landingship had a SATA port, that is also implemented via a USB to SATA bridge (JMicron JM20329). So I open GeekBox to take out the board, and insert it into Landingship where I have connected a 2.5″ SSD drive that I got with CubieTruck Metal Kit.

GeekBox_LandingshipI move the power supply cable to the baseboard jack, and still had to press the power button on GeekBox board to start the board. I have two partition on the drive: one EXT-4 partition mounted in /mnt/usb_storage/USB_DISK0/udisk1, and one NTFS partition mounted in /mnt/usb_storage/USB_DISK0/(1). So I used custom location option in A1 SD bench to test the performance:

  • EXT-4 – Read: 24.3 MB/s; Write: 27.04 MB/s
  • NTFS – Read: 21.37 MB/s ; Write: 29.51 MB/s

So for some odd reasons read speed is slower than write speeds,. I also had to run the benchmark on the EXT-4 partition three times, as the first two times, A1 SD bench would just exit by itself. The write speed is quite OK for a USB 2.0 connection, but the read speed could probably be improved (with some software tuning?).

Read and Write Speeds in MB/s

Read and Write Speeds in MB/s (Click to Enlarge)

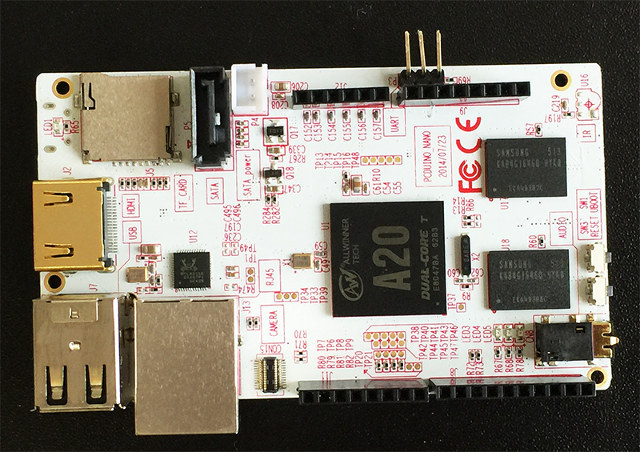
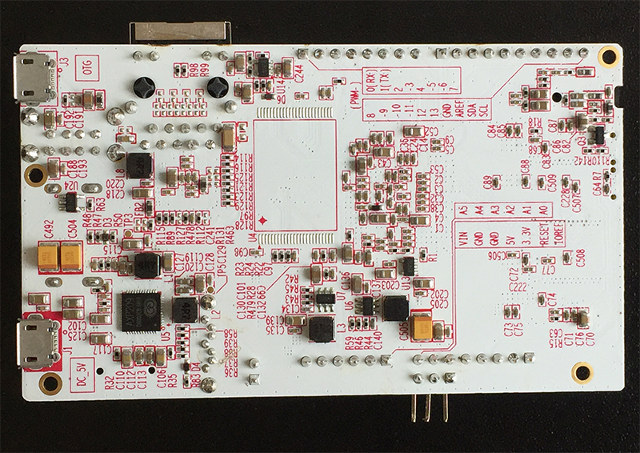
For reference that SSD achieved close to 180 MB/s read speed and 36MB/s write speed in Bonnie++ benchmark while connected to the SATA port of CubieTruck board (Allwinner A20).

The good thing is that I have not found any major flaws with the Android benchmarks, and GeekBox performance is above average in most tests, except 802.11n WiFi with my setup, but not outstanding. The main advantages of the platform are operating systems support (Android, Ubuntu, and Light Biz OS), hackability with expansion headers and hardware add-ons such as touch screen panel, and hopefully a community that will grow overtime.

I’d like to thanks GeekBuying for sending a GeekBox kit for review. If you are interested, and GeekBox sells for $109.99 shipped, and you can also get Landingship baseaboard for $29.99, and other accessories on the same page. Support is also available on GeekBox forums, and if you want to modify or improve Android 5.1 operating system for the platform, you’ll find the SDK on Github.

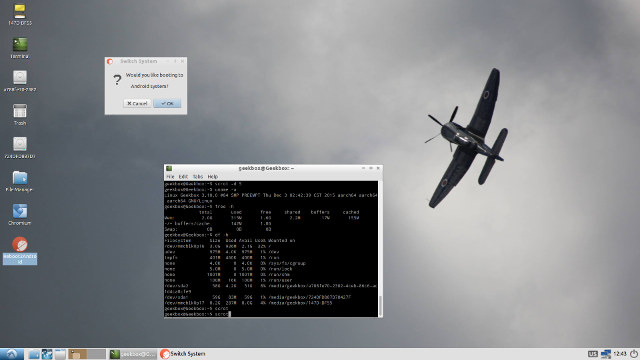
[Update: Since I plan to use a firmware image running Ubuntu (Actually Lubuntu) only instead of the dual boot image, I’ve quickly tried the dual boot in GeekBox with the pre-loaded firmware.

Click for Original Size

Click for Original Size

Ubuntu has it own 3.0GB partition, and can also access the 8.18GB “NAND Flash” partition found in Android. Clicking on Reboot2Android icon will pop-up a menu asking you whether you’d like to reboot to Android system.

]

The next step will be to checkout Ubuntu and Light Biz OS. I’m not sure in which order yet….

GigaDevice GD32 is a Faster, Software and Pin-to-pin STM32 Compatible Cortex M3 MCU

$
0
0

Las month, Olimex discovered a Chinese company called GigaDevice has made an STM32 clone called GD32 and compatible with STM32F103, but with higher core frequency (108MHz). Olimex has now posted an update after receiving a letter from GigaDevice, and trying GD32F103RBT6 MCU on their own STM32F103 boards. The company explained that GD32 was their own implementation, and claimed rights on GD32 trademarks, while Olimex discovered than GD32 was working just fine on their board having passed “all functional tests without any modifications”, and with all the same development tools and software code running fine.

Olimex_STM32_P103_GD32_MCU

Olimex STM32-P103 Board with GD32 MCU

GD32F103xx datasheet (PDF / English version) can be downloaded to find a few more details:

The GD32F103xx device incorporates the ARM Cortex-M3 32-bit processor core operating at 108 MHz frequency with Flash accesses zero wait states to obtain maximum efficiency. It provides up to 3 MB on-chip Flash memory and up to 96 KB SRAM memory. An extensive range of enhanced I/Os and peripherals connected to two APB buses. The devices offer up to three 12-bit ADCs, up to two 12-bit DACs, up to ten general-purpose 16-bit timers, two basic timers plus two PWM advanced-control timer, as well as standard and advanced communication interfaces: up to three SPIs, two I2Cs, three USARTs, two UARTs, two I2Ss, an USB 2.0 FS, a CAN and a SDIO.

The device operates from a 2.6 to 3.6 V power supply and available in –40 to +85 °C temperature range. Several power saving modes provide the flexibility for maximum optimization between wakeup latency and power consumption, an especially important consideration in low power applications.

Roger Clark also found out the board previously, and added support for GD32 to Arduino STM32. He also noticed that beside the fast clock speed, the zero wait state internal flash also provided performance improvements with GD32 delivering 64.41 VAX MIPS against 48.81 VAX  MIPS when both MCUs are clocked at the same 72 MHz frequency.

GD32 Board

GD32 Board

The tests were done on the GD32F103 board above, which can be purchased for 15 RMB (~$2.3 US) on Taobao. I also looked for GD32 board on Aliexpress, but the MCU does not appear to be very popular outside of China, and I only found one $12.75 GD32 + WiFi board. If you are based in China you have more more choice here and there with evaluation boards with LCD displays selling for 281 RMB (~$44 US) and up. You can also purchase various version of GD32 MCUs directly for $0.70 to $2.80 on Taobao.

Visit GigaDevice GD32 product page for some more details.

How to Upgrade Rockchip RK3368 Firmware in Linux

$
0
0
Home > Linux, Testing, Android, Ubuntu, Rockchip RK33xx > How to Upgrade Rockchip RK3368 Firmware in Linux

How to Upgrade Rockchip RK3368 Firmware in Linux

I’ve been looking for ways to upgrade firmware on Rockchip RK3368 based GeekBox in a computer running Ubuntu 14.04, but while they’ve provided firmware update instructions for Windows, which remains basically the same as upgrading firmware on Rockchip RK3288, there’s no such information for Linux. However, I could remember than Radxa Rock supported upgrade_tool utility, but since the tool linked on Radxa website might be outdated, I instead searched for some RKtools repository on Geekboxzone Github account, and I was lucky enough to find one.

upgrade_tool_RK3368

Here’s what I did to flash Light Biz OS to GeekBox with my Linux computer:

  1. Get the tools, and make sure upgrade_tool is there.

    1

    2

    3

    4

    5

    6

    git clone https://github.com/geekboxzone/lollipop_RKTools.git

    cd lollipop_RKTools/linux/Linux_Upgrade_Tool

    unzip Linux_Upgrade_Tool_v1.23.zip

    cd Linux_Upgrade_Tool_v1.23/

    ls -l upgrade_tool

    -rw-rw-r 1 jaufranc jaufranc 3013546 Dec 17  2014 upgrade_tool

  2. Download and extract the firmware, e.g. Cross_Lollipop_BizOS_V151208.7z:

    sudo apt-get install p7zip-full

    7z x Cross_Lollipop_BizOS_V151208.7z

  3. Now connect a USB cable to the USB OTG port of your device or board. In case of GeekBox that’s the micro USB port. Now as the board is powered on, keep pressing the Update key while pressing the Reboot key for a short time, and release the Update key after a few seconds. If Android or Ubuntu boots then you have not pressed the Update key long enough.
  4. Now you can use upgrade_tool to flash the image
    ./upgrade_tool uf Geekbox_Lollipop_BizOS_V151208/update.img
  5. The tools sjhould then show the progress, and complete successfully:
    That’s the output I got with Light Biz OS:

    Loading firmware...

    Support Type:RK330A    FW Ver:5.1.00    FW Time:2015-12-08 15:57:42

    Loader ver:2.40    Loader Time:2015-11-12 16:57:57

    Upgrade firmware ok.

    During the process, the board will reboot twice: once to flash the image, and once to boot your newly flashed firmware.

  6. You’re done. Enjoy!

If you own an RK3368 Android TV box, instead of a development platform like GeekBox, it’s unlikely you’ll get a reset button, but you’ll probably have a Update or Recovery pinhole somewhere that you can press with a toothpick, while powering on your device, in order to enter bootloader mode.

SMA-Q Smartwatch Mini Review and Teardown

$
0
0

I had great hopes for SMA-Q smartwatch, as it features an always on color e-Paper display, a built-in heart rate monitor, and promised 30-day standby battery life, as well as being 30-meter water resistant. But last week, I found out that the latter did not mean waterproof, and instead the watch was rated IP65 that’s only good enough to wash hands and a little rain, but not showering let alone swimming. In the last week, I could play with the watch, and found some serious Bluetooth connectivity issues (with Iocean M6752 smartphone), and I was recommended to upgrade the firmware of SMA-Q watch, and after that my Bluetooth issue have somewhat improve, but everything pretty much went downhill, and the watch is now out of order, and shows no sign of life.

So while I was expecting to write a full review, I’ll simply report with experience with the watch and SMALife app, before tearing it down to see how it was made.

SMA-Q Smartwatch Mini Review

One you’ve fully charged you watch, you’ll probably want to pair it with your smartphone. To do so you need to install SMAlife for iOS or Android.

Click to Enlarge

Click to Enlarge

You’ll be asked to enter you country code, phone number and password to register, but you could also use Chinese social networks to register, and simply skipped registration altogether by selection “Try directly”. I have registered with my phone number, and after that you are asked to input your age, gender, height and weight. It’s important to give the correct value to have a better estimates, such as walked distance. Finally, you’ll be asked to authorized notification access the app. The first time, the app also detect a new version with a Changelog in Chinese only, and I proceeded to get the latest SMALife 2.7 app.

Now you should have access to the settings menu.

Click to Enlarge

Click to Enlarge

Tap on Connect watch, then select SMA WATCH Q, and the next window you search for your watch, and then display Bluetooth connecting. The full pairing may well take over one minute, and while that’s annoying by itself, the app did not seem to reconnect to the watch if connection was lost, and I had to do a manual disconnect and reconnect that did not work, unless I reboot my phone. Reconnecting to the watch also mean the step and distance count in the watch, and all data that was out of sync with the phone would be lost.

Click to Enlarge

Click to Enlarge

Beside Anti-lost and sedentary could never be enabled, sleeping tracking did not work, and I struggled to get any activity tracking data. So this is when I decided to contact GearBest to report the problems, and got instructions to upgrade the firmware on the watch. Firmware upgrade went smoothly, but was only available in Chinese (in the app), and I tagged Shenzhen Smart Care Technology Limited in Facebook, and the following day the company had provided an updated app with English support. So at least, the company is trying what they can to improve the device.

Sadly, while there was some improvement, with better connectivity, and I could enable Anti-lost and sedentary, the last two features never worked. Having said that I could get gmail, SMS, and call notification working, and since four lines are shown in the watch screen it was much more readable and easy to use than on No.1 D3 watch.

Click to Enlarge

Click to Enlarge

While only calls and SMS notifications are enabled by default, you can receive any app notifications to you watch, but going to SMA-Q settins, Pushing Setting, and enable the apps you wish. Running Track is crashing when I accessed it, Upgrade Help is only in Chinese, and you ma already have noticed the English translation may need to work across the app. I particularly like the “you have been binding” to notified the watch is allegedly connected to the phone whether it is or not.

Before the firmware upgrade I could get 4 to 5 day battery life, but I got surprised when the watch showed 21% one morning, and simply turned off a couple of hours later… However, after the firmware upgrade this went down to 20 hours, and the last day as I used to heart rate monitor, it seems to have gone to hell with the battery lasting 5 hours…

Talking about the heart rate monitor, I did learn a few things. Since the hear rate monitor is using an electro-optical sensor it’s important not to let light affect the results, and you should make sure the watch is tight around your arm, and placed after the carpal bone, higher up your forearm. I did this, and went for a walk. It started at 80 bpm, and went up to 110 bpm as I walked a bit faster, so it seemed to work. But as I started to jog, the measured value went down to 80 bpm again… The watch also has a running mode that will record a run with your hear rate, time and estimated distance, but I did not manage to load the results to the phone, as the heart rate icon return an error in Chinese. The last day as I ran a bit faster the heart rate was also stuck at 80 to 90 bpm, and that was in the evening. I also noticed the running time was different from the one reported by Nike+ Running app on my phone. So yet one more issue.

While I really prefer the Sharp e-Paper display used in the watch compared to the OLED displays used in most other smartwatches, as it’s always on and readable in bright light, it’s quite dim compared to the display on my “dumb” Casio digital watch, and viewing angles are very poor.

Finally, the watch stopped working after a 25-minute run one evening, as I used the running mode and heart rate monitor. As I completed the run, I press the back button, but instead of asking whether I wanted to save the results, the screen just went blank. A few minutes later, I noticed the screen switched between red and rainbow colors just like in a firmware update. I then saw it enter some test mode, and the HRM green LED would keep on blinking. I tried to turn it off, but it kept blinking, so I let the battery deplete. I could see some humidity found its way into the watch… Nevertheless, at night and the next morning, I still tried to charge the watch again with two different power supplies, but nothing happens after a few hours waiting. The watch was clearly dead.

SMA-Q Smartwatch Teardown

While the watch is clearly a massive disappointment, the silver lining is that I could now tear it down to find out how it was made.

SMA-Q_Watch_Screen_CoverThe screen cover has some glue/silicon to provide some sort of waterproofness. I could then relatively easily take the screen out and find out a Silicon Labs EFM32 MCU was used in SMA-Q.

Click to Enlarge

Click to Enlarge

More exactly EFM32 Giant Gecko EFM32GG330F512 ARM Cortex-M3 MCU @ 48 MHz with 512 KB Flash, and 128KB RAM.

Click to Enlarge

Click to Enlarge

Taking out the board to checkout the other side confirms the watch features a 150 mAh battery, and we can find out the Bluetooth 4.0 LE is implemented with Nordic Semi n51822 (nRF51822) Bluetooth Smart SoC. That means that company has not used an home grown (Chinese) electronics in their watch, but instead relied on European tech for the ICs, and Japanese tech from Sharp for the display. There are also various test points on this side of the watch board that might be used for hacking.

Even though I’m quite sad that SMA-Q smartwatch did not perform well at all for me, I’d like to thanks GearBest for providing a sample. If you’d still like to purchase one, you can do so on their website for $55 shipped.

Viewing all 2336 articles
Browse latest View live