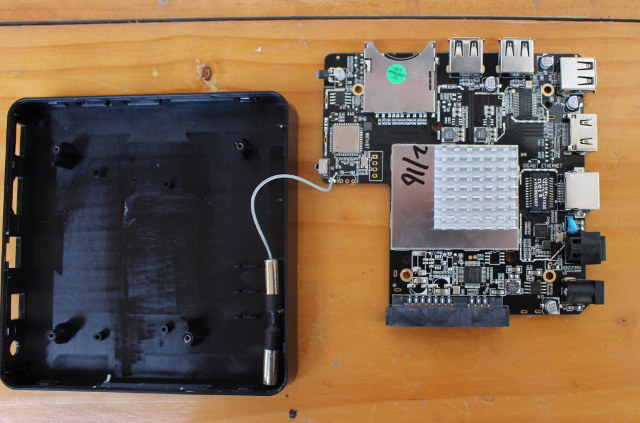
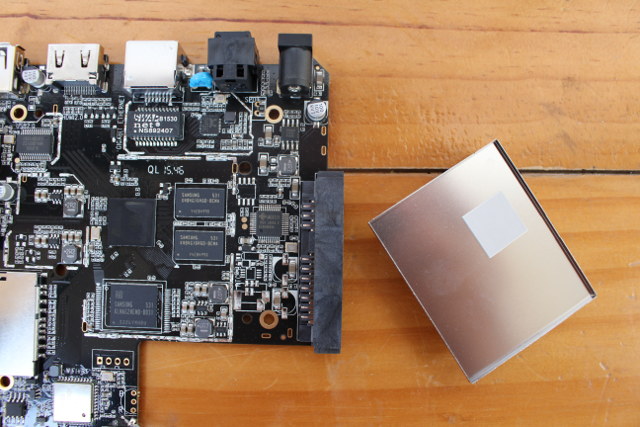
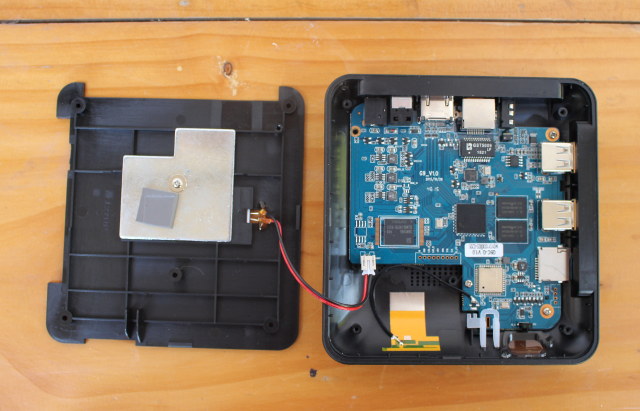
We’ve already seen that MINX NEO U1 has some impressive hardware to offer with a good thermal solution, and high-end chips for storage and WiFi, as well as some neats additions like RTC support. But obviously the most important is to find out how the box performs, so I’ve put it through it spaces with video playback and features testing, as well as some benchmarks.
First Boot, OTA Firmware, Settings and First Impressions
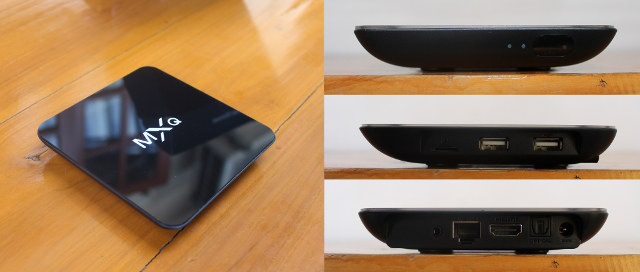
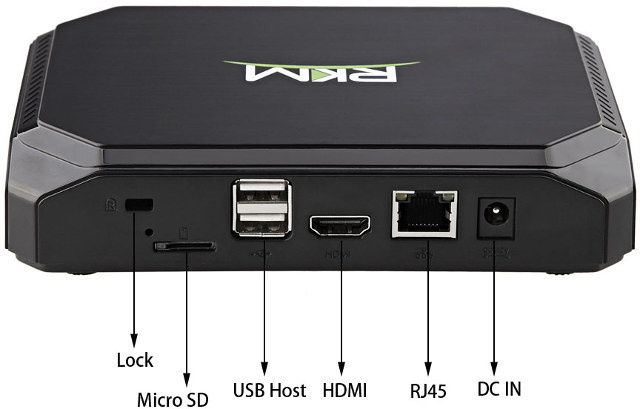
The device has three full-sized USB 2.0 ports, which become four once we had the provided USB OTG adapter to the remaining micro USB port. So I’ve connected a USB 3.0 hard drive, the RF dongle for NEo A2 Lite air mouse, a USB hub with a USB webcam, a USB keyboard, and the RF dongle for Tronsmart Mars G01 gamepad, as well as USB powered speakers to the micro USB port. After inserting HDMI, optical audio and Ethernet cables, as well as the speakers cable into the 3.5mm speaker jack, I connected the 5V/3A power supply, and… nothing happened. So you just need to press the power button on the remote or unit itself to boot the device. A boot typically takes just over 30 seconds, or quite faster than the 50 seconds or so on lower end Amlogic S905 devices such as K1 Plus or Beelink MINI MX.
![Click for Original Size]()
Click for Original Size
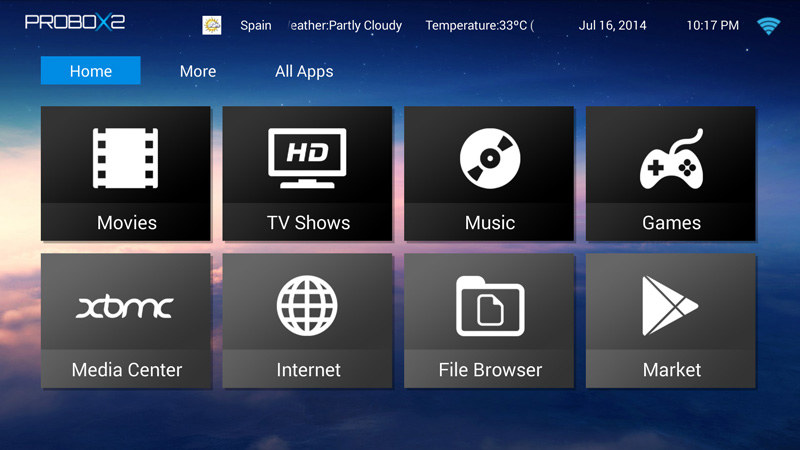
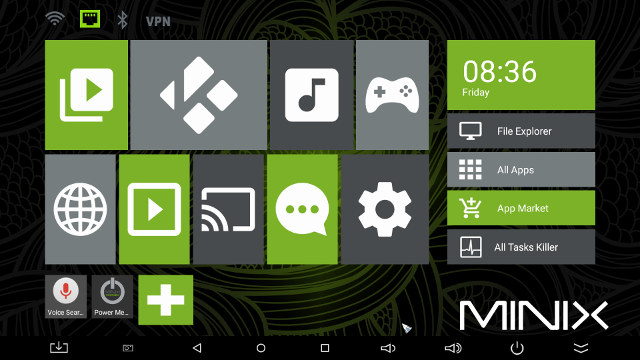
That’s the typical MINIX launcher, but an improvement over MINIX NEO X8-H Plus home screen when it launched last year. The top 4 icons shows WiFi, Ethernet, Bluetooth and VPN status. The first 8 icons in the center are “folders” for apps categorized in Videos, Kodi, Music, Games, Internet, Online streaming. Screencasting, and Social, with the last one redirecting to Amlogic settings app, as seen on all other Android Lollipop firmware for Amlogic TV boxes. The bottom row is for shortcuts, and the right column features time/data, a File Explorer apps folder, the full list of app (confusingly sorted in Chronological order), and App Market apps folder, and All Tasks Killer to automatically kill all background tasks. The status provided a convenient link to the Download folder, as well as the usual other buttons Home, Back, Volume, etc… You can hide the bar with the double down arrow icon on the right, and make it show again by pulling it up from the bottom.
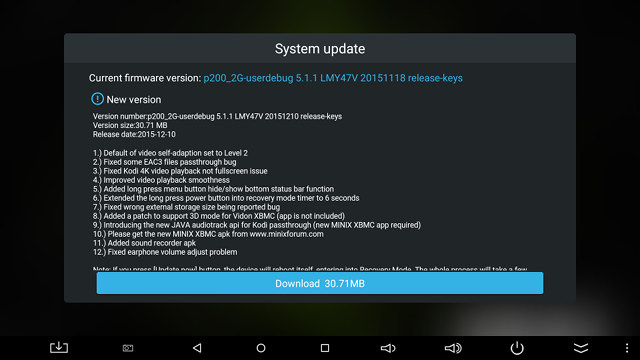
Before going to the settings, I’ll mention my experience with FOTA (Firmware Over The Air) update. MINIX asked me to delay the review until their release FW003 firmware and XBMC for MINIX, which was out Friday evening. So I went to MINIX System Update app, and the new firmware was properly detected.
![Click for Original Size]()
Click for Original Size
I liked that the update comes with a full log, and that it was a small incremental 30.71 MB download. The process went very smooth, with the device rebooted after unpacking the firmware, and flashing it with the usual Android firmware update animation. I would have however preferred that XBMC for MINIX was included inside that firmware, instead of asking users to side-load MINIX_XBMC_20151209.apk themselves.
![Click to Enlarge]()
Click to Enlarge
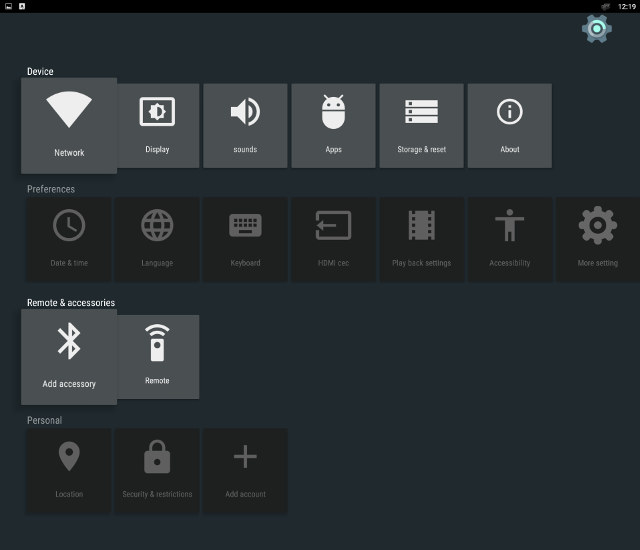
The main options in the settings app are exactly the same as in MINI MX, as shown above, however the company also made some improvement (in bold) to the most important options:
- Network – WiFi, Ethernet, and VPN configuration
- Display
- Screen resolution: Auto, 480p-60Hz, 576p-50Hz, 720p 50/60Hz, 1080i 50/60Hz, 1080p 24/50/60Hz, 4K2K 24/25/30/50/60Hz or SMPTE
- Screen position
- Screen rotation (middle port, force land, original)
- Sound – System sound (On/Off), Digital sounds (Auto detection, PCM, HDMI or SPDIF), and USB audio
- Preferences – HDMI CEC (But not working: “This remote device does not support CEC”), and Play back settings with “HDMI self-adaption” with three options:
- OFF – no processing
- Level 1 – 23.976fps videos are processed under 1080p60Hz mode;
- Level 2 – Switching TV’s output according to source video fps
- Remote & accessories – Add Bluetooth devices (redirect to Android lollipop Bluetooth configuration)
As with other Amlogic devices, configuring the network options (WiFi, Ethernet and Bluetooth) went well. I could set video output to 4k2k @ 60Hz, but sometimes the video output would fall back to 1080i50 or 2160p25. The former happened once or twice after a reboot, or power cycle, and is easily noticeable, as the mouse pointer will be much bigger. I think the latter (2160p25) happened after playing some videos (TBC).
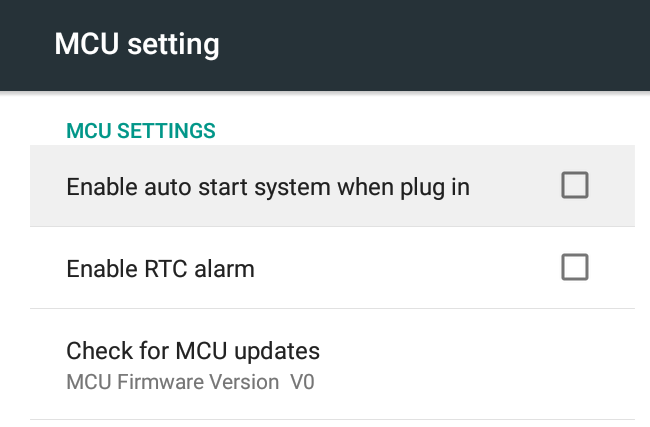
You can go to Android Lollipop settings by clicking on More Settings. I could immediately a new feature that stands out: MCU setting.
![MINIX_NEO_U1_MCU_Settings]()
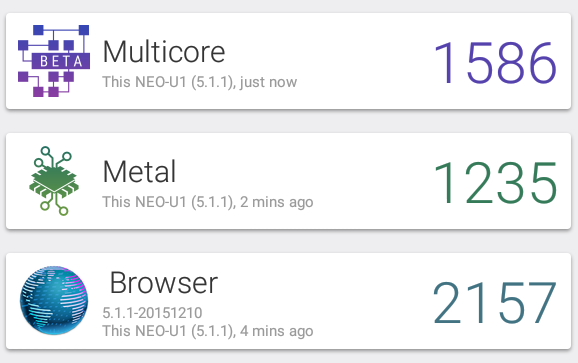
![About_NEO_U1]() You can configure the MCU behavior in this section. For example, you can select to automatically start the device when power is on, instead of having to press the power button. I’ve not sure what “RTC alarm” means in that context, maybe “low battery”?, but if the MCU is also handling RTC some neat feature like timed power on/off could also be implemented in the future. Finally, I could upgrade the MCU firmware to Version V1 without issues.
You can configure the MCU behavior in this section. For example, you can select to automatically start the device when power is on, instead of having to press the power button. I’ve not sure what “RTC alarm” means in that context, maybe “low battery”?, but if the MCU is also handling RTC some neat feature like timed power on/off could also be implemented in the future. Finally, I could upgrade the MCU firmware to Version V1 without issues.
The 16GB eMMC flash is partitioned with a single unified 11.87GB partition, which is plenty of space for apps, and some data, and at the end of the review I still had 7.57GB free space. All options that you can find in Android Lollipop are also there including Language & Input, Backup & reset, Printing, Accessibility, and so o.
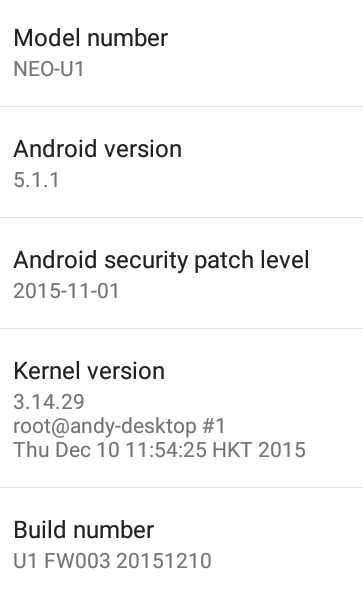
The “About Mediabox” section reports NEO-U1 model number running Android 5.1.1 on top of Linux kernel 3.14.29, with the firmware firmware version being U1 FW003 20151210. The firmware is not rooted by default.
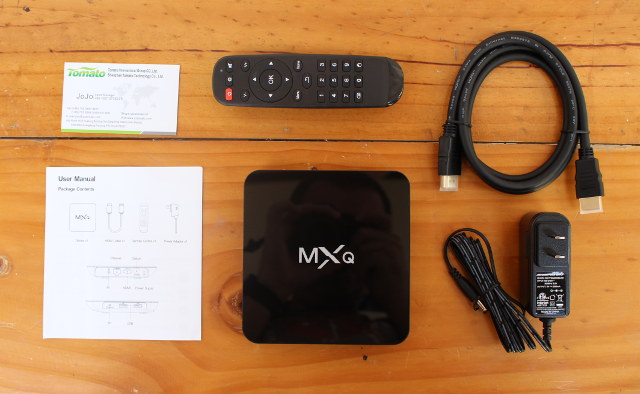
A MINIX infrared remote control is included by default. I added two AAA batteries, and I could use it without problem, even up to 10 meters. But I strongly recommend you also purchased MINIX NEO A2 Lite air mouse as well, especially if you don’t already a wireless keyboard or air mouse with keyboard, as it makes the user experience much better with a three-in-one keyboard, air mouse, and remote control. The mouse pointer works just as well as in MeLE F10 Deluxe, but the dedicated air mouse activation key removed unwanted clicks I sometimes get with the MeLE device when I want to enable air mouse mode. The keyboard is also nice with large keys, and the range is also very good, as I could test it up to 10 meters. I only found some “minor” issues. I found myself pressing the top button of the D-pad quite often instead of the OK button, so the design might have been slightly more ergonomic if the D-Pad was slightly higher. That one probably depends on your hand size though. While the keyboard is really nice, I wished the often used Space and Back key where left alone as in a full keyboard, as when Fn is enabled, pressing space will display the equal sign “=” instead, and the Back key will feel like it’s not used as all since it’s in “Delete mode”. But as I said these are minor, and possibly just something to get used to. Another input option is to use the Android remote control app for MINIX NEO U1 with your smrtphone.
The Google Play Store worked for all apps I had to use for the review, and most apps I previously installed on my phone would also install, except when telephony is required, or an app can now be only installed in specific countries. I also installed Amazon Underground, in order to play Riptide GP2 for free.
Power handling is very well implemented, and you can go into standby or power off the device with the remote control, or the power button. MINIX NEO H8-Plus would not support turning on the device with the remote control, which was a pain, the company fixed that with NEO U1 and you can comfortably control the system from your sofa using either the included IR remote or NEO A2 Lite air mouse.
Power consumption is also good, and the hard drive is properly turned off in standby or power off modes:
- Power off – 0.1 Watt
- Standby – 1.2 Watt
- Idle – 3.2 to 3.4 Watts
- Power off + USB HDD – 0.1 Watt
- Standby + USB HDD – 1.4 Watt
- Idle + USB HDD – 4.3~4.4 Watts
So you’ll actually spend a little less money compared to cheaper Amlogic alternatives when the box is in power off or standby mode. I did come across two issues:
- Once I got stuck in standby mode, which required a power cycle
- When I disconnected the USB hub, all other USB ports went down… so the hard drive, and A2 Lite air mouse would not work… That was a little scary, but I used the IR remote control to turn off and on the device again, and it worked.
Amlogic S905 processor is already low power, and just like Beelink MINI MX, NEO U1 stays cool during operating. I measured 41°C and 45°C respectively on the top and bottom of the case after Antutu 6.0, and the temperature went up slightly after playing Riptide GP2 for 20 minutes to 45°C and 50°C. Those are values measured with an IR thermometer, and I scanned both top and bottom covers of the case to find the highest temperature.
Overall, the firmware is very and extremely responsive, as I never had slowdown during use, so the user experience is very good with this device, and much different from the cheaper Amlogic S905 devices. As seen above there are still some small bugs, which hopefully they’ll be worked on in due time.
Video Playback with Kodi/XBMC 15.3 for MINIX
So far, Kodi was not really usable on Amlogic devices, so I had to review K1 plus with Video Player, and MINI MX with MX Player. But some patchsets have made it to Kodi, and MINIX must have leveraged them by releasing their own XBMC for Kodi 15.3. You’ll actually have two versions in the firmware: Kodi 16.0 alpha that comes with the firmware, but you should really download and install MINIX version instead.
So I played all videos with “Kodi 15.3 MINIX” from a network share over Ethernet, unless otherwise noted. The first time I started Kodi, I could not hear much, unless I boosted my TV volume to 100%. I exited the app, and when adjusting the volume from the launcher, I noticed it was only about 30% (but showed 100% in Kodi), so I adjusted it to the max, reduced my TV volume to 25%, and restarted Kodi to have proper audio volume.
Let’s start with the easy video with with Linaro media samples, Elecard H.265 samples, and low resolution VP9 video:
- H.264 codec / MP4 container (Big Buck Bunny) – 480p/720p/1080p – OK
- MPEG2 codec / MPG container – 480p/720p/1080p – OK
- MPEG4 codec, AVI container 480p/720p/1080p – OK
- VC1 codec (WMV) – 1080p – 480p/720p/1080p – OK
- Real Media (RMVB), 720p / 5Mbps – OK
- WebM / VP8 480p/720p/1080p – OK
- H.265 codec / MPEG TS container – OK
- WebM / VP9 (no audio in video) – OK
Clean sheet here. Please also note that HDMI self-adaption, better known as automatic frame rate switching, worked very well too.
I’ve also gone through some videos with higher bit rates, still over SAMBA and Ethernet:
- ED_HD.avi – OK
- big_buck_bunny_1080p_surround.avi (1080p H.264 – 12 Mbps) – OK
- h264_1080p_hp_4.1_40mbps_birds.mkv (40 Mbps) – OK
- hddvd_demo_17.5Mbps_1080p_VC1.mkv (17.5Mbps) – Could be smoother
- Jellyfish-120-Mbps.mkv (120 Mbps video without audio) – Not 100% smooth, but no buffering while playing from network… Same results on USB drive.
Not too bad. The Jellyfish video felt exactly the same as on MINI MX with MX Player, so Amlogic S905 might struggle with 100 Mbps+ videos.
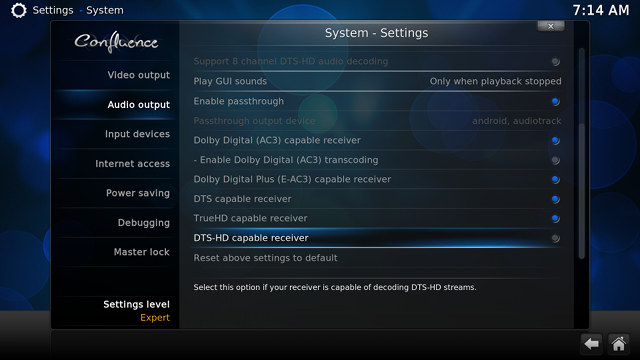
After that I tested audio capabilities of the device with PCM, HDMI and S/PDIF pass-through in Kodi, as well as PCM (downmix) with MX Player and MoviePlayer apps. For pass-through you need to configure Kodi/XBMC 15.3 as shown below. With S/PDIF you should also enable Dolby Digital (AC3) transcoding.
![Kodi_TrueHD_DTS-HD_Pass-through]()
You’ll notice that DTS-HD capable receiver is not enabled, and it’s not a mistake, as MINIX made clear this is not supported right now.
| Video |
PCM Output
(Kodi) |
PCM Output
(MX Player)
|
HDMI Pass-through
(Kodi) |
S/PDIF Pass-through
(Kodi) |
| AC3 / Dolby Digital 5.1 |
Audio OK, video not smooth |
No audio |
OK (Dolby D 5.1) |
OK (Dolby D 5.1) |
| E-AC-3 / Dolby Digital+ 5.1 |
OK |
No audio |
OK (Dolby D 5.1) |
OK (Dolby D 5.1) |
| Dolby Digital+ 7.1 |
OK |
No audio |
OK (Dolby D+ 7.1) |
Audio Formats Not Supported over S/PDIF |
| TrueHD 5.1 |
OK |
No audio |
OK (TrueHD 5.1) |
| TrueHD 7.1 |
OK |
No audio |
OK (TrueHD 7.1) |
| Dolby Atmos 7.1 |
OK |
No audio |
OK? (TrueHD 7.1) |
| DTS HD Master |
OK |
No audio |
DTS 5.1 only |
OK (DTS 5.1) |
| DTS HD High Resolution |
OK |
No audio |
DTS 5.1 only |
OK (DTS 5.1) |
So that’s pretty good overall, except DTS-HD pass-through is not working yet over HDMI, and since DTS and Dolby license are not included, only apps that handle DTS/Dolby by software will output anything when PCM is selected. I had a question marked to “Atmos OK” because I could hear audio fine, and TrueHD 7.1ch B was shown on my AV receiver, but I’m not 100% sure if Atmos should have shown instead.
4K video can now be played pretty well in Kodi, almost as well as with MX Player:
- HD.Club-4K-Chimei-inn-60mbps.mp4 – OK
- sintel-2010-4k.mkv – OK
- Beauty_3840x2160_120fps_420_8bit_HEVC_MP4.mp4 (H.265) – OK
- Bosphorus_3840x2160_120fps_420_8bit_HEVC_MP4.mp4 (H.265) – OK
- Jockey_3840x2160_120fps_420_8bit_HEVC_TS.ts (H.265) – It would not play the first time, but I clicked again and it was OK…
- MHD_2013_2160p_ShowReel_R_9000f_24fps_RMN_QP23_10b.mkv (10-bit HEVC) – OK
- phfx_4KHD_VP9TestFootage.webm (VP9) – 3 to 4 fps
- BT.2020.20140602.ts (Rec.2020 compliant video) – OK
- big_buck_bunny_4k_H264_30fps.mp4 – OK
- big_buck_bunny_4k_H264_60fps.mp4 – The video is not very smooth and large audio delay (4K H.264 @ 60 fps not supported by S905 VPU)
- Fifa_WorldCup2014_Uruguay-Colombia_4K-x265.mp4 (4K, H.265, 60 fps) – OK
- Samsung_UHD_Dubai_10-bit_HEVC_51.4Mbps.ts (10-bit HEVC / MPEG-4 AAC) – Failed. It will show the first images, and gets stuck at ~85% buffering. The same behavior occurs from a USB drive.
- Astra-11479_V_22000-Canal+ UHD Demo 42.6 Mbps bitrate.ts (10-bit H.265 from DVB-S2 stream) – The first time it played zoomed in with only one quarter of the video showing on the full screen. But I tried later and it played fine, and without the bug where the video freezes for a short time, as in MX Player and Video Player in the other two S905 boxes I tested.
The only really problem is with Samsung_UHD_Dubai_10-bit_HEVC_51.4Mbps.ts, and times when videos can play, and other don’t but overall it’s very good. It’s also the first Amlogic S905 that can play those files from the network without buffering issues.
You can see how I configured the system in the video below, as well as show 4K videos and audio pass-through in action.
[embedded content]
Sintel-Bluray.iso and amat.iso (Ambra – Prism of Life) Blu-ray ISO could play smoothly, as well as two 1080i video samples. Hi10p videos can be decoded somewhat, but with so many artifacts that they are not really watchable:
- [Commie] Steins;Gate – NCED [BD 720p AAC] [10bit] [C706859E].mkv – Audio and subtitles OK, some video artifacts
- [1080p][16_REF_L5.1][mp3_2.0]Suzumiya Haruhi no Shoushitsu BD OP.mkv – Audio and susbtites OK, more artifacts
The TV used for review, namely LG 42UB820T does not support 3D, but I could still check whether the system could decoded some stereoscopic 3D videos:
- bbb_sunflower_1080p_60fps_stereo_abl.mp4 (1080p Over/Under) – Video OK, but some audio/video sync issues
- bbb_sunflower_2160p_60fps_stereo_abl.mp4 (2160p Over/Under) – Blackscreen with audio only
- Turbo_Film-DreamWorks_trailer_VO_3D.mp4 (1080p SBS) – OK
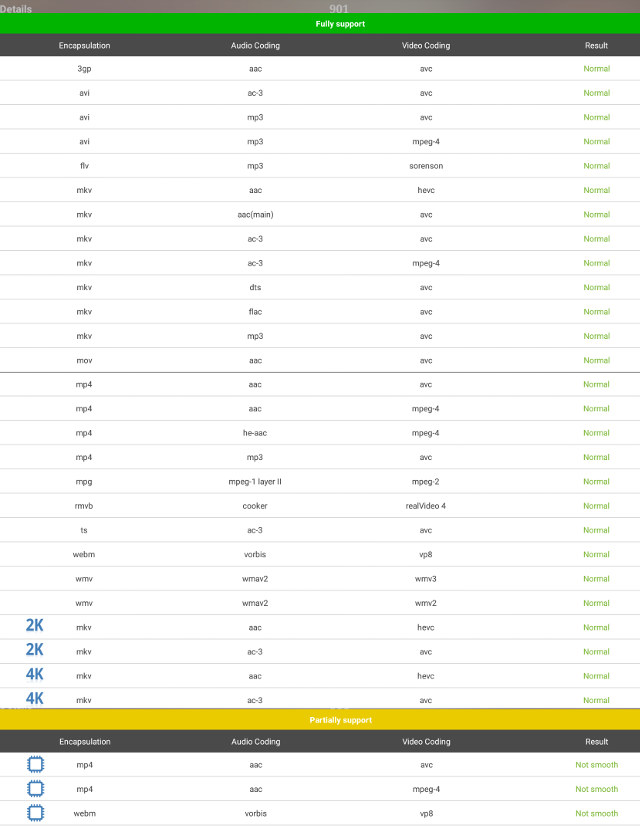
Most videos and movies in my library (VOB, IFO, MKV, AVI, MP4 and MKV) played without issues, but some FLV did not have audio for some reasons. I also played a a 2-hour video to test stability, and it played very well. For reference, Kodi’s log window reported 3 dropped frames and 1 skipped frame, which is very good, although we can’t also trust the data from Kodi here.
MINIX NEO U1 achieved 901 points in Antutu Video Tester 3.0, or about the same as K1 Plus (906) and MINI MX (891), so no surprises here.
![Click to Enlarge]()
Click to Enlarge
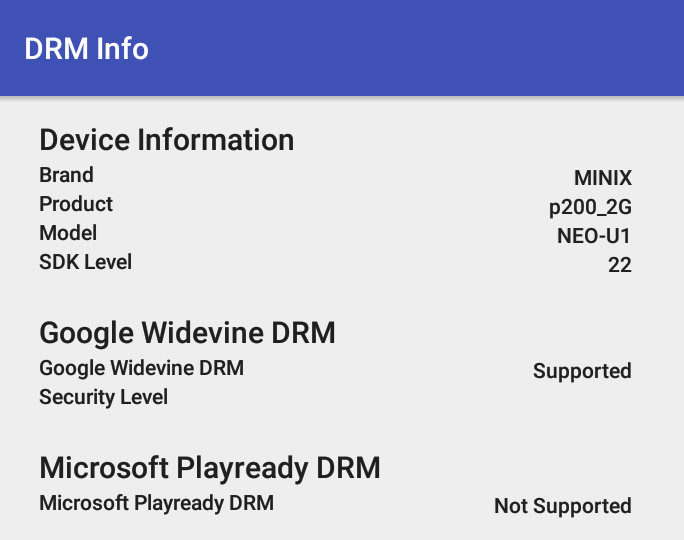
I also ran DRM info, and contrary to the other two boxes, Widewine is said to be enabled in NEO U1, but for some reasons, the app does not reports the security level.
![MINIX_NEO_U1_DRM_Info]() So I tried iflix, the equivalent of Netflix for south-east asia, as I have a free one month trial, and it could stream videos, albeit the quality was not really good.
So I tried iflix, the equivalent of Netflix for south-east asia, as I have a free one month trial, and it could stream videos, albeit the quality was not really good.
Video samples used for this review can be found here.
Network Performance (Wi-Fi and Ethernet)
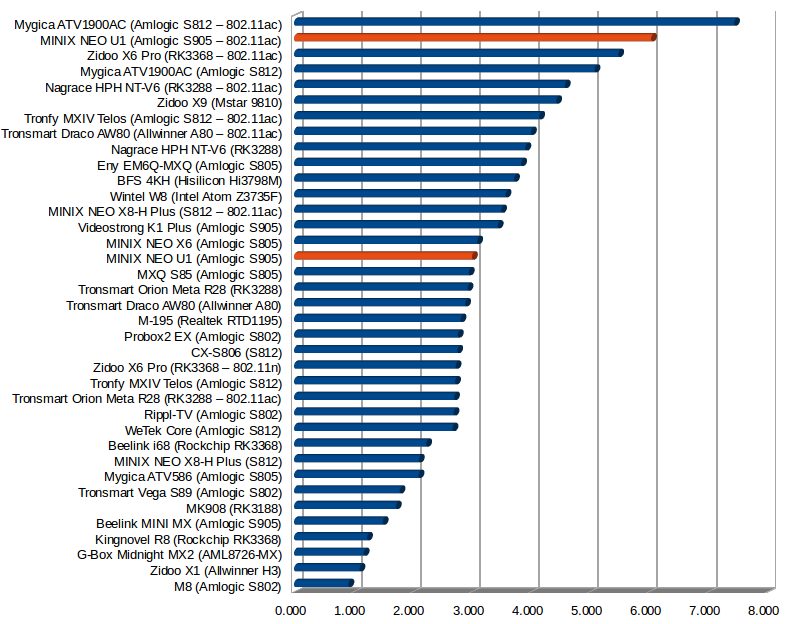
In order to evaluate WiFi performance, I transfer a 278MB file between a network share (SAMBA) and the internal flash for three times using ES File Explorer, and average the results. I tested both 802.11ac (connected at 780 Mbps) and 802.11n (connected at 117 Mbps), and both results are very good.
![Throughput in MB/s (Click to Enlarge)]()
Throughput in MB/s (Click to Enlarge)
802.11ac performance is nearly at the very top of the chart with 6.0MB/s transfer rate, and 802.11n is also pretty good at 3.01 MB/s (around 24 Mbps) and above average.
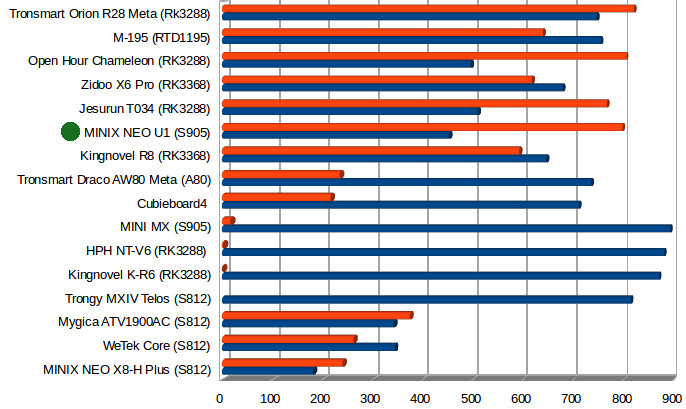
I repeat the same test for Gigabit Ethernet, but with a 885 MB file instead of the average performance (12.4 MB/s) is OK, but for some reasons it was much faster in one direction (22.12 MB/s) and slower in the other direction (8.59 MB/s).
![Throughput in MB/s]()
Throughput in MB/s
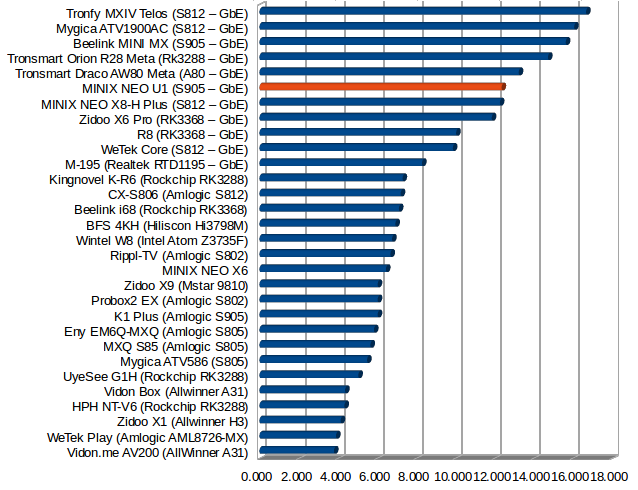
I also ran iperf -t 60 -c server_ip -d to test raw dual duplex performance, and the latest Ethernet IP in Amlogic S905 appear to much better than in previous generation Amlogic S8xx processors.
![Throughput in Mbps (Click to Enlarge)]()
Throughput in Mbps (Click to Enlarge)
iperf output:
|
|
Client connecting to 192.168.0.113, TCP port 5001
TCP window size: 85.0 KByte (default)
––––––––––––––––––––––––––––––
[ 6] local 192.168.0.104 port 57804 connected with 192.168.0.113 port 5001
[ ID] Interval Transfer Bandwidth
[ 6] 0.0-60.0 sec 3.17 GBytes 453 Mbits/sec
[ 4] 0.0-60.0 sec 5.57 GBytes 798 Mbits/sec
|
Miscellaneous Tests
Bluetooth
MINIX NEO U1 shows as p200 Bluetooth device, and I could pair it with my smartphone to trnsfer some pictures. It worked, but one of the picture got corrupted during the transfer. I also successfully connected a Bluetooth headset, and paired No.1 D3 smart watch with the device. The firmware is not rooted, so I could not try Sixaxis app for PS3 gamepads.
Storage
The “10 MB free space bug” is still remaining in NEO U1, as in all other 5 devices I’ve tested with Amlogic and Android Lollipop. So while the NTFS & exFAT partitions on my USB hard drive could be mounted, but the total and free space would only show as 10MB, and I could not copy files larger than 10MB. A FAT32 micro SD card could be mounted
| File System |
Read |
Write |
| NTFS |
OK |
No (10 MB free space) |
| EXT-4 |
Not mounted |
Not mounted |
| exFAT |
OK |
No (10 MB free space) |
| BTRFS |
Not mounted |
Not mounted |
| FAT32 |
OK |
OK |
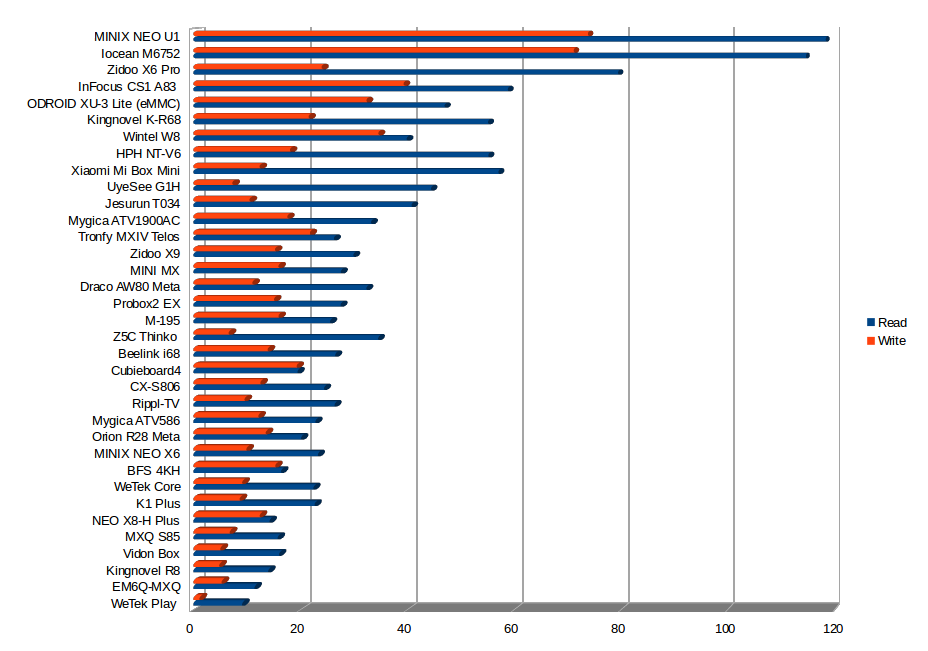
So again, I skipped USB storage benchmarks, and only tested the internal storage with A1 SD bench app. The results are quite phenomenal with 118.37MB/s read speed and 73.85 MB/s write speed, the best so far for any device reviewed on CNX Software, and at least twice as fast as any other TV boxes tested so far, and about 5 to 10 times faster than the cheaper Amlogic S905 devices.
![Read and Write Speed in MB/s]()
Read and Write Speeds in MB/s (Click to Enlarge)
This must at least partially explain why I never noticed any slow downs on the device…
USB Webcam
I connect a standard UVC webcam to the box, and login with Skype and successfully run the Echo/Service test, and make a video calls. However, after two tries at different times, I never managed to login to Google Hangouts, and I would only see the spinning wheel as it tried to login.
Gaming
Beelink MINI MX struggle a bit with games in my last review, but MINIX NEO U1 perform way better. First, I played Candy Crush Saga with NEO U1 air mouse without any issue.
Then I switch to 3D racing games and used Tronsmart Mars G01 wireless gamepad. Beach Buggy Racing was very smooth with default settings, so I maxed out the graphics settings to “High Resolution” and it was still very much playable and enjoyable, albeit possibly with a slightly lower frame rate.
Riptide GP2 was also super smooth with default settings, and with graphics settings set to the max, it was still playable, but not really optimal, so I went back to default settings for the longer test. Other device tends to slow down after playing the game for a while, but NEO U1 was stable after 15 minutes, and it was fun so I played about 5 minutes more (6 races), and I had the same performance all the way. I suspect the large heatsink in the device really helps avoiding GPU throttling.
MINIX NEO U1 Benchmarks
CPU-Z detects NEO U1 is another p200 platform (p200_2G), and that it features a quad core Cortex A53 processor @ up to 2.02 GHz with a Mali-450MP GPU without recognizing Amlogic S905 processor yet.
![Click to Enlarge]()
Click to Enlarge
Since I’ve run Antutu 6.0 benchmark on the device, and it gets 38,032 points, but remember scores between Antutu 5.x adn Antutu 6.x are not directly comparable. If we look into the details of the score, we’ll notice that Marooned 3D graphics benchmark (3D 孤立) did not complete, so if somehow this is fixed in the feature, the scores will automatically go up, and the reason is because this test is based on OpenGL ES 3.1, which is not supported by the GPU. For reference, Vega S95 Telos, another Amlogic S905 platform, got 36,741 points, with the gap most entirely due to UX I/O test, and the ultra eMMC flash in NEO U1.![MINIX_NEO_U1_Antutu]()
So to compare to other devices, better run some other benchmarks like Vellamo 3.2.
![Click for Original Size]()
Click for Original Size
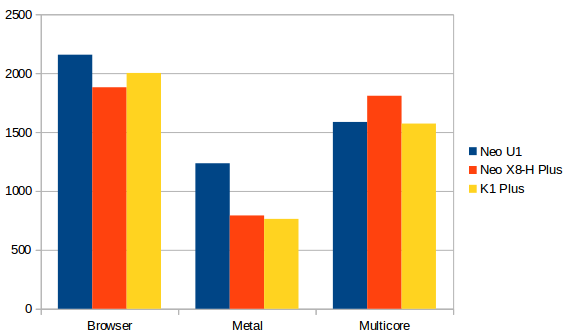
I’ve drawn a comparison chart with K1 Plus (low cost Amlogic S905 platform), and MINIX NEO X8-H Plus (previous generation Amlogic S812 device).
![MINOX_NEO_U1_vs_NEO_X8-H_Plus_vs_K1_Plus]() So apart from the metal score, results are pretty equivalent on all three devices. Please note that MINIX NEO X8-H Plus runs Android 4.4, and does not benefit from the faster ART runtime found in Android Lollipop and greater.
So apart from the metal score, results are pretty equivalent on all three devices. Please note that MINIX NEO X8-H Plus runs Android 4.4, and does not benefit from the faster ART runtime found in Android Lollipop and greater.
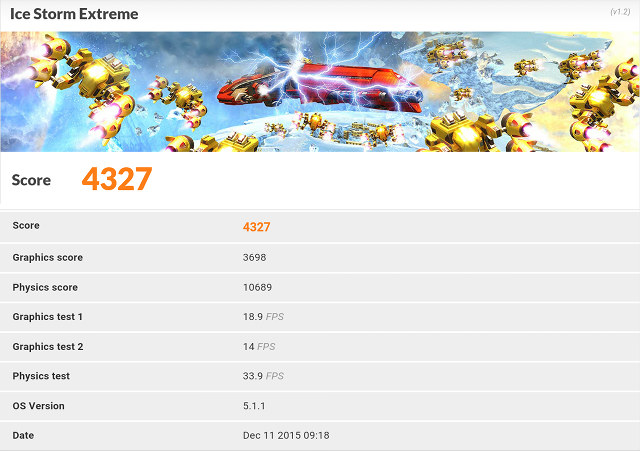
![Click to Enlarge]()
Click to Enlarge
NEO U1 media hub scores 4,327 points in 3Dmarks’ ICE Storm Extreme benchmark, against 4,304 in K1 plus, and 6,056 points in NEO X8-H Plus. It’s not surprising that the penta-core GPU in Amlogic S905 SoC is slower than the octa-core GPU featured in Amlogic S812 processor.
Conclusion
It’s quite difficult to find a device where both the hardware and software are very good. Most of the time, I’m given decent hardware with half-baked firmware, but I’ve also tested boxes with outstanding hardware and rather poor firmware (e.g. Mygica ATV1900AC), or on the contrary very good firmware, but hardware that could be better (e.g. WeTek Core). So I’m happy to report MINIX guys have managed to combined excellent hardware with very stable and responsive firmware that works (the vast majority of the time).
One the hardware side, you’ve got good (802.11n) and excellent (802.11ac) WiFi transfer rate, and Gigabit Ethernet works very well, even for streaming high bitrate videos, while the eMMC flash is the fastest I’ve tested in any devices, and whatever performance I get is sustainable thanks to the large heatsink in side the device keep everything cool and running smoothly over time.
One the software side, the system feel very responsive at all times, certainly helped with the good hardware, but most of advertised features just work out of the box, with XBMC for MINIX running well enough for be your primary media player / center, a first on the Amlogic S905 devices I tested. That’s not to say there aren’t any flaws, or bugs but there are not major, and I’m sure many will be fixed with upcoming firmware updates.
PROS
- Recent stable and always responsive Android 5.1 OS firmware
- Video Output – HDMI 2.0 up to 2160p 60Hz; 24/25/30/50/60 Hz refresh rates supported
- Good Kodi support (XBMC 15.3 MINIX Edition) with smooth 4K H.265 (10-bit) and H.264 video playback
- Dolby 5.1, Dolby+7.1, DTS and TrueHD audio pass-through are working (HDMI and S/PDIF).
- Proper implementation of power handling with more feature possible as the MCU firmware is upgradeable and the included RTC.
- 3x USB ports + 1x micro USB port with USB OTG
- Very good to outstanding network performance with Gigabit Ethernet and WiFi (802.11n / 802.11ac)
- Fastest internal storage I’ve seen in any device tested so far
- Decent platform for 3D games
- Skype working fine with USB webcam
- Working OTA firmware upgrade
- Active support forums
CONS
- HDMI – DTS HD pass-through not working yet; CEC not working; Video output resolution set in settings is not always used at next power on, and may fall back to 1080i50. I’ve also noticed the resolution switch to 2160p25 (instead of 2160p60), after playing some videos.
- A few video playing OK in MX Player has issues in
Kodi XBMC for MINIX.
- Lack of DTS and Dolby support for PCM (downmix) output. Does not affect Kodi users, or people with an AV receiver.
- DRM installed, but lacks Widewine Level 1 required for full HD and 4K video streaming in some apps (e.g. Netflix)
- USB hard drive partitions (NTFS / exFAT) reported as having 10MB free only, basically rendering the partitions read-only. (likely bugs related to having multiple partitions on a single hard drive)
- Some small UI issues – Mouse pointer looks quite small at 4K resolution, list of apps shown in chronological order instead of alphabetical, Kodi folder empty in home screen after firmware update.
- System may be stuck in standby mode (only happens once)
- Potential USB port shutdown issue (only happened once when I disconnect a USB hub and all USB port turned off).
- I could not login to Google Hangouts
- Volume may be very low in Kodi (Workaround is to adjust volume in launcher first).
I also tested MINIX NEO A2 Lite air mouse in the review, and I really recommend it, this is an excellent input device, and IMHO better than MeLE F10 Deluxe due to larger keyboard keys, and a dedicated button to activate air mouse function.
I’ve seen some people ask whether they should upgrade their MINIX NEO X8-H Plus to NEO U1. In terms of performance, you won’t see much differences, and X8-H Plus should have higher 3D performance, but if you care about H.265 video playback at 4K @ 60 Hz, 10-bit HEVC support, 802.11ac WiFi, and get something that you can turn on/off with the remote control, then go ahead you won’t be disappointed.
MINIX NEO U1 sells for $129.99 on Amazon US, Amazon UK, DX.com, GearBest, GeekBuying and others, but I really recommend you spend $20 extra and get the bundle with MINIX NEO A2 Lite air mouse on these sites. The air mouse is also sold separately for $29.99 shipped.