Quantcast
Channel: Developers » Visit CNX Software
Viewing all 2336 articles
Browse latest View live

Quick Start Guide for LinkIt Smart 7688 (Duo) Board

$
0
0

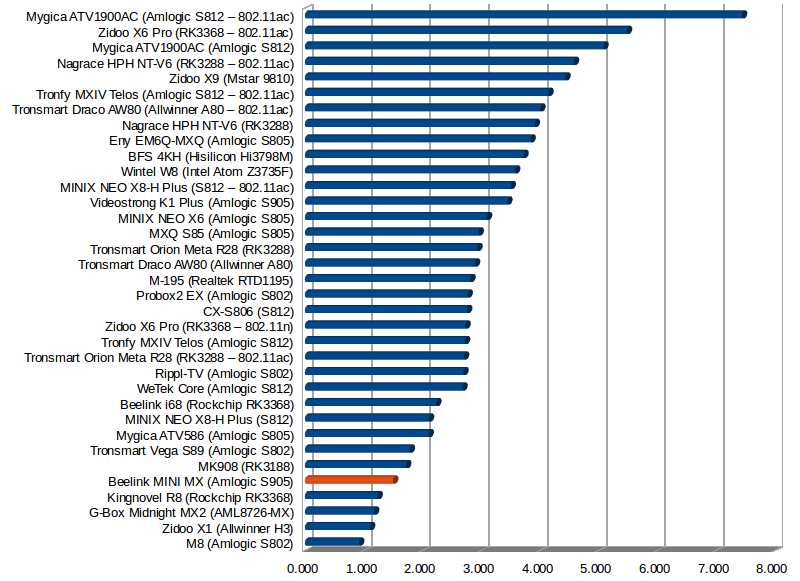
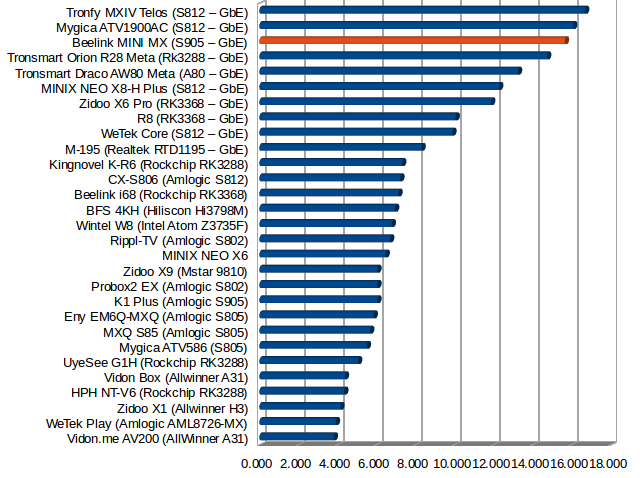
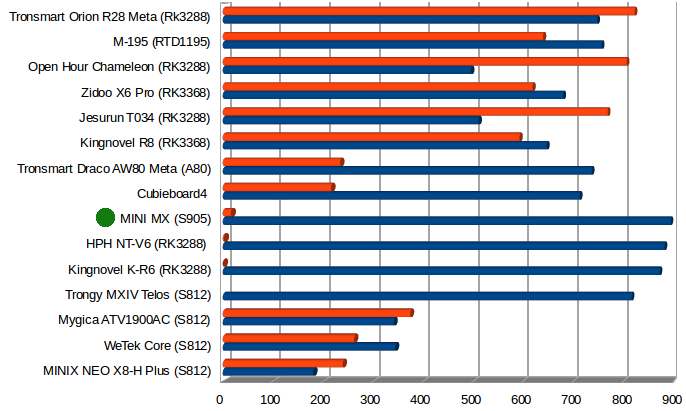
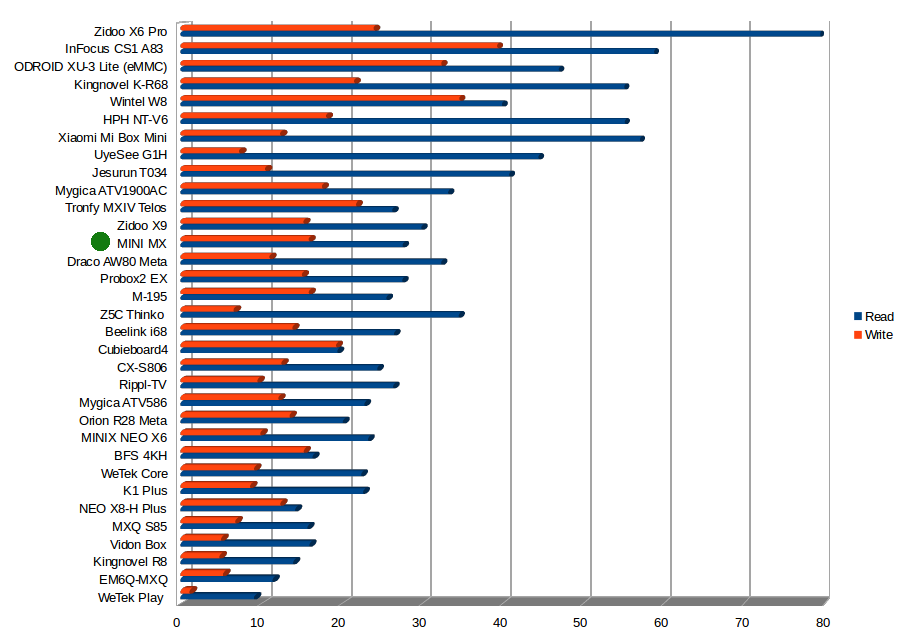
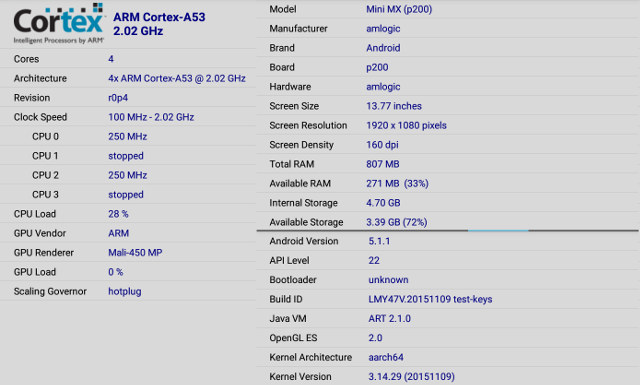
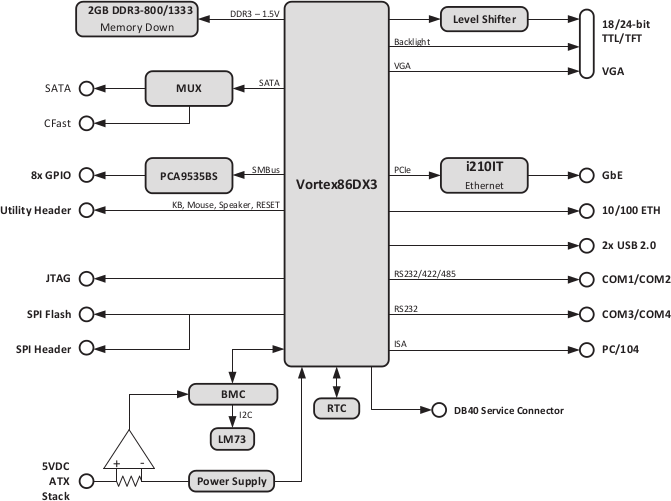
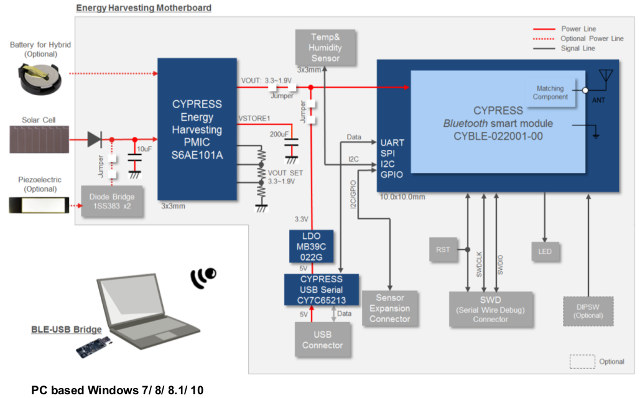
[05000C0C][05000C09]

DDR Calibration DQS reg = 0000888A

U-Boot 1.1.3 (Aug 12 2015 - 04:01:01)

Board: Ralink APSoC DRAM:  128 MB

relocate_code Pointer at: 87f68000

flash manufacture id: c2, device id 20 19

find flash: MX25L25635E

============================================

Ralink UBoot Version: 4.3.0.0

ASIC 7628_MP (Port5<->None)

DRAM component: 1024 Mbits DDR, width 16

DRAM bus: 16 bit

Total memory: 128 MBytes

Flash component: SPI Flash

Date:Aug 12 2015&nbsp; Time:04:01:01

============================================

icache: sets:512, ways:4, linesz:32 ,total:65536

dcache: sets:256, ways:4, linesz:32 ,total:32768

##### The CPU freq = 575 MHZ ####

estimate memory size =128 Mbytes

RESET MT7628 PHY!!!!!!

GPIOMODE > 50054404

GPIOMODE2 > 5540551

Please choose the operation:

1: Load system code to SDRAM via TFTP.

2: Load system code then write to Flash via TFTP.

3: Boot system code via Flash (default).

4: Entr boot command line interface.

7: Load Boot Loader code then write to Flash via Serial.

9: Load Boot Loader code then write to Flash via TFTP.

0

3: System Boot system code via Flash.

## Booting image at bc050000 …

Image Name:&nbsp;&nbsp; MIPS OpenWrt Linux-3.18.21

Image Type:&nbsp;&nbsp; MIPS Linux Kernel Image (lzma compressed)

Data Size:&nbsp;&nbsp;&nbsp; 1118491 Bytes =&nbsp; 1.1 MB

Load Address: 80000000

Entry Point:&nbsp; 80000000

Verifying Checksum ... OK

Uncompressing Kernel Image ... OK

No initrd

## Transferring control to Linux (at address 80000000) …

## Giving linux memsize in MB, 128

Starting kernel ...

[&nbsp;&nbsp;&nbsp; 0.000000] Linux version 3.18.21 (buildbot@builder1) (gcc version 4.8.3 (Op5

[&nbsp;&nbsp;&nbsp; 0.000000] Board has DDR2

[&nbsp;&nbsp;&nbsp; 0.000000] Analog PMU set to hw control

[&nbsp;&nbsp;&nbsp; 0.000000] Digital PMU set to hw control

[&nbsp;&nbsp;&nbsp; 0.000000] SoC Type: MediaTek MT7688 ver:1 eco:2

[&nbsp;&nbsp;&nbsp; 0.000000] bootconsole [early0] enabled

[&nbsp;&nbsp;&nbsp; 0.000000] CPU0 revision is: 00019655 (MIPS 24KEc)

[&nbsp;&nbsp;&nbsp; 0.000000] MIPS: machine is MediaTek LinkIt Smart 7688

[&nbsp;&nbsp;&nbsp; 0.000000] Determined physical RAM map:

[&nbsp;&nbsp;&nbsp; 0.000000]&nbsp; memory: 08000000 @ 00000000 (usable)

[&nbsp;&nbsp;&nbsp; 0.000000] Initrd not found or empty - disabling initrd

[&nbsp;&nbsp;&nbsp; 0.000000] Zone ranges:

[&nbsp;&nbsp;&nbsp; 0.000000]&nbsp;&nbsp; Normal&nbsp;&nbsp; [mem 0x00000000-0x07ffffff]

[&nbsp;&nbsp;&nbsp; 0.000000] Movable zone start for each node

[&nbsp;&nbsp;&nbsp; 0.000000] Early memory node ranges

[&nbsp;&nbsp;&nbsp; 0.000000]&nbsp;&nbsp; node&nbsp;&nbsp; 0: [mem 0x00000000-0x07ffffff]

[&nbsp;&nbsp;&nbsp; 0.000000] Initmem setup node 0 [mem 0x00000000-0x07ffffff]

[&nbsp;&nbsp;&nbsp; 0.000000] Primary instruction cache 64kB, VIPT, 4-way, linesize 32 bytes.

[&nbsp;&nbsp;&nbsp; 0.000000] Primary data cache 32kB, 4-way, PIPT, no aliases, linesize 32 bys

[&nbsp;&nbsp;&nbsp; 0.000000] Built 1 zonelists in Zone order, mobility grouping on.&nbsp; Total pa2

[&nbsp;&nbsp;&nbsp; 0.000000] Kernel command line: console=ttyS2,57600 rootfstype=squashfs,jff2

[&nbsp;&nbsp;&nbsp; 0.000000] PID hash table entries: 512 (order: -1, 2048 bytes)

[&nbsp;&nbsp;&nbsp; 0.000000] Dentry cache hash table entries: 16384 (order: 4, 65536 bytes)

[&nbsp;&nbsp;&nbsp; 0.000000] Inode-cache hash table entries: 8192 (order: 3, 32768 bytes)

[&nbsp;&nbsp;&nbsp; 0.000000] Writing ErrCtl register=00004fc0

[&nbsp;&nbsp;&nbsp; 0.000000] Readback ErrCtl register=00004fc0

[&nbsp;&nbsp;&nbsp; 0.000000] Memory: 126332K/131072K available (2703K kernel code, 129K rwdat)

[&nbsp;&nbsp;&nbsp; 0.000000] SLUB: HWalign=32, Order=0-3, MinObjects=0, CPUs=1, Nodes=1

[&nbsp;&nbsp;&nbsp; 0.000000] NR_IRQS:256

[&nbsp;&nbsp;&nbsp; 0.000000] intc: using register map from devicetree

[&nbsp;&nbsp;&nbsp; 0.000000] CPU Clock: 580MHz

[&nbsp;&nbsp;&nbsp; 0.000000] clocksource_of_init: no matching clocksources found

[&nbsp;&nbsp;&nbsp; 0.000000] Calibrating delay loop... 385.84 BogoMIPS (lpj=1929216)

[&nbsp;&nbsp;&nbsp; 0.060000] pid_max: default: 32768 minimum: 301

[&nbsp;&nbsp;&nbsp; 0.060000] Mount-cache hash table entries: 1024 (order: 0, 4096 bytes)

[&nbsp;&nbsp;&nbsp; 0.070000] Mountpoint-cache hash table entries: 1024 (order: 0, 4096 bytes)

[&nbsp;&nbsp;&nbsp; 0.080000] pinctrl core: initialized pinctrl subsystem

[&nbsp;&nbsp;&nbsp; 0.090000] NET: Registered protocol family 16

[&nbsp;&nbsp;&nbsp; 0.110000] mt7621_gpio 10000600.gpio: registering 32 gpios

[&nbsp;&nbsp;&nbsp; 0.120000] mt7621_gpio 10000600.gpio: registering 32 gpios

[&nbsp;&nbsp;&nbsp; 0.130000] mt7621_gpio 10000600.gpio: registering 32 gpios

[&nbsp;&nbsp;&nbsp; 0.140000] Switched to clocksource MIPS

[&nbsp;&nbsp;&nbsp; 0.150000] NET: Registered protocol family 2

[&nbsp;&nbsp;&nbsp; 0.150000] TCP established hash table entries: 1024 (order: 0, 4096 bytes)

[&nbsp;&nbsp;&nbsp; 0.170000] TCP bind hash table entries: 1024 (order: 0, 4096 bytes)

[&nbsp;&nbsp;&nbsp; 0.180000] TCP: Hash tables configured (established 1024 bind 1024)

[&nbsp;&nbsp;&nbsp; 0.190000] TCP: reno registered

[&nbsp;&nbsp;&nbsp; 0.200000] UDP hash table entries: 256 (order: 0, 4096 bytes)

[&nbsp;&nbsp;&nbsp; 0.210000] UDP-Lite hash table entries: 256 (order: 0, 4096 bytes)

[&nbsp;&nbsp;&nbsp; 0.220000] NET: Registered protocol family 1

[&nbsp;&nbsp;&nbsp; 0.230000] futex hash table entries: 256 (order: -1, 3072 bytes)

[&nbsp;&nbsp;&nbsp; 0.260000] squashfs: version 4.0 (2009/01/31) Phillip Lougher

[&nbsp;&nbsp;&nbsp; 0.280000] jffs2: version 2.2 (NAND) (SUMMARY) (LZMA) (RTIME) (CMODE_PRIORI.

[&nbsp;&nbsp;&nbsp; 0.300000] msgmni has been set to 246

[&nbsp;&nbsp;&nbsp; 0.310000] io scheduler noop registered

[&nbsp;&nbsp;&nbsp; 0.320000] io scheduler deadline registered (default)

[&nbsp;&nbsp;&nbsp; 0.330000] Serial: 8250/16550 driver, 16 ports, IRQ sharing enabled

[&nbsp;&nbsp;&nbsp; 0.350000] 10000c00.uartlite: ttyS0 at MMIO 0x10000c00 (irq = 28, base_baudA

[&nbsp;&nbsp;&nbsp; 0.360000] 10000d00.uart1: ttyS1 at MMIO 0x10000d00 (irq = 29, base_baud = A

[&nbsp;&nbsp;&nbsp; 0.380000] console [ttyS2] disabled

[&nbsp;&nbsp;&nbsp; 0.390000] 10000e00.uart2: ttyS2 at MMIO 0x10000e00 (irq = 30, base_baud = A

[&nbsp;&nbsp;&nbsp; 0.410000] console [ttyS2] enabled

[&nbsp;&nbsp;&nbsp; 0.410000] console [ttyS2] enabled

[&nbsp;&nbsp;&nbsp; 0.420000] bootconsole [early0] disabled

[&nbsp;&nbsp;&nbsp; 0.420000] bootconsole [early0] disabled

[&nbsp;&nbsp;&nbsp; 0.440000] spi-mt7621 10000b00.spi: sys_freq: 193333333

[&nbsp;&nbsp;&nbsp; 0.450000] m25p80 spi32766.0: mx25l25635e (32768 Kbytes)

[&nbsp;&nbsp;&nbsp; 0.470000] m25p80 spi32766.0: using chunked io

[&nbsp;&nbsp;&nbsp; 0.470000] 4 ofpart partitions found on MTD device spi32766.0

[&nbsp;&nbsp;&nbsp; 0.490000] Creating 4 MTD partitions on “spi32766.0″:

[&nbsp;&nbsp;&nbsp; 0.500000] 0x000000000000-0x000000030000 : “u-boot”

[&nbsp;&nbsp;&nbsp; 0.510000] 0x000000030000-0x000000040000 : “u-boot-env”

[&nbsp;&nbsp;&nbsp; 0.520000] 0x000000040000-0x000000050000 : “factory”

[&nbsp;&nbsp;&nbsp; 0.530000] 0x000000050000-0x000002000000 : “firmware”

[&nbsp;&nbsp;&nbsp; 0.610000] 2 uimage-fw partitions found on MTD device firmware

[&nbsp;&nbsp;&nbsp; 0.620000] 0x000000050000-0x00000016115b : “kernel”

[&nbsp;&nbsp;&nbsp; 0.630000] 0x00000016115b-0x000002000000 : “rootfs”

[&nbsp;&nbsp;&nbsp; 0.640000] mtd: device 5 (rootfs) set to be root filesystem

[&nbsp;&nbsp;&nbsp; 0.650000] 1 squashfs-split partitions found on MTD device rootfs

[&nbsp;&nbsp;&nbsp; 0.660000] 0x000001500000-0x000002000000 : “rootfs_data”

[&nbsp;&nbsp;&nbsp; 0.690000] ralink_soc_eth 10100000.ethernet eth0: ralink at 0xb0100000, irq5

[&nbsp;&nbsp;&nbsp; 0.700000] mt7621_wdt 10000120.watchdog: Initialized

[&nbsp;&nbsp;&nbsp; 0.710000] TCP: cubic registered

[&nbsp;&nbsp;&nbsp; 0.720000] NET: Registered protocol family 17

[&nbsp;&nbsp;&nbsp; 0.730000] bridge: automatic filtering via arp/ip/ip6tables has been deprec.

[&nbsp;&nbsp;&nbsp; 0.760000] Bridge firewalling registered

[&nbsp;&nbsp;&nbsp; 0.760000] 8021q: 802.1Q VLAN Support v1.8

[&nbsp;&nbsp;&nbsp; 0.770000] mtk-linkit bootstrap: Version&nbsp; : LINKITS7688

[&nbsp;&nbsp;&nbsp; 0.780000] mtk-linkit bootstrap: Revision : REV3

[&nbsp;&nbsp;&nbsp; 0.790000] mtk-linkit bootstrap: setting up bootstrap latch

[&nbsp;&nbsp;&nbsp; 0.810000] VFS: Mounted root (squashfs filesystem) readonly on device 31:5.

[&nbsp;&nbsp;&nbsp; 0.830000] Freeing unused kernel memory: 144K (8031c000 - 80340000)

[&nbsp;&nbsp;&nbsp; 2.130000] init: Console is alive

[&nbsp;&nbsp;&nbsp; 2.140000] init: - watchdog -

[&nbsp;&nbsp;&nbsp; 4.170000] usbcore: registered new interface driver usbfs

[&nbsp;&nbsp;&nbsp; 4.180000] usbcore: registered new interface driver hub

[&nbsp;&nbsp;&nbsp; 4.190000] usbcore: registered new device driver usb

[&nbsp;&nbsp;&nbsp; 4.200000] exFAT: Version 1.2.9

[&nbsp;&nbsp;&nbsp; 4.220000] SCSI subsystem initialized

[&nbsp;&nbsp;&nbsp; 4.230000] ehci_hcd: USB 2.0 ‘Enhanced’ Host Controller (EHCI) Driver

[&nbsp;&nbsp;&nbsp; 4.250000] ehci-platform: EHCI generic platform driver

[&nbsp;&nbsp;&nbsp; 4.460000] phy phy-usbphy.0: remote usb device wakeup disabled

[&nbsp;&nbsp;&nbsp; 4.470000] phy phy-usbphy.0: UTMI 16bit 30MHz

[&nbsp;&nbsp;&nbsp; 4.480000] ehci-platform 101c0000.ehci: EHCI Host Controller

[&nbsp;&nbsp;&nbsp; 4.490000] ehci-platform 101c0000.ehci: new USB bus registered, assigned bu1

[&nbsp;&nbsp;&nbsp; 4.500000] ehci-platform 101c0000.ehci: irq 26, io mem 0x101c0000

[&nbsp;&nbsp;&nbsp; 4.540000] ehci-platform 101c0000.ehci: USB 2.0 started, EHCI 1.00

[&nbsp;&nbsp;&nbsp; 4.550000] hub 1-0:1.0: USB hub found

[&nbsp;&nbsp;&nbsp; 4.560000] hub 1-0:1.0: 1 port detected

[&nbsp;&nbsp;&nbsp; 4.570000] ohci_hcd: USB 1.1 ‘Open’ Host Controller (OHCI) Driver

[&nbsp;&nbsp;&nbsp; 4.580000] ohci-platform: OHCI generic platform driver

[&nbsp;&nbsp;&nbsp; 4.590000] ohci-platform 101c1000.ohci: Generic Platform OHCI controller

[&nbsp;&nbsp;&nbsp; 4.600000] ohci-platform 101c1000.ohci: new USB bus registered, assigned bu2

[&nbsp;&nbsp;&nbsp; 4.620000] ohci-platform 101c1000.ohci: irq 26, io mem 0x101c1000

[&nbsp;&nbsp;&nbsp; 4.690000] hub 2-0:1.0: USB hub found

[&nbsp;&nbsp;&nbsp; 4.700000] hub 2-0:1.0: 1 port detected

[&nbsp;&nbsp;&nbsp; 4.710000] platform gpio-leds: Driver leds-gpio requests probe deferral

[&nbsp;&nbsp;&nbsp; 4.730000] MTK MSDC device init.

[&nbsp;&nbsp;&nbsp; 4.780000] mtk-sd: MediaTek MT6575 MSDC Driver

[&nbsp;&nbsp;&nbsp; 4.790000] platform gpio-leds: Driver leds-gpio requests probe deferral

[&nbsp;&nbsp;&nbsp; 4.800000] sdhci: Secure Digital Host Controller Interface driver

[&nbsp;&nbsp;&nbsp; 4.810000] sdhci: Copyright(c) Pierre Ossman

[&nbsp;&nbsp;&nbsp; 4.820000] sdhci-pltfm: SDHCI platform and OF driver helper

[&nbsp;&nbsp;&nbsp; 4.840000] usbcore: registered new interface driver usb-storage

[&nbsp;&nbsp;&nbsp; 5.520000] init: - preinit -

[&nbsp;&nbsp;&nbsp; 6.550000] rt305x-esw 10110000.esw: link changed 0x00

[&nbsp;&nbsp;&nbsp; 6.720000] random: procd urandom read with 10 bits of entropy available

Press the [f] key and hit [enter] to enter failsafe mode

Press the [1], [2], [3] or [4] key and hit [enter] to select the debug level

[&nbsp;&nbsp; 10.100000] jffs2: notice: (371) jffs2_build_xattr_subsystem: complete build.

[&nbsp;&nbsp; 10.140000] mount_root: switching to jffs2 overlay

[&nbsp;&nbsp; 10.170000] procd: - early -

[&nbsp;&nbsp; 10.180000] procd: - watchdog -

[&nbsp;&nbsp; 10.990000] procd: - ubus -

Command failed: Not found

[&nbsp;&nbsp; 12.000000] procd: - init -

Please press Enter to activate this console.

[&nbsp;&nbsp; 13.850000] NET: Registered protocol family 10

[&nbsp;&nbsp; 13.950000] ip6_tables: (C) 2000-2006 Netfilter Core Team

[&nbsp;&nbsp; 13.970000] i2c /dev entries driver

[&nbsp;&nbsp; 14.630000] < RTMPAllocTxRxRingMemory, Status=0, ErrorValue=0x

[&nbsp;&nbsp; 14.650000] < RTMPAllocAdapterBlock, Status=0

[&nbsp;&nbsp; 14.660000] mtk_gpio_wifi gpio-wifi: registering 1 gpio

[&nbsp;&nbsp; 14.700000] i2c-ralink 10000900.i2c: loaded

[&nbsp;&nbsp; 14.720000] Linux video capture interface: v2.00

[&nbsp;&nbsp; 14.760000] Enable Ralink GDMA Controller Module

[&nbsp;&nbsp; 14.770000] GDMA IP Version=3

[&nbsp;&nbsp; 14.800000] ******* mt76xx_pcm_init *******

[&nbsp;&nbsp; 14.810000] *******Enter codec_wm8960_i2c_probe********

[&nbsp;&nbsp; 14.820000] soc-audio soc-audio: ASoC: machine MTK APSoC I2S should use snd_)

[&nbsp;&nbsp; 14.840000] wm8960 0-001a: No platform data supplied

[&nbsp;&nbsp; 15.350000] soc-audio soc-audio: wm8960-hifi <-> mt76xx-i2s mapping ok

[&nbsp;&nbsp; 15.370000] ip_tables: (C) 2000-2006 Netfilter Core Team

[&nbsp;&nbsp; 15.410000] nf_conntrack version 0.5.0 (1976 buckets, 7904 max)

[&nbsp;&nbsp; 15.460000] usbcore: registered new interface driver uvcvideo

[&nbsp;&nbsp; 15.470000] USB Video Class driver (1.1.1)

[&nbsp;&nbsp; 15.510000] xt_time: kernel timezone is -0000

[&nbsp;&nbsp; 15.540000] PPP generic driver version 2.4.2

[&nbsp;&nbsp; 15.550000] NET: Registered protocol family 24

[&nbsp;&nbsp; 21.400000] device eth0.1 entered promiscuous mode

[&nbsp;&nbsp; 21.410000] device eth0 entered promiscuous mode

[&nbsp;&nbsp; 21.450000] br-lan: port 1(eth0.1) entered forwarding state

[&nbsp;&nbsp; 21.460000] br-lan: port 1(eth0.1) entered forwarding state

[&nbsp;&nbsp; 22.210000] efuse_probe: efuse = 10000012

[&nbsp;&nbsp; 22.450000] tssi_0_target_pwr_g_band = 26

[&nbsp;&nbsp; 22.460000] tssi_1_target_pwr_g_band = 35

[&nbsp;&nbsp; 23.460000] br-lan: port 1(eth0.1) entered forwarding state

[&nbsp;&nbsp; 29.010000] <==== rt28xx_init, Status=0

[&nbsp;&nbsp; 30.170000] device ra0 entered promiscuous mode

[&nbsp;&nbsp; 30.180000] br-lan: port 2(ra0) entered forwarding state

[&nbsp;&nbsp; 30.190000] br-lan: port 2(ra0) entered forwarding state

[&nbsp;&nbsp; 32.190000] br-lan: port 2(ra0) entered forwarding state

BusyBox v1.23.2 (2015-11-18 16:34:33 CET) built-in shell (ash)

_______&nbsp;&nbsp;&nbsp;&nbsp;&nbsp;&nbsp;&nbsp;&nbsp;&nbsp;&nbsp;&nbsp;&nbsp;&nbsp;&nbsp;&nbsp;&nbsp;&nbsp;&nbsp;&nbsp;&nbsp; ________&nbsp;&nbsp;&nbsp;&nbsp;&nbsp;&nbsp;&nbsp; __

|&nbsp;&nbsp;&nbsp;&nbsp;&nbsp;&nbsp; |.-.-.-.|&nbsp; |&nbsp; |&nbsp; |..|&nbsp; |_

|&nbsp;&nbsp; -&nbsp;&nbsp; ||&nbsp; _&nbsp; |&nbsp; -__|&nbsp;&nbsp;&nbsp;&nbsp; ||&nbsp; |&nbsp; |&nbsp; ||&nbsp;&nbsp; _||&nbsp;&nbsp; _|

|_______||&nbsp;&nbsp; __|_____|__|__||________||__|&nbsp; |____|

|__| W I R E L E S S&nbsp;&nbsp; F R E E D O M

-

CHAOS CALMER (15.05+linkit, r47501)

-

* 1 1/2 oz Gin&nbsp;&nbsp;&nbsp;&nbsp;&nbsp;&nbsp;&nbsp;&nbsp;&nbsp;&nbsp;&nbsp; Shake with a glassful

* 1/4 oz Triple Sec&nbsp;&nbsp;&nbsp;&nbsp;&nbsp;&nbsp; of broken ice and pour

* 3/4 oz Lime Juice&nbsp;&nbsp;&nbsp;&nbsp;&nbsp;&nbsp; unstrained into a goblet.

* 1 1/2 oz Orange Juice

* 1 tsp. Grenadine Syrup

-

root@CNXSoft_linkit:/#


ADLINK CM1-86DX3 Dual Core Vortex86DX3 SBC Complies with PC/104 Standard

$
0
0
Home > DM&P Vortex, Hardware, Linux, QNX Neutrino > ADLINK CM1-86DX3 Dual Core Vortex86DX3 SBC Complies with PC/104 Standard

ADLINK CM1-86DX3 Dual Core Vortex86DX3 SBC Complies with PC/104 Standard

Adlink has recently introduced a rugged industrial single board computer based on PC/104 standard with anISA bus, and powered by DM&P Vortex86DX3 dual core processor combined with 2GB RAM, SATA and CFast for storage, and Fast & Gigabit Ethernet for networking.

Click to Enlarge

Click to Enlarge

Adllink CM1-86DX3 board specifications:

  • SoC – DM&P Vortex86DX3 dual core x86 processor @ 1GHz with 2D GPU, FPU, 32K I-Cache, 32K D-Cache, and 512KB L2 Cache
  • Memory – 2GB DDR3L
  • Storage – SATA, CFast socket.
  • Video Output – VGA; 18/24-bit single-channel TLL/LVDS
  • Connectivity – 1x integrated Fast Ethernet, 1x Gigabit Ethernet (via Intel i210T)
  • USB – 2x USB 2.0
  • Serial – 2x RS232/422/485,2x RS232,
  • Other I/Os -8x GPIO, 8x A/D
  • Misc – RTC; watchdog; PS/2 port; Smart Embedded Management Agent (SEMA) functions such as a timer, temperature. monitor, fail-safe BIOS, etc…
  • Power Supply – 5V DC (AT mode); Consumption: ~6-7 W
  • Dimensions – 96 x 90mm (PC/104 specifications 2.6 form factor)
  • Temperature Range – Operating: 0 to 60°C; storage: -55 to +85°C
  • Shock (non-operating) – 50G peak-to-peak, 11ms duration, MIL-STD-202G Method 213B
  • Vibration (operating) – 11.96 Grms, 50-2000 Hz, each axis, MIL-STD-202G Method 214A
Adlink CM1-86DX3 PC/104 SBC Block Diagram

Adlink CM1-86DX3 PC/104 SBC Block Diagram

You’ll have noticed very few of the usual connectors can be found on the board, as most I/Os are routed via PC/104 expansion busses. Supported operating systems include Linux, WES7, WES2009, and QNX, while Windows CE 6.0 and WEC7 can be supported on request.

Adlink board is selling for $425 on WDL Systems, with the optional cable kit and passive heatsink going for $75 and $38 respectively. Further information may be found on Adlink CM1-86DX3 product page.

Via Linux Gizmos

ShiftWear Shoes Integrate a Flexible e-Paper Display, Energy Harvesting Capabilities (Crowdfunding)

$
0
0

ARM CTO, Mike Muller, showcase imprinted electronics, that is an integrated circuit printed on a plastic film, at ARM TechCon 2015, and several products are featured flexible displays, so in future flexible electronics could bring innovation applications from truly wearables electronics to traceable bank notes, and so on. A company has launched an Indiegogo campaign for a new product, that’s both cool and relatively useless, with ShiftWear sneakers that integrate a flexbile e-Paper display, a battery that recharges by harvesting energy from your steps, and some connectivity (likely Bluetooth LE) to update the display from your iOS, Android or  Windows device.

Smart_Shoes_DisplayThree models are available: L1, M1 and H1 referring to low height, medium height and high height of the part around the ankle (heel tab?). But all three have basically the same features:

  • Always-on HD color e-paper flexible display
  • Up to 30 days of battery life
  • Waterproof up to 5 meters
  • Machine washable
  • Kevlar fiber coated oles
  • Wireless charging
  • Walk to charge technology
Limited Edition

Limited Edition

You can display both static images and animation, but battery life will obviously be much better with static images. The shoes are using energy harvesting “walk-to-charge” technology, but it might not be enough to keep the battery charged all the time, so wireless charging is also an option. The Classic version of the shoes are only partially covered with the display. but there’s also a Limited Edition M1 with a display all around the shoe, and limited to 2,000 pieces. There will also be a community to exchange and potentially sell designs to upload to the shoes.

[embedded content]

If you watch the video above, you may want to say “just take my money”, but it might be risky because 1. there’s no prototype, 2. launch is only planned for fall 2016, or about one year from now, 3. few technical details are provided, 4. some of the features like HD displays seem tied to a 1 million dollar stretch goal, walk-to-charge to 2 millions, etc.. With that in mind, you could pledge $150, $250, or $350 for respectively L1, M1 and H1 Classic, or splurge $1,000 for a M1 Limited edition. Shipping is not included and adds $25 to North America, and $50 to the rest of the world.

You might also find some extra information on ShiftWear website.

Tronsmart Vega S95 4K Android TV Box Features an External SATA Port

$
0
0

Tronsmart is adding three new devices to the long list of Amlogic S905 TV boxes on the market with:

  • Vega S95 Pro – 1GB RAM, 8GB flash, AP6212 wireless module (2.4GHz WiFi + Bluetooth 4.0)
  • Vega S95 Meta – 2GB RAM, 8GB flash, AP6330 wireless module (Dual band WiFi + Bluetooth 4.0)
  • Vega S95 Telos – 2GB RAM, 16GB flash, AP6335 wireless module (802.11 b/g/n/ac WiFi + Bluetooth 4.0), and SATA

All three models also include Gigabit Ethernet. The Pro and Meta models have a lot of competition, but Telos is quite unique so far, as it’s the first to include a SATA port.

Tronsmart_Vega_S95_Telos

Tronsmart Vega S95 Telos specifications:

  • SoC –  Amlogic S905 quad core ARM Cortex-A53 @ up to 2.0GHz with penta-core Mali-450MP GPU @ 750 MHz
  • System Memory – 2GB DDR3
  • Storage – 16GB eMMC 5.0 flash by Samsung + SATA connector + SD card slot
  • Video
    • HDMI 2.0 up to 4K @ 60 Hz with HDMI CEC support
    • 4K HEVC Hardware Decoding, Up to 10bit, 4K @ 60 fps; 4K H.264 video playback up to 4K @ 30 fps
  • Audio
    • HDMI, optical S/PDIF;
    • DTS-HD, Dolby TrueHD, 7.1 audio pass-through via HDMI
  • Connectivity – Gigabit Ethernet, 802.11 b/g/n/ac Wi-Fi and Bluetooth 4.0 (Ampak AP6335) with 5dB internal antenna
  • USB – 3x USB 2.0 host ports
  • Misc – IR receiver
  • Power Supply –  12V/2A
  • Dimensions & Weight –  N/A

The device will ship with an IR remote, an HDMI cable, a power adapter, a SATA cable, and a user’s manual in English. As with other S905 device, it runs Android 5.1, but also supports OTA firmware update, and Vidon Kodi is pre-installed for support for DTS-HD & Dolby TrueHD, pass-through, 3D MKV, 3D BDMV and 3D ISO playback, as well as BD-J menu navigation.

Click to Enlarge

Tronsmart Vega S95 Board (Click to Enlarge)

There’s no USB 3.0, nor PCIe interface on Amlogic S905 so SATA has probably been implemented with a USB 2.0 to SATA bridge, and performance should be equivalent to what you’d get with an external USB hard drive connected to a USB 2.0 port.

Tronsmart Vega S95 Telos normally sells for $99.99 including shipping, but you can get a $10 discount for any Vega S95 model by leaving a comment on their promotion page. The two other models, Vega S95 Pro and Vega S95 Meta, sell for $59.99 and $79.99 respectively, before the $10 coupon is applied.

Thunderboard Wear is a $75 Smartwatch Development Board by Silicon Labs

$
0
0

A few days ago I watched an ARMDevices.net’s video about an ARM’s smartwatch reference design running mbed OS 3.0, powered by a Silicon Labs EFM32 Giant Gecko Cortex M3 MCU, and promising up to 2 months battery life on a 160 mAh battery. While I could not find the full details about the reference design, I noticed Silicon Labs also launched a development board called Thunderboard Wear, based on the same platform, just quite bigger, and still wearable… (Sort of)

Thunderboard_WearThunderboard Wear specifications:

  • MCU – Silicon Labs EFM32GG995F1024 ARM Cortex-M3 MCU up to 48 MHz with 128 kB RAM,1 MB Flash
  • External Memory – 256 kB external SRAM
  • External Storage – micro SD card slot
  • Display – 128×128 pixel Memory LCD from Sharp
  • Connectivity – Bluetooth 4.1 smart module (Silicon Labs BGM111), upgradeable to Bluetooth 4.2
  • Sensors
    • Ambient Light Sensing (ALS) and Proximity/Gesture via Silicon Labs Si1141.
    • Optical hear-rate monitoring (HRM) via Silicon Labs Si1144
    • 9-axis accel/gyro/magnetometer Bosch
  • USB – 2x micro USB port (device and debug)
  • Debugging
    • Built in debugger with virtual COM port
    • Support for EFM32 STK debugger
  • Misc – Touch button and touch slider, user buttons, vibration motor for tactile feedback
  • Power Supply – Coin-cell battery, USB, or external power source.
  • Dimensions – N/A
Block Diagram

Block Diagram

EFM32 STK debugger (not included) allows for advanced/precise energy monitoring, and full ETM trace. The platform also support mbed Online IDE exports for Simplicity Studio available for Windows, Mac OS X, and Linux. Source code is available on mbed.org.

Thunderboard Wear evaluation board ships with an adjustable strap, ribbon cables for energy monitoring, and quick start guide.
[embedded content]

The first 1,000 boards can be pre-ordered on Element14 for a discounted price. Price is $75 in the US, but will vary by depending on the country where the kit is purchased. More details may be available on Silicon labs’ Thunderboard Wear product page.

iMX6 TinyRex Module and Development Board Support HDMI Input in Linux (Video Demo)

$
0
0

A couple of years ago, I wrote about iMX6 Rex open source hardware project combining a Freescale i.MX6 SoM and baseboard that aimed a teaching hardware design (schematics and PCB layout). I had not followed the project very closely since then, until I watched a video showcasing HDMI input capabilities in Linux using the new version of the module and baseboard called i.MX6 TinyRex.

Click to Enlarge

Click to Enlarge

i.MX6 Tiny Rex module specifications:

  • SoC – Freescale iMX6 processor up to 1.2GHz and 4 cores
  • System Memory – Up to 4GB DDR3-1066 (533MHz)
  • Storage – EEPROM
  • Connectivity – 10/100/1000 Mbps Ethernet PHY
  • I/Os via 3 board to board connectors:
    • Display / Video Output
      • 1x HDMI (up to QXGA 2048×1536)
      • 1x LVDS (up to WUXGA 1920×1200)
      • 1x 20-bit parallel LCD display (up to WXGA 1366×768) or 1x Video Input (CSI)
      • 1x MIPI DSI differential display output (up to XVGA 1024×768)
    • Video Input
      • 1x 20-bit parallel video input CSI (up to 8192×4096)
      • 1x MIPI differential camera input
    • Storage – 1x SATA; 1x NAND Flash or 1x MMC (8bit); 2x SD (2x 4bit or optional 4 & 8bit)
    • 1x PCIe
    • 2x USB
    • 5x UART, 3x I2C, 2x SPI, 1x CAN
    • Digital audio
    • 2x GPIO, 2x GPIO or PWM
    • System signals -Reset in/out, Boot mode, Power ok, User button
  • Misc – User LED, power LED, JTAG on testpoints
  • Dimensions – 38 x 38 x 4.8
  • Power –  2.7 to 5.5V DC, single +3.3V and +5V
iMX6 Tiny Ref Module Block Diagram (Click to Enlarge)

iMX6 Tiny Ref Module Block Diagram (Click to Enlarge)

The company provides Linux support via the Yocto Project. Bear in mind that contrary to OpenRex, TinyRex is not open source hardware. In order to complement the module, iMX6 TinyRex baseboard Lite has also been designed by Fedevel, and manufactured by Voipac.

imx6_Tiny_Rex

Click to Enlarge

Baseboard specifications:

  • Storage – 1x SATA port, 1x micro SD card slot, up to 128Mbit on-board SPI Flash
  • Video
    • 1x HDMI Output with Audio
    • 1x micro HDMI input with audio (e.g. from GoPro camera) via ADV7610 HDMI receiver.
    • 1x MIPI-CSI camera input (compatible with Raspberry Pi)
  • Connectivity – 1x Gigabit Ethernet
  • USB –  1x USB (Optional: 2x USB ), 1x micro USB OTG port
  • Expansion
    • 1x PCIE mini card socket (PCIE & USB)
    • Headers with 4x UART, 1x SPI, 1x CAN (CMOS), 3x I2C, 2x PWM, 8x GPIO
  • Debugging – 1x UART debug console header (compatible with FTDI cable)
  • Misc – Reset & user buttons, power and user LEDs,
  • Power Supply – 3.2 to 5.5V DC via power barrel
  • Dimensions – 90 x 80 mm (with four holes for heatsink)
Click to Enlarge

Click to Enlarge

The schematics for the baseboard are available on request, and software documentation can be found on imx6rex website, including one part showing how to use HDMI input with the Yocto built image which using Video4Linux2 (V4L2), adv7610 driver, and Gstreamer. The demo below shows how to output the HDMI input to an HDMI monitor. It’s not very useful by itself, unless you do some processing or use as video stream as part of an application, but shows the system works, and could be modified for live video streaming for example.
[embedded content]

I understand iMX6 TineRex module and baseboard should be available by the end of the year, or Q1 2016, with the module starting at 59 Euros for 1k orders. Further details can be found on iMX6 TinyRex SoM and Baseboard Lite product pages.

Omate Rise is a $199 3G and WiFi Smartwatch Powered by Mediatek MT2601 SoC (Crowdfunding)

$
0
0

Most smartwatches sold on the western markets are designed to be smartphone’s companions, and only come with Bluetooth LE connectivity, while we’ve seen many smartwatches (aka watchphones) with SIM card slot originating from China in the past, including the lower end No.1 D3 smartwatch which I reviewed recently. But this may be changing, as Omate is going to launch a new smartwatch called Omate Rise that will include 3G connectivity via a micro SIM card slot, as well as WiFi, Bluetooth Smart, and GPS.

Click to Enlarge

Click to Enlarge

Omate Rise specifications:

  • SoC – Mediatek MT2601 dual core ARM Cortex A7 @ 1.2GHz with ARM Mali-400 MP GPU
  • System Memory –  512MB RAM
  • Storage – 4GB flash
  • Display – 1.3″ round muti-touch color display with 360×360 resolution (Innolux)
  • Connectivity – Bluetooth 4.1 LE (A2DP profile), WiFi 802.11 b/g/n, GPS
  • Cellular Connectivity – 3.5G HSDPA (2100/1900 MHz), GPRS / EDGE /GSM (850/900/1800/1900 MHz); micro SIM card slot
  • Sensors – 6-axis accelerometer, magnetometer / gyroscope
  • Audio – Microphone and loud speaker
  • Misc – Home/power button
  • Battery – 580mAh polymer battery
  • Dimensions – N/A (22 mm watch strap)
  • IP rating – N/A (1 ATM water resistant)

Omate_Rise_Watch_Face

The watch will run Android 5.1 with Omate OUI 4.0, and be compatible with Android 4.3+ and iOS 9. It’s interesting to note the processor, memory, storage and display parts of the specifications looks exactly the same as the upcoming Bluboo Xwatch with Android Wear. However,  Omate Rise does have some extra features like 3G, WiFi, GPS,  upport for the newer Bluetooth 4.1, a larger battery, and likely a better overall quality. The company also plans to release the source code on XDA Developer forums.

[embedded content]

The watch will be introduced via Indiegogo (not live yet) on December 7, 2015 at 10am (New York time), but unlike other crowdfunding campaign that typical last one to two months, Omate Rise crowdfunding will only take place over 48 hours. A $199 pledge should get you an Omate Rise watch, and for super early bird backers a free BLE heart rate monitor chest belt will be included. Delivery is scheduled for endo f March 2016.

Via Liliputing

Xiaomi Mi 3 TV Box Board’s Pictures Reveal Amlogic S905-H Processor

$
0
0

Xiaomi unveiled Mi 3 TV box based on Amlogic S905 processor a while ago, but since we’ve got so many Amlogic S905 boxes on the market, and the interface is only in Chinese, I did not find it that interesting. But somebody did a teardown of the device, and sent me some good pictures revealing that the device uses Amlogic S905-H with DTS and Dolby licenses paid for and enabled. So that means just like for Amlogic S812, where there’s a S812-H with Dolby and DTS, there are two versions for Amlogic S905. I understand the silicon might be the same, but the SDK will differ (TBC).

Click to Enlarge

Click to Enlarge

Other main components include a 4GB Toshiba THGBMBG5D1KBAIT eMMC 5.0 flash, two NANYA NT5CB256M16DP-EK 512MB DDR3 chips (1GB in total), a Broadcom wireless chipset (BCM40458?) for 802.11ac Wifi and Bluetooth 4.1, and Ricoh RN5T567A PMIC.

Click to Enlarge

Click to Enlarge

There are few connectors as on other Xiaomi TV boxes: power jack, HDMI 2.0 and AV outputs, and one USB port. Xiaomi are not big fans of Ethernet, and there’s no RJ45 interface in the new model either. Some websites mention a micro SD slot, but it’s clearly not there. There’s also a IR receiver shown at the bottom, but the remote control supports both IR and Bluetooth and features a 6-axis gyro and voice support.

Xiaomi_3_ShieldThere’s no much on the bottom side of the board except a shield. One the software side, the box is said to run an “Google CTS Certified Android 5.0 system” with a Chinese interface only.

Xiaomi Mi 3 TV box can be purchased on GearBest or GeekBuying for respectively $61.79 and $71.79, but I’d only recommend it to the most adventurous, or people who can read Chinese, and potentially are happy with setting up a VPN. [Update: One person provided instructions to root the device, and install third party apps such as Google Play on previous generation Xiaomi Mi TV bxoes, so it might also work on Xiaomi Mi 3 TV box]

Thanks to Steven for the photos!


LattePanda is a $79 Arduino Compatible Intel Atom x5 Board Running Windows 10 (Crowdfunding)

$
0
0

I feel like I’m living in another world after writing a title combining Arduino, Intel and Windows 10, but that’s exactly what LattePanda is promising with a development board featuring both an Intel Atom x5-Z8300 processor and an Atmel AVR MCU, and Windows 10 as the operating system.

LattePandaLattePanda board specifications:

  • SoC – Intel Atom x5-Z8300 “Cherry Trail” quad core processor @ 1.44 GHz (Burst frequency: 1.84 GHz) with Intel Gen8 HD graphics @ 500 MHz
  • System Memory –  2 to 4 GB DDR3L
  • Storage – 32 or 64 GB eMMC, micro SD slot
  • MCU – Atmel Atmega32u4 micro-controller
  • Video Output / Display – HDMI, and MIPID DSI connector
  • Audio I/O – HDMI, 3.5mm audio port
  • Connectivity – Ethernet, WiFi and Bluetooth 4.0
  • USB – 1x USB 3.0 port, 2x USB 2.0 host ports, 1x micro USB port for power
  • Serial – 1x from Intel SoC, 1x from Atmel MCU
  • Expansion
    • Intel processor header with 2 GPIOs
    • Atmel MCU “Arduino” header with 20 GPIOs
    • 7x 3-pin relimate connectors compatible with DFRobot “Gravity” sensors.
  • Misc – Wake-on-LAN support
  • Power Supply – 5V via micro USB port
  • Dimensions – 88 x 70 mm

The company also mentions the board is Android and Linux compatible, but it’s not clear if they plan to do much work on these two operating systems.

Block Diagram

Block Diagram

The claim that ” Lattepanda comes pre-installed with a full edition of Windows 10, including powerful tools such as Visual Studio, NodeJS, Java, Processing, and more!” probably means it’s only a trial version based on their aggressive pricing, and lack of details about the exact version. I assume you’ll be able to program the Arduino part, just like as if you had an Arduino board connected to a Windows 10 PC. Tutorials and documentation should eventually be posted on Lattepanda.com, but right now there are only a few pictures.

The company plan to launch a Kickstarter campaign in order to raise at least $150,000 for mass production. A $69 early bird pledge would get you a LattePanda board with 2GB RAM, 32GB eMMC, and Windows 10, with the pricing going up to $79 after the first 100 units are taken. A higher version with 4GB RAM and 64GB eMMC, called LattePanda Enhanced, is also offered for $129, and starter kits with a 7″ display will also be available. Since the campaign is not live yet, I can’t check out shipping, but we do know delivery is scheduled for February 2016.

Via Liliputing

iWave Systems iW-RainboW-G20M-Q7 SoM Features Renesas RZ/G1M Cortex A15 SoC

$
0
0
Home > Hardware, Linux, Linux 3.0, Renesas MCU > iWave Systems iW-RainboW-G20M-Q7 SoM Features Renesas RZ/G1M Cortex A15 SoC

iWave Systems iW-RainboW-G20M-Q7 SoM Features Renesas RZ/G1M Cortex A15 SoC

iWave Systems has unveiled a new Qseven 2.0 compliant system-on-module part of their RainboW family with iW-RainboW-G20M-Q7 module powered by Renesas RZ/G1M dual core ARM Cortex A15 SoC, and targeting industrial and automotive applications with over 10 years of support.

Click to Enlarge

Click to Enlarge

iW-RainboW-G20M-Q7 module specifications:

  • Other expansion connectors:
    • 80-pin header 1 with
      • 24bpp RGB LCD or 16Bit Camera interface
      • 24Bit Camera or dual 8Bit Camera interface
      • 1x UART
    • 80-pin header 2 with
      • Memory bus interface (16-bit sync/async)
      • 1x CAN
      • 1x SSI/I2S for audio
      • 2x UART Port or 1x UART + 1x SPI
      • 2x PWM + GPIOs
  • Power Supply – 5V @  2A input through Qseven edge connector
  • Dimensions – 70mm x 70mm (Qseven 2.0 form factor)
  • Temperature Range – -40°C to +85°C Industrial
Block Diagram (Click to Enlarge)

Block Diagram (Click to Enlarge)

The module supports Linux 3.10.31, the company will provide BSPs and user’s manual for the Renesas module, and an optional RZ/G1M Qseven development kit is also available, and based on the company’s generic Qseven carrier board that supports both Qseven edge connector and the two non-standard 80-pin expansion connectors.

iWave Systems' generic Qseven Carrier Board with RainboW Q7 SoM

iWave Systems’ generic Qseven Carrier Board with RainboW Q7 SoM

Pricing and availability information is not publicly available, but you can request a quote for your project on RZ/G1M Qseven Module product page.

Sonoff & Slampher are $5 RF and WiFi Smart Switches and Lightbulb Adapters (Crowdfunding)

$
0
0

ITEAD Studio has launched two new low cost home automation products with Sonoff smart switch, and Slampher smart E27 light bulb adapter both supporting control via WiFi and your Android smartphone, or 433MHz with a simple remote control, while still retaining the capability to control your electrical appliances and lights with a manual switch.

Sonoff_Slampher

Installation is pretty easy, and safer than some other products like Semlamp.

  • Sonoff – You simply need to cut the cable to your appliance, and insert two wires into the IN part, and the other two wires into the OUT part. Turn if on, and add it to the app if you are going to use a smartphone
  • Slampher – Remove your light bulb from its current socket, screws the bulb to Slampher, and put it back into your socket. Register the light in to the app and your done.

3_ways_to_control_SlampherBoth devices will send data to a cloud platform via WiFi Router, which allows for status synchronization to the app. For example, if you turn on a light with the app, and turn it off with the remote control, the app will still show the light is off. The cloud will also allow for Internet control of the appliances, so you don’t need to be at home to check the status or control your devices or lights. The app also includes support for up to 8 timing schedules.

Sonoff supports 90-250V, up to 10A, while Slampher supports 90-265V up to 2A. I’m not quite sure how they’ve implemented it, but considering the price, ESP8266 is probably involved ITEAD Studio confirmed it’s based on ESP8266, but a Mediatek solution is prepared as backup… You can see how this all works in the video below.

[embedded content]

The project launched on Indiegogo a few days ago, and the company aims to raise $20,000. The $5 pledge is for early bird rewards (300 units) which includes Sonoff or Slampher and a 433MHz remote, with the price going up to $7 after. There are also other rewards with different quantities which brings the price down to about $5 per device, and considering shipping is $5 for all rewards, it might be worth getting a bundle with up to 4 devices, which is the maximum a single RF remote can support.

If you don’t need WiFi, there are already some similar packages on Aliexpress with 12 switches controlled by a single 433MHz remote selling for $78.

Thank you Nanik!

Wio Link is an ESP8266 Board Designed to Make IoT Projects Easier (Crowdfunding)

$
0
0

There are already plenty of board or modules based on Espressif ESP8266 WiFi SoC, but if you don’t like soldering, or would rather avoid breadboards and some cables for your or your kids projects, Wio Link may be interested, as all you need to is to connect Grove modules required for your applications to get started, and Seeed Studio also took care of the low level software part and a drag-and-drop mobile app is provided, so software programming has been made easy too.

Wio_LinkWio Link hardware specifications:

  • SoC – Espressif ESP8266EX Tensila SoC
  • Storage – 4MB flash
  • Connectivity – 802.11b/g/n WiFi, with WEP/TKIP/AES encryption support
  • Expansion – 6x Grove connectors: 3x digital, 1x analog, 1x UART and 1x I2C (3.3V I/Os)
  • Power Supply
    • 5V via micro USB port
    • 3.4 ~ 4.2V via external battery
    • Output DC Current – 1000mA MAX
    • Charge Current: 500mA MAX
  • Dimensions – 55mm*48mm
  • Weight – 26g
  • Certifications – CE/FCC/IC

That’s for the main board, and you can connect one or more of the many Grove modules available so far. Now just powered the board with a USB charger or a LiPo battery, and start the mobile app, available for Android and iOS, in order to setup the board, by dragging and dropping the Grove module(s) you’ve connected. The app will also let you upgrade the firmware over the air (OTA).

Wio_Linux_Visual_Configuration

The behavior of the board can either be set using IFTTT (if-this-then-that) applications through Seeed IFTTT channel, or programming the board with a RESTful API in Python, JavaScript, Node.js, PHP, Objective-C or Java.

Some sample applications include connected traffic lights, pet feeder, plant watering, and whatever you may think of, as you can see in the video below.

[embedded content]

Seeed Studio has already raised well over their $20,000 target on the Kickstarter campaign in less than day, and while all $9 early bird rewards are gone, you could still pledge for a Wio Link development board for $12. You may also consider a kit with the board and some Grove modules starting at $29, and up to $89 for a kit with two Wio Link boards, and 16 Grove modules including sensors, a relay, some buttons, a servo, a speaker, and LED strip, and more. Shipping is $5 for most rewards, and free for the larger ones. Delivery is planned for March 2016.

Axiomtek MANO300 Industrial mini-ITX Board Features Intel Celeron N3150 Processor, Plenty of Interfaces

$
0
0
Home > Hardware, Intel Celeron, Windows 8 > Axiomtek MANO300 Industrial mini-ITX Board Features Intel Celeron N3150 Processor, Plenty of Interfaces

Axiomtek MANO300 Industrial mini-ITX Board Features Intel Celeron N3150 Processor, Plenty of Interfaces

Axiomtek MANO300 is an industrial grade fanless mini-ITX motherboard powered by an Intel Celerron N3150 “Braswell” quad core processor with two SO-DIMM slots, two SATA interfaces, dual Gigabit Ethernet, several serial interfaces and more, targeting automation and embedded industries.

MANO300_Intel_Celeron_N3150_Board

MANO300 board specifications:

  • SoC – Intel Celeron N3150 quad core Braswell processor @ up to 2.08 GHz with Intel HD Gen8 Graphics
  • System Memory – 2x 204-pin SO-DIMM dual channel DDR3L-1333 up 8 GB
  • Storage – 1 x SATA-600, 1x mSATA, SDXC card slot
  • Display – 1x VGA, 1x HDMI, 1x LVDS (Up to 3 independent displays supported)
  • Connectivity – 2 x 10/100/1000Mbps (Realtek RTL8111F)
  • Serial
    • 2x RS-232/422/485 (DB9)
    • 4x RS-232 (one with 5V/12V power select) via connectors
  • USB – 4x USB 3.0 host ports, 2x USB 2.0 (internal)
  • Audio – Mic-in/Line-out
  • Expansion – 1x PCIe x1, 1x PCI Express Mini Card with SIM card slot, 8x digital I/Os
  • Misc – 1x PS/2 combo for keyboard and mouse,  3V/220 mAH Lithium battery, watchdog Timer
  • Power Requirements – 12VDC or Standard ATX
  • Dimensions – 170×170 mm (mini-ITX form factor)
  • Temperature Range – 0° ~ +60°C
  • Certifications – CE

Industrial_Mini-ITX_Motherboard_Intel_Braswell

The board is said to runs well with Windows 7 and 8 operating systems, but would also likely support Windows 10, and Linux operating systems.

Axiomtek MANO300 motherboard will become available in January 2016 for an undisclosed price. More details should eventually be found on Axiomtek MANO300 product page.

Cypress Unveils a $49 Solar Powered IoT Development Kit with Bluetooth LE Connectivity

$
0
0

Cypress Semiconductors has recently launched a Solar powered IoT device kit, with the easy-to-remember codename S6SAE101A00SA1002, featuring the company’s CYBLE-022001-00 Bluetooth Smart module, and S6AE101A energy harvesting power management IC
(PMIC) on the main board, as well as all accessories such as a small solar panel, a BLE-USB bridge, and all necessary components and cables. Target applications include battery-less wireless sensor node (WSN), IoT device that monitors various sensors, BLE Beacon, wearable device, building energy management system (BEMS), Home EMS, Factory EMSystem, wireless lighting control,wireless HVAC sensor and security system.

Solar_powered_Iot_development_kitThe main features of the Energy harvesting motherboard include:

  • Cypress CYBLE-022001-00 Bluetooth Smart module with ARM Cortex-M0 @ 48MHz, 128 KB flash, 16KB SRAM
  • Cypress S6AE101A energy harvesting PMIC
  • Sensor – Temperature & humidity sensor
  • USB – 1x USB port for programming and debugging
  • Debugging – SWD (serial Wire Debug) connector, JTAG header for USB-BLE
  • Expansion – Sensor expansion connector with I2C/UART/SPI/GPIO signals
  • Misc – LEDs for USB power and status, DIP switch for future expansion
  • Power Supply / Energy harvesting:
    • Panasonic AM-1801 solar module to harvest light energy as low as 200 lx
    • Optional external diode bridge to harvest vibration energy (not included)
    • Optional battery for Hybrid power supply
  • Dimensions – 45 x 25 mm
Block Diagram (Click to Enlarge)

Block Diagram (Click to Enlarge)

The firmware supports two modes: Bluetooth Low Energy (BLE) Beacon, transmitting data at 1.5 sec intervals with ambient light as low as 200 lx; and Wireless Sensor Node (WSN), transmitting data at 6 sec intervals with ambient light as low as 200 lx. You can also monitor Bluetooth communication with the BLE-USB bridge provided with the kit, and pre-programmed with custom firmware. This works with Windows 7/8/8.1/10 only.

Click to Enlarge

Click to Enlarge

Documentation include the reference schematic, BOM list, and layout data, as well as a user’s manual, a quick starter guide, and release notes. You can also download the complete DVD (1.1 GB) with all the tools and documentation.

You can get all this and/or buy the kit for $49 on Cypress S6SAE101A00SA1002 product page. Alternativble, Mouser also list the kit for $45.94.

Review of Beelink MINI MX TV Box with MX Player

$
0
0

Beelink MINI MX Amlogic S905 Android media player has similar features, and costs about the same as K1 Plus TV box I reviewed last week, so it would be interesting to compare both. While specifications are similar there are some differences. For example, MINI MX lacks AV output, and only features two USB ports against four for K1 Plus, but it supports Gigabit Ethernet which could be an advantage while playing high bitrate 4K videos, as well a Bluetooth 4.0. I’ve already provided pictures and torn down MINI MX, so today is time for the full review and a comparison with K1 plus.

First Boot, Settings and First Impressions

I connected my USB 3.0 hard drive to one of the USB port, and a USB hub to tghe other port with a USB webcam, a USB keyboard, and two RF dongles for a gamepad and an air mouse. I also inserted the usual HDMI, optical audio and Ethernet cables, and connected the 5V/3A power supply. The boot usually takes a little over 50 seconds, only a little slower than K1 Plus (48 seconds).

Click for Original Size

Click for Original Size

I think I’ve seen this launcher before, although don’t quite remember on which device exactly. It includes 6 large icons, with 4 of those (Online Video, Recommend, Music, and Local) being some folders for apps, and My Apps providing access to all installed app, and Settings to the usual Amlogic settings app. There are also customizable shortcuts on the bottom of the screen, and status icons and date & time on the top.

Some of Pre-installed Apps

Some of Pre-installed Apps

The list of pre-installed app is pretty standard, except APP4TV app linking to some streaming apps like Netflix or Hulu, and KodiMate which will install some add-ons for Kodi. More on this latter.

Click to Enlarge

Click to Enlarge

The settings app is exactly the same as on K1 Plus, except for the add accessory option to add Bluetooth devices. Apart from that, the list of the main options remain the same:

  • Network – WiFi, Ethernet, and VPN configuration
  • Display
    • Screen resolution: Auto, 480p-60Hz, 576p-50Hz, 720p 50/60Hz, 1080i 50/60Hz, 1080p 24/50/60Hz, 4K2K 24/25/30/50/60Hz or SMPTE
    • Screen position
    • Screen rotation (middle port, force land, original)
  • Sound – System sound (On/Off), and Digital sounds (Auto detection, PCM, HDMI or SPDIF)
  • Preferences – HDMI CEC (But not working: “This remote device does not support CEC”), and Play back settings with “HDMI self-adaption” On/Off.
  • Remote & accessories – Add accessories for Bluetooth

About_MINI_MXWiFi, Ethernet and Bluetooth all worked OK, and I could set video output to 4k2k 60Hz. However, the same problem (as in K1 Plus) occur, with the video output sometimes falling back to 1080p50.

More Settings will lead you to Android 5.x Android settings with all standard options including Bluetooth, Printing, Language & input, etc… The internal storage is comprised of a unified partition (wrongly reported as being 8GB large), and with around 4.25GB free space, just like one KI Plus

Going int to “About Mediabox” section shows  MINI MX “model number” running Android 5.1.1 on top of Linux kernel 3.14.29, and the firmware build was s905_102L1. You can also go to a System update menu in this section, and the good news is that it’s working, and I got the firmware updated to s905_103L1, while NOT getting my data and apps wiped out. But unfortunately it was only released after I finished testing, so I did not test Dec 4 firmware in details. Nevertheless that’s a big plus against K1 Plus here. The firmware is also rooted by default.

MINI_MX_OTA_Firmware_Update

I could use the provided infrared remote control up to 10 meters, but it’s quite directional, so you have to make sure you point it to the device, especially once you start getting over 5 meters away. There’s no IR learning function in this remote, and HDMI-CEC is not working either. I did not use the remote control very long, and fully switch to MeLE F10 Deluxe for the rest of the review, especially since the status bar can be shown and hidden easily.

I could install most apps required for the review from the Google Play Store, except Antutu Video Tester, which I normally side-load anyway. Applications that require telephony / SMS, GPS or limited to specific country can’t be installed, and that’s fine. I also installed Riptide GP2 from Amazon Underground since I got it for free over there.

If you want to see some details about the settings I did not cover here, you can watch the user interface walk-though video.

[embedded content]

The device can be cleanly powered on and off with the remote control. Standby mode is not implemented, which mean you’ll need to wait 50 seconds or so each time you boot the device. There’s no power button on the unit.

I’ve also done some powered measurements with in power on and idle states both with a USB hard drive connected and without:

  • Power off – 1.0 Watt
  • Idle – 2.2 Watts
  • Power off + HDD – 1.0 Watt
  • Idle + HDD – 3.3 Watts

MINI MX seems to consume a little less than K1 Plus in power off mode (1.3W), and much lower in idle mode, where I could not K41 Plus to get below 6 Watts in idle mode. It’s not perfect though, as there’s still some residual power used in power off mode, and the best device will just show 0 or 0.1 Watt while powered off.

Beelink MINI MX stays quite cool, as I measured 39°C and 44°C on the top and bottom of the case after running Antutu 5.7.1, and after playing Riptide GP2 for about 15 minutes (although not with maxed out graphics settings), the maximum temperature went up a little to 45°C and 48°C.

The firmware is stable, but feels sluggish at times, where I may have to wait 1, 2 or 3 seconds before I can move the mouse pointer, and it miay take 5 to 8 seconds to go back the launcher after exiting an application.

Video Playback on Beelink MINI MX

Kodi 15.2 is pre-installed in the device without add-ons, and this time I had no problem with an incorrect resolution being reported, even when settings the resolution to 4K 60 Hz.

MINI_MX_Kodi Kodi_15.2_MINI_MXAs mentioned before I noticed an app called KodiMate in the firmware, so I started it.

KodimateLots of plugins for Kodi apparently. So I clicked on AllPlugins and it downloaded some files, and installed Kodi add-ons, including the infamous Navi-X or 1 Channel add-ons, which are banned on Kodi forums.

Kodi_15_Add-ons_MINI_MXI guess they’ve done that to avoid getting caught at the customs, as the box is shipped without any piracy add-ons, but the user can easily install them at home.

One Kodi developer informed me that Kodi was not ready for Amlogic S905, but I still gave it a try in case Netxeon or their partners worked on Kodi. Unless otherwise noted, all videos are played over Ethernet from a SAMBA share.

I started with Linaro media samples, Elecard H.265 samples, and low resolution VP9 video, and I was pleasantly surprised not to get the letterbox issues as in K1 Plus.

  • H.264 codec / MP4 container (Big Buck Bunny) – 480p/720p/1080p – OK
  • MPEG2 codec / MPG container –  480p/720p/1080p – OK
  • MPEG4 codec, AVI container 480p/720p/1080p – OK
  • VC1 codec (WMV) – 1080p – 480p/720p/1080p – OK
  • Real Media (RMVB), 720p / 5Mbps – OK
  • WebM / VP8 480p/720p/1080p – OK
  • H.265 codec / MPEG TS container  – 360p and 720p OK, 1080p some massive audio delay or AV sync issue, and not very smooth
  • WebM / VP9 (no audio in video) – OK

Not too bad actually, although H.265 hardware decode does not seem implemented. But then I tested with audio video samples in Kodi, and MX Player, and things started to get bad in Kodi for some reasons, and DTS and Dolby are not supported by the system, except if you use audio pass-through.

Video PCM Output
(Kodi)

PCM Output
(MX Player)

HDMI Pass-through
(MX Player)
S/PDIF Pass-through
(MX player)
AC3 / Dolby Digital 5.1 Audio OK, video not smooth No audio OK (Dolby D 5.1) OK (Dolby D 5.1)
E-AC-3 / Dolby Digital+ 5.1 Audio OK, video not smooth No audio OK (Dolby D 5.1) OK (Dolby D 5.1)
Dolby Digital+ 7.1 OK No audio, and slowmo video No audio Audio Formats Not Supported over S/PDIF
TrueHD 5.1 Audio OK, video in slow motion No audio OK (TrueHD 5.1)
TrueHD 7.1 Audio OK, video in slow motion No audio OK (TrueHD 7.1)
Dolby Atmos 7.1 Audio OK, video not smooth No audio Continuous beep and Dolby D 5.1 shows in AVR
DTS HD Master Audio OK, video not smooth No audio DTS 5.1 only DTS 5.1
DTS HD High Resolution Audio OK, video not smooth No audio DTS 5.1 only DTS 5.1

I still tried 2 4K videos in Kodi 15.2:

  • Beauty_3840x2160_120fps_420_8bit_HEVC_MP4.mp4 (H.265) –  Plays at 3 to 4 fps
  • big_buck_bunny_4k_H264_30fps.mp4 – Starts in slow motion, and then play with massive artifacts

I wanted to show it in video, but I shot the video about an upgrade to 103L1 firmware which also includes Kodi 16.0 Beta. The artifacts are gone, but Kodi is crashed/exited for both videos.

[embedded content]

So I’ve just switched to ES File Explorer + MX Player for the remainder of the test, starting with 4K videos:

  • HD.Club-4K-Chimei-inn-60mbps.mp4 – OK from USB HDD, but buffering a lot from network.
  • sintel-2010-4k.mkv – OK, but no audio.
  • Beauty_3840x2160_120fps_420_8bit_HEVC_MP4.mp4 (H.265) –  OK
  • Bosphorus_3840x2160_120fps_420_8bit_HEVC_MP4.mp4 (H.265) – OK
  • Jockey_3840x2160_120fps_420_8bit_HEVC_TS.ts (H.265) – OK from USB HDD, but gets stuck while streaming from network
  • MHD_2013_2160p_ShowReel_R_9000f_24fps_RMN_QP23_10b.mkv (10-bit HEVC) – OK
  • phfx_4KHD_VP9TestFootage.webm (VP9) – Will stop after a few seconds while playing from SAMBA share
  • BT.2020.20140602.ts (Rec.2020 compliant video) – OK from USB HDD, but stopping after a short while while playing from network.
  • big_buck_bunny_4k_H264_30fps.mp4 – OK
  • big_buck_bunny_4k_H264_60fps.mp4 – Audio/video synchronization issues, and the video is not very smooth
  • Fifa_WorldCup2014_Uruguay-Colombia_4K-x265.mp4 (4K, H.265, 60 fps) – OK, but no audio.
  • Samsung_UHD_Dubai_10-bit_HEVC_51.4Mbps.ts (10-bit HEVC / MPEG-4 AAC) – Very good USB HDD, but won’t play at all from network (Black screen only)
  • Astra-11479_V_22000-Canal+ UHD Demo 42.6 Mbps bitrate.ts (10-bit H.265 from DVB-S2 stream) – Plays fine most of the time OK, but it will freeze and the same exact point every time for several seconds. (tested on USB drive only).

The results are very similar between Video Player – as tested with K1 Plus -, and MX player. I’m a little disappointed that the Gigabit Ethernet connection does not improve playback from the SAMBA share, so there must be a another bottleneck.

I’ve also tested some other videos with various bitrates

  • ED_HD.avi – Not very smooth at all, and no audio
  • big_buck_bunny_1080p_surround.avi (1080p H.264 – 12 Mbps) – Video OK, but no audio
  • h264_1080p_hp_4.1_40mbps_birds.mkv (40 Mbps) – OK, but the video buffered once
  • hddvd_demo_17.5Mbps_1080p_VC1.mkv (17.5Mbps) – Could be smoother, and no audio
  • Jellyfish-120-Mbps.mkv (120 Mbps video without audio) – Not 100% smooth, but no buffering while playing from network… Same results on USB drive

The last one is interesting… That 120 Mbps video is the video with the higher rate in my video test files, but the network can cope fine, although video decoding not being optimal. The videos is a 1080p H.264 video at 24 fps without audio.

Just like Video Player, MX Player can’t handle Blu-ray ISO files reporting “can’t play this link”. My two 1080i video samples could play fine, and the two hi10p video had the usual issues, and MX Player lacks support for subtitles:

  • [Commie] Steins;Gate – NCED [BD 720p AAC] [10bit] [C706859E].mkv – Audio OK, some video artifacts, and no subtitles
  • [1080p][16_REF_L5.1][mp3_2.0]Suzumiya Haruhi no Shoushitsu BD OP.mkv – Audio OK, more artifacts, and no subtitles

Although LG 42UB820T UHD television does not support 3D, I’ve still tested some stereoscopic 3D videos check decoding:

  • bbb_sunflower_1080p_60fps_stereo_abl.mp4 (1080p Over/Under) – OK
  • bbb_sunflower_2160p_60fps_stereo_abl.mp4 (2160p Over/Under) – MX Player exits immediately
  • Turbo_Film-DreamWorks_trailer_VO_3D.mp4 (1080p SBS) – OK

I’ve also tested some longer movies, or video clips, and MX Player does not support IFO files, but I had no troubles with VOB, MKV, AVI, MP4 and MKV video, except for the lack of DTS/Dolby support with PCM output, as I did not get audio at all when these codecs were used.

Previously I also tested a 2-hour video in Kodi 15.2, and it plays all the way without issues, except that there was some stutter when the camera was panning, probably due to the lack of automatic frame rate switching support.

MINI MX got 891 points in Antutu Video Tester 3.0, or a little lower than the 906 point in KI Plus, but still without many unsupported videos.

Click to Enlarge

Click to Enlarge

I’ve also included the result from DRM Info, which shows Widewine nor PlayReady are installed, and the former may be any issue for some video streaming apps such as Netflix.
MINI_MX_DRM_Info 
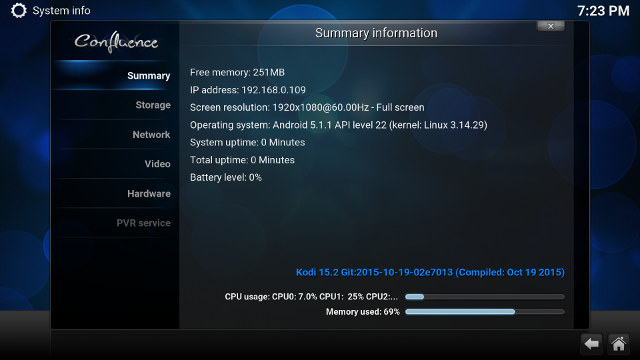
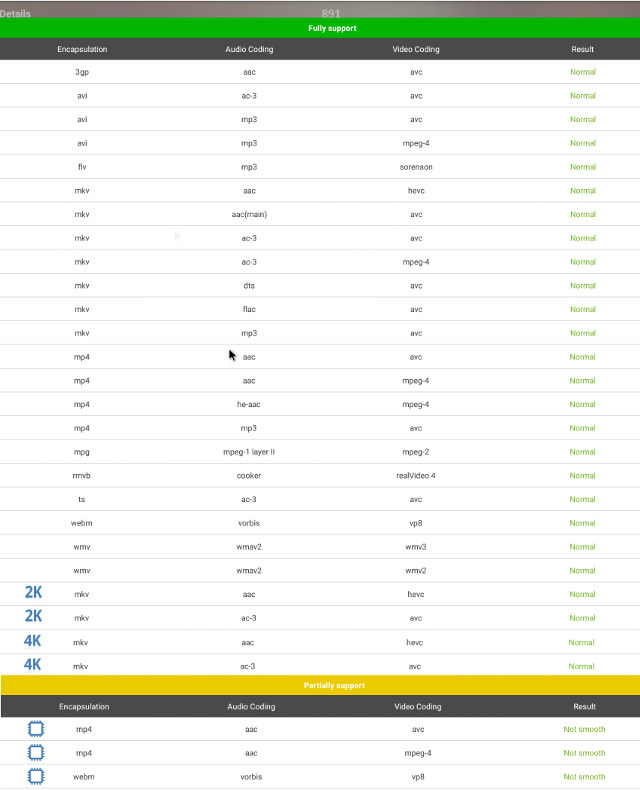
If you want the video samples used in my reviews, please visit “Where to get video, audio and images samples” post and comments section.

Network Performance (Wi-Fi and Ethernet)

MINI MX could transfer a 278MB file @ 1.5MB/s on average between the flash and a network share (SAMBA), which makes the device only of the worst performer.

Throughput in MB/s

Throughput in MB/s

Gigabit Ethernet, tested with a large file, was much better in both direction (flash to SAMBA, and SAMBA to flash) with an average transfer rate of 15.7 MB/s, one of the best in all devices I’ve tested.

Throughput in MB/s

Throughput in MB/s

However since with Gigabit Ethernet, this test is also impacted by the internal storage read and write speeds, it’s always good to test raw performance with iperf. I’m using a full duplex transfer for 1 minutes with the command line “iperf -t 60 -c server_ip -d“. But most of the time, it seems to kill Ethernet connectivity, so the test would not complete, and I was unable to browse the web anymore. So I rebooted, and it went a little further but full duplex is not handled very well with an excellent 894 Mbit/sec in one direction, but only 16 Mbit/sec in the other.

Thoughput in Mbps

Throughput in Mbps

You can also check iperf output:

1

2

3

4

5

6

Client connecting to 192.168.0.110, TCP port 5001

TCP window size:  187 KByte (default)

[  7] local 192.168.0.104 port 36813 connected with 192.168.0.110 port 5001

[  7]  0.0-60.0 sec  6.25 GBytes   894 Mbits/sec

[  5]  0.0-2204.7 sec   121 MBytes   462 Kbits/sec

There’s again a problem with the timings showing 2204.7 seconds instead of 60 seconds.

Miscellaneous Tests

Bluetooth

Contrary to Videostrong KI Plus, Beelink MINI MX does support Bluetooth, and it worked pretty well, as I could transfer photos over Bluetooth with my smartphone, listen to YouTube music videos via a Bluetooth headset, and pair No.1 D3 smart watch with the device. Since the firmware is rooted, I could also successfully use a PS3 Bluetooth game controller with Sixaxis.

Storage

The same “10 MB free space bug” found in Amlogic Android Lollipop SDK also occurred here with the NTFS & exFAT partitions on my USB hard drive. My FAT32 micro SD card could be mounted fine, and I got access to all the space..

File System Read Write
NTFS OK No (10 MB free space)
EXT-4 Not mounted Not mounted
exFAT OK No (10 MB free space)
BTRFS Not mounted Not mounted
FAT32 OK OK

That means I had to skip USB storage benchmarks, and only ran A1 SD bench app on the internal. with the app reporting 27.62MB/s read speed and 15.95 MB/s write speed. A pretty decent results for a low cost TV box.

Read and Write Speeds in MB/s (Click to Enlarge)

Read and Write Speeds in MB/s (Click to Enlarge)

And that makes me scratch my head as to why I regularly experience some slowdowns, and it may take over 5 seconds to get back to the home screen…

Gaming

In my last review I said I had never seen Candy Crush Saga on any devices, except the lower end ones based on single or dual core Mali-400 GPU, but for some reasons, I had some serious stability problems with the game on the platform. As I ran the game, the volume was a little high, so I tried to lower it, but the system would not react at all, and the game exited, or crashed, 4 times. So I tried to reboot, and could finally start to play, but I had some moments where the pointer should be stuck, the audio would cut, and finally the game exited…

Somehow Beach Buggy Racing was much better, even with the graphics quality set to the maximum  “high resolution”. It played quite smoothly, but with some very short freezes (<0.5 second) from time to time.

Riptide GP2 was also interesting, and while it was very playable with default settings, it would just exit/crash when I tried to set the quality settings to the maximum, 100% reproducible. So I set it to one bar less, and the game could run for a while, before exiting as I tried to play… So I went back to default setting and I could play 4 to 5 races for about 15 minutes. When I exited the app manually, it took 8 to 9 seconds to go back to the launcher.

Beelink MINI MX Benchmarks

CPU-Z still detects a quad core Cortex A53 processor @ up to 2.02 GHz with a Mali-450MP GPU, with the board being called “p200”.

Click to Enlarge

Click to Enlarge

The Antutu 5.7.1 score was 28,390 points or about the same as K1 Plus.

Click to Enlarge

Click to Enlarge

Conclusion

While the firmware is mostly stable, I did experience some slow downs that didn’t seem related to a slow flash, and games were somewhat unstable for some reasons. This review also confirmed that Kodi 15 nor 16 is ready for Amlogic S905, but that does not stop manufacturer from pre-loading their half-baked version, so I had to test video with MX Player, which was much better, and similar to K1 Plus. Gigabit Ethernet performance was pretty good, but somehow it did not help with videos played from the network, while WiFi performance was very poor. So while MINI MX has potential, Beelink/Netxeon still have some work to do to make it a usable device.

PROS

  • Recent Android 5.1 OS firmware
  • Video Output – HDMI 2.0 up to 2160p 60Hz; 24/25/30/50/60 Hz refresh rates supported
  • Good 4K H.265 (10-bit) and H.264 video playback in MX Player (USB HDD only, not from network)
  • Good Gigabit Ethernet performance
  • Dolby 5.1 and DTS audio pass-through is working.
  • Proper power handling
  • OTA firmware update is working.
  • Built-in Bluetooth works fine
  • Very good price/performance ratio, provided issues are fixed

CONS

  • The firmware experience slowdowns at time, and it may take 5 to 9 seconds to go back to the launcher after exiting an app.
  • Pre-installed Kodi 15.2 (102L1 firmware) or 16.0 Beta (103L1 firmware) are not really usable
  • HDMI – Dolby Digital 7.1+, TrueHD / Atmos, DTS HD audio pass-through not working; CEC not working; Video output resolution set in settings is not always used at next power on.
  • Gigabit Ethernet does not seem to help with playing videos over SAMBA
  • Missing DTS and Dolby support for PCM output
  • No DRM installed, even Widewine Level 3 required for SD playback on relevant apps.
  • Poor WiFi performance
  • Stability issues with games including Candy Crush Saga
  • USB hard drive partitions (NTFS / exFAT) reported as having 10MB free only, basically rendering the partitions read-only.

Both Beelink MINI MX and Videostrong K1 Plus have issues, many of them overlap in both devices as their firmware is based on the same Amlogic SDK, and the products are been rushed to market. I can’t really recommend any device right now, but working OTA firmware updates for MINI MX does bring some peace of mind. You’d also have to consider whether you need Gigabit Ethernet and Bluetooth (lacking on K1 Plus, but present on MINI MX), or AV output and more USB ports as found on K1 Plus. I understand two issues – DRM and DTS & Dolby support – can’t be fixed with firmware upgrades, so I’d wait if you need either or both.

I’d like to thanks GearBest again for providing Beelink MINI MX sample for review. If you’d like to go ahead and purchase the device, you could do from their shop for $40.89 including shipping. You can also find the TV box on some other e-retailed such as GeekBuying ($44.99), eBay, Amazon US ($55), and others.


Zidoo X5 is Yet Another Amlogic S905 Android Media Player

$
0
0

Zidoo has also joined the fray of companies releasing Amlogic S905 based TV boxes, and they’ve decided to go low end with 1GB RAM, 8 GB internal storage, Fast Ethernet, and 2.4 GHz WiFi.
Zidoo_X5
Zidoo X5 specifications:

  • SoC –  Amlogic S905 quad core ARM Cortex-A53 @ up to 2.0GHz with penta-core Mali-450MP GPU
  • System Memory – 1GB DDR3
  • Storage – 8GB eMMC + micro SD slot
  • Video Output – HDMI 2.0 up to 4K @ 60Hz with CEC support, and 3.5 mm AV jack
  • Audio – HDMI, AV, optical S/PDIF
  • Connectivity – Fast Ethernet, 802.11 b/g/n Wi-Fi, and Bluetooth 4.0
  • USB – 2x USB 2.0 host ports
  • Misc – IR receiver
  • Power Supply –  5V/2A
  • Dimensions & Weight – N/A (plastic case)
The device runs Android 5.1. Based on my last two reviews about their products, Zidoo has an history of releasing products a little too early, not unlike most of their competitors, but at least they are also committed to provide regular firmware updates, which they’ve done in the past, and they also released patchsets for their Kodi’s improvements for Rockchip and Allwinner SoCs.

Zidoo_X5_ConnectorsZidoo X5 has not been officially released yet, and pricing has not been disclosed, but the company is taking orders from distributors and resellers for quantities as well as 20 pieces.

$15 PINE64 64-Bit ARM Single Board Computer is Powered by Allwinner R18 Processor (Crowdfunding)

$
0
0

It looks like Next Things’  C.H.I.P computer with Allwinner R8 processor will soon have a big brother with PINE64 board powered by Allwinner R18 / A64 quad core Cortex A53 processor, and made by a US start-up also called PINE 64.

Click to Enlarge

Click to Enlarge

PINE64 and PINE64+, a version with more memory and features, will have the following specifications:

  • SoC – Allwinner R18 (based on Allwinner A64?) quad core ARM Cortex A53 processor @ 1.2 GHz with Mali-400MP2 GPU
  • System Memory
    • PINE64 –  512 MB DDR3
    • PINE64+ – 1 GB DDR3
  • Storage – micro SD slot supporting up to 256 GB
  • Video Output
    • HDMI 1.4 up to 4K resolution @ 30 Hz
    • PINE64+ only –  4-lane MIPI DSI connector and touch panel connector
  • Video Codecs – H.265 up to 4K
  • Audio – HDMI, 3.5 mm headphone jack
  • Connectivity
    • PINE64 – Fast Ethernet + optional WiFi & Bluetooth module
    • PINE64+ – Gigabit Ethernet + optional WiFi & Bluetooth module
  • USB – 2x USB 2.0 host ports
  • Camera (PINE64+ only) – MIPI CSI camera interface
  • Expansion – 40-pin Raspberry Pi 2 compatible header + 34-pin “Euler” header
  • Misc – RTC header
  • Power – 5V via micro USB port; 3.7V Lithium battery support
  • Dimensions – N/A
Click to Enlarge

Click to Enlarge

The platform will support Android 5.1, Ubuntu, and OpenWRT operating systems, as well as open source software like openHAB for automation or XBMC/Kodi. All pictures above show Allwinner R18 processor, which I’ve never heard of before, but it must be pin-to-pin compatible with Allwinner A64 as some pictures and parts of the promo video show the latter. So I assume Allwinner R18 must be a low cost version of Allwinner A64, similar to what R8 is to A13.
[embedded content]

The boards will be launch on Kickstarter on December 9, 2015, with PINE64 going for $15, and PINE64+ for $19, excluding shipping and handling. You can find a few more details, and/or sign-up for the launch on pine64.com.

Thanks to Peter for the tip!

Nexpaq Modular Case Supports iPhones, Samsung Galaxy Phones and Other Smartphones

$
0
0

While Google is working on Project Ara modular phone, Nexpaq had the idea to leverage the existing user base and create a phone case accepting up to 6 modules and compatible with iPhone 6 and 6 Plus, Samsung Galaxy S5, S6, S6 Edge, Note4, and Note4 Edge as well as Oneplus One. If you don’t happen to own any of those models, the company also designed Batpaq modular power bank communicating with the phone via USB or Lightning cables, or Bluetooth.

Nexpaq_Modular_case

Nexpaq

Each Nexpad case includes a 1000 mAh battery, slots for 6 modules out of a selection of 12:

  • Battery module
  • Amplified speaker
  • USB flash card
  • Breathalyser
  • LED light
  • Hot keys
  • Laser
  • Hot keys
  • Air quality
  • Temperature and humidity sensor
  • 64GB backup
  • SD card reader

The company also claims that 300 idea of modules thanks to the community gathered with the Kickstarter campaign earlier this year, including make-up modules, barometer, altimeter, and so on, that may come to life via third parties once the company releases their $295 developer kit.

Batpaq

Batpaq

The Batpaq power bank includes a 2,600 mAh, and support for the same modules used on Nexpaq. Contrary the case, it does not require a specific smartphone model, and should work with any mobile device running iOS and Android.

Charbax filmed the company recently, and you can see the prototype in action, and see the project’s progress.

[embedded content]
Beside the devlopment kit, Batpaq and Nexpaq are up for pre-order for $65, as well as the module for $19 to $29 on Nexpaq e-Store. You can find out more on Nexpaq website, and the forum.

How to Run Headless Linux on Amlogic S905 Devices Such as MINI MX or K1 Plus

$
0
0

A few week ago, I had been informed that Amlogic S905 U-boot and Linux source code was released, and one person use the code and other resources to load a minimal Ubuntu 14.04 image to his K1 Plus TV box and released the installation instructions and the image (Thanks olin!). I also have K1 Plus here, but since I’ve just finished reviewing Beelink MINI MX, I decided to use the latter instead. The instructions below boot Linux from the (micro) SD card, and can still boot Android if you remove the SD card.

Modifying U-boot environment

The instructions include opening the box, and connecting or soldering a USB to TTL debug board to access U-boot and change some parameters. But later once an image with network is working, you could also build and load fw_setenv and fw_saveenv, and do the same steps with an Android shell and without the need to open the device.

Click to Enlarge

Serial connection to MINI MX (Click to Enlarge)

K1 Plus has the UART headers populated so you don’t have to solder anything, but MINI MX requires a little bit a soldering on the clearly marked Tx, Rx, GND pins.

Connect your USB to TTL debug board to your computer, configure minicom / putty / screen to 115200 8N1, start the board, and press the space bar to interrupt the boot:

Enter USB burn

Try connect time out 701, 700, 834

Hit any key to stop autoboot:  0

gxb_p200_v1#

You may want to run printenv in order to back the default settings:

Environment size: 4777/65532 bytes

1

2

3

4

5

6

7

8

9

10

11

12

13

14

15

16

17

18

19

20

21

22

23

24

25

26

27

28

29

30

31

32

33

34

35

36

37

38

39

40

41

42

43

44

45

46

47

48

49

50

51

52

53

54

55

56

57

58

59

60

61

62

63

64

baudrate=115200

bootargs=rootfstype=ramfs init=/init console=ttyS0,115200 no_console_suspend earlyprintk=aml-uart,0xc81004c0 ramoops.mem_address=0x20000000 ramoops.mem_size=0x100000 ramoops.record_size=0x8000 ramoops.conf

bootcmd=run storeboot

bootdelay=1

bootmode_check=get_rebootmode; echo reboot_mode=${reboot_mode};if test ${reboot_mode} = factory_reset; then defenv_reserv aml_dt;setenv upgrade_step 2; save;fi;

bootup_offset=0x10ac270

bootup_size=0x5eec36

cmdline_keys=if keyman init 0x1234; then if keyman read usid ${loadaddr} str; then setenv bootargs ${bootargs} androidboot.serialno=${usid};fi;if keyman read mac ${loadaddr} str; then setenv bootargs ${bo;

cvbsmode=576cvbs

digitaudiooutput=PCM

display_bpp=24

display_color_bg=0

display_color_fg=0xffff

display_color_index=24

display_height=2160

display_layer=osd1

display_width=3840

dtb_mem_addr=0x1000000

edid.crcvalue=0xa62c0000

ethact=Meson_Ethernet

ethaddr=00:15:18:01:81:31

factory_reset_poweroff_protect=echo wipe_data=${wipe_data}; echo wipe_cache=${wipe_cache};if test ${wipe_data} = failed; then run init_display; run storeargs;if mmcinfo; then run recovery_from_sdcard;fi;i

fb_addr=0x3f800000

fb_height=1080

fb_width=1920

fdt_high=0x20000000

firstboot=0

gatewayip=10.18.9.1

hdmimode=2160p60hz420

hostname=arm_gxbb

init_display=hdmitx hpd;osd open;osd clear;vout output ${outputmode};imgread pic logo bootup $loadaddr;bmp display $bootup_offset;bmp scale

initargs=rootfstype=ramfs init=/init console=ttyS0,115200 no_console_suspend earlyprintk=aml-uart,0xc81004c0 ramoops.mem_address=0x20000000 ramoops.mem_size=0x100000 ramoops.record_size=0x8000 ramoops.cone

ipaddr=10.18.9.97

irremote_update=if irkey 0xe31cfb04 0xb748fb04 2500000; then echo read irkey ok!; if itest ${irkey_value} == 0xe31cfb04; then run update;else if itest ${irkey_value} == 0xb748fb04; then run update;

fi;fi;fi;

is.bestmode=false

loadaddr=1080000

mac=da:7b:db:4e:28:af

netmask=255.255.255.0

outputmode=2160p60hz420

preboot=run factory_reset_poweroff_protect;run upgrade_check;run bootmode_check;run init_display;run storeargs;run upgrade_key;run switch_bootmode;

reboot_mode=normal

recovery_from_flash=if imgread kernel recovery ${loadaddr}; then bootm ${loadaddr}; fi

recovery_from_sdcard=if fatload mmc 0 ${loadaddr} aml_autoscript; then autoscr ${loadaddr}; fi;if fatload mmc 0 ${loadaddr} recovery.img; then if fatload mmc 0 ${dtb_mem_addr} dtb.img; then echo sd dtb.im;

recovery_from_udisk=if fatload usb 0 ${loadaddr} aml_autoscript; then autoscr ${loadaddr}; fi;if fatload usb 0 ${loadaddr} recovery.img; then if fatload usb 0 ${dtb_mem_addr} dtb.img; then echo udisk dtb.;

sdc_burning=sdc_burn ${sdcburncfg}

sdcburncfg=aml_sdc_burn.ini

serverip=10.18.9.113

stderr=serial

stdin=serial

stdout=serial

storeargs=setenv bootargs ${initargs} logo=${display_layer},loaded,${fb_addr},${outputmode} hdmimode=${hdmimode} cvbsmode=${cvbsmode} hdmitx=${cecconfig} androidboot.firstboot=${firstboot}; run cmdline_ke;

storeboot=if imgread kernel boot ${loadaddr}; then store dtb read $dtb_mem_addr; bootm ${loadaddr}; fi;run update;

switch_bootmode=get_rebootmode;if test ${reboot_mode} = factory_reset; then run recovery_from_flash;else if test ${reboot_mode} = update; then run update;else if test ${reboot_mode} = cold_boot; then run ;

try_auto_burn=update 700 750;

update=run usb_burning; run sdc_burning; if mmcinfo; then run recovery_from_sdcard;fi;if usb start 0; then run recovery_from_udisk;fi;run recovery_from_flash;

upgrade_check=echo upgrade_step=${upgrade_step}; if itest ${upgrade_step} == 3; then run init_display; run storeargs; run update;else if itest ${upgrade_step} == 1; then defenv_reserv; setenv upgrade_step;

upgrade_key=saradc open 0; if saradc get_in_range 0x0 0x50; then echo detect upgrade key; run update;fi;

upgrade_step=2

usb_burning=update 1000

wipe_cache=successful

wipe_data=successful

Environment size: 4777/65532 bytes

Now you can change some settings in U-boot in order to allow for Linux to boot from SD card. If you are doing so directly in Android terminal via adb, you can replace setenv and saveenv by fw_setenv and fw_saveenv (no present in MINI MX firmware):

setenv preboot “run factory_reset_poweroff_protect;run upgrade_check;run bootmode_check;run init_display;run storeargs;run update_key;run irremote_update;run user_start;run switch_bootmode;”

setenv user_start “if mmcinfo; then run linux_start_mmc;fi;”

setenv linux_start_mmc “if fatload mmc 0 1080000 kernel.img; then if fatload mmc 0 0x1000000 dtb.img; then echo sd dtb.img loaded; fi;echo ===[LINUX START from mmc]===; bootm 1080000;fi;”

saveenv

Flash Ubuntu image to the SD card

First download the Ubuntu image: ubuntu-14.04-headless-arm64.7z.

I’ve done this step in an Ubuntu computer, but you could also perform the same steps in Windows with 7pzip and Win32DiskImager. Install required tools and uncompress the image.

sudo apt-get install p7zip-full pv

7z x ubuntu-14.04-headless-arm64.7z

Insert the micro SD card (2GB or greater) in your computer, check the device with lsblk, and flash the image to your SD card by replacing /dev/sdX in the command below by your actual device.

sudo dd if=ubuntu-14.04-headless-arm64.img | pv | sudo dd of=/dev/sdX bs=16M

sync

Get the Device Tree File for Your device

If you are trying this on K1 Plus, you can skip that step, but if you are using another device, in my case Beelink MINI MX replacing the device tree file in /boot/dtb.img might be a good idea. For example, MINI MX would only get a Fast Ethernet connection with K1 Plus device tree file, but once I extracted the one from the Android firmware I got an Gigabit Ethernet connection.

If you’ll need to get boot.img either from some firmware update file, or directly from the NAND flash. I don’t have firmwre for MINI NX, so I dumped the boot partition with an adb shell:

dd if=/dev/block/boot of=<sdcard_path>/boot.img

Then I followed the instructions to extract a device tree file from Android, until I get boot.img-second.gz file, which I copied to the boot partition in the SD card with Ubuntu

cp boot.img-second.gz /media/jaufranc/boot/dtb.img

Run Ubuntu in MINI MX

You may want to extend the rootfs partition in the SD card with gparted, or you’ll only have a small part of your SD card used. Now insert the SD into your Amlogic S905 TV box, and connect the power.

After some time getting wasted waiting for the network, you should be able to access to command line by logging in with user debian and password temppwd:

koneplus login: debian
Password:
Last login: Thu Jan 1 00:02:46 UTC 2015 on ttyS0
Welcome to Ubuntu 14.04 LTS (GNU/Linux 3.14.29 aarch64)

* Documentation: https://help.ubuntu.com/
debian@koneplus:~$

1

2

3

4

5

6

7

8

9

Ubuntu 14.04 LTS koneplus ttyS0

koneplus login: debian

Password:

Last login: Thu Jan 1 00:02:46 UTC 2015 on ttyS0

Welcome to Ubuntu 14.04 LTS (GNU/Linux 3.14.29 aarch64)

* Documentation: https://help.ubuntu.com/

debian@koneplus:~$

That’s a minimal image so there’s plenty of free space and memory:

1

2

3

4

5

6

7

8

9

10

11

12

13

14

15

debian@koneplus:~$ df -h                                                        

Filesystem      Size  Used Avail Use% Mounted on                                

/dev/mmcblk0p2   29G  462M   28G   2% /                                         

devtmpfs        280M  4.0K  280M   1% /dev                                      

none            4.0K     0  4.0K   0% /sys/fs/cgroup                            

tmpfs           404M     0  404M   0% /tmp                                      

none             81M  252K   81M   1% /run                                      

none            5.0M     0  5.0M   0% /run/lock                                 

none            404M     0  404M   0% /run/shm                                  

none            100M     0  100M   0% /run/user                                 

debian@koneplus:~$ free -h                                                      

             total       used       free     shared    buffers     cached       

Mem:          807M       125M       681M       256K       3.1M        22M       

-/+ buffers/cache:        99M       707M                                        

Swap:           0B         0B         0B

All four cores are shown when I check the cpuinfo:

Hardware : Amlogic

1

2

3

4

5

6

7

8

9

10

11

12

13

14

cat /proc/cpuinfo                                            

Processor       : AArch64 Processor rev 4 (aarch64)                            

processor       : 0                                                            

processor       : 1                                                            

processor       : 2                                                            

processor       : 3                                                            

Features        : fp asimd crc32                                                

CPU implementer : 0x41                                                          

CPU architecture: AArch64                                                      

CPU variant     : 0x0                                                          

CPU part        : 0xd03                                                        

CPU revision    : 4                                                            


Hardware        : Amlogic

The kernel is build with Android’s option “CONFIG_ANDROID_PARANOID_NETWORK“, so all network configuration must be done with root:

ifconfig eth0 192.168.0.201 up
No support for INET on this system.
sudo ifconfig eth0 192.168.0.201 up

sudo ifconfig
sudo: unable to resolve host koneplus
eth0 Link encap:Ethernet HWaddr da:7b:db:4e:28:af
inet addr:192.168.0.201 Bcast:192.168.0.255 Mask:255.255.255.0
inet6 addr: fe80::d87b:dbff:fe4e:28af/64 Scope:Link
UP BROADCAST RUNNING MULTICAST MTU:1500 Metric:1
RX packets:2570 errors:0 dropped:0 overruns:0 frame:0
TX packets:248 errors:0 dropped:0 overruns:0 carrier:0
collisions:0 txqueuelen:1000
RX bytes:384945 (384.9 KB) TX bytes:19904 (19.9 KB)
Interrupt:40

1

2

3

4

5

6

7

8

9

10

11

12

13

14

15

16

17

18

19

20

21

22

23

24

25

ifconfig eth0                                                

eth0      Link encap:Ethernet  HWaddr da:7b:db:4e:28:af                        

          inet6 addr: fe80::d87b:dbff:fe4e:28af/64 Scope:Link                  

          UP BROADCAST RUNNING MULTICAST  MTU:1500  Metric:1                    

          RX packets:1788 errors:0 dropped:0 overruns:0 frame:0                

          TX packets:178 errors:0 dropped:0 overruns:0 carrier:0                

          collisions:0 txqueuelen:1000                                          

          RX bytes:265549 (265.5 KB)  TX bytes:14810 (14.8 KB)                  

          Interrupt:40                                                          


ifconfig eth0 192.168.0.201 up                              

No support for INET on this system.

sudo ifconfig eth0 192.168.0.201 up

sudo ifconfig                                                

sudo: unable to resolve host koneplus                                           

eth0      Link encap:Ethernet  HWaddr da:7b:db:4e:28:af                         

          inet addr:192.168.0.201  Bcast:192.168.0.255  Mask:255.255.255.0      

          inet6 addr: fe80::d87b:dbff:fe4e:28af/64 Scope:Link                   

          UP BROADCAST RUNNING MULTICAST  MTU:1500  Metric:1                    

          RX packets:2570 errors:0 dropped:0 overruns:0 frame:0                 

          TX packets:248 errors:0 dropped:0 overruns:0 carrier:0                

          collisions:0 txqueuelen:1000                                          

          RX bytes:384945 (384.9 KB)  TX bytes:19904 (19.9 KB)                  

          Interrupt:40

So there’s some work to be done, but at least that’s a start.

[Update: It’s easy to put the case together with the serial wires by cutting the plastic case a little.

Beelink_MINI_MX_with_UART_cables]

How to extract kernel.img with mkboot script

$
0
0

As I tried instructions to install Linux on Amlogic S905 Android TV boxes yesterday, I wanted to extract kernel.img file found in Android firmware, but Google did not help that much until I found mkboot part of mkbootimg_tools scripts.
mkboot

But first let’s see how kernel.img is created… Google provide a Python script called mkbootimg that combine the kernel image (e,.g. zImage), a rootfs/ramdisk and the device tree (DTB) file with a command line that looks like:

./mkbootimg base=0 kernel_offset=0x01080000  kernel ${KERNEL} ramdisk_offset=0x01000000 ramdisk ./${ROOTFS} second ${DTBFILE} output ./kernel.img

However, AFAIK the company does not provide a “unmkbootimg” script, and mkbootimg can only be used to create kernel.img, not decompile it. But that’s what mkboot does, and it works for kernel.img and recovery.img. Let’s retrieve the necessary files first:

git clone https://github.com/xiaolu/mkbootimg_tools

mkboot is a bash script so we can use it right away:

1

2

3

4

5

6

7

8

9

10

11

cd mkbootimg_tools

./mkboot

<Unpack and repack boot.img tool>

Not enough parameters or parameter error!

unpack boot.img & decompress ramdisk

&nbsp;&nbsp;&nbsp; mkboot [img] [output dir]

&nbsp;&nbsp;&nbsp; mkboot boot.img boot20130905

Use the unpacked directory repack boot.img(img_info)

&nbsp;&nbsp;&nbsp; mkboot [unpacked dir] [newbootfile]

&nbsp;&nbsp;&nbsp; mkboot boot20130905 newboot.img

So it can be used both for unpacking and repacking kernel.img to/from the output directory. Let’s run the command with an actual kernel.img file:

1

2

3

4

5

6

7

8

9

10

11

12

13

14

15

16

./mkboot kernel.img k1plus

Unpack & decompress ../kernel.img to k1plus

&nbsp; kernel&nbsp;&nbsp;&nbsp;&nbsp;&nbsp;&nbsp;&nbsp;&nbsp; : kernel

&nbsp; ramdisk&nbsp;&nbsp;&nbsp;&nbsp;&nbsp;&nbsp;&nbsp; : ramdisk

&nbsp; page size&nbsp;&nbsp;&nbsp;&nbsp;&nbsp; : 2048

&nbsp; kernel size&nbsp;&nbsp;&nbsp; : 7236663

&nbsp; ramdisk size&nbsp;&nbsp; : 4282196

&nbsp; second_size&nbsp;&nbsp;&nbsp; : 31763

&nbsp; base&nbsp;&nbsp;&nbsp;&nbsp;&nbsp;&nbsp;&nbsp;&nbsp;&nbsp;&nbsp; : 0x01078000

&nbsp; kernel offset&nbsp; : 0x00008000

&nbsp; ramdisk offset : 0xfff88000

&nbsp; second_offset&nbsp; : 0xffe88000

&nbsp; tags offset&nbsp;&nbsp;&nbsp; : 0xfef88100

&nbsp; cmd line&nbsp;&nbsp;&nbsp;&nbsp;&nbsp;&nbsp; :

ramdisk is gzip format.

Unpack completed.

The script has indeed decompiled kernel.img with the kernel itself, the ramdisk (compressed and decompressed), and second.img that’s the DTB file. img_info contains the information shown during extraction above.

1

2

3

4

5

6

7

8

ls -l k1plus/

total 11364

-rw-rw-r  1 jaufranc jaufranc     250..   7 10:22 img_info

-rw-rw-r  1 jaufranc jaufranc 7236663..   7 10:22 kernel

drwxrwxr-x 18 jaufranc jaufranc    4096..   7 10:22 ramdisk

-rw-rw-r  1 jaufranc jaufranc 4282196..   7 10:22 ramdisk.packed

-rw-rw-r  1 jaufranc jaufranc   31763..   7 10:22 second.img

-rw-rw-r  1 jaufranc jaufranc   32768..   7 10:22 second.img.tmp

second.img and second.img.tmp files differ in size, so I ran through dtc to get the readable device tree file,. and the resulting files are identical:

dtc -I dtb second.img -O dts -o k1plus.dtd

dtc -I dtb second.img.tmp -O dts -o k1plus.dtd.tmp

diff k1plus.dtd k1plus.dtd.tmp

So the tmp files must have had some padding, that the script stripped to create second.img.

In theory, you can change the kernel files, randisk or device tree, and repack everything with:

./mkboot k1plus kernelimg_new.img

but it did not quite work here:

1

2

3

4

5

6

7

8

9

10

11

12

13

14

15

16

17

18

19

20

21

22

23

24

25

mkbootimg from k1plus/img_info.

  board          : k1plus

  kernel         : kernel

  ramdisk        : new_ramdisk

  page size      : 2048

  kernel size    : 7236663

  ramdisk size   : 4282403

  second_size    : 31763

  base           : 0x01078000

  kernel offset  : 0x00008000

  ramdisk offset : 0xfff88000

  second_offset  :

  tags offset    : 0xfef88100

  cmd line       :

ramdisk is gzip format.

Traceback (most recent call last):

  File “/home/jaufranc/edev/mini_mx/mkbootimg_tools/mkbootimg”, line 140, in &lt;module&gt;

    main()

  File “/home/jaufranc/edev/mini_mx/mkbootimg_tools/mkbootimg”, line 133, in main

    img_id = write_header(args)

  File “/home/jaufranc/edev/mini_mx/mkbootimg_tools/mkbootimg”, line 57, in write_header

    args.pagesize))                                 # flash page size we assume

struct.error: ‘I’ format requires 0 &lt;= number &lt;= 4294967295

Make boot.img Error! pls check img_info file.

...

If we look a the first ./mkbootimg command in this post we can see some different offset in the decompile image, so I changed img_info as per the first command line, with base=0, kernel_offset=0x01080000, and ramdisk_offset=0x01000000, and it all worked out OK:

1

2

3

4

5

6

7

8

9

10

11

12

13

14

15

16

17

./mkboot k1plus kernelimg_new.img

mkbootimg from k1plus/img_info.

  kernel         : kernel

  ramdisk        : new_ramdisk

  page size      : 2048

  kernel size    : 7236663

  ramdisk size   : 4282403

  second_size    : 31763

  base           : 0

  kernel offset  : 0x01080000

  ramdisk offset : 0x01000000

  second_offset  :

  tags offset    : 0xfef88100

  cmd line       :

ramdisk is gzip format.

Kernel size: 7236663, new ramdisk size: 4282403, kernelimg_new.img: 11556864.

kernelimg_new.img has been created.

Viewing all 2336 articles
Browse latest View live