Quantcast
Channel: Developers » Visit CNX Software
Viewing all 2336 articles
Browse latest View live

Intel Compute Card Dock DK132EPJ Specifications and User Manual Published

$
0
0

Intel unveiled the Compute Card at the very beginning of the this year, without that many details, except it would included a 7th Gen Intel Core, memory, storage and wireless connectivity, and connect compliant dock with a new standard connector featuring USB-C and extra I/Os. Later this year, we learned more details about some Apollo Lake and Kaby Lake Compute Cards including specifications and block diagram. However those cards won’t be of any use without docks, and while NexDock promised a laptop dock for the cards, I have not seen any other announcements, but we now have some info about Intel’s own Compute Card dock that looks like a mini PC as the company released technical specifications and user manuals for DK132EPJ dock, and three Compute Card SKUs.

Click to Enlarge

Intel Compute Card Dock DK132EPJ specifications:

  • CPU, Memory, Storage, Wireless – Via slot supporting certified Intel Compute Cards
  • Video Output – HDMI and mini DisplayPort
  • USB – 3x USB 3.0 ports
  • Connectivity – Gigabit Ethernet (via Intel I211-AT); Built-in compute card: 802.11ac WiFi and Bluetooth 4.2
  • Misc – Lock indicator; eject button+indicator; power button; security lock
  • Power Supply – 19V via power barrel jack
  • Dimensions – 151.76 mm x 145 mm x 20.5 mm

Click to Enlarge

The enclosure also supports 75 x 75 and 100 x 100 VESA mount so it can be mounted on the back of compatible monitors or televisions. The dock comes with a 19 power adapter with plug adapter for various countries and a 2-meter power cord. The operating system is not pre-installed in the Compute Card, but Windows 10 Home, Windows 10 Pro, Windows 10 Enterprise, Windows 10 Education, and Windows 10 IoT Enterprise are supported, and some Linux operating systems may be supported. The cards requires software support at least for authentication and the eject function.

Compute Card Dock Block Diagram – Click to Enlarge

The compute cards & dock should be available for purchase now, but they do not seem broadly available online, as I could just find the dock listed for $111.19 on Provantage (with the wrong product photo), and CD1C64GK Compute Card with Celeron N3350/4GB/64GB configuration for 641 AED (~$175 US) on “Gear Up Me” website with stock expected in 9 days. Alzashop has all four Compute Card SKUs with prices ranging from 143 to 527 Euros depending on model.

Via Ian Morrison in Mini PCs and TV Boxes G+ Community

Tweet Intel unveiled the Compute Card at the very beginning of the this year, without that many details, except it would included a 7th Gen Intel Core, memory, storage and wireless…


Wemos LOLIN32 Lite Board Powered by ESP32 Rev 1 Chip Sells for $4.90

$
0
0
Home > Espressif, FreeRTOS, Hardware > Wemos LOLIN32 Lite Board Powered by ESP32 Rev 1 Chip Sells for $4.90

Wemos LOLIN32 Lite Board Powered by ESP32 Rev 1 Chip Sells for $4.90

Wemos introduced the first low cost ESP32 board with LOLIN32 board going for $6.90 plus shipping in April, but the company is now back with a new Lite version of the board switching ESP-WROOM-32 module with their own design around ESP32 Rev 1 chip (with various silicon bug fixes), and a lower $4.90 price tag to which you need to add ~$2 for shipping.

Click to Enlarge

Wemos LOLIN32 Lite is also smaller, so we’ll lose some of the pins (mostly extra power pins), but the I/Os look the same:

  • SoC – Espressif ESP32-DOWD6Q Rev 1.0 dual core Tensilica Xtensa LX6 processor with WiFi and BLE
  • Connectivity – 802.11 b/g/n WiFi + Bluetooth LE
  • I/Os via 2x 13-pin headers with digital I/Os, analog inputs, UART, I2C, SPI, VP/VN, DAC…
    • 3.3V I/O voltage
    • Breadboard compatible
  • USB – 1x micro USB port for power and programming/debugging
  • Misc – Reset button
  • Power – 5V via micro USB + battery header for Lithium battery (charging current: 500mA max)
  • Dimensions & Weight – TBD

The board sold on Aliexpress is pre-loaded with micropython firmware, but you could also change that to Arduino, or other supported firmware. The Wiki has limited information for now.

Tweet Wemos introduced the first low cost ESP32 board with LOLIN32 board going for $6.90 plus shipping in April, but the company is now back with a new Lite version…

Goophone Phone X is an iPhone X “Clone” with Fake 4G LTE, Fake Storage Capacity, and Fake Android Version

$
0
0

Apple recently released iPhone X, but at close to $1,000 it’s not for everybody. If you want the “social status” that comes with owning the thing, but have limited budget, and/or find spending $1,000 on a phone is ridiculous, Goophone has prepared Phone X smartphone for you that externally looks like an iPhone X, and only sells for around $105 and up. It just comes with 8 or 16 GB flash, and 2G/3G connectivity, but don’t you worry losing face in front of your friends, as it has a fake 4G LTE mode, and reports 64GB flash storage. Social life saved!

Goophone Phone X specifications:

  • SoC – Mediatek MT6580 quad core ARM Cortex A7 processor @ up to 1.3 GHz with Mali-400 GPU
  • System Memory – 1GB RAM
  • Storage – 8 or 16GB  (shown as fake 64GB) + micro SD slot up to 64GB
  • Display – 5.5 ” capacitive touch display with 1280×720 resolution
  • Audio – Real 3.5mm headphone jack, built-in speaker and microphone
  • Camera – 8.0MP rear facing camera (with fake dual camera?) + 2.0MP front facing camera
  • Connectivity – 802.11 b/g WiFi, Bluetooth 3.0, GPS, 2G GSM 850/900/1800/1900MHz, 3G WCDMA 900/2100MHz, and fake 4G LTE; micro SIM slot
  • USB – 1x mini USB port
  • Battery – 2,100 mAh
  • Dimensions – Just like iPhone X

The phone only runs Android 5.0, but the company really made every efforts to prevent any potential embarrassment, and it will show a fake Android 7.0 version instead. The “photo” above is just a render, but they’ll certainly manage to make something that looks to iPhone X close enough, as Goophone has years of experience in doing copycats.

Via Liliputing and Gizchina

Tweet Apple recently released iPhone X, but at close to $1,000 it’s not for everybody. If you want the “social status” that comes with owning the thing, but have limited…

NXP RoadLink SAF5400 is a Single Chip Secure DSRC/802.11p V2X Platform

$
0
0

Marvell unveiled 88W8987xA wireless SoC for V2X (Vehicle to Everything) applications supporting 802.11p WiFi, and DSRC (Dedicated Short Range Communications) last June, but NXP has recently launched Roadlink SAF5400 which it claims to be the world’s first “automotive qualified, high-performance single-chip DSRC modem”

Key features for Roadlink SAF5400:

  • Compliant with IEEE 802.11p, IEEE 1609.4
  • Compliant with:
    • ETSI EN 302663 – Intelligent Transport Systems (ITS); Access layer specification for Intelligent Transport Systems operating in the 5 GHz frequency band
    • ETSI EN 302571 – Intelligent Transport Systems (ITS); Radiocommunications equipment operating in the 5 855 MHz to 5 925 MHz frequency band; Harmonized EN covering the essential requirements of article 3.2 of the R&TTE Directive
  • Compliant with ARIB T-109M – 700 MHz Band Intelligent Transport Systems
  • Single channel handling for 802.11p reception/transmission. Includes Channel Switching
  • Optional ECDSA verification: 2000 messages/sec (Brainpool/NIST curves 256 bits)
  • Qualified in accordance with AEC-Q100 grade 2
  • Host interface – SPI, R(G)MII Ethernet, or SDIO

The solution will be used for vehicle to vehicle communication as illustrated below, and potentially other nodes along the road.  Roadlink SAF5400 can be combined with NXP i.MX processor, and security can be achieved by software in the i.MX processor, or via a dedicated SXF1800 hardware secure element based in similar technology used in electronic passports, and banking cards.

Click to Enlarge

The solution will support all global V2X standards in US, EU, JPN and KOR, with sampling to lead customers starting in December 2017. Further details may be found in the product page and the press release.

Tweet Marvell unveiled 88W8987xA wireless SoC for V2X (Vehicle to Everything) applications supporting 802.11p WiFi, and DSRC (Dedicated Short Range Communications) last June, but NXP has recently launched Roadlink SAF5400…

Unofficial List of TV boxes Running Android TV OS

$
0
0

Most TV boxes run a modified version of Android operating system for smartphone, and devices based on Google’s Android TV are harder to find, and often country specific since they are tied to local streaming services. Yesterday, I was searching for boxes based on Marvell Armada 1500 Ultra SoC, and first found a couple in Spain and the US, but eventually found a bunch more when I discovered somebody was keeping track of all/most Android TV devices in a page hosted by Google but with no actual affiliation with Google.

The devices are sorted in three categories:

  1. Pay TV Providers, usually only sold in a specific country with programs in the local language, and a fairly long list
  2. Streaming / Gaming – Those are the most famous Android TV TV boxes like Xiaomi Mi Box or Nvidia Shield Android TV with only 6 models in that list
  3. TVs with Android TV OS

The first list is probably the most interesting as it show each device with the release year, country where it is sold, the model name / SKU and processor used with most of the devices being based on Broadcom or Marvell solutions, as well as a few Amlogic and Qualcomm Snapdragon in the mix.

Clicking on the link for each device will provide more details like specifications, official website, and more.

Tweet Most TV boxes run a modified version of Android operating system for smartphone, and devices based on Google’s Android TV are harder to find, and often country specific since…

Hantek PSO2020 is a $53 USB Oscilloscope Pen

$
0
0

I previously covered IkaScope & Aeroscope oscilloscope probes that are both portable and connect wirelessly to your mobile device or computer over respectively WiFi or Bluetooth. The former has slightly better specifications and sells for 300 Euros, while the latter goes for $200 US with 20 MHz bandwidth and 100 MSps capabilities. Several people mentioned it was more expensive than they were prepare to pay, but I’ve been informed about another portable solution: Hantek PSO2020 oscilloscope pen with about the same key specifications as Aeroscope 100A, except it relies on a USB port instead of a wireless connection. This also means it does not need a battery, and sells for much less at $53.20 including shipping.

Hantek PSO2020 specifications:

  • Analog Bandwidth  – 20 MHz
  • Sample Rate – 96 MSps
  • Host Interface – USB 2.0 port
  • Input Range – +/-50 V range
  • Input Sensitivity – 20mV/div to 50V/div
  • Offset Range – +/- 20V to +/- 40V offset
  • Input Impedance – 1MΩ
  • Voltage Resolution – 20mV/div to 20V/div
  • Sample Resolution – 8-bit
  • Time Resolution –  1ns/div to 5000s/div
  • Memory Depth – 1 million points
  • Protection Input Level – 100V (DC+AC peak)
  • Misc – Rotary button to change voltage/time division; voltage, offset, position, time, plus, minus, and R/S buttons; LED
  • Dimensions – N/A


The oscilloscope ships with a “witch hat”, and a CD ROM with documentation and software that works on Windows XP and greater operating system, and supports various features including math functions like FFT or Hann function, cursor measurements, and so on. You can also download those directly from the manufacturer’s product page. The device is not listed in Sigrok wiki, but other Hantek USB oscillopes are, so it might be possible to use with Sigrok open source tool. The pen has been available at least since 2015, but I could not find any (detailed) independent reviews, however the video below shows how PSO2020 in action while connected to a laptop running the Windows based tool.

[embedded content]
It’s fairly large so I’m not sure it’s that convenient to use. Having said that people who bought it on Aliexpress appear to be pretty happy with their purchase. The few “reviews” left on Banggood are also good.

Thanks to Theguyuk for the tip

Tweet I previously covered IkaScope & Aeroscope oscilloscope probes that are both portable and connect wirelessly to your mobile device or computer over respectively WiFi or Bluetooth. The former has…

7″ LCD Display with HDMI input, Audio output Launched for Orange Pi (and Other) Boards

$
0
0

If you want a cheap and simple way to add a screen to your development board, there are some 7″ displays with HDMI inputs that costs under $30 shipped. But Shenzhen Xunlong has decided to make their own 7″ LCD display with HDMI input and audio output, and sell for $22 + shipping.

The company only provided minimal technical information about the board and display:

  • Display  – 7″ TFT LCD with 1024×600  resolution
  • Video & Audio Input – HDMI
  • Audio Output – 3.5mm audio jack
  • Power Supply – 5V via micro USB port

If we look at a closer picture of the board, we’ll see they used Lontium LT8619B, but the company’s website is down… The board also features three different connectors for displays, so they probably have other displays planned. While the company claims the display is made for  Orange Pi H3 boards, it should really work with any board that can output 1024×600 over HDMI.

Click to Enlarge

All you need to use the kit is a board, a HDMI cable (preferably less than 1.5 meters), and a USB power supply for the “transfer” board and the display. It should also be possible to connect speakers via the 3.5mm audio jack. As usual, no documentation is provided, but I would not expect too many issues as long as the hardware works.

Tweet If you want a cheap and simple way to add a screen to your development board, there are some 7″ displays with HDMI inputs that costs under $30 shipped….

Review of Koogeek BP2 Bluetooth Blood Pressure Monitor

$
0
0

Koogeek BP2 is an FDA approved smart blood pressure monitor that connects over Bluetooth to your Android or iOS smartphone, or WiFi to the cloud. The company sent me a sample for evaluation, so let’s get started right away.

Koogeek BP2 Unboxing

The device is sent in a cardboard package with Koogeek brand…

and some more derails about the specifications on the bottom of the package.

Click to Enlarge

I asked the company to confirm about FDA approval, and they told me to look for K134029 on the FDA website, which lead me to this document testing Shenzhen Belter Health Management and Analysis ePA-46B, and comparing it to the results of Omron HEM-7200-Z (BP742) with the conclusion being that:

The Belter Blood pressure meter (ePA-46B) is substantially equivalent to the predicate devices.

Koogeek BP2 is the same as Belter ePA-46B, but just rebranded, and with a different mobile app.

Click to Enlarge

In the package will find the device with the cuff attached to the main unit with an LCD display.

Click to Enlarge

The top of the unit comes with a power button, an LED, a reset pin hole, and a micro USB port for charging the 400 mAh battery.

Click to Enlarge

The package also included a charging cable and a multi-language quick start guide.

Click to Enlarge

We’ll find marking for CE and FDA approval on the cuff, and it’s a medium cuff designed for arms between 22 and 36 cm circumference.

Click to Enlarge

The blood pressure monitor wraps aroudn your upper arm, and is kept in place with Velcro. But before going ahead, you may want to read the user manual…

Click to Enlarge

Click to Enlarge

..with two pages per language, except for Chinese where there are more details provided. Beside English, and Chinese, other languages include French, German, Spanish, Italian, and Japanese. You may also want to charge the monitor before starting. It took about two hours to fully charge the device, with the LED blinking while charging, and solid once it is completed.

Koogeek BP2 Blood Pressure Monitor Review

In theory, you could use the blood pressure monitor without smartphone, by pressing the button once to power it, and another time to start measurement, with diastolic and systolic blood pressure and heart rate shown on the display at the end. But mostly people will likely prefer to use a smartphone to keep track of the evolution instead of relying on pen and paper, and download Koogeek app available for Android or iOS.

Click to Enlarge

Once it’s done, you’ll be asked to login and join Koogeek. THe latter can be done with an email, Facebook or Google+ account. I first tried with Facebook, and it failed with an HTTP 500 error, but I could go ahead with Google+.

Click to Enlarge

You’ll then be prompted to created a new user. For the date of birth, make sure to tap on the year, as it makes it much faster than scrolling through the months… Also indicate your height and weight, and click on create a new user.

Click to Enlarge

You’ll then be shown the timeline (empty), and can start using the monitor as follows:

  1. Tap on the Heart icon
  2. Select “Arm type” (first time only)
  3. Place BP2 monitor on your upper arm with your elbow on the table to make sure the monitor is at heart level, and place your hand palm up
  4. Turn on the monitor
  5. It will establish a Bluetooth connection, and within a few seconds later the Start button will show up
  6. Select the user (if more than one), and press Start, the cuff will inflate and take the measurement. This should take less than one minute
  7. The results will be shown on the smartphone and the LCD display on the monitor
  8. Koogeek BP2 monitor will automatically turn off after 15 seconds. Do not press the button, as it would just start measurement again

The screenshot on the right above shows the results for systolic and diastolic blood pressure in a diagram with 6 different zones:

  • Green – Optimal blood pressure
  • Blue – Normal blood pressure
  • Yellow – High blood pressure (within the normal range)
  • Orange – Mild hypertension
  • Orange Red – Moderate to high blood pressure
  • Red – Severe Hypertension

I’ve shot a video to show the full process.

[embedded content]

In theory, after the first setup with the app, you can take measurements and upload results to the cloud without your smartphone. In the timeline, click the + button which will allow you to install a new device.

Click to Enlarge

The company also offers smart scales, thermometers,  fitness trackers, etc.., but for our use case, I selected KS-BP2 device, and set it up to connect to my WiFi router. I then tried to make a measurement without starting the app, pressing the power button once to start it up, and once again to start measurement, and at the end I could see the WiFi icon on the display showing it upload the data to the cloud, but it may have gone too high, and to medical records heaven, as I was unable to retrieve the results in my phone. I had setup two users at the time, so maybe that’s why. There’s an unknown measurement section in the app, but the results were not their either.

Click to Enlarge

You can create and switch between users in the timeline by tapping on the blue round icon in the bottom left corner with the initials of the current selected users, or switch between users and access to more settings by tapping on the three bars icon on the top left, which will also allow you to set reminders, adjust settings such as app language, units, Google Fit support, and so on. We’ve created two fictitious users to take daily measurements on two different real 🙂 humans between Monday and Saturday, and for each user you can access a chart with the blood pressure over time…

Click to Enlarge

.. as well as heart rate, and a full list of measurements is also accessible. If you can see some outliers, it’s likely a problem with the measurements, but not due to the device. For example, Marge Simpson had a normal blood pressure only on September 11, but we can see the heartrate at 92 bpm was higher than during the other days, and so it must have interfered with the measurement, as we should have waited a little longer after sitting, before starting taking the blood pressure.

Koogeek BP2 (aka KS-BP2) works as expected most of the time, and results appears to be in line with reality based on each respective patient’s history, but I had troubles using WiFi to cloud function when not using my smartphone, and once the blood pressure monitor started to inflate, deflate, inflate, etc…as if it had troubles completing the measurements. I could easily stop it by pressing the power button to turn it off, and restarted it to make a successful measurement right after.

I’d like to thank Koogeek for sending the review sample, and Koogeek BP2 can be purchased for $69.99 on Amazon. Koogeek is a TomTop brand, so you’ll also find their products on Tomtop.com.

Tweet Koogeek BP2 is an FDA approved smart blood pressure monitor that connects over Bluetooth to your Android or iOS smartphone, or WiFi to the cloud. The company sent me…


Review of Vobot Alarm Clock with Alexa

$
0
0

Karl here with a review of Vobot sent By Cafago. I had to Google it when I was asked to review it. Turned out it was an Echo type device with a pixel display and a battery. It started as an Indiegogo campaign. I had been wanting to try to do some sort of voice control with my home automation so I agreed to review it.

Vobot Clock C1 Specifications

These are pulled from Vobot’s website. No power supply is included but a long USB cable is.

Click to Enlarge

Setup

I let my wife do the initial setup as I figured that she would use it the most. She followed the instructions, and it seemed straightforward from what she told me. She said she had to reboot it once during a step but it continued the setup with no problems. She tied to our Amazon Prime account, and she quickly was playing some music. During research, I did find out that it was not an always listening device.

Update

I logged into myvobot.com today to see if anything had changed, and there was an update. It suggested that I rebooted the device so I did before updating. Without logging in I wouldn’t have known there was an update. Maybe I missed something but I don’t remember seeing or hearing some sort of notification. I received a verbal notification that it could take up to 10 minutes, but only took a few minutes. The thing is I have no idea what has changed or improved. There is no changelog.

Teardown

I wanted to do a teardown when I first received the speaker, but I was afraid to break it. Now here at the end, I finally put some force behind it and finally got it apart. Only a few minor scratches and it seems to be fine. The teardown reveals that it is running on a Mediatek MT7688AN, and confirms battery’s capacity. 512MB NANYA storage NT5TU32M16FG-AC completes the list of the main chips. Maybe some enterprising soul will hack this and bring some imaginative new usage.

One big issue

Everything that I tried worked the way I expected for the most part . Home assistant can emulate a Hue bridge, but after reading in the forums, it only works with an Amazon Echo or Google Home speaker. Bummer, that is not the real issue I wanted to bring up. I really wish that it had an always listening microphone. You have to press the button to put it in listening mode. I understand that it has a battery, and would drain the battery but why not have it always listening when plugged in and use the button when roaming about.

Random final thoughts

OK now that I have a device that will take voice commands now what. I like the scrolling display. It is pretty cool and a little retro. I used this about 95% of the time just to play music. Don’t expect much from the speaker, but you can send audio to a home system through the 3.5mm jack on the back.

I know that there are 1000’s of skills but few attracted me. I did like the idea of calling another Alexa device but not supported. Arggh, OK maybe another issue. I did use the weather feature asking about the weather for the next day on occasion.

My 5 year old son was easily able to start music, and it could understand his voice which surprised me. The display is nice, and battery powered is a plus, but I don’t understand one thing. For just about the same price, I can get an Echo Dot which gets me always listening, and 100% works with all the features but no battery or display. I bet that the limitations with the exception of the always listening is inherent to all non Echo devices.

If you are looking for a portable Alexa powered device with a display then the Vobot might be for you. Seems sturdy. Descent battery life. I listened for about 2 hours and it still had a charge on the battery. To get an official Echo Tap it sets you back $120. It is the only official Echo that has a battery.

I would like to thank Cafago for sending the device for review. They provided a coupon code “V3127SA” for the Vobot which is good until 9/30/17, and brings the price down to $ 41.99/€36.1. You’ll also find it for $45 and up on other sites such as DX.com or Amazon.

Tweet Karl here with a review of Vobot sent By Cafago. I had to Google it when I was asked to review it. Turned out it was an Echo type…

MeLE PCG35 Apo mini PC Review – Part 1: Unboxing, Teardown, and M.2 SSD / SATA HDD Installation

$
0
0

MeLE PCG35 Apo is a mini PC powered by Intel Pentium J3455, one of the most powerful Intel processors from Apollo Lake family, coupled with 4GB LPDDR3, 32GB eMMC flash and support for M.2 SSD and 2.5″ SATA HDD/SSD. The company sent me a sample for review, and I’ll start by taking photos of the device, accessories, and internal design, as well as showing how to install an M.2SSD and 2.5″ SATA drive, before publishing the second part of the review with Windows 10 at the end of next month.

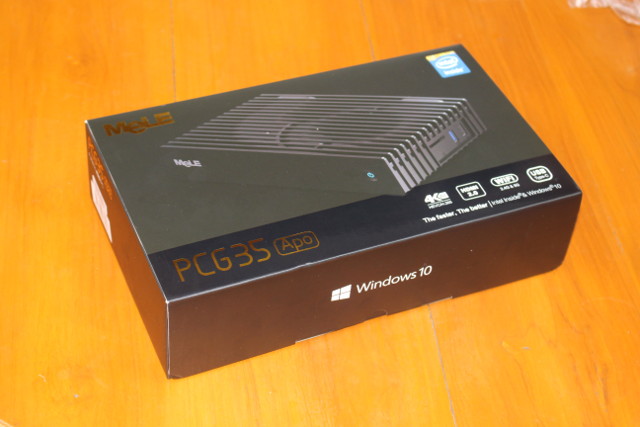
MeLE PCG35 Apo Unboxing

The mini PC comes with the usual black package with gold fonts the company has used us to.

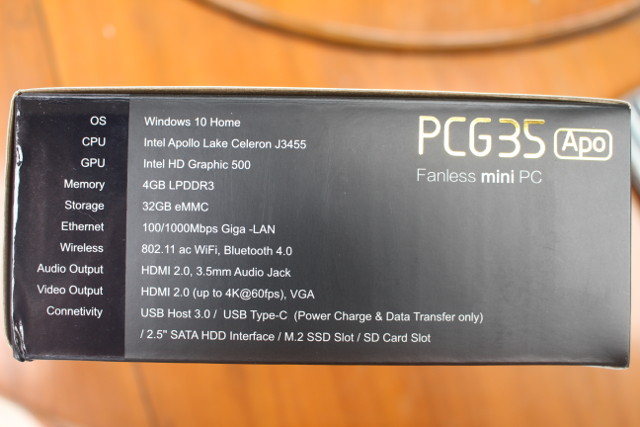
The side shows the main specifications of the fanless mini PC.

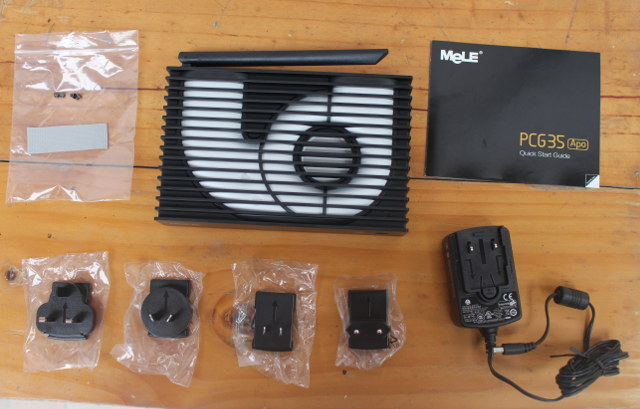
The mini PC, which comes with an aluminum heatsink shaped as number 6, ships with a 12V/2A power supply plus UK, AU, US, and EU plug adapter, a quick start guide, and a zip bag with 4 screws to install a 2.5″ SATA drive, as well as thermal pad for the M.2 SSD.

Click to Enlarge

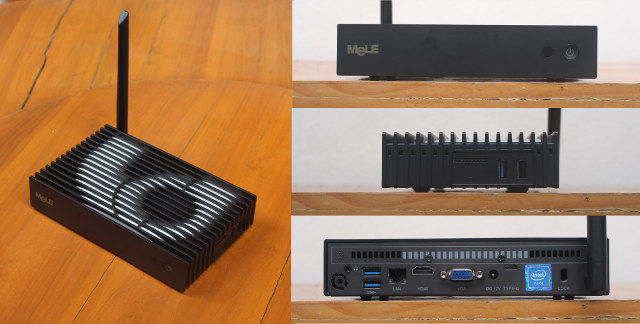
The case is not fully made of metal with the top part made of plastic, and the bottom and rear panel made of metal. The front panel include power button and LED, one of the side features a full sized SD card slot, a USB 3.0 ports, and a USB 2.0 ports…

Click to Enlarge

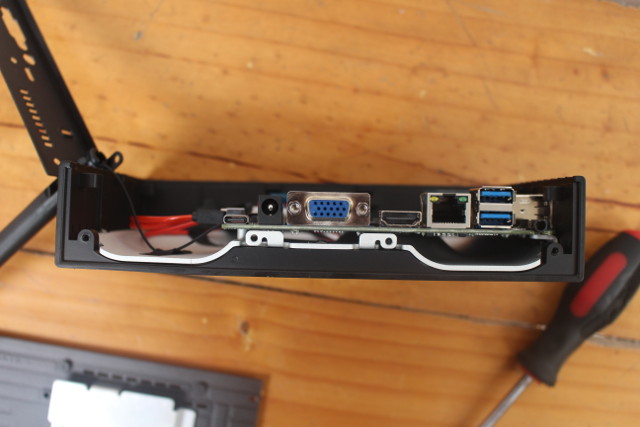
… and the rear panel is equipped with a 3.5mm audio jack, two more USB 3.0 ports, a Gigabit Ethernet port, HDMI 2.0 and VGA outputs, the power jack, a USB type C port for data and power only (no video/audio), a security lock, and an external WiFi antenna.

MeLE PCG35 Apo Teardown

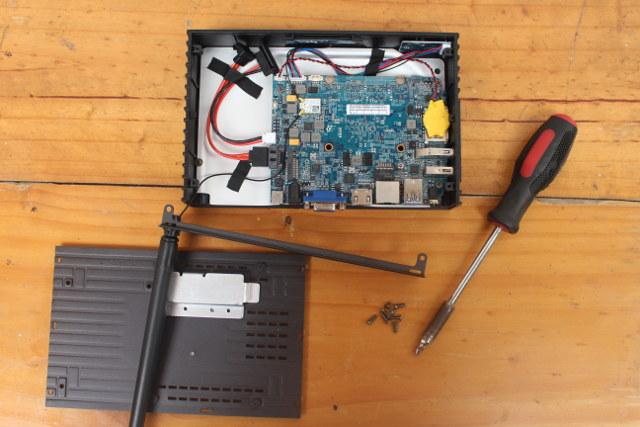
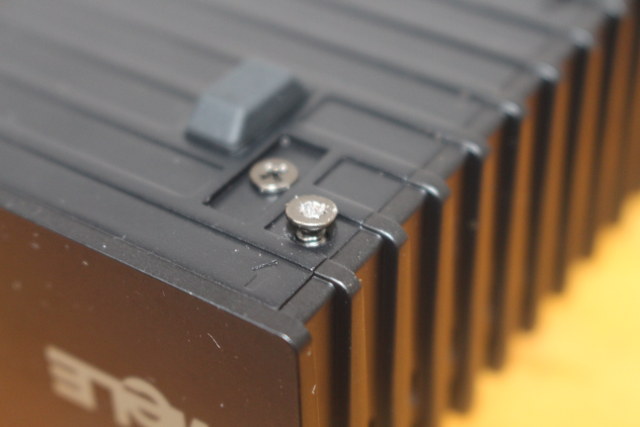
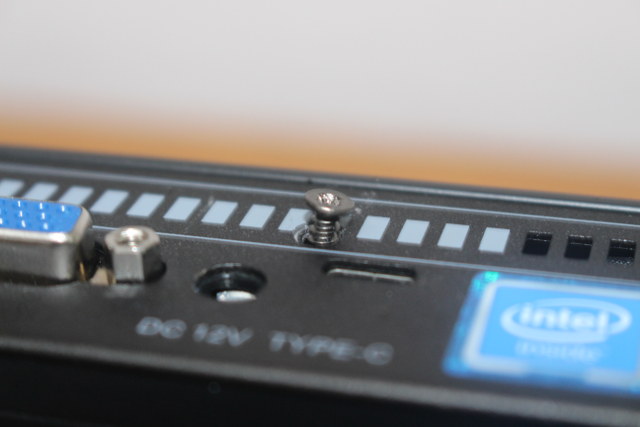
If you plan to install an hard drive and/or SSD you’ll need to open the case. Four screws are located on the bottom, and four screws in the rear panel. I loosened all eight screws, but it should be possible to install the drives by only removing the bottom cover.

Click to Enlarge

Note that the screws do not feel of good build quality, and I had to try with 4 different screw drivers/heads for fear of damaging them, as with the first screw driver I used I could see some metal going off of the first screws. You’ll need to find a screw head that fit perfectly to avoid any damage. Note that two screws are shorter than the other to make sure to check this when you open the box. The short ones are on the edges of the rear panel.

Click to Enlarge

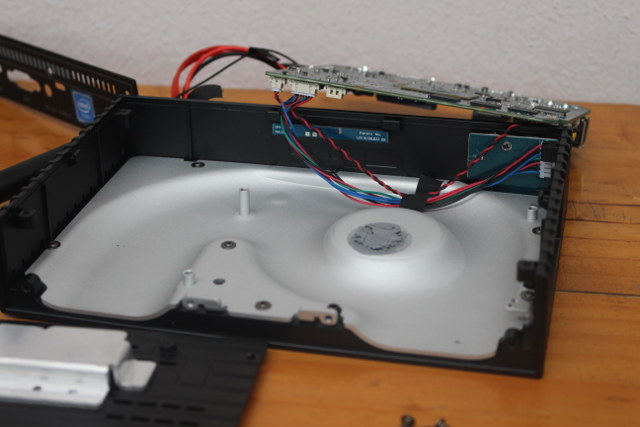
The bottom metal cover also include another aluminum piece that, as we’ll see later, is used to cool the M.2 SSD. We can also find the SATA cables, and 80mm M.2 slot inside the case as expected.

Click to Enlarge

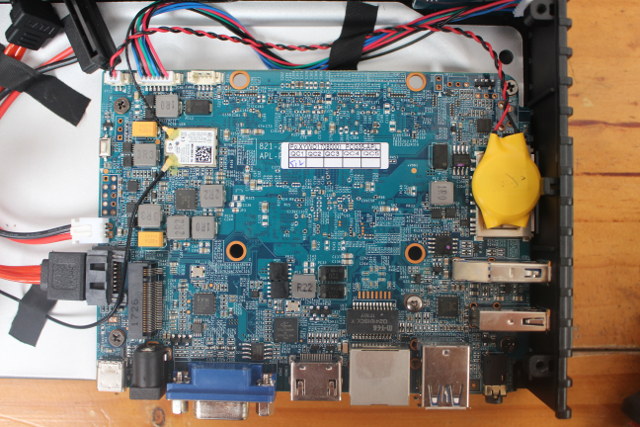
On the top of the main board we’ll get the RTC battery, and several chips including:

  • Parade PS175HDM DisplayPort to HDMI 2.0a video interface converter
  • ITE IT6513FN DisplayPort to VGA controller
  • Richtek RT5074A power management IC?
  • Realtek ALC269 audio coded for the headphone jack
  • M-TEK G24101SCGX Gigabit Ethernet transformer
  • Intel 3165D2W wireless module for 802.11 b/g/n/ac WiFi and Bluetooth 4.0 LE
  • Realtek RTS5170 card reader controller driver

Unsurprisingly, those are exactly the same chips used in MeLE PCG35 Apo.

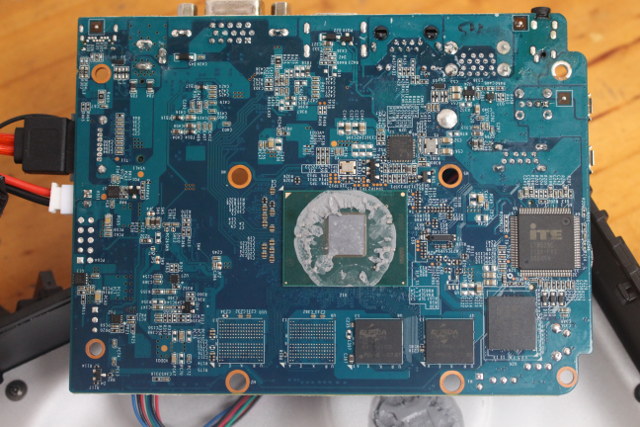
If we looks on the side, we’ll see more about the design of the aluminum heatsink. It actually looks like a heat spreader, but since it’s attached to plastic part of the case, it does not spread heat to another metal part. Most people should not do that, but I loosened for more screws to take out the board, and have a better looks at the design of the aluminum part. There’s a fair amount of thermal paste on the “volcano” like part of the heatsink that makes contact with the Intel Pentium J3455 processor.

Click to Enlarge

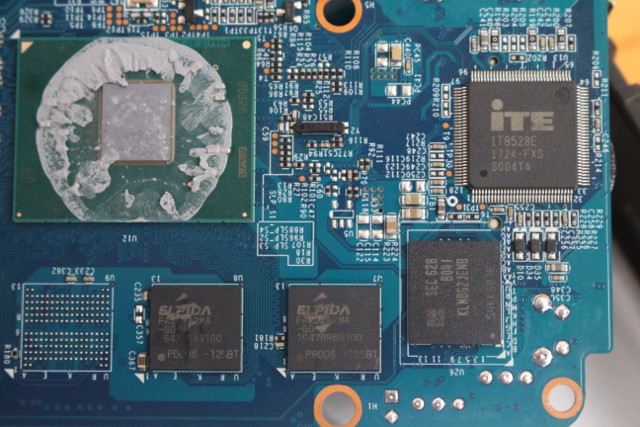
We can also see an internal WiFi/Bluetooth antenna in the background. That part of the PCB also includes the chips for RAM, storage, ITE IT8528E embedded controller, and Realtek RTL8111(AN) Gigabit Ethernet transceiver.

Click to Enlarge

We have 32GB storage with Samsung KLM8G2JENB-B041 eMMC 5.1 flash with theoretical performance of up to 310MB/s read, 70MB/s write, and 13K/14K R/W IOPS, which differs from the Toshiba eMMC flash found in PCG03 Apo, and the best 32GB Samsung eMMC part available.

We also have two ELPIDA FAZ32A2MA RAM chips that should be 2GB each for a total of 4GB RAM, and there are two unpopulated footprints for two more, meaning there could be a 8GB RAM model on the way, or for OEM customers.

M.2 SSD and SATA HDD Installation in MeLE PCG35 Apo

The user manual does not explain at all how to install either M.2 SSD, nor SATA HDD, but it’s quite easy enough to figure out.

I used KingDian N480 M.2 SSD (80mm long), inserted it in the M.2 slot and kept it in place with the screw. You may also want to the the M.2 SSD thermal pad included in the package. Peel off the plastic sheet on the pad, and place it pad on the of the aluminum part attached to the bottom metal cover, before peeling off the second plastic sheet as shown in the photo below.

Click to Enlarge

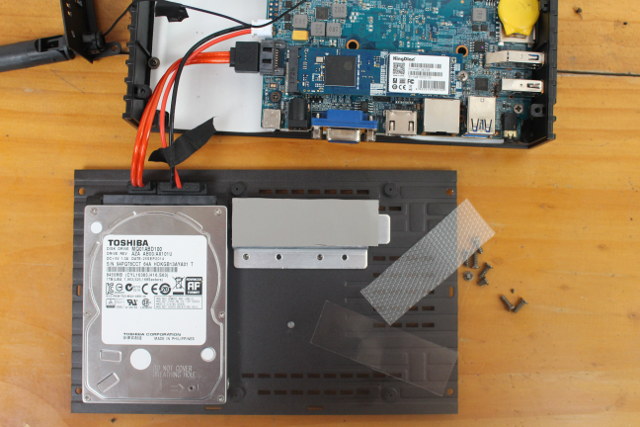
If you plan to use a 2.5″ drive too, use the four extra screws in the package to attach it to the bottom metal cover making sure the drive is oriented such as the SATA connector is placed close to the SATA marking on the cover, and connect the SATA cables accordingly. Now we can put everything back together, and we should be good to go. So I plan to use the eMMC flash for Windows 10, the M.2 SSD for program, cache, and email database, and the SATA hard drive for other data.

About those screws…

When I first started the teardown, I mentioned the screws could be damaged easily, and I managed to damage one on the bottom plate, enough so I can not screw it or loosen it with a screwdriver anymore. I’ll have to use another tool to take it once I want to get back my SSD and hard drive.

I also had another problem with another screw in the rear panel that would not go straight. I tried to loose the other screw around, and try again, and later mix the screws but no luck…

Since the mini PC is designed to be open, it would have been good if the company has found an easier way to open the device to insert an SSD/HDD, or sturdier screws.

[Update from MeLE:

As for the screws on the rear panel and bottom, we have realized the seriousness that it may bring uncomfortable experience to customers who install and uninstall frequently. Therefore, we have urged our R&D team to implement new screws (more stronger and more feasible) from next batch of massive production in end of this month by sending official ECN (engineering change notice) to our factory within this week.

]

I’d like to thank MeLE for sending their latest fanless mini PC for review, and if you are interested in the device, you can purchase it for $179.99 including shipping on Aliexpress. They also have options for a VESA mount, and a MeLE F10 air mouse. Please note that the company will often put the device back to $199.99, just wait a few days if this is the case, and I’ve also been told promotional prices are always on during week-ends.

Tweet MeLE PCG35 Apo is a mini PC powered by Intel Pentium J3455, one of the most powerful Intel processors from Apollo Lake family, coupled with 4GB LPDDR3, 32GB eMMC…

Wanscam HW0026 720p IP Camera Goes for $9.99 (Promo)

$
0
0

Wanscam HW0026 is a 720p IP camera with night vision, motion detection, and ONVIF 2.1 support that was launched in 2015, although they seem to have updated the model since then. GearBest now has a promotion for the US version of the camera for just $9.99 shipped. The version with the EU plug is sold for $15 shipped without any deep discount.


Wanscam HW0026 IP camera features and specifications:

  • Camera
    • 720P HD resolution, 1.0MP 1/4 inch CMOS sensor, 1 – 25fps adjustable frame rate
    • 90 degree wide angle FOV, 3.6mm lens
    • Supports 10 LEDs for night vision with infrared distance up to 10m
    • Motion detection up to 10 – 15m
    • Video – H.264 codec, AVI container, NTSC or PAL standard.
  • Storage – micro SD card up to 64 GB
  • Connectivity
    • 802.11 b/g/n WiFi
    • Protocols – DDNS, DHCP, FTP, LAN, P2P, RTSP, TCP, UPNP
  • Audio – Built-in mic and speaker, supports two-way intercom
  • Power Supply – 5V / 1A
  • Dimensions – 11.70 cm x 8 cm x 8 cm
  • Weight – 104 grams

The camera can be controlled from web browsers in desktop OS like Mac OS, Windows, or Linux, as well as Android or iOS smartphones using E-view 7 app. It ships with an English user manual, an accessories kit and a power adapter. I could not find custom open source firmware, or specific hacks for the camera, but since it’s compliant with ONVIF 2.1, it should be compatible with third party programs like Xenoma, and NAS with support for surveillance cameras. The old model was based on Hisilicon Hi3518E processor, but the new version appears to be based on Ingenic T10 MIPS processor.

Thanks to Ivo for the tip

Tweet Wanscam HW0026 is a 720p IP camera with night vision, motion detection, and ONVIF 2.1 support that was launched in 2015, although they seem to have updated the model…
Designing a 3D Printed Jig to Flash Firmware to ESP8266 based Light Bulbs

$
0
0

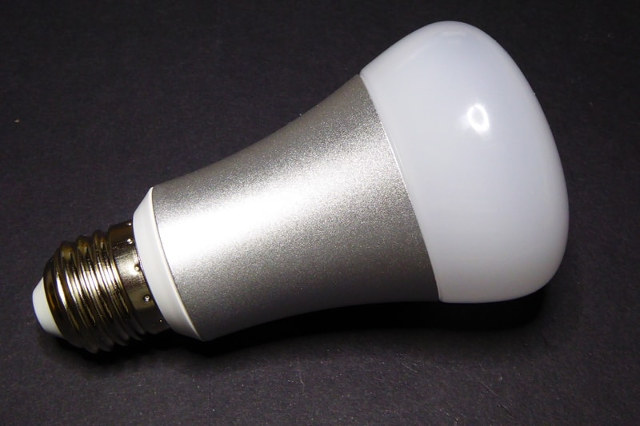
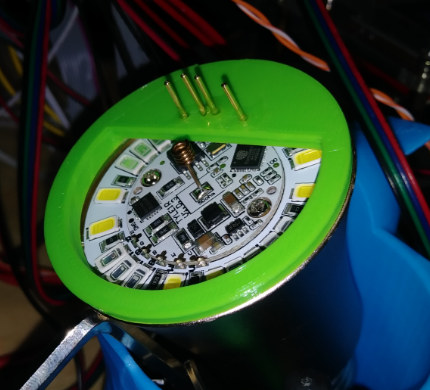
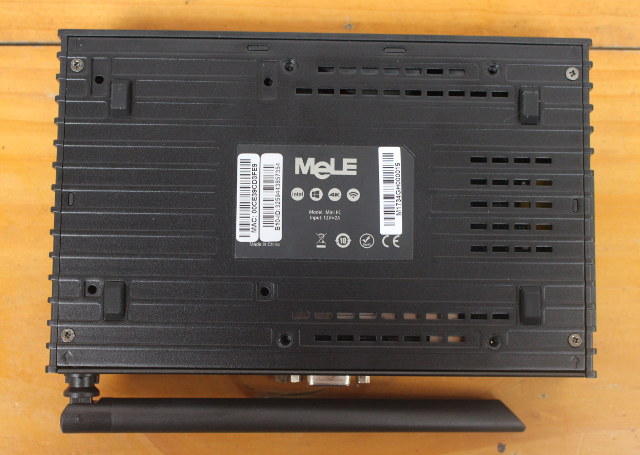
Karl here. I have to say that my favorite part of 3D printing is designing things from scratch. Recently a reader was asking about a way to flash a lot of Ai Lights on a project he was working on. I suggested 3D printing a jig that pressure fits pins. He didn’t have a printer, and we exchanged contact information and he sent me one of the lights and some pogo pins from Amazon.

Click to Enlarge

Design in Fusion 360

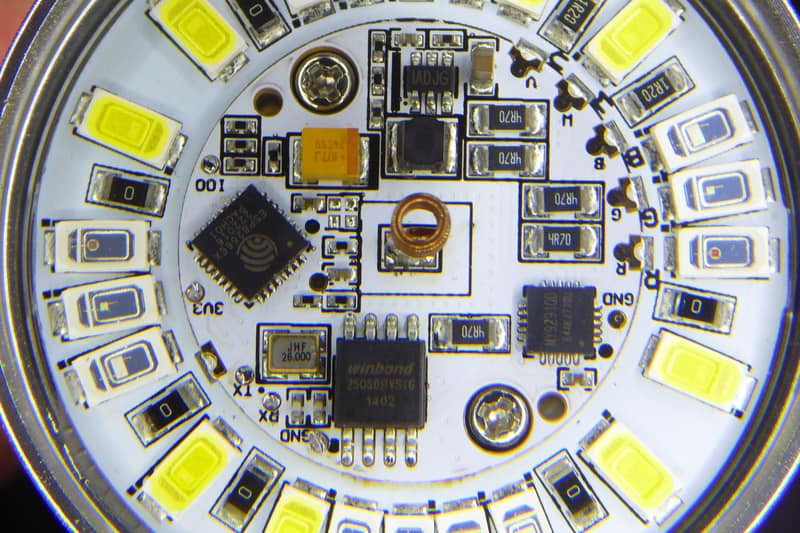
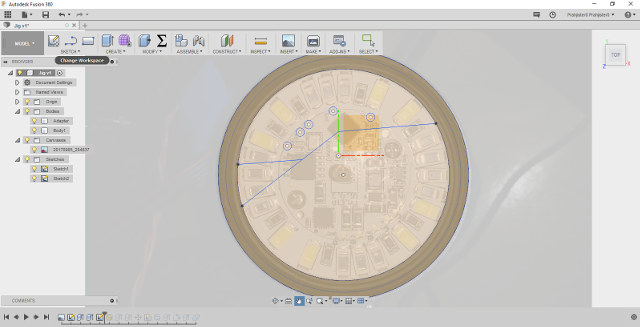
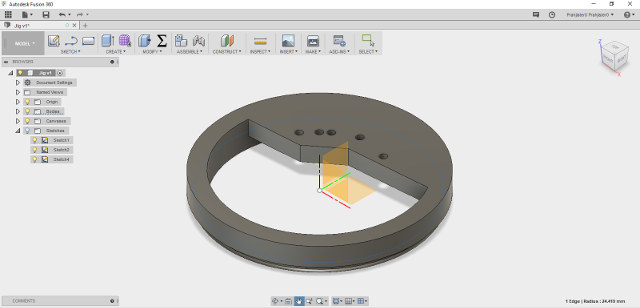
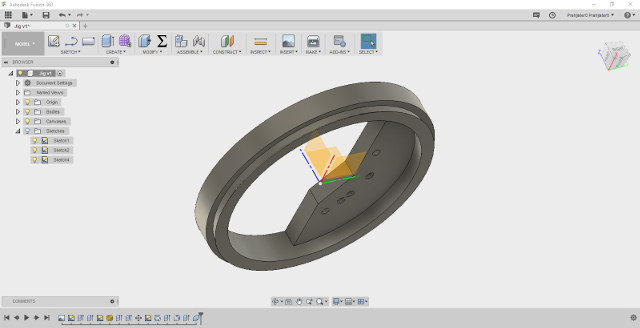
I started by taking a picture of the light to get my pin placement. I set a scale by measuring a known distance then printed and tested. It took about 3 iterations to get them to line up in real life. Keep in mind camera lenses distort reality and knew It would take a couple times. I would just let a few layers print then stop and line everything up. I had a mostly working prototype in a couple hours. I did have to go back and add an additional pin after I found out that 100 needed to be grounded when powering up so took a couple more tries to line that pin up. The first couple times pressing into place it is very snug. After 3 or 4 times it becomes easier to remove.

Click to Enlarge

Click to Enlarge

Click to Enlarge

First Iteration

Building the Jig

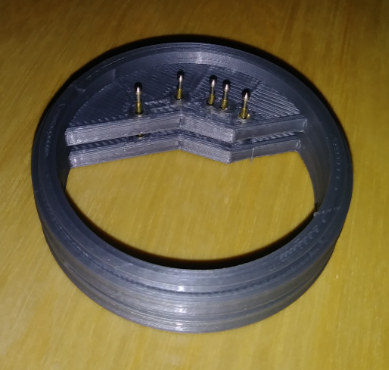
I built this thing too many times, but I finally settled a reproducible method. First print at least 2 copies of the jig. Insert pins in jig then place on 2ng jig with pins up. 2nd jig is only for alignment and to keep straight. Once aligned super glue the pins to the jig and let dry. Do not get glue inside the pins or they will get stuck. When I was first putting this together I was doing it the other way, and glue kept on seeping down to the pins and making them stick. This method of gluing worked the first time.

After gluing solder on your leads, use some shrink tube, and make sure to connect pin 100 to the ground. I thought it needed to be temporary, but I forgot to disconnect one flash. I test flashed the light about a dozen time with 100% success.

The method I used to connect is with the leads connected to PC, I press the jig in place slightly offset clockwise a couple degrees. Press in, then turn counter clockwise until you hear a click. When it clicks into the pads and PC dings it is ready to flash.

This was a fun little project and if you would like to print it you can find it here.

Click to Enlarge

Tweet Karl here. I have to say that my favorite part of 3D printing is designing things from scratch. Recently a reader was asking about a way to flash a…

Need to Program Many ESP-WROOM-32 / ESP-32S Modules? This Board Should Help

$
0
0

We’ve just published an article about a 3D printed jig to program some ESP8266 light bulbs, but as I watched Andreas Spiess’s latest video about ESP32 boards, he showed a board specifically designed to flash firmware to ESP-WROOM-32 or/and ESP-32S modules, which could be useful if you have many to program.

Click to Enlarge

The acrylic base does not appear to be offered by all vendors, as some use some standoffs instead to lift the board up. You just need to insert your compatible ESP32 module in the board, flash the firmware it, take it out, and more to the next module. It can also be used as a development board since it exposes I/Os via three 14-pin headers, comes with a on/off button, reset and program buttons, as well as a micro USB port for power, programming and debugging

I first found it on Banggood, where it is sold for $14.99 shipped, the best price at the time of writing, but you can also purchase it on Amazon, eBay, Aliexpress, and I’m sure other websites. Just search for “ESP32 Test Board Small Batch Burn Fixture”.

Tweet We’ve just published an article about a 3D printed jig to program some ESP8266 light bulbs, but as I watched Andreas Spiess’s latest video about ESP32 boards, he showed…

LimeSDR Mini is a $135 Open Source Hardware, Full Duplex USB SDR Board (Crowdfunding)

$
0
0

LimeSDR open source hardware software defined radio was launched last year with the promise of integration with Ubuntu Snap Store allowing to easily download and install various radio implementations such as LTE, WiFi, Bluetooth, LoRa, etc… It was offered for $200 and up as part of a crowdfunding campaign, but Lime Microsystems is back on CrowdSupply with a cheaper and low end version aptly called LimeSDR Mini.LimeSDR mini specifications:

  • FPGA – Intel Altera Max 10 (10M16SAU169C8G) with 16K Logic gates, 549 KB M9K memory, 2,368 KB user flash memory
  • Storage –  4 MB flash memory for data; 2x128KB EEPROM for RF transceiver MCU firmware and data
  • RF
    • Lime Microsystems LMS7002M RF transceiver
    • Tx & Rx SMA connectors
    • Frequency range – 10 MHz to 3.5 GHz
    • RF bandwidth – 30.72 Mhz
    • Sample Rate – 30.72 MSps with 12-bit sample depth
    • Power Output (CW): up to 10 dBm
  • USB – 1x USB 3.0 port via FTDI FT601 controller chip
  • Expansion – 8-pin FPGA GPIO header
  • Misc – 2x  dual color LEDs, JTAG
  • Power – USB or external power supply
  • Dimensions – 69 mm x 31.4 mm

The company also put together a table to compare LimeSDR to LimeSDR Mini and other product on the markers from the dirty cheap RTL-SDR stick to more expensive and advanced solutions like Ettus B210.

The new LimeSDR Mini board will support the same development tools such as LimeSuite, and Snappy Ubuntu Core apps as its old brother, although I’m not quite sure about the status about the app store, as they did not provide that many details. The board will also be open source hardware, with hardware design files that should be released on MyriadRF’s Github account shortly before or after shipping. The company will also offer some accessories for the board such as an acrylic enclosure, and three SMA antennas optimized for 800-960 MHz, 1710-2170 MHz, and 2400-2700 MHz.

LimeSDR Mini Prototype (no SMA connectors) in Acrylic Case

The goal is to raise at least $100,000 for mass production, and after a few days they’re off to a good start with over $76,000 pledged. All 500 $99 early bird rewards are gone, but you can still pledge $139 for the board with delivery planned for December 31, 2017. Shipping is free to the US, and $10 to the rest of the world.

[embedded content]

Tweet LimeSDR open source hardware software defined radio was launched last year with the promise of integration with Ubuntu Snap Store allowing to easily download and install various radio implementations…

Mictrack MT600 4G GPS Tracker Supports Traccar, OpenGTS, and Other GPS Tracking Platforms

$
0
0

Cellular GPS trackers have been around for a few years, but so far mostly 2G or 3G GPS trackers with products like Ping, Particle Asset tracker, and many other models selling on Aliexpress. 4G GPS tracker have been less common. However, recently we’ve seen platforms like Wio LTE and AutoPi that could handle GPS tracking over LTE connectivity, and another alternative would be Mictrack MT600 that ready-to-use solution to track your car or other vehicle with GPS and 4G.

Mictrack MT600 hardware specifications:

  • GNSS
    • U-BLOX7 GPS Chip
    • GPS sensitivity -162dBm
    • Channel – 56
    • Positioning Accuracy – 10m
    • Cold start: 30s; warm start: 15s; hot start: 1s
    • SMA antenna connector
  • Cellular Connectivity
    • Qualcomm 4G LTE chip
    • MT600-A model (North America):
      • 4G FDD LTE: 700/850/1700/1900MHz
      • 3G UMTS: 850/1700/1900MHz
      • GSM: 850/1900MHz
    • MT600-C model (Asia):
      • 4G FDD LTE: 900/1800/2100MHz
      • 4G TDD LTE: 1900/2300/2500/2600MHz
      • 3G UMTS: 900/2100MHz
      • GSM: 900/1800MHz
    • MT600-E (Australia/Asia/Europe)
      • 4G FDD LTE: 800/850/900/1800/2100/2600MHz
      • 3G UMTS: 850/900/2100MHz
      • GSM: 850/900/1800/1900MHz
    • MT600-J (Japan Only) – 4G FDD LTE: B1/ B3/ B8/ B18/ B19/ B26
    • MT600l-V (Verizon Only) – 4G FDD LTE: 700/1700MHz
    • MT600-AUT (Telstra Only)
      • 4G FDD LTE: 700/850//1800/2100/2600MHz
      • 4G UMTS: 850/2100MHz
    • SMA Antenna connector; SIM card slot
  • Sensors – 3-axis accelerometer sensor, temperature sensor
  • Misc – 4G, GPS and charging LEDs; micro USB port, microphone port, J2 “reserve” connector
  • Input voltage – DC 9V-36V via J1 connector
  • Battery – 700mAh/3.7V for backup
  • Power Consumption – 60mA standby current
  • Dimension – 90 x 70 x x 24 mm
  • Weight – 138g
  • Temperature Range –  -20°C to +70°C
  • Humidity – 5% to 95% non-condensing

MT600 GPS tracker ships with GPS and 4G antennas, a 6-pin power cable, and an SOS button by default, with an optional relay available. The 6-pin cable connected to the car’s battery, the SOS button, ACC (12V) power, and optional to the relay connected to the fuel pump. It’s unclear what the reserve connector, micro USB port, and headphone port are for, since they are not mentioned at all in the user manual, except for the diagram above.

6-pin cable connection diagram

It can be controlled / managed through SMS, computer programs, or Yi Tracker mobile app for Android or iOS which will allow you to monitor the real-time position of your car, trip history, alarms for SOS button, low car/backup battery level, towing, high temperature, speeding, and geo-fencing. The company also lists support for camera, door sensor, and fuel sensor but only for ODM partners, which might be the reason why J2 connector and micro USB port exist. The video below explains about the connections without actually showing how to connect it to an actual car, and shows to get started with the tracker using a mobile phone.

[embedded content]

The manufacturer claims the “protocol is open” (but does not provide any details), and explains the device is also supported by various third party GPS platforms such as Gurtam, GPSGate, CoryUSGPS, Orange GPS,  OpenGTS and Traccar, with the last two being open source platforms.

Mictrack MT600 is sold on Aliexpress, often under other brands, for $108 shipped and higher. The company has also just released MT550 global 4G GPS tracker using LTE CAT M1/NB1. More info and products can be found on Mictrack website.

Tweet Cellular GPS trackers have been around for a few years, but so far mostly 2G or 3G GPS trackers with products like Ping, Particle Asset tracker, and many other…


uCAN CAN Ethernet Converter and Logger is Based on Orange Pi Zero Board

$
0
0

The CAN bus is a serial communication protocol used in automotive and automation applications. The guys at ucandevices.pl have designed a solution around Orange Pi Zero board that allows you to log CAN bus data or act as a bridge between the CAN bus and Ethernet or WiFi. They call it “CAN Ethernet converter, CAN Logger, Linux CAN computer”. Sorry, no shorter name that I could find…

Click to Enlarge

uCAN (pronounced micro CAN) CAN Bus board specifications:

  • Main Board – Orange Pi Zero with Allwinner H2+ quad core cortex-A7 processor, 256 MB RAM
  • Network Connectivity – 10/100M Ethernet, 802.11 b/g/n WiFi
  • Can Bus – 2-pin terminal block; support for CAN version 2.0 support
  • Power Supply – DC 5V/2A via micro USB port
  • Dimension – 50 x 50 x 20 mm

The device comes pre-load with Debian distribution provided by Armbian plus various CAN tools. The getting started video below shows uCANTools web interface programmed with Node.js and running by default on the board, and explains how to use sockets instead to access the CAN data.

[embedded content]
You can find the source code for uCANTools on Github, and the other pre-installed tools are based on can-utils package available from Debian repository.

uCAN CAN Ethernet converter is normally sold on Tindie for $50 plus shipping, but right as I was about to finish this article the price switched to $150 with the message “This seller is on vacation. Please return after Oct. 14, 2017 to purchase this awesome product!”. Oh well…

Tweet The CAN bus is a serial communication protocol used in automotive and automation applications. The guys at ucandevices.pl have designed a solution around Orange Pi Zero board that allows…

Rikomagic Introduces V3 TV Stick, MK39 TV Box, R3 Projector, and DS01 Digital Signage Player

$
0
0

Rikomagic will launch four new Android devices this month with RKM V3 TV stick powered by Rockchip RK3328 processor, RKM MK39 TV box / mini PC based on Rockchip RK3399, RKM R3 projector with an octa-core processor, and DS01 digital signage player.

RKM V3 TV Stick

RKM V3 specifications:

  • SoC – Rockchip RK3328 quad core Cortex A53 processor @ 1.5 GHz with Mali-450MP2 GPU
  • System Memory – 2 GB RAM
  • Storage – 8 GB eMMC flash + micro SD card up to 32GB
  • Video & Audio Output – HDMI 2.0a up to 4K @ 60 Hz with HDR10 and HLG support
  • Video Codec – 4K VP9, H.265 and H.264. 1080p VC-1, MPEG-1/2/4, VP6/8
  • Connectivity – 10/100M Ethernet, 802.11 b/g/n WiFi, Bluetooth 4.2
  • USB – 1x USB 2.0 port, 1x USB 3.0 port
  • Misc – IR receiver? (TBC)
  • Power Supply – 5V/2A via power barrel jack

The stick runs Android 7.1 OS with Google Play store, Miracast, DLNA, etc… It ships with a USB male to female adapter, and a power supply.

RKM MK39 TV box

RKM MK39 mini PC specifications:

  • SoC – Rockchip RK3399 hexa core processor with 2x ARM Cortex A72 cores @ up to 2.0 GHz, 4x ARM Cortex A53 cores @ up to 1.5 GHz, and ARM Mali-T860MP4 GPU
  • System Memory – 4GB DDR3
  • Storage – 32 GB eMMC flash + micro SD card slot up to 32GB
  • Video Output – HDMI 2.0a up to 4K @ 60 Hz
  • Video Codecs – 4K H.265 & VP9 decoding
  • Audio Output – HDMI, optical S/PDIF
  • Connectivity – Gigabit Ethernet, dual band 802.11 b/g/n/ac WiFi + Bluetooth 4.1
  • USB – 2x USB 2.0 ports, 1x USB 3.0 port, 1x USB type C port (no details about supported features)
  • Misc – IR receiver
  • Power Supply – 12V/2A

The device also runs Android 7.1, and ships with an HDMI cable, a simple IR remote control, and the power supply.

R3 Projector, and DS01 Digital Signage Player

We don’t have the full details about the last two devices to launch this month, but we do know RKM R3 will be an Android 6.0 smart Full HD projector powered by an Octa-core processor (maybe RK3368) coupled with 2GB RAM, 32GB storage, and delivering 220 lumen brightness, while DS01 will be a digital signage player powered by Rockchip RK3228 quad core Cortex A17 processor, and also sold with the board only.

Eventually, all details about the four new models should be provided on Rikomagic products’ page, and sold to individuals via their Aliexpress store.

Tweet Rikomagic will launch four new Android devices this month with RKM V3 TV stick powered by Rockchip RK3328 processor, RKM MK39 TV box / mini PC based on Rockchip…

Amlogic S805X Processor is Designed for Low Cost TV Boxes with 1080p H.264, H.265 and VP9 Video Support

$
0
0

The low end of the TV box market is now highly competitive with Rockchip and Amlogic battling to offer the cheapest solutions available, as we’ve seen in a recent factory price list of TV boxes with RK3229 based devices selling for as low as $17.8, and Amlogic S905W based boxes going for $17.5 and up (per unit) for orders of 200 pieces. Amlogic has been working on an even lower cost SoC with Amlogic S805X based on four Cortex A53 cores, the same Mali-450MP GPU, but no 4K support, and instead H.264, H.265 and VP9 video decoding up to 1080p60, as I found out in a document shared on Amlogic Open Linux website.

Amlogic 805X will be quite similar to Amlogic S905X and S905D with the same CPU by clocked at a lower 1.2 GHz frequency, the same penta-core GPU, TrustZone support, and Fast Ethernet. The main difference is that in order to lower costs, they limited the multimedia capabilities to 1080p video decoding, and 1080p video output. Those last two actually make it more similar to Amlogic S805 SoC, but instead of a four Cortex A5 32-bit cores, S805X comes with more powerful Cortex A53 64-bit cores, and VP9 support was added to S805X.

The processor is likely be used in both Android and Linux TV boxes, as the company’s Mbox P241 reference platform / development board based on S805X SoC, comes with either 512MB DDR3 or 1GB DDR4, coupled with eMMC flash, and an AP6255 wireless module supporting 802.11 b/g/n/ac and Bluetooth 4.2.

I’ve yet to see any S805X TV boxes, even on Alibaba, but I’d expect them to sell retail for around $20 including shipping. The processor could also be an interesting choice for low cost development boards, competing against Allwinner H5 solutions.

Tweet The low end of the TV box market is now highly competitive with Rockchip and Amlogic battling to offer the cheapest solutions available, as we’ve seen in a recent…

TV030 is a $10 DVB-T Tuner for your Android Smartphone or Tablet

$
0
0
Home > Android, Hardware, Video > TV030 is a $10 DVB-T Tuner for your Android Smartphone or Tablet

TV030 is a $10 DVB-T Tuner for your Android Smartphone or Tablet

We’ve previously covered tuners or small boxes that allow you to watch free-to-air TV on your smartphone or tablet with products such as PT115m/PT115e or DTV Link box, but I’ve just noticed GeekBuying added TV030 DVB-T tuner that connects to the micro USB port of your smartphone, and sells for just $10.99 shipped.

TV030 TV mobile stick specifications:

  • Signal: 75 Ohm Digital TV Aerial Input
  • Punctured Codes: 1/2, 2/3, 3/4, 4/5, 5/6 and 7/8
  • Receive Frequency: DVB-T: 474 ~ 858 MHz (UHF)
  • Input: DVB-T
  • Bandwidth: 6/7/8 MHz
  • Dimensions – 27 x 18 x 7mm; antenna: 210mm long max
  • Weight – 14 grams

The stick sells with an antenna, and a CDROM apparently containing the Android apk for EZTV app. It requires Android 4.1-5.0 or greater with the following minimal requirements to watch:

  • SD TV – Cortex A8 @ 800 MHz with 512MB RAM, 20 MB flash, 800×480 display resolution
  • HD TV – Cortex A8 @ 1.2 GHz with 512MB RAM, 20 MB flash, 1024*600 display resolution

With this type of requirements, it’s clear the tuner is not a new product, and I could find it on Banggood too where they provided the content of the CD with padtv_v1.0.1_933(isdbt).apk. Make sure DVB-T is a supported standard in your country, as I regularly receive emails from people in the US asking me why they DVB-T2 TV box is not working… That’s possibly why there are several bad reviews on Amazon and eBay, where I also found the cheapest price ($9.99). TV030 only supports DVB-T, not DVB-T2, but Banggood points to MyGica PT360 if you want the latter. It’s out of stock in most places, but Aliexpress still has it for about $23. The review below (really starting at 1:00) shows Mygica PT360 in action. Note that TV030 and PT360 use different apps.

[embedded content]

Tweet We’ve previously covered tuners or small boxes that allow you to watch free-to-air TV on your smartphone or tablet with products such as PT115m/PT115e or DTV Link box, but…

Intel NUC Roadmap 2018 – 2019 – Gemini Lake, Coffee Lake, and Kaby Lake H

$
0
0

Intel’s new generation of Gemini Lake and Coffee Lake processors is expected to launch at the end of this year, beginning of next, and this morning I received Intel’s NUC roadmap that gives a good idea of what’s coming in 2018 and 2019.

Click to Enlarge

Intel plans a whole new generation of NUCs from “Hades Canyon VR” NUCxi7HVK model with a 100W Intel Core i7-xxxxK Kaby Lake-H processor to “June Canyon Celeron” NUC7CJYH model with a 10W Intel Celeron J4005 dual core “Gemini Lake” processor. All in all a total of 7 new NUCs should be launching in 2018.

Let’s have a closer look at the cheaper and lower power Gemini Lake models, starting with “June Canyon Celeron” NUC7CJYH specifications:

  • SoC – Intel Celeron J4005 dual core GLK processor (10W TDP)
  • System Memory – 2x DDR4-2400 slots for up to 8GB RAM
  • Storage – M.2 SSD slot, SDXC slot
  • Display – 2x HDMI 2.0a ports supporting up to two independent displays
  • Audio – front stereo headset, rear stereo out / TOSLINK
  • Connectivity – Gigabit Ethernet (TBC), 802.11ac 1×1 WiFi and Bluetooth 5

Intel “June Canyon Pentium” NUC7PJYH model has exactly the same specifications, except for the Intel Pentium J5005 quad core processor with 10W TDP. Both models are expected to launch in Q1 2018.

An interesting aspect of the more powerful NUCs based on Coffee Lake/Kaby Lake H processors is that they all come with one or two ThunderBolt 3 interfaces, and support Optane memory.

Tweet Intel’s new generation of Gemini Lake and Coffee Lake processors is expected to launch at the end of this year, beginning of next, and this morning I received Intel’s…

Viewing all 2336 articles
Browse latest View live