Quantcast
Channel: Developers » Visit CNX Software
Viewing all 2336 articles
Browse latest View live

Particle E Series is a Family of 2G, 3G, 4G LTE Cellular IoT Modules Optimized for Mass Production

$
0
0

Cellular IoT has really taken off this year from the low cost Orange Pi 2G IoT board to 4G GPS Trackers, and global IoT SIM cards. Particle has been in this market for a couple of years, starting with their Electron boards, and the company has just announced the new Particle E series family of industrialized 2G, 3G, and LTE-enabled modules and a development kit.

Key features of Particles E series modules:

  • Cellular Connectivity
    • u-blox SARA modules for cellular connectivity
      • LTE: SARA-R410M
      • 3G: SARA-U201/U260/U270
      • 2G: SARA-G350 (2G)
    • Embedded SIM card, Particle MVNO support in 100+ countries
    • u.FL antenna connector
  • MCU – STM32F205RGT6 120MHz ARM Cortex M3 microcontroller with 1MB flash, 128KB RAM
  • Storage – • Expandable flash memory
  • I/Os – 63-pin surface mountable castellated module with up 30x GPIOs, 12x ADC, 2x DAC, 13x PWM, 3x UART, 2x SPI, 1x I2S, 2x CAN, 1x USB 2.0 (Some signals are multiplexed)
  • Power Supply – 3.88 to 12V input; BQ24195 power management unit and battery charger; MAX17043 fuel gauge
  • Power Consumption (@5V?)
    • Operating current (cellular ON): 180 mA to 250 mA
    • Operating current (cellular OFF): 47 mA to 50 mA
    • Peak current: 800mA (3G), 1800 mA (2G)
    • Sleep Current: 0.8 mA to 2 mA
  • Dimensions – 43 x 36 x 4.6 mm
  • Weight – < 10 grams
  • Temperature Range – -20 to +85°C (extended range)
  • Certifications – FCC, CE, IC wireless certifications, PTCRB (End-Product Certified) & GCF cellular certifications, RoHS

A total of 7 modules are planned to launch by mid 2018 with the naming convention using the first number reserved for the “G” number, the second for local (0) or global (1), and the third being an incremental number:

  • E210 – 2G only – Q4 2017 working worldwide (quad band)
  • E301 – 3G with 2G fallback – Q4 2017 for Americas/Australia (850/1900 MHz)
  • E302 – 3G with 2G fallback – Q4 2017 for Europe, Asia, and Africa (900/1800/2100 MHz)
  • E310 – 3G with 2G fallback – Q4 2017 working worldwide (850/900/1800/1900/2100 MHz)
  • E401 – LTE M1 – Early 2018 for US (LTE B13)
  • E402 – LTE M1 – Early 2018 for North America (LTE B2/4/5/12)
  • E410 – LTE M1/NB1 – Mid 2018 for the global market

Electron Board (Left) and E-Series Eval Kit (Right)

The new modules share the same software development tools, Particle Cloud platform, code and peripherals as Electron prototyping board with the modules running FreeRTOS, supporting  CoAP encrypted messaging, TCP/IP and UDP/IP, GCC toolchain, and various firmware update methods including OTA. E series were created because while Electron board suitable for evaluation, pin-row headers, plastic SIM cards, and USB connectors made it less appropriate for integration into products and mass production.

The company has also introduced an E Series evaluation kit working globally with the following specifications:

  • Module – Particle E310 3G with 2G fallback
  • Breakout Board with
    • 2x micro USB port for flashing and serial communications
    • SMA antenna connector
    • 1x female expansion header, 2x Grove connectors
    • Misc – MODE and RESET buttons, Charge and status LEDs
    • Power – Li-Po battery connector,  power barrel jack
  • Battery –  2,000 mAh Li-Po battery
  • Antenna – Taoglas penta-band antenna (u.FL), SMA to u.FL adapter for connecting external SMA antennas
  • 1x Grove temperature sensor
  • 1x USB Micro cable
  • Pinout reference card

The kit will come with three months of Particle’s 1MB monthly data plan upon eSIM activation. Data plan pricing depends on the country of operation and number of nodes, but for reference, for up to 100 nodes in the US, you’d pay $2.99 per month/device including 1MB data, plus $0.99 per extra MB.

Pricing information has not been publicly disclosed for the module, but you can purchase E series development kit for $99.99, or $249 with 3 extra spare E310 modules. Visit Particle E-Series product page for further details.

Tweet Cellular IoT has really taken off this year from the low cost Orange Pi 2G IoT board to 4G GPS Trackers, and global IoT SIM cards. Particle has been…


Linux 4.9 Kernel Source Code Released for Phoenix OS Android Desktop Operating System

$
0
0

Phoenix OS is one of the last options left for people wanting to run Android with desktop optimizations on their computer. The problem is that so far, it was fully closed source, and the company refused to comply with the Linux kernel’s GPLv2 license, despite part of the project being based on Android-x86 work. The community also wanted to get involved to improve hardware compatibility with graphics cards, wireless modules / dongles, and other peripherals. However, without source code, nothing could be done, and a petition was launched on Change.org asking Chaozhuo, the company behind the project, to release the Linux kernel code.

After over 300 signatures was reached in the petition, the company did push Linux 4.9.24 to Github, and after verifying there was indeed some changes compared to Android x86 kernel, the community declared victory. They are however trying to make the company develop the kernel in the open on Github, and accept contributions from the community. Another request will be to make Phoenix OS completely open source, but this highly unlikely to happen. The kernel released is likely only for x86 and AMD64/x86-64 platforms, and ARM hardware supported by Phoenix OS are bound to use separate vendor trees.

Thanks to Ian and for the tip.

Tweet Phoenix OS is one of the last options left for people wanting to run Android with desktop optimizations on their computer. The problem is that so far, it was…

H96 PRO Plus Amlogic S912 TV Box with 3GB RAM, 32GB Storage Sold for $48.49 (Promo)

$
0
0

H96 Pro+ is a Amlogic S912 TV box with 3GB RAM, 32GB storage, that’s similar to R-Box Pro 3G TV box I reviewed, and Banggood has now a promotion for the box for just $48.49 shipped with about 850 pieces left in stock.

H96 Pro+ specifications:

  • SoC – Amlogic S912 octa-core ARM Cortex A53 processor @ up to 1.5 GHz with Mali-820MP3 GPU
  • System Memory – 3 GB DDR3
  • Storage – 32 GB eMMC flash + micro SD slot up to 32GB
  • Video Output – HDMI 2.0a with HDR and CEC support up to 4K @ 60 fps, and AV port for composite output
  • Audio Output – HDMI, AV (stereo audio), and optical S/PDIF
  • Video codecs – VP9-10 profile 2 up to 4K @ 60 fps, H.265 [email protected] up to 4K 60fps, H.264 AVC up to 4K @ 30 fps, H.264 MVC up to 1080p60, MPEG-4, WMV/VC-1 SP/MP/AP,  AVS-P16(AVS+)/AVS-P2 JiZhun Profile, MPEG-2 MP/HL, MPEG-1 MP/HL, and  RealVIDEO 8/9/10 all up to 1080p60
  • Connectivity – Gigabit Ethernet, dual band WiFi 802.11 b/g/n + Bluetooth 4.1
  • USB – 2x USB 2.0 ports, 1x micro USB OTG port
  • Misc – IR receiver, power button, front-panel LCD display, LEDs
  • Power Supply – 5V/2A
  • Dimensions & weight –  N/A

The box runs Android 6.0, and ships with a remote control, a HDMI Cable, a power adapter, and a user manual.

I double check the prices on GearBest and GeekBuying, and they sell the device in the same 3GB/32GB configuration for $65.99 and $61.99 including shipping respectively, which means the offer on Banggood is about $17.50 and $13.50 cheaper.

Banggood has a site-wide promotion on their store during September 7-9 for their 11th anniversary, where you may find further deals for gadgets and other products.

Tweet H96 Pro+ is a Amlogic S912 TV box with 3GB RAM, 32GB storage, that’s similar to R-Box Pro 3G TV box I reviewed, and Banggood has now a promotion…

e-con Systems Introduces a 360° Camera Kit for NVIDIA Jetson TX1/TX2 Development Boards

$
0
0

e-con Systems has previously launched MIPI cameras for Jetson TX1/TX2 development kit, but the company has now announced e-CAM30_HEXCUTX2, a kit with an adapter board, and six synchronized HD cameras connected that can be used for video surveillance, or robots requiring a 360° or “720°” field of view.

The kit is comprised of the following elements:

  • e-CAMHEX_TX2ADAP adapter board for connecting six cameras through Jetson boards’s J22 connector supporting up to 6x 2-lane MIPI CSI-2 cameras
  • 6x 3.4MP MIPI CSI2 low light camera board with interchangeable S-mount lens, and featuring ON Semiconductor AR0330 color CMOS image sensor; each camera supports VGA to 1080p/3M resolution up to 30 fps
  • 6x 30cm custom micro coaxial cable

The kit operates at 5V, and requites between 5.33 to 8.10 watts, the later while streaming 6 Cameras on Jetson TX2. Software support is implemented through a Linux camera driver (V4L2) on top of NVIDIA’s JetPack 2.3/3.0, and e-con Systems also developed demos such as their Gstreamer based hexcam app to manage six synchronized cameras, as well as e-CAM_TK1 GUVCView for single streams as showcased in the embedded video below.

[embedded content]
The e-CAM30_HEXCUTX2 camera kit is available now, and such system is rather pricey at $1,499 without the Jetson TX1/TX2 development kit, but you save $200 if you order before September 14, 2017. You’ll find a purchase link, and access to software and hardware documentation in the product page.

Tweet e-con Systems has previously launched MIPI cameras for Jetson TX1/TX2 development kit, but the company has now announced e-CAM30_HEXCUTX2, a kit with an adapter board, and six synchronized HD…

Geekcreit ESP32 Development Board Goes for $4 Shipped (Promo)

$
0
0

While you may have thought Wemos Lolin32 board selling for $6.9 plus shipping was already a decent deal, you can now buy a breadboard friendly ESP32 development board for the normal price of ES8266 board thanks to a promotion on Banggood selling 1,000 pieces of “Geekcreit ESP32” board for $4.09 including shipping, and valid until September 10, or while stock lasts.

It looks to be roughly the same design as the fake NodeMCU ESP-32s board I once spotted:

  • Wireless Module – ESP-WROOM-32 with Espressif ESP32 dual core processor with 802.11 b/g/n WiFi and Bluetooth 4.0 LE
  • Expansion – 2x 19 pin headers with GPIOs, Analog inputs (ADC), UART, I2C, VP/VN, etc…; breadboard compatible
  • USB – 1x micro USB port for power and programming
  • Misc – BOOT and EN buttons, red (power) and blue (GPIO2) LEDs
  • Power Supply – 5V via USB or Vin pin
  • Dimensions – 51.4 x 28.3 mm

But instead, it’s made by Doit.am, and called ESP32 Devkit v1. Banggood link to LuaNode Github repo, but you should be able to use anything you want to progrm the board including Arduino Core, Espruino, Micropython, ESP-IDF SDK, etc…

Tweet While you may have thought Wemos Lolin32 board selling for $6.9 plus shipping was already a decent deal, you can now buy a breadboard friendly ESP32 development board for…

IPv10 Draft Specification Released for IPv6 IPv4 Communications

$
0
0

The first time I used IPv6 was in 2000 for my final year project, and for many years, we’ve been told that IPv4 32-bit address space was running out, and a transition to 128-bit IPv6 address was necessary, and would happen sooner rather than later. Fast forward to 2017, I’m still using IPv4 in my home network, and even my ISP is still only giving a dynamically allocated IPv4 address each time we connect to their service. Based on data from Google, IPv6 adoption has only really started in 2011-2012, and now almost 20% of users can connect over IPv6 either natively or through IPv4/IPv6 tunneling. But today, I’ve read that IPv10 draft specifications had been recently released.

What? Surely with the slow adoption of IPv6, we certainly don’t need yet another Internet protocol… But actually, IPv10 (Internet Protocol version 10) is designed to allow IPv6 to communicate to IPv4, and vice versa, which explains why it’s also called IPMix, and it derives its names from IPv6 + IPv4 = IPv10.

IPv10 was created as it was clear that both IPv4 and IPv6 would still be in use for decades to come, but with the Internet of Things, a large number of IPv6-only nodes would come online with still the need to communicate with IPv4 nodes. Existing workaround such as native dual stack (IPv4 and IPv6), dual-stack Lite, NAT64, 464xlat and MAP, either do not allow for IPv4 to IPv6 communication, or are inefficient.

So IPv10 aims to address those shortcomings as described in the draft specs:

It solves the issue of allowing IPv6 only hosts to communicate to IPv4 only hosts and vice versa in a simple and very efficient way, especially when the communication is done using both direct IP addresses and when using hostnames between IPv10 hosts, as there is no need for protocol translations or getting the DNS involved in the communication process more than its normal address resolution function.

IPv10 allows hosts from two IP versions (IPv4 and IPv6) to be able to communicate, and this can be accomplished by having an IPv10 packet containing a mixture of IPv4 and IPv6 addresses in the same IP packet header.

From here the name of IPv10 arises, as the IP packet can contain (IPv6 + IPv4 /IPv4 + IPv6) addresses in the same layer 3 packet header.

IPv10 handles all 4 types of communications IPv4 to IPv6, IPv4 to IPv4, IPv6 to IPv4, and IPv6 to IPv6. You can read the draft specifications for details about the packets.

IPv10 Operation Example – Click to Enlarge

Tweet The first time I used IPv6 was in 2000 for my final year project, and for many years, we’ve been told that IPv4 32-bit address space was running out,…

Habey EMB-2200 Pico-ITX board is Designed for Industrial IoT Gateways & HMI Panels

$
0
0

Habey USA has sent out an email to announce their EMB-2200 industrial grade Pico-ITX board powered by NXP i.MX6UL processor with up to 512 MB DDR3, WIFi and Bluetooth, optional PoE support, LCD interface, etc…, and designed for IoT gateways, HMI applications, and other embedded applications.

Click to Enlarge

Habey EMB-2200 board specifications:

  • SoC- NXP i.MX 6UltraLite single core ARM Cortex-A7 processor at 528/696MHz
  • System Memory – 128, 256 or 512MB RAM
  • Storage – Various options of eMMC, iNAND or SLC NAND flash (Default: 8GB eMMC flash)
  • Display – 1x 24-bit Parallel LCD (RGB) interface up to 1366×768, 4-wire touch interface
  • Audio – 1x 3.5mm Line OUT jack
  • Connectivity – 2x 10/100 Mbps Fast Ethernet ports, WiFi and Bluetooth module
  • USB – 2x USB 2.0 ports
  • I/Os – 5x RS-232 header, 2x CAN Bus, 2x USB2.0, 1x USB OTG Configurable GPIO, SPI, I2C
  • Expansion – 1x full-size mini-PCIe with USB connection for cellular modules
  • Misc – Watchdog Timer Programmable timer system reset
  • Power Supply – 9V~ 36V DC via 2.5mm power jack; PoE ready via add-on module
  • Dimensions – 100 x 72 mm (Pico-ITX form factor)
  • Temperature Range – Operating: -40 ~ 80°C; storage: -50 ~ 105°C
  • Humidity – 5% ~ 95% @ 40°C (Non-Condensing)

The company also provides a Power over Ethernet (POE) 802.3af add-on module, and a 5” resistive touch panel development kit (800×480) to create custom HMI or automation systems easily. One the software side, the board runs Embedded Linux, but apart from that, details are sparse…

Click to Enlarge

The board – and add-on modules – should be available now, at an undisclosed price. More information about Habey’s EMB-2200 pico-ITX board can be found in the product page.

Tweet Habey USA has sent out an email to announce their EMB-2200 industrial grade Pico-ITX board powered by NXP i.MX6UL processor with up to 512 MB DDR3, WIFi and Bluetooth,…

Amlogic A111, A112 & A113 Processors are Designed for Audio Applications, Smart Speakers

$
0
0

Amlogic processors are mostly found in TVs and TV boxes, but the company is now apparently entering a new market with A111, A112, and A113 audio processors. I was first made aware of those new processors through Buildroot OpenLinux Release Notes V20170831.pdf document posted on their Open Linux website, where two boards with Amlogic A113D and A113X are shown.

S400 Version 03 Board

First, S400 board with the following key features/specifications:

  • SoC – Amlogic A113D CPU
  • System Memory – 1GB DDR3
  • Storage – 512MB SLC NAND flash
  • Display I/F – MIPI interface
  • Connectivity – Gigabit Ethernet SDIO WiFi/BT (AP6356S)
  • Audio
    • SPDIF_IN/SPDIF_OUT
    • LINE_IN/LINE_OUT
    • 2x Audio headers (MIC_Connector & SPK_Connector)
  • USB – 1x USB 2.0 OTG
  • Expansion – 2x PCIe ports
  • Misc – 6x ADC Keys, IR_IN/IR_OUT, UART Interface (RS232)

The second S420 board is based on A113X SoC, and comes with less features (no display, no Ethernet, no PCIe…), less memory:

  • SoC – Amlogic A113X CPU
  • System Memory – 512 MB DDR3
  • Storage – 512MB SLC NAND flash
  • Connectivity – SDIO WiFi/BT (AP6356S)
  • Audio
    • SPDIF_IN
    • LINE_IN/LINE_OUT
    • 2x Audio headers (MIC_Connector & SPK_Connector)
  • USB – 1x USB 2.0 OTG
  • Misc – 6x ADC Keys, IR_IN/IR_OUT, UART Interface (RS232)

The document also explains how to build Linux built with buildroot (you’ll need an Amlogic account), and use audio via applications or frameworks such as aplay, gstreamer, alsaplayer, shairport (Airplay), VLC, DLNA, etc…

Information about Amlogic A113X/A113D processor is lacking on the web, but I eventually found that Amlogic had a YouTube account with now a whopping two subscribers (including yours truly), and one of the two videos was an Alexa voice services demo on Amlogic A113 with what looks like a microphone array inserted on the top of the board.

[embedded content]

Further research led me to a page in Chinese discussing Amlogic A111, A112, A113 audio processors, and revealing that Xiaomi AI smart speaker is based on Amlogic A112 quad core Cortex A53 processor, that also shows up in GeekBench running Android 6.0. They also report that A113 features the same four Cortex 53 cores, but has better audio capabilities with 8x PDM interfaces, and 16x I2S interfaces. I also found a page about a microphone array designed for Amlogic S905/S912/A112, and based on Knowles SPH0645LM4H-B miniature microphones .

Finally, I decided to go directly to Amlogic website, and they do have pages for A111 and A112 SoCs, strangely not indexed by search engines so far.

Amlogic A111 key features:

  • CPU – Quad-core ARM Cortex-A5
  • Audio Interface
    • 2-channel I2S input and output
    • TDM/PCM input and output, up to 8 channels
    • S/PDIF output
  • Video Interface – LVDS and MIPI-DSI panel output
  • Security – Supports secure boot and secure OS
  • Ethernet – 10/100/1000M MAC
  • IP License (Optional) – Dolby Digital, Dolby Digital Plus, DTS Digital Surround, DTS HD, DTS Express
  • Process – 28nm HKMG

Amlogic A112 key features:

  • CPU – Quad-core ARM Cortex-A53
  • Audio Interface
    • 8-channel I2S and S/PDIF input and output
    • TDM/PCM input and output, up to 8 channels
    • 2-channel PDM input
  • Video Interface – RGB888 output
  • Security – Supports secure boot and secure OS
  • Ethernet – 10/100M MAC+PHY
  • IP License(Optional) – Dolby Digital, Dolby Digital Plus, DTS Digital Surround, DTS HD, DTS Express
  • Process – 28nm HKMG

If you are interested in evaluating / playing with those processors, and cannot get hold of Amlogic boards (since they only deal with companies), one solution is to get Xiaomi AI smart speaker available for pre-order/arrival notice on sites likes GearBest or GeekBuying, and expected to ship on October 1st.

Thanks to vertycall for the tip.

Tweet Amlogic processors are mostly found in TVs and TV boxes, but the company is now apparently entering a new market with A111, A112, and A113 audio processors. I was…


UFS 3.0 Embedded Flash to Support Full-Duplex 2.4GB/s Transfer Speeds

$
0
0

All my devices are still rely on eMMC flash, but premium smartphones, for example, make use a UFS 2.0/UFS 2.1 flash storage with performance similar to SSD, with Samsung UFS 2.0 storage achieving up to 850MB/s read speed, 260 MB/s write speed, and 50K/30K R/W IOPS. UFS 3.0 promises to roughly double the performance of UFS 2.0/2.1 with transfer rates of up to 2.4 GB/s, and separately, the UFS Card v2.0 standard should deliver UFS 2.1 performance on removable storage.

Image Source: Next Generation of Mobile Storage : UFS and UFS Card – Click to Enlarge

Several Chinese and Taiwanese websites, including CTimes and Benchlife, have reported that companies have started getting UFS 3.0 & UFS Card v2.0 licenses from JEDEC, and Phison is working on a controller to support both new standards, and scheduled to launch in 2018.

Premium smartphone SoC are only expect to support UFS 3.0 in 2019 and beyond, and hopefully by that time eMMC will have been replaced by UFS 2.0/2.1 in entry level and mid range devices. The outlook for UFS cards is less clear, as I’ve yet to see a product equipped with a UFS slot.

Click to Enlarge

Based on a recent presentation at the Flash Memory Summit, (typical) embedded storage capacity will also increase to 32GB for IoT / multimedia applications, 256GB for smart home products and drones, 512GB for mobile devices, and over 1TB for automotive applications.

Via Liliputing

Tweet All my devices are still rely on eMMC flash, but premium smartphones, for example, make use a UFS 2.0/UFS 2.1 flash storage with performance similar to SSD, with Samsung…

$99 Inforce IFC6420 Qualcomm Snapdragon 600E Board Comes with 3 HDMI Out/In Ports

$
0
0

Inforce Computing has introduced the first board of their “Application Ready Platforms” family with Inforce 6420 SBC powered by Qualcomm Snpadragon 600 / 600E processor, and equipped with three HDMI ports including one HDMI input, and two independent HDMI outputs making suitable for products needing streaming, content sharing or rendering on multiple displays. The board also comes with WiFi, Bluetooth, Ethernet, etc… for “edge computing in the IoT space”.

Click to Enlarge

Inforce 6420 board specifications:

  • SoC –  Qualcomm Snapdragon 600 / 600E (APQ8064 / APQ8064E)  quad core Krait 300 CPU @ up to 1.7 GHz with Qualcomm Adreno 320 GPU, and Hexagon DSP
  • System Memory – 2GB on-board DDR3 (PCDDR3-533MHz)
  • Storage – 4GB eMMC flash (expandable to 64GB)
  • Connectivity – Gigabit Ethernet via Atheros8151, dual band dual stream 802.11 b/g/n/ac WiFi and Bluetooth 4.1 via QCA6234
  • Video – 2x HDMI 1.4a outputs up to 1080p, 1x HDMI input up to 1080p
  • Audio – WCD9311 audio codec; 8-channel 7.1 surround sound, Dolby Digital Plus, Dolby True HD, and DTS-HD via HDMI-out
  • USB – 2x USB 2.0 ports, 1x micro USB OTG port
  • Camera – Via USB 2.0 port or/and HDMI input
  • Misc – IR receiver
  • Power Supply – 5V/4A (typ.)
  • Dimensions – 160 mm x 70 mm
  • Temperature Range – 0-70° C
  • RoHS and WEEE compliant

The board comes pre-loaded with Android Lollipop 5.1.1, and the company provide a board support package (BSP) for development. Linux support based on an Open embedded is in progress. The solution is destined to be used for video collaboration, medical applications such as remote diagnosis & treatment, video capture, and smart boards.

Inforce Computing commits to supply Inforce 6420 board for at least 10 years, and you can purchase samples directly on their website for $99. Further information can be found on the product page.

Tweet Inforce Computing has introduced the first board of their “Application Ready Platforms” family with Inforce 6420 SBC powered by Qualcomm Snpadragon 600 / 600E processor, and equipped with three…

PiPo X12 Mini PC is Equipped with a 10.8″ Touchscreen Display, an RS232 Port, Ships with a Digital Stylus Pen

$
0
0

PiPo has released several mini PCs with touchscreen displays with products like PiPo X8 or PiPo X9S, and now the company has launched PiPo X12 model based on an Intel Cherry Trail processor, with a larger 10.8″ display, an RS-232 port to connect a barcode reader for instance, and that ships with a digital stylus pen.

PiPo X12 specifications:

  • SoC – Intel Atom x5-Z8350 “Cherry Trail” quad core processor @ 1.44 GHz/1.92 GHz with Intel Gen8 HD graphics
  • System Memory – 4 GB DDR3
  • Storage – 64 GB flash, and micro SD slot
  • Display – 10.8″ capacitive touch IPS display with 1920×1280 resolution
  • Video Output – HDMI 1.4a and VGA
  • Audio Output – HDMI, 3.5mm audio jack, built-in microphone and speaker.
  • Connectivity – 10/100M Ethernet ports, dual band 802.11 b/g/n/ac Wi-Fi and Bluetooth 4.0 with external antenna
  • USB – 3x USB 2.0 host ports, 1x USB 3.0 port
  • Misc – Power and volume buttons, and reset pinhole; gravity sensor
  • Battery – 10,000 mAh @ 3.7V
  • Power Supply – 5V/3A
  • Dimensions – 250.6 x 174.3 x 70.4 mm
  • Weight – 850 grams

PiPoi X12 ships with an activated version of Windows 10, a power adapter, and a digital stylus pen that can be used for hand-writing.


PiPo X12 is sold for $227.99 on Banggood, but we could also find the device on Aliexpress for about the same price, as well as a dual boot Windows 10 / Android 5.1 version (maybe) on GeekBuying. Note the latter only mentions Android 5.1 in the title, and does not specifically list the stylus, but shows a picture of it.

Via AndroidPC.es

Tweet PiPo has released several mini PCs with touchscreen displays with products like PiPo X8 or PiPo X9S, and now the company has launched PiPo X12 model based on an…

Getting Started with Espruino & JavaScript on ESP32 with ESPino32 Board

$
0
0

Venus Supply Co., Ltd, better known as ThaiEasyElec, is a company based in Thailand, selling embedded systems and development board, as well as providing development services based in Thailand. The company sent me their latest board called ESPino32 powered by Espressif ESP-WROOM-32 WiFi and Bluetooth module for evaluation. While the board is supported in Arduino-esp32, I’ve already tested Arduino with ESP32-Bit module & ESP32-T board, so after checking out the hardware, I’ll load it with something different: Espruino, a firmware allowing for JavaScript programming over the serial console, or a Web based IDE.

ESPino32 Unboxing and Soldering

The board shipped with four female headers, and I/O stickers.

Click to Enlarge

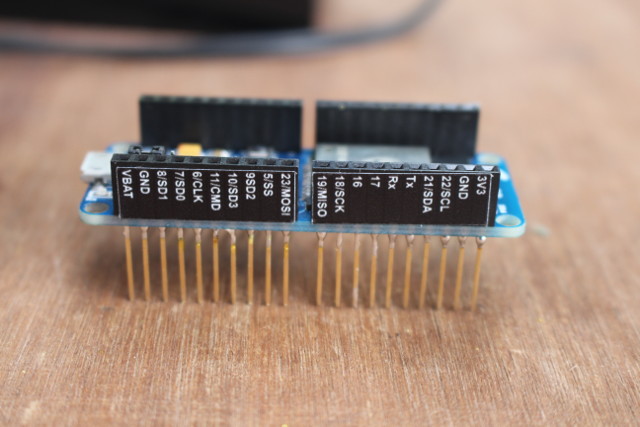
The board includes ESP-WROOM-32, exposes I/Os through four 10-pin headers, features CP2104 chip for serial to USB debugging via micro USB port, two buttons (reset and program), a user LED connected to IO16, and a jumper to select between regulated power supply (micro USB or Vin), or battery power (Vbat).

Click to Enlarge

If you’re going to integrate your board in a project, you may want to use it asif without header to save on space, but for prototyping and use with a breadboard, we should start by soldering the four female headers. It’s even a little easier than with other headers, since you can simply place the board on top of the headers to do the soldering.

Click to Enlarge

Once we’re done, we can apply the stickers on all four headers, which will make it easier to play with while connecting the jumper cables.

Now we can insert the board into a breadboard, connect an external 5V LED through pin 16, and connect a micro USB cable to a computer to get power and access the board.

Click to Enlarge

A board with female headers has the advantage of providing two usable rows on each side of the board. With male-only you’d lose that extra row, unless you use a narrower board such as  ESP32 Pico Core board.

That’s the output I get when connecting the board to my Linux computer:

1

2

3

4

5

6

7

8

[ 7809.352096] usb 5-3: new full-speed USB device number 4 using ohci-pci

[ 7809.547130] usb 5-3: New USB device found, idVendor=10c4, idProduct=ea60

[ 7809.547134] usb 5-3: New USB device strings: Mfr=1, Product=2, SerialNumber=3

[ 7809.547137] usb 5-3: Product: CP2104 USB to UART Bridge Controller

[ 7809.547140] usb 5-3: Manufacturer: Silicon Labs

[ 7809.547142] usb 5-3: SerialNumber: 013CF2B2

[ 7809.551174] cp210x 5-3:1.0: cp210x converter detected

[ 7809.561307] usb 5-3: cp210x converter now attached to ttyUSB0

Quick Start Guide for Espruino on ESP32

Espruino has a page about ESP32 support that explains what is working:

  • onewire
  • hardware SPI
  • hardware I2C
  • DAC
  • ADC
  • Serial
  • WIFI – as a client and access point

and what is not (yet):

  • Over-The-Air (OTA) firmware updates.
  • Bluetooth and BLE

So we can’t play with Bluetooth, but WiFi and GPIO should work. There are also some instructions in that page which I will follow and adapt (since some are not working/out of date) below.

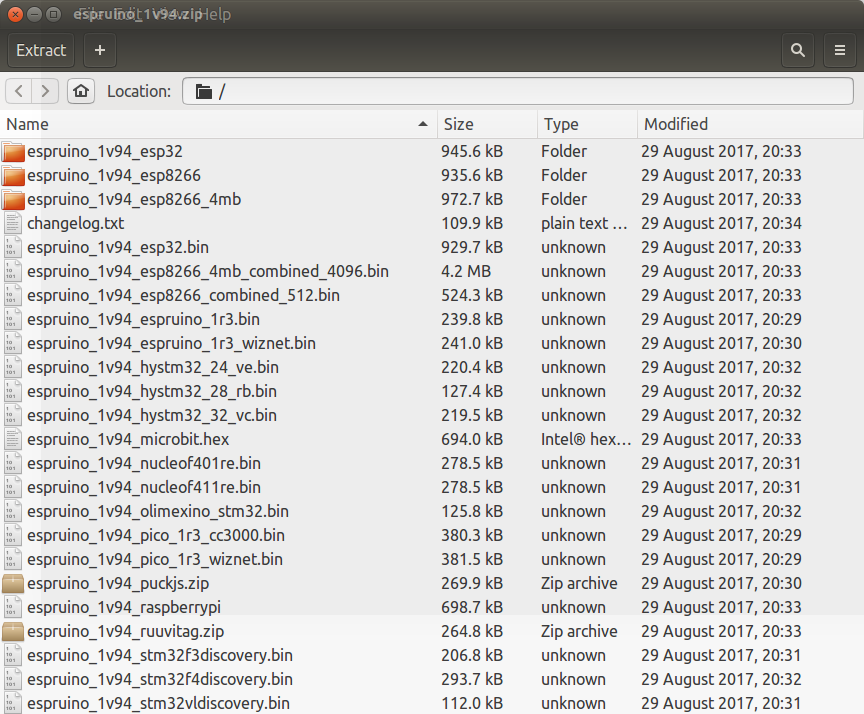
First we need to download the latest version of Espruino, in my case Espruino 1.94.

Espruino Firmware for various board – Click to Enlarge

The zip file includes firmware for all supported platforms include the company’s own Espruino boards & Puck.js, Micro::bit, OlimeXino, Raspberry Pi, STM32 discovery boards, and more..
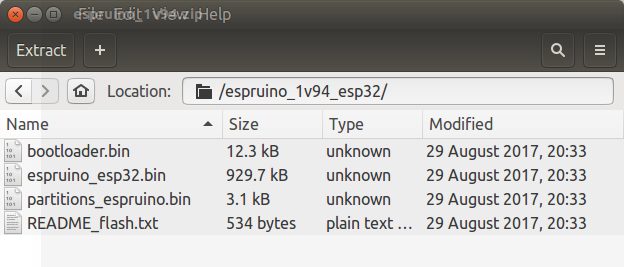
For our use, we need to get into espruino_1v94_espruino, where we’ll find 3 binary files (bootloader.bin, espruino_esp32.bin, and partitions_espruino.bin), as well as README_flash.txt that explains how to do the update in Windows with flash_download_tools_v3.4.4.zip, or in Linux with esptool.py from the ESP-IDF SDK. I’m running Ubuntu 16.04, so I’ll go with the later, but since most people won’t need to install the ESP-IDF SDK, you can instead get esptool from pip for Python 2.7 or 3.4 or newer:

sudo apt install python-pip

sudo pip install upgrade pip

sudo pip install esptool

if you’ve used esptool previously for other esp32/esp8266 board(s) before, you can upgrade esptool with:

1

sudo pip install esptool upgrade

In my case, I had installed an older version of esptool (v0.4.6) with apt when I played with NodeMCU board, so I removed it:

1

sudo apt remote esptool

Now that we have the latest esptool utility installed, we can flash the image we’ve  just extracted:

1

2

3

4

5

6

7

8

9

10

esptool.py chip esp32

port “/dev/ttyUSB0″

baud 921600

write_flash

-z

flash_mode “dio”

flash_freq “40m”

0x1000 bootloader.bin

0x10000 espruino_esp32.bin

0x8000 partitions_espruino.bin

It worked the first time. Log of successful installation:

Leaving…
Hard resetting…

1

2

3

4

5

6

7

8

9

10

11

12

13

14

15

16

17

18

19

20

21

22

esptool.py v2.1

Connecting........_

Chip is ESP32D0WDQ6 (revision 0)

Uploading stub...

Running stub...

Stub running...

Changing baud rate to 921600

Changed.

Configuring flash size...

Auto-detected Flash size: 4MB

Compressed 12272 bytes to 7603…

Wrote 12272 bytes (7603 compressed) at 0x00001000 in 0.1 seconds (effective 961.3 kbit/s)...

Hash of data verified.

Compressed 929680 bytes to 516107…

Wrote 929680 bytes (516107 compressed) at 0x00010000 in 9.3 seconds (effective 802.6 kbit/s)...

Hash of data verified.

Compressed 3072 bytes to 136…

Wrote 3072 bytes (136 compressed) at 0x00008000 in 0.0 seconds (effective 6143.7 kbit/s)...

Hash of data verified.

Leaving...

Hard resetting...

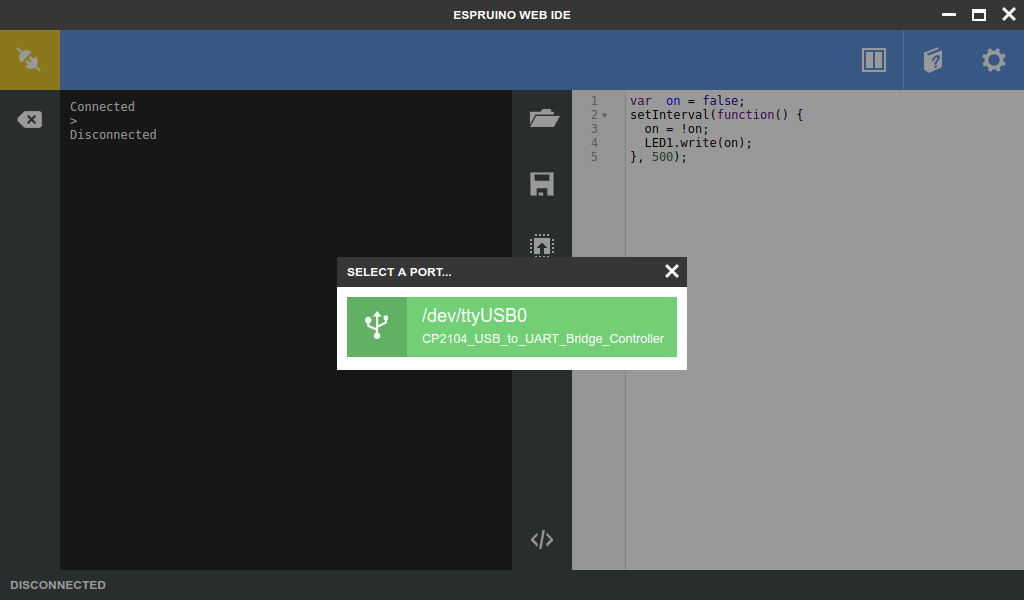
At this point, in theory, you can install Espruino Web IDE chrome extension,  click on the connect icon on the left top corner, select /dev/ttyUSB0 port, and program away.

Click to Enlarge

Espruino Web IDE will also show in Ubuntu 16.04 dash. But in practise, there’s a known issue that the first time you won’t be able to connect through the Web IDE, and indeed I could not.. The work around is to first connect using screen or minicom in a terminal window:

1

minicom baudrate 115200 device /dev/ttyUSB0

We can then run an hello world sample:

>console.log(‘Hello ESP32!’);

Hello ESP32!

=undefined

>

That “=undefined” is a little confusing, but Espruino developers explain that is expected :

This is normal and it indicates the result of the last operation, which in this case is the return value of console.log, which is always undefined.

The next step is to configure a WiFi connection to your access point:

var wifi = require(‘Wifi’);
wifi.connect(ssid, {password: password}, function() {
console.log(‘Connected to Wifi. IP address is:’, wifi.getIP().ip);
wifi.save(); // Next reboot will auto-connect
});

1

2

3

4

5

6

7

8

var ssid = ‘YOUR_SSID’;

var password = ‘YOUR_SSID_PASSWORD’;

var wifi = require(‘Wifi’);

wifi.connect(ssid, {password: password}, function() {

    console.log(‘Connected to Wifi.  IP address is:’, wifi.getIP().ip);

    wifi.save(); // Next reboot will auto-connect

});

Replace “YOUR_SSID” and “YOUR_SSID_PASSWORD” with the value for your WiFi router. If this is successful, you should  see a message like shortly after:

1

Connected to Wifi. IP address is: 192.168.0.112

The line wifi.save() will make sure the WiFi connection is permanent, so the board will reconnect to the router automatically after each reboot.

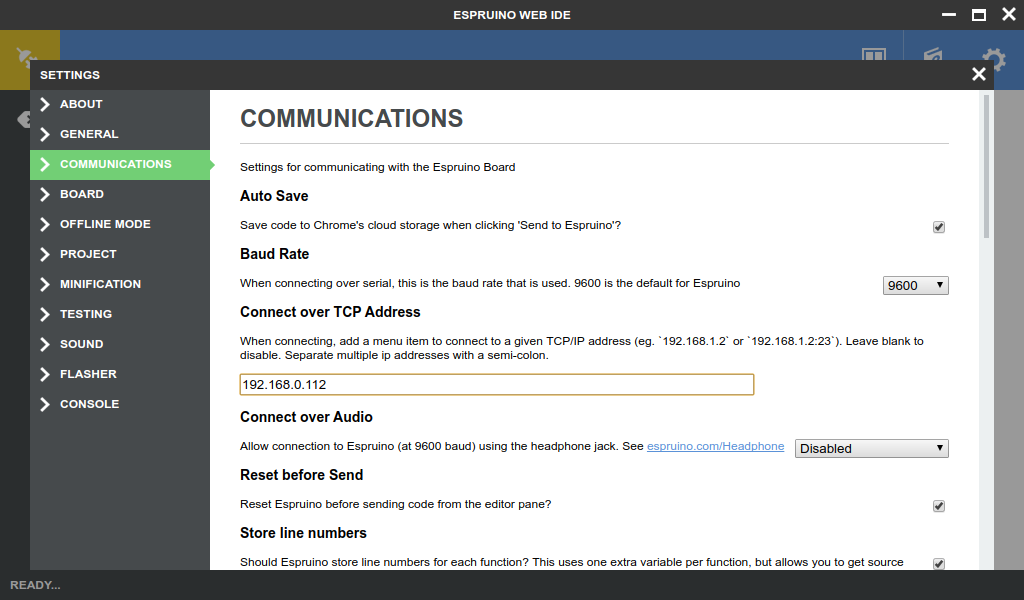
We can now go back to Espruino Web IDE, click on the Setup icon on the top right corner, go to Communications tab, and input the IP address (192.168.0.112 in my case) in the field “Connect over TCP Address“.

Click to Enlarge

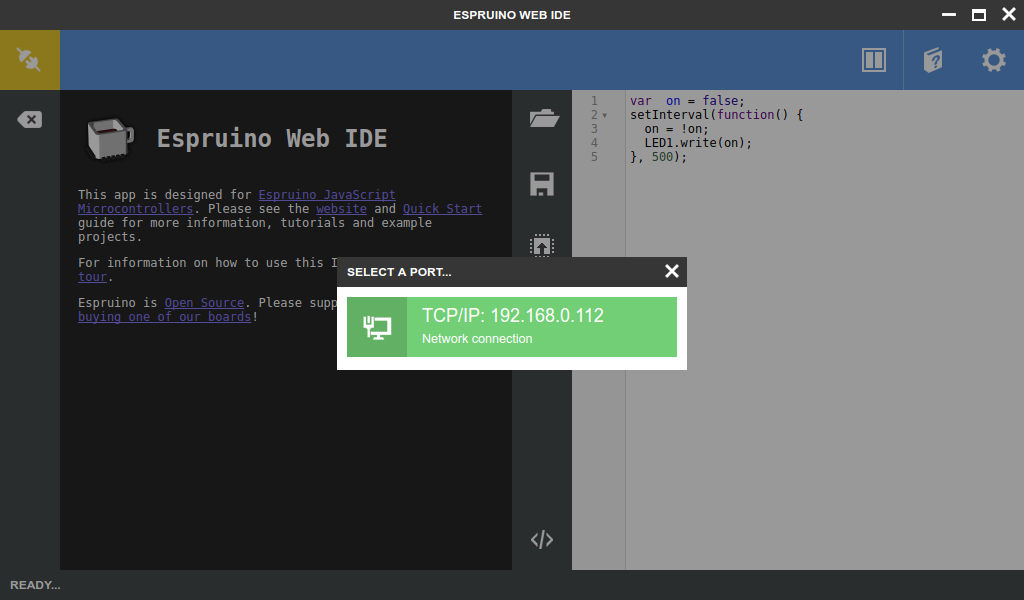
You don’t even need to connect the board to your computer at this stage, if you be powered by a battery, or a USB power adapter. If we click on the Connect icon again, we’ll have the option to select TCP/IP: 192.168.0.112.

Click to Enlarge

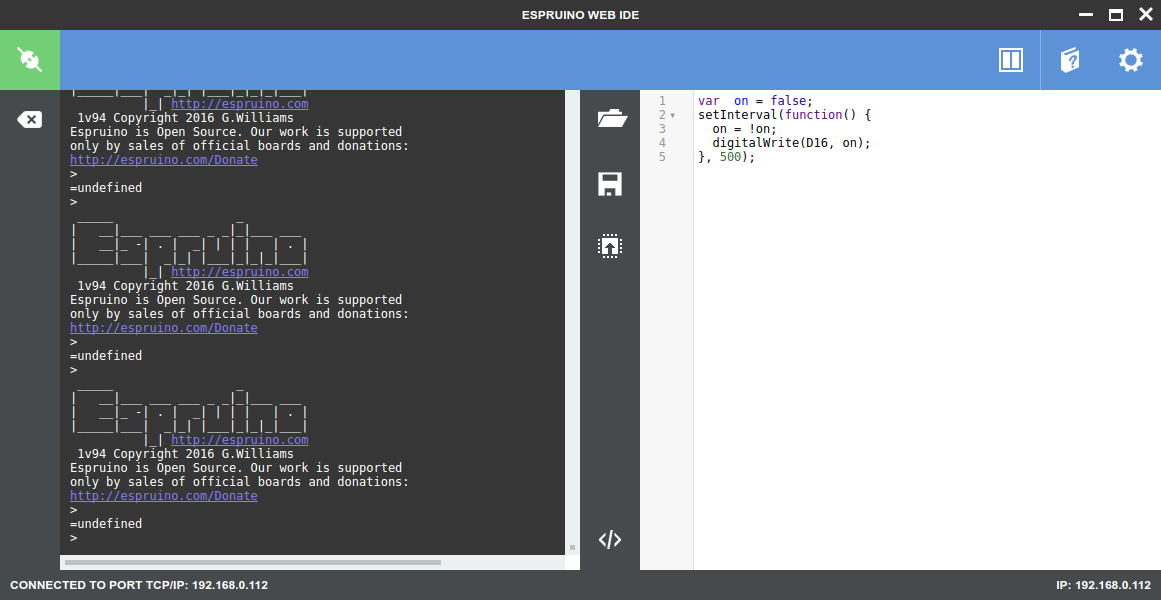
I wrote a simply LED blink demo in the right part of the window, and clicked on he Upload button (third button in the middle) to upload and start the program:

var  on = false;

setInterval(function() {

  on = !on;

  digitalWrite(D16, on);

}, 500);

Click to Enlarge

D16 is connected both the board’s IO16 LED and the LED on the board. IO16 will be turned on when D16 is low, and my LED when D16 is high every half second. I’ve shot a quick demo below.

[embedded content]

However, if you reboot or power cycle the board, your program will not automatically start. So if you want the program to be “permanent”, add save command at the end of your code:

The output from the console should look like when you click on Upload button.

Erasing Flash..................

Writing.....

Compressed 80000 bytes to 2998

Checking...

Done!

I could turn off and on the board, the LED demo resumed automatically without having to upload the code from the IDE.

Note that at this stage, I started to have some strange issues, like failure to connect to the board, and sometimes it would should “module http not found” or “module wiki not found”, as I wrote code for a web server.

It could be you need include the code for a permanent WiFi connection, before running the save command. It was still working sometimes, but I decided to connect through micro USB cable via Espruino Web IDE (it worked at this stage) to carry on with my tests more reliably.

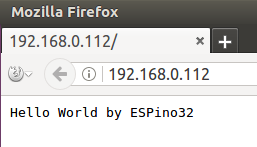
In case you want to use ESPino32 board as small webserver, you can do so by creating a access point, and returning a simple “hello world” with the following code:

wifi.connect(ssid, {password: password}, function() {
http.createServer(processRequest).listen(port);
console.log(‘Web server running at http://’, wifi.getIP().ip,':’,port);
});

1

2

3

4

5

6

7

8

9

10

11

12

13

14

function processRequest (req, res) {

  res.writeHead(200);

  res.end(‘Hello World by ESPino32′);

}

var ssid = ‘YOUR_SSID’;

var password = ‘YOUR_SSID_PASSWORD’;

var port = 80;

var http = require(‘http’);

var wifi = require(‘Wifi’);

wifi.connect(ssid, {password: password}, function() {

  http.createServer(processRequest).listen(port);

  console.log(‘Web server running at http://’, wifi.getIP().ip,‘:’,port);

});

I click on Upload button, and I could access web server from Firefox.

The main advantage of Espruino over the Arduino IDE is that it’s much faster to try your code on the target, since there’s no need to compile a binary, upload to the board, and flash to storage during development. Another advantage depends on your skill set, as if you’re a seasoned web developer with a good knowledge of JavaScript, you won’t need to learn C programming used in Arduino IDE.

For other interface (SPI, I2C, ADC…) and more advanced tasks, you may check Espruino ESP32 page, but be forewarned, as the blink and web server samples did not work for me (unknown variable and missing semi-colon) by default. So you may want to read through the API reference in case the samples do not work. The company behind Espruino, Pur3 Ltd, is likely focusing most of the development efforts of their own hardware platforms like Puck.js and Espruino boards, and there’s more activity for those in the forums. So if you are interested in JavaScript on micro-controllers, but don’t want too many issues, ESP32 may not be best platform to learn, but if you like challenges, go ahead! 🙂

I’d like to thank ThaiEasyElec for sending an ESPino32 board sample. The company sells the board locally and globally for respectively 590 THB / ~$16 plus shipping on their website, where you’ll also find some documentation in English and Thai language. If you are based in Thailand, you can get further discount and free shipping if you purchase through LINE app.

Tweet Venus Supply Co., Ltd, better known as ThaiEasyElec, is a company based in Thailand, selling embedded systems and development board, as well as providing development services based in Thailand….

Arm Research Summit 2017 Streamed Live on September 11-13

$
0
0

The Arm Research Summit is “an academic summit to discuss future trends and disruptive technologies across all sectors of computing”, with the second edition of the even taking place now in Cambridge, UK until September 13, 2017.

Click to Enlarge

The Agenda includes various subjects such as architecture and memory, IoT, HPC, computer vision, machine learning, security, servers, biotechnology and others. You can find the full detailed schedule for each day on Arm website, and the good news is that the talks are streamed live in YouTube, so you can follow the talks that interest you from the comfort of your home/office.

[embedded content]

Note that you can switch between rooms in the stream above by clicking on <-> icon. Audio volume is a little low…

Thanks to Nobe for the tip.

Tweet The Arm Research Summit is “an academic summit to discuss future trends and disruptive technologies across all sectors of computing”, with the second edition of the even taking place…

How to Remove Watermarks & Timestamps from Photos with GIMP

$
0
0

Watermarks can be seen on some photographs for copyright reasons, but in some cases even people or companies who clearly don’t own copyrights add watermarks, such as online resellers who add watermarks on top of photos provided by manufacturers, and some camera adds date & time automatically to photos if you’ve used the  settings to enable it. I’ve recently read a blog post on Google Research about making watermarks more effective, as some computer algorithm could remove watermarks automatically. Since I often waste time while searching for watermark-free version of the photo, I decided to check if I could find such program running in Linux. I did not but I found a somewhat old blog post explaining how to use GIMP to perform the task with three different methods:

  1. Crop, if the watermark is on the edges… Easiest method, but for most case this won’t do…
  2. Content-aware filling using resynthetiser plugin. Automatic and easy, but results will depend on source since it will use adjacent pixels around the zone to “heal”.
  3. Manual removal. Works most of the time, but is time consuming

I tried the second method with the instructions provided, but the plugin failed to install. Eventually, I realized installation is even easier today in Ubuntu 16.04:

1

sudo apt install gimp gimp-resynthesizer

The last package will install resynthesizer and extra filters. We can now load the photo with watermarks, select the marker mark with the rectangle, ellipse, or free select tools, and apply the filter with Filters->Enhance->Heal selection…

Click to Enlarge

The following window with show up. The context sampling width set the number of pixels outside the selected zone you want to use. You can then select samples from all four edges, left and right sides, or above and below. The option will depend on the image, as for example for a watermark covering the white and black zone of the left sided of the phone, I had to select “Above and below”.

Finally, the Filling order allows to randomize the filter, or use inwards towards center, or outwards from center. You can experiment with options to find the one that works best with your source image. As you can see from the image below, the results are not quite perfect on the images I used, but still better than me using the smudge tool. Results will be better when the watermark is on a homogeneous zone with no sharp lines or large differences in colors.

Before (left) vs After (right)

I also tried with some photos since it’s likely to work better, starting with a scan of an old photo with some rather pale timestamp watermark on the bottom right side on top of water.

I selected two zones before applying “Heal selection” filter, and it worked very well as shown in the watermark free photo below.

I took two photo with a point and shoot camera with timestamp enable for further testing. In the first I make sure the timestamp was on top of tree leaves.

Click for Full Size

I applied the filter with default settings and the results are impressive. Even if you download the full size picture, and zoom in you may not be able to sport the filtered zone that easily.

Click for Full Size

The filter is bound not to work as well on the last photo since the timestamp is placed on top of a mixture of water and plants.

Click for Full Size

And indeed the result is not perfect, but it may not be that noticeable unless your focus on the filtered area.

Click for Full Size

Tweet Watermarks can be seen on some photographs for copyright reasons, but in some cases even people or companies who clearly don’t own copyrights add watermarks, such as online resellers…

Review of Sonoff RF Bridge, Sonoff 4ch Pro, and Sonoff POW with Sonoff-Tasmota Firmware

$
0
0

Karl here. Today we are going to look at 2 new and one older Sonoff devices.

I spent very little time with the stock firmware on the device. I don’t like the fact that an Internet connection is needed, and I am not in control. As of the time of this writing I found the Ewelink was not configurable enough to meet my needs. There is one feature that is really nice that I could easily see keeping stock firmware. It is the Alexa Skill. It worked. I am also currently reviewing Vobot Smart Alarm Clock with Alexa integration and had no trouble controlling the Sonoff devices with Alexa. But unfortunately I am lazy and want everything automatic so I can’t keep it. With the RF bridge I was unable to trigger a light from a motion sensor. In comes Arendst ‘s Sonoff-Tasmota firmware  to the rescue. It gets better all the time. It is dead simple, and so configurable now. He continues to add features and devices.

RF Bridge

You may have seen my previous article building a 433toMQTTto433 bridge to use cheap 433mhz devices. I never did build a case for it, and it’s a little bit of an eyesore. When I found out about a nicely packaged one, I was excited to check it out. Like I stated previously, it didn’t work as I anticipated and was glad when I found out Arendst got one as well. He has a good wiki with on the github page and all the needed information to flash and configure so I won’t go into it. It flashed uneventfully. I was a little scared by the design that it was only going to be able to receive 16 individual codes and pass onto MQTT but that is not the case. It passes everything it receives. You can only send 16 different codes right now which need to be saved ahead of time. So after monitoring the MQTT server I ran into first hurdle. I was getting this example json value.

1

tele/sonoffrfbridge/RESULT {“RfReceived”:{“Sync”:11580, “Low”:320, “High”:1130, “Data”:“982817”, “RfKey”:“None”}}

And actually I found after much frustration that “Data” is a nested json value. This took a while for me to figure out. After that it was relatively easy to parse in Home Assistant and move my automations over from the previous bridge.

1

2

3

4

5

6

7

8

9

10

11

- alias: Living Room Tamper

    hide_entity: true

    trigger:

      platform: mqtt

      topic: tele/sonoffrfbridge/RESULT

    condition:

      condition: template

      value_template: ‘{{ trigger.payload_json.RfReceived.Data == “982817” }}      

    action:

      service: homeassistant.toggle

      entity_id: light.living_room

and

1

2

3

4

5

6

7

- platform: mqtt

    name: “Living Room Motion”

    payload_on: “98281B”

    payload_off: “9971736”

    sensor_class: motion

    state_topic: “tele/sonoffrfbridge/RESULT”

    value_template: ‘{{ value_json.RfReceived.Data }}

From the previous article payload off is a made up value and is only used internally to turn the sensor off after a minute.

Just a couple gripes about the rf bridge which are superficial. There is a noticeable increased delay over the homemade bridge from the time it senses a trigger until the light comes on. It is only about half a second but a noticeable difference. And my wife pointed quickly that the led indicating it is on is very bright. I might remove it or install a varistor to tone it down. The receiver does not appear to be as good or might just be that it is in a case or my positioning. I am still able to cover my house but the trigger on my mailbox across the street doesn’t trigger. It was hit or miss on the old one but never triggers now.

FYI I am still running off the same batteries I initially installed in the 433mhz motion sensors over 6 months ago.

Sonoff 4ch Pro

Click to Enlarge

Click to Enlarge

Click to Enlarge

I also received the Sonoff 4ch Pro with 433mhz transmitter remote.

I tested it with stock Ewelink software and all tests done before worked. I quickly installed the alternative firmware from above, and again no loss in functionality. I was still able to pair and clear the 433 MHz remotes. It is weird that it does not indicate with a light that it is in pairing mode as of right now but when you press the button the light blinks when it is learned. The inching, self locking and interlock continued to work as well via switches. I can definitely see this being used for lighting, or if you needed to control multiple items in close proximity. Maybe simple access control. Possibilities are endless. On the product page, it shows wiring with motors as well which looks cool. If I find a unique or interesting project I will share.

The 4 button transmitter is very powerful. It transmits further than any of my other 433mhz devices.

Sonoff POW

Click to Enlarge

A buddy of mine gave me a Sonoff POW to play with. The Sonoff POW is very similar to the Sonoff Basic, but has the ability to measure power usage. I didn’t bother testing the stock software. I went straight to Arendst software. I didn’t have anything to measure power before and this is a welcome addition to my tools arsenal. I don’t need super accurate readings just a good idea what the draw is. I installed a light rated at 75w to test and got the results below. If a more accurate load is available you can calibrate the POW and instructions are in the Wiki.

OTA Firmware

Who wants to drag all their devices back to the PC and flash new firmware? I finally checked it out. It is really simple to do.

First uncomment BE_MINIMAL then export compiled Binary. After a while you will have a bin file in your sketch folder.

Click to Enlarge

After uploading comment BE_MINIMAL, upload again. The 2 steps procedure is because he is running out of space with all the features. He is trying to reduce the code down, and hopefully make this a single step in the future. If you have a web server there are instructions to automate this.

Conclusion

I would like to thank Itead Studio for sending the Sonoff RF Bridge, 4ch Pro and 4 button 433 MHz transmitter. They keep expanding their Sonoff line and make them hacker friendly. I would also like to thank Arendst for his tireless work on Sonoff-Tasmota firmware. If you are just looking to control your lights via Alexa, and don’t mind requiring the Internet to be available the stock firmware might work for you.

Tweet Karl here. Today we are going to look at 2 new and one older Sonoff devices. Sonoff RF Bridge – $9.90 433MHz RF to WiFi Bridge Sonoff 4ch Pro…


SanStar WS-3A Medical Board Runs Android 5.1 on Rockchip RK3288 SoC

$
0
0

Warp United, a “Chinese Health 2.0″/point-of-Care medical technology company based in Shenzhen, launched Warp 3 medical recorder – an Android powered handheld device supporting various  vital signs and ultrasound medical modules – earlier this year,  and the company has now just introduced SanStar WS-3A motherboard powered by Rockchip RK3288 quad core Cortex-A17 SoC, and running Android 5.1 in order to allow engineers to develop and connect their own medical modules via the various interfaces of the board, and create their own medical products.

SanStar WS-3A medical motherboard specifications:

  • SoC – Rockchip RK3288 quad core Cortex-A17 processor @ 1.8GHz with an ARM Mali-T764 GPU with support for OpenGL ES 1.1/2.0 /3.0, OpenVG1.1, OpenCL, Directx11
  • System Memory – 2GB or 4GB DDR3
  • Storage – 8GB, 16GB, or 32GB eMMC flash, micro SD slot up to 32GB
  • Video Output / Display I/F
    • HDMI 2.0 up to 3840 x 2160 pixel
    • embedded DisplayPort (eDP)
    • 10-bit dual LVDS, MIPI DSI, 1x backlight header, 1x I2C interface for touchscreen
  • Audio – audio input, output, MIC interfaces, HDMI out.
  • Connectivity
    • Isolated 10/100M Ethernet interface
    • Dual band  802.11 a/b/g/n WiFi, Bluetooth 4.0
    • SIM slot for support for cellular networks via 4G LTE, 3G, 2G modules
    • Optional GPS module : -159dBm, 1575.42MHz, 20 channels, positioning accuracy <10m
  • USB – 7x USB host, 1x USB OTG
  • Serial – 2x RS232
  • Expansion – 4x custom I/O ports, mini PCie interface
  • Camera – USB/MIPI camera up to 13MP
  • Sensors – Support for 3-axis G-sensor, gyroscope, compass
  • Misc – IR receiver; 3x user keys; 1x 12V cooling fan header; 3x LEDs for power, status, and user; RTC with battery; watchdog timer
  • Power Supply – 12V @ 3A-5A via power barrel connector
  • Dimension – 145(L) x 90(W) x 22(H) mm
  • Weight – 99.27g
  • Conformity
    • ISO 13485:2003 Medical devices – Quality management systems – Requirements for regulatory purposes
    • EN 60601-1: 2006 + A1: 2013 Medical Electrical Equipment – Part 1: General Requirements for Basic Safety and Essential Performance
    • EN 60601-1-2:2007 Medical electrical equipment – Part 1-2: General requirements for basic safety and essential performance – Collateral standard: Electromagnetic compatibility – Requirements and tests
    • EN 60950-1:2006+A11:2009+A1:2010+A12:2011 Information technology equipment – Safety –Part 1: General requirements

Block Diagram – Click to Enlarge

The board runs Android 5.1, and support up to two independent screens, or one 4K screen. The best way to find out what’s possible with the board is to check out what the company has done with Warp 3 medical recorder system comprised of a 7″ RK3288 tablet communicating with Volans 3 Vital Sign Module to gather ECG, heart rate (HR), respiration (Resp) rate, temperature (Temp), SpO2, pulse rate (PR), and non-invasive blood pressure (NIBP), as well as various “Urxa 3” ultrasound modules. Software includes an interface to display all those metrics on the tablet, as well as support for cloud based mobile health (mHealth) and EMRs (electronic medical records).

[embedded content]

SanStar WS-3A single board computer is available now at an undisclosed price. Visit Warp United’s SanStar WS-3A product page for further details.

Via LinuxGizmos

Tweet Warp United, a “Chinese Health 2.0″/point-of-Care medical technology company based in Shenzhen, launched Warp 3 medical recorder – an Android powered handheld device supporting various  vital signs and ultrasound…

Factory Prices of Some TV Boxes and Accessories

$
0
0

Some companies that contact me have not read the about section of the blog, and either tell me they can give me a good price for TV boxes, and some even send me their price list. And this morning, I’ve received a EXW (Ex Works) price list this of Amlogic S912/S905X/S905W and Rockchip based TV boxes, as well as some air mice, and Android projectors.

The cheapest models are based on S905W and RK3229, with MXQ Pro 1GB/8GB going for $17.5 per unit for 200 pieces orders. For reference that models goes for around $26 shipped online before any discount coupon you may find. At the other end of the scale, you have TX2 model with 3GB RAM, 64GB flash going for $77.5 EXW for 200-unit orders, and sold online for $86 including shipping, again before coupon. Margin must be really low, or the prices above are not that competitive, but nevertheless it gives an idea of factory prices of various TV boxes. Air mice are really cheap, and backlight usually only adds 90 cents.

Tweet Some companies that contact me have not read the about section of the blog, and either tell me they can give me a good price for TV boxes, and…

IkaScope WiFi Oscilloscope Probe Works with Windows, Linux, Mac OS X, Android and iOS

$
0
0

Last year, I wrote about Aeroscope, a portable Bluetooth oscilloscope that looks somewhat like a Stabilo Boss highlighter pen, and sends measurements over the air directly to your Android and iOS tablet or smartphone. It was introduced through a crowdfunding campaign which eventually failed, but Aeroscope can now be purchased for $199 on Amazon US or their own website. If you’d prefer WiFi over Bluetooth, and would like something that also works on Windows, Linux, and/or Mac OS X, IKALOGIC has just launched IkaScope WiFi oscilloscope probe compatible with all popular mobile and desktop operating systems.

IkaScope WS200 specifications:

  • Analog Bandwidth  – 30 MHz @ -3dB
  • Sample Rate – 200 MSps
  • Connectivity – 802.11 b/g/n/e/i WiFi @ 2.4 GHz configurable as access point or station
  • Input Range – +/-40 V range CAT1
  • Offset Range – +/- 20V to +/- 40V offset
  • Input Impedance – 10MΩ || 14pF
  • Input Contact – ProbeClick intelligent probe tip that will only start measurements upon contact
  • Voltage Resolution – 100 mV/division to 10 V/division
  • Sample Resolution – 8-bit
  • Max Refresh Rate – 250 fps
  • Memory Depth – 4K points (4x 1000 points for burst buffers)
  • Protection Input Level – 253 VAC 1min
  • USB – Isolated micro USB port for charging only
  • Misc – Power/Charging and WiFi status LEDs
  • Battery – 420 mAh battery good for about 1 week battery life with daily regular use.
  • Dimensions – 161mm long

IkaScope specifications are slightly better than the ones of Aeroscope when it comes with analog bandwidth and sample rate for example, but the battery capacity is lower. However,  the latter is likely more than compensated by ProbeClick technology that will only measure when a contact is detected, hence saving power during idle times. One advantage of WiFi over Bluetooth is that it allows for a higher refresh rate up to 250 fps.

The probe ships with a ground clip and a USB charging cable. OS support will be brought step by step starting with Windows, but Linux, Mac OS X, iOS, and Android will all be supported by November 9th if the schedule’s deadlines can be met, and all desktop OK will be supported by the end of September before shipping. More details about the software can be found in IkaScope knowledge base.
IKALOGIC has started taking pre-order for IkaScope for 299 Euros excluding VAT and shipping scheduled by the end of the year. “EARLYBIRD” coupon valid until the 20th of September will power the price by 10%.. Some more information, and the purchase link are available on the product page.

Tweet Last year, I wrote about Aeroscope, a portable Bluetooth oscilloscope that looks somewhat like a Stabilo Boss highlighter pen, and sends measurements over the air directly to your Android…

USBCEE Tiny-PAT Board Helps Testing USB-C Power Adapters (Crowdfunding)

$
0
0

USB power delivery allows for up to 100W charging using 20V @ 5A through a USB type C port, and the specifications also mandate supports for various voltages between 5V and 20V. However, some USB-C power adapter that not be fully compliant with the specifications, potentially risking to damage your device. USBCEE Tiny-PAT board has been created in order to test such power adapters to make sure they are compliant with USB PD 2.0/3.0 specifications.

Tiny-PAT board features and specifications:

  • Supported USB Spec Version – PD 2.0 / PD 3.0
  • Max Voltage: 24 V
  • Max Current: 5 A
  • Max Power: 100 W
  • USB type C receptacle
  • Misc – Fail and Pass LEDS, S4 mode button, through holes for VBUS & GND
  • Power Consumption: ~10 mA (may vary based on voltage)
  • Dimensions – 35 x 20 mm

By default, the board will test all power rules advertised by the power adapter, measure the voltage (VBUS), and show whether the test failed or passed with the LEDs on the board.

USB PD 3.0 Power Ratings, Voltages and Currents – Source: Texas Instruments

S4 button is used to switch to manual mode, where you can switch between each power rule, and verify the voltage(s) with a multimeter, external load, or oscilloscope. In that mode, Tiny-PAT could also be used a variable power supply where you can for example, select 5 V/3 A, 9 V/3 A, 15 V/3 A or 20 V/4.35 A  with Apple’s 87 W USB-C power adapter, or 5 V/3 A, 7 V/3 A, 8 V/3 A, 9 V/2.7 A, or 12 V/2 A with Verizon USB charger. The company promises to release schematics under an open license.

[embedded content]

USBCEE has launched a CrowdSupply campaign to raise some funds for mass production of the board. A pledge of $40 should get you a Tiny-PAT board shipped at the end of November. Shipping is free to the US, and adds $7 to the rest of the world.

Tweet USB power delivery allows for up to 100W charging using 20V @ 5A through a USB type C port, and the specifications also mandate supports for various voltages between…

WizziKit is a DASH7, LoRa and Sigfox Wireless Sensor & Actuator Network Kit

$
0
0

Over the last few years, I’ve written several article about LoRaWAN, Cellular IoT, and Sigfox based long range low power IoT solutions. DASH7 is another LPWAN (Low Power Wide Area Network) standard that operates on the same 868 and 915 MHz ISM bands as LoRa and Sigfox, but has much lower power consumption, and the cost of a shorter range up to 500 meters, instead of the 5+km associated with LoRa or SigFox.

The DASH7 Alliance Protocol (D7A) is an Open Standard, and if you want more details you can download version 1.1 of the specifications on DASH7 Alliance website. I’m writing about DASH7 today thanks to an article on ST blog about Wizzilab’s Wizzikit, an evaluation kit and framework for DASH7 with a gateway, and several nodes that can also optionally support LoRaWAN and Sigfox protocols.

Click to Enlarge

The kit is comprised of the following items:

  • WizziGate GW2120 Ethernet/Wifi/Dash7 gateway – based on GL-iNet AR150 router –  with antenna for the selected band (868/915 MHz) and USB power cable.
  • 2x Nucleo-L432KC STM32 development board compatible with Arduino. mbed, and ST morpho
  • 2x D7A SH2050 Nucleo Shield with a multimode Murata Lora Module supporting LoRa, DASH7, and Sigfox, as well as four sensor chips: light sensor,  magnetometer & accelerometer, humidity and temperature sensor, and a pressure sensor.
  • 2x mini USB cable to power up and program the Nucleo boards

DA7 SH2050 Shield

You’ll also need to add you own USB power adapter for the gateway. The kit also comes with access to the company’s DASH7Board cloud service. The Wiki includes some information, including a quick start guide explaining how to register the gateway, and start loading the demo code using mbed. Since DASH7 is much more power efficient than LoRaWAN it can either be used to prolong battery life, or to send more frequent messages for example to control actuators. With LoRaWAN, downlink access can only be initiated by the end node, but DASH7 is bi-directional allowing for OTA firmware upgrades. The solution was showcased a few months ago at ST Techday with two demos: sending a message to a single node, and OTA code upgrade (actually picture upload) to multiple boards with a broadcast message.
[embedded content]

Wizzilab’s Wizzikit is sold for 299.00 Euros with either 868 and 915 MHz band. Further details on be found on Wizzilab website.

Tweet Over the last few years, I’ve written several article about LoRaWAN, Cellular IoT, and Sigfox based long range low power IoT solutions. DASH7 is another LPWAN (Low Power Wide…

Viewing all 2336 articles
Browse latest View live