Quantcast
Channel: Developers » Visit CNX Software
Viewing all 2336 articles
Browse latest View live

$45 Hisilicon Hi3535 Based Network Video Recorder Board Comes with HDMI, VGA, Dual SATA, GbE, and USB 3.0 Ports

$
0
0

Network Video Recorder (NVR) boards allow you to record videos from IP cameras to a SATA drive, and display them in a mosaic for monitoring & security. One of such boards is XiongMai NBD7024T-P powered by a Hisilicon Hi3535 dual core Cortex A9 processor, and featuring Gigabit Ethernet, SATA, and USB 3.0 interfaces, on top of HDMI and VGA video output and stereo audio output. With such features, this type of board could likely be re-purposed for other applications, such as a NAS setup too,and they are fairly inexpensive going for $45 including shipping on Aliexpress.

Click to Enlarge

NBD7024T-P NVR board specifications:

  • SoC –  Hisilicon Hi3535 dual core Cortex A9 processor @ 1.0 GHz
  • System Memory – 4Gbit (512MB) RAM
  • Storage – 2x SATA ports up to 8TB each, maybe some SPI flash for firmware
  • Video Output – 1x HDMI, 1x VGA
  • Audio Output – 2x RCA jacks for stereo audio
  • Video Input (IP) – 8x @ 5M, 16x @ 4M, 32x (24fps), 16x, 8x @ 1080p, 32x @ 960p, 16x @ 720p up to 192 Mbps bandwidth
  • Video & Audio Compression – H.264, G.711A
  • Display & Playback “Quality” – 1280×1080 max display resolution, playback: 5M/4M 1080p/960p/720p
  • Video Preview – 1/4/8/16/24/32
  • Connectivity – Gigabit Ethernet port + 4ch WiFi ???
  • USB – 1x USB 2.0 port, 1x USB 3.0 port
  • Misc – RTC battery, some expansion headers
  • Power supply – 12V/4A
  • Power Consumption – <10W (without HDD)
  • Dimensions – 164mm x 80mm
  • Weight – ~130g
  • Temperature Range – 0°C-+55°C
  • Humidity – 10%-90% RH

You can use the built-in interface shown above, a Windows based CMS app, XMeye mobile app to manage the video streams, or any ONVIF compliant apps. The board is said to run some kind of embedded Linux distributions. The seller of the board on Taobao, also “sells” the SDK for various Hisilicon processors for 5 RMB. But since the name of the SDK is shown a search for Hi3535_V100R001C01SPC020 led me to that direct link on baidu where it looks like you can download it for free, until you find out the archive is password protected… The SDK is said to be based on Linux 3.14, and you’d have to use this, since I could not see any activity about Hi3535 in LKML.

HiSilicon Hi3535 Block Diagram – Click to Enlarge

The manufacturer of the board is Hangzhou XiongMai Technology, and you can find a product brief here. If you find $45 is too high for your use case, some cheaper 4-channel NVR boards based on HiSilicon Hi3520D ARM Cortex A9 processor @ 660 MHz can be found for about $17 shipped with Fast Ethernet, one SATA 2.0 interface, and HDMI & VGA output.

HiSilicon Hi3535 processor sells for about $8 in quantities, so in case software support is acceptable, and HiSilicon helps with the release of the SDK, it might be possible to make low cost boards for headless applications. It still remains to be seen how SATA, Ethernet, and USB 3.0 interfaces perform on the processor.

Thanks to Jon for the tip.

Tweet Network Video Recorder (NVR) boards allow you to record videos from IP cameras to a SATA drive, and display them in a mosaic for monitoring & security. One of…


Supermicro A2SDi-2C-HLN4F Server Mini-ITX Motherboard is Based on Intel Atom C3338 “Denverton” Processor

$
0
0

Almost exactly one year ago, I wrote about Intel Atom C3000 Series “Denverton”  processor based on the same Goldmont architecture used in Apollo Lake processor, and used in an early GIGABYTE MA10-ST0 server motherboard prototype. The latter is not out yet, but according to a YouTube video, the 16-core motherboard should be launched in H2 2017. In the meantime, Supermicro also made their own Denverton motherboard based on a lower-end Atom C3338 dual core processor.

Supermicro A2SDi-2C-HLN4F board specifications:

  • Processor – Intel Atom C3338 dual core Denverton processor @ 1.50 / 2.20 GHz with 4 MB  cache; 9W TDP
  • System Memory
    • Up to 64GB Register DIMM RDIMM and DDR4-1866MHz
    • Up to 32GB Unbuffered ECC/non-ECC UDIMM, DDR4-1866MHz, in 2 DIMM slots
  • Storage – 4x SATA 3 ports, but up to 8x SATA 3 (6 Gbps) ports are configurable; N.B.: total combined PCI-E lanes and SATA ports is up to 8
  • Connectivity – 4x GbE Ethernet via Intel C3000 SoC
  • USB – 4x USB 2.0 ports including 2x via headers, 1x USB 3.0 port
  • Expansion – 1x PCI-E 3.0 up to x4 (in x4 slot); number of PCI-E lane is configurable via BIOS setup: 0, 2, or 4.
  • Video Output – VGA
  • Serial – 1x COM port via header
  • IPMI & 2D Graphics – ASPEED AST2400 BMC
  • Misc – TPM header; AMI UEFI 2.4/SMBIOS 2.7.1 “BIOS”;  HW monitoring: 4-fan status and tachometer, CPU voltage monitoring, system temperature, VBAT, etc…
  • Power Supply – ATX power connector; 12V DC power input; CPU thermal trip support for processor protection; power-on mode for AC power recovery
  • Dimensions –  17.02cm x 17.02cm (Mini-ITX)
  • Temperature Range – Operating: 0°C ~ 60°C; storage: -40°C – 85°C

The board supports Windows 64-bit operating systems like Windows 10, Windows Server 2016, Hyper-V Server 2016, etc.. as well as various 64-bit Linux distributions such as RedHat Linux EL 7.3, Fedora 25, SuSE SLES 11 SP4, Ubuntu 16.04 LTS and others, as well as FreeBSD. You may find the full list here.

If you’d like a complete system, the company also offer SuperServer 5029A-2TN4 with the board, and the company’s SC721TQ-250B mini tower with four hot-swap 3.5″ SATA drive bays, two internal 2.5″ drive bays, and 1 slim DVD-ROM drive bay shared with one internal 2.5″ bay.

Supermicro A2SDi-2C-HLN4F motherboard is sold for just above $200 on websites such as Atacom and WiredZone. I found the barebone “SuperServer” sold for $405 on Newegg. The latter has been reviewed on ServeTheHome in April with the conclusion rather positive:

If you are looking for a 1GbE NAS unit, this is a great option. The performance is well above the previous generation dual core and sometimes quad core models. The ability to maintain a low power profile will help ROI.

Over time, we expect to see better support for the X553 NIC. The major competition for this unit will be when the higher core count variants come out and iterations that support 10GbE.

In many environments, this is going to be a perfect NAS/ network services platform. If you wanted a simple 1GbE Linux NAS or caching appliance, the Supermicro SYS-5029A-2TN4 should be high on your list.

They also ran several benchmarks to put the CPU performance into perspective.

OpenSSL Sign Benchmark – Higher is Better

You’ll find more details about the motherboard on the product page.

Thanks to Paul for the tip.

Tweet Almost exactly one year ago, I wrote about Intel Atom C3000 Series “Denverton”  processor based on the same Goldmont architecture used in Apollo Lake processor, and used in an…

2017 Tevo Tarantula Dual Extruder 3D Printer Review – Part 1: Assembly and First Prints

$
0
0

Karl here. Going to review the Tevo Tarantula 3D printer a little differently this time. With this build process, I need to space over several days due to time and working on many projects at once. I am logging each session with dates and times. I rarely have big blocks of time to work on my projects with working a full time job, and 2 children. I think this is indicative of a lot of people so wanted to give it a try. If you like this format let me know. If you are new to 3D printing, I would suggest reading the 3D Printer Basics section from Raiscube R2 review.

Tevo Tarantula Specs

  • Bed Size – 200x280x200
  • Extruder – all metal dual color
  • Bed Leveling – Auto
  • Extruder Style – Bowden
  • Materials – Metal Frame with some Acrylic parts
  • Heated Bed – Yes
  • Filament – 1.75
  • Filament Included – 2 colors 0.5 kg each
  • Power Supply – 12V / 25A
  • Board – MKS Base 1.4

3D Printer Build Timeline

6.25.17 12:15-12:30

Getting started late, basic unboxing for tonight so won’t count it against build time.. Looking good so far. Manual looks excellent upon first look, but seems to be for single extruder. After sales card? Will monitor Facebook Group to see if it is real. One thing caught my eye is the heated bed is insulated from the factory. That is a plus.

Click to Enlarge

Click to Enlarge

Click to Enlarge

Click to Enlarge

Click to Enlarge

Click to Enlarge

6.26.17 10:50-12:25 ~1.5hours

Really the first build session tonight. Spread all the parts around my work area in foam parts.Went smooth after I figured out I needed to look at the parts list, and to find some of the parts. All the small parts are in bags and labeled. The metal frame is called out on the left page, as well as the small parts but the acrylic pieces are not. Need to find the acrylic pieces by the picture. Once I figured that out the build sped up. Have to pay attention to orientation in the pictures. Only the orientation of the x axis stepper motor so far contradicts itself in the pictures. The bed is shown in the picture installed but kind of skips it on the page. I put the remaining piece parts in the bag for now. Will wait until end to install. Make it easier to install the belt. Also on the frame not really tightening everything until the end and make sure everything is square. If you never have worked with eccentric nuts, they are nuts that the hole in the center is off set.

They are used on the wheels and you turn them to tighten the wheels into the rails to get a nice smooth tight movement. One other non standard nut is the t-nut. They are used to connect the rails together. Loosely screw them on the screw and slide them in the groove and when you tighten the screw the nut turns until it locks in and finish tightening.

Click to Enlarge

6.27.17 11:10-1:25 ~2.25 hours

Starting the next steps. Should have been an easy uneventful night, but it was slow. I have the main frame together. Instructions differ because of the dual extrusion but with a little common sense it is was easy to overcome. I did have to resort to looking at the picture of the built system on the first page to get orientation. I had to widen 3 holes in the acrylic for the hotend to mount. I’m afraid my belts are too tight x and y are not the easiest to move. I’ll try stick stock at first but frame seems wobbly. Think a good candidate to mount on piece of plywood. Feeding the filament from the bottom is the way it shows to mount the extruder motors but isn’t good for my setup. I like to feed from above. I used 2 extra screws to stiffen the heated bed like in the Raiscube R2. I tightened everything up and ready for the electronics. Very late need to get some sleep.

6.28.17 6:55-1:00 5 hours

Going through the remaining bags and seeing what is in the instructions, and if not installing it. I installed z stepper motor parts and some bracing. Put together all the electronics. Had to do some guessing on what plugs in where. Most connections are modular. I tinned the main power from the power supply, so I didn’t have any stragglers, and have a short. The power to the heated bed seems to be 2 zones. Two wires are clamped together and are very close in the screw down terminal. There is no case for the power supply. After getting everything together I took it apart and reorganized extruder motors. I set on angles using one as a brace. There is a lot mounted on the right arm and very cramped for space. Removed screen from top and placed on top power supply. Wobbles printer too much, if printing. Can’t figure out how to mount auto level sensor. After turning on, I went through all the checks. Move x, Move y, Move z, home, and level the printbed, while it is warm. I had to flip the y stepper because moving in wrong direction, and corrected thermistor connection. First test print failed. I went all in, and did a 2 color frog from Thingiverse. Filament that came with seems like junk. Second print better but definitely needs cooling, and used some filament that I had. Missed a picture before mounting fan below.

Click to Enlarge

6.30.17

Build process is complete now, and it is a mess. Not too worried, until I get it printing. Printed parts cooler fan on Raiscube R2, and mounted it. Got some lithium grease from O’reilly Auto Parts to lube z axis screw. It was squealing, when it was moving up and down. I found the place to mount the auto level sensor, and it is on back of the extruder. Terrible place, but not sure where else to mount. Took everything apart and mounted it. Spent quite a bit of time to start printing, but can’t adjust without taking apart. Now to level I think I am going to see feasibility to drill a hole in x axis to get to the mounting screws to tweak the height. Z axis offset seems to get reset every time I set through the menu on the display. I connected fan for the parts cooler to the board and hotend fan directly to the power supply with the board cooling fan. It is very quiet, and my concerns with having too tight of belts was unwarranted. It moves freely and smoothly.

7.1.17

To tackle this auto level sensor, and try to drill tonight if it lines up with a cavity. Don’t think this is going to work now that I look, but will still give it a shot. I have some hex with the balls on the end, so going to hit it at an angle. Surprisingly it worked really well. Success. I am able to tighten and loosen the auto level sensor. Opened Cura added the G29 G-Code to auto bed level in the start script. But ran into issues. Had to use 3 lines. Home, raise 5mm then auto level. If the z was already in home position and started to auto level it would throw an error. If you try this drilling method be sure to remove the belt first.

G0 X0 Y0 Z5 ;Raise 5mm

G29 ;Auto Level

G28 ;Home

G0 X0 Y0 Z5 ;Raise 5mm

G29 ;Auto Level

I have also been doing research. Seems like everyone is upgrading firmware to the latest Marlin or Repetier. Tevo makes it surprisingly easy to upgrade. They kind of encourage it by hosting firmware. Not quite ready to do that yet. Hopefully get a first print tonight on stock.

Auto bed leveling seemed to work. Seems like it is only 3-point in this firmware. I think in most recent 3D printers 9-point bed leveling is standard. First layers seems good so far. Fan kicked in at the second level. Printing Benchy at 60mm per second. It didn’t turn out the greatest but it is a start. Slicing with latest Cura…Will slice with Craftware, and print again. Unfortunately I am forced to use Cura with 2 hotends. Craftware doesn’t support it.

7.2.17

Printing rocket first tonight sliced by Craftware. Will print Benchy again, when complete sliced by Craftware. I got fed up with the auto-level and back to manual leveling. It was too inconsistent. Sometimes seemed too close other times too far. Just a few prints with only minor tweaking. Biggest thing I have are little buggers on travel moves. Not stringing per say. Left benchy is Cura, Right is Craftware.

Click to Enlarge

First Impressions

So it took several days, and some tuning but it is printing. l still have some way to go. I thought I was going to like the auto leveling, but seems more of a hassle and not totally reliable. Manual leveling is not difficult. I have only printed on glass so using this surface to print on is pretty nice. No messy glue sticks and no warping so far. The manual was OK, but I had to infer some to build. The board is a MKS Base V1.4, and it is fully loaded with features. I am glad Tevo included a fan to cool it. I am surprised that a part cooling fan wasn’t included. It is a must to print in my opinion on any printer. The power supply is rated 25A, and when the heated bed and hotend turn on all the fans slow down considerably, so don’t know how true that is. I have some HIPS on the way as well as some flexible PLA. HIPS is a water soluble filament. I will use it for support via the second extruder. Once printed I will put it in a warm bucket of water and in theory it should dissolve and leave no trace of supports. I will also try some 2 color prints and flexible filament. I’m going to look at stiffening the frame as well. I only tracked my time for the initial build and it was about 9 hours. Then I had about 4-5 reconfiguring and test printing.

I would like to thank Gearbest for sending this printer. If you are interested, you can purchase it on their store for $418.59 includding worldwide shipping [Update: If you use TEVODUAL coupon, price will go down to $349.99]. Note that there are various models of Tevo Tarantula with 200×200 or 200×280 (large) beds, single or dual extruder, with or without auto-leveling, and the one reviewed here is the higher end model with all a large bed, dual extruder for bi-color prints, and auto-leveling.

Tweet Karl here. Going to review the Tevo Tarantula 3D printer a little differently this time. With this build process, I need to space over several days due to time…

$29 Bluey nRF52832 BLE & NFC Development Board Comes with Temperature, Humidity, Light, and Motion Sensors

$
0
0

Electronut Labs, a startup based in Bangalore, India, has designed Bluey board powered by Nordic Semi nRF52832 Bluetooth LE SoC, and equipped with 3 sensor chips reporting temperature, humidity, light intensity, and acceleration data.

Bluey board specifications:

  • SoC – Nordic Semi nRF52832 ANT + BLE ARM Cortex-M4 @ 64 MHz processor with 512kB flash, 64kB RAM
  • Storage – Micro SD slot
  • Connectivity – Bluetooth 4.2/5 LE and other proprietary 2.4 GHz wireless standards via PCB Antenna, NFC via PCB antenna
  • Sensors
    • TI HDC1010 Temperature/Humidity sensor
    • APDS-9300-020 ambient light sensor
    • ST Micro LSM6DS3 accelerometer
  • Expansion Header – 18-pin header with GPIO, 5V, 3.3V, and GND
  • Debugging – CP2104 USB interface; 6-pin SWD header
  • Misc – CREE RGB LED; 2 push buttons; coin cell holder; on/off witch; external / battery power jumper
  • Power Supply – 5V via micro USB port, up to 6V battery voltage via 4-pin header

The board is partially open source hardware with KiCad & PDF schematics (v1.1 PCB) released in Github, but not the Gerber files nor the BoM released on Github, where you’ll find some documentation, and various samples relying on Nordic nRF5 SDK to play with Bluetooth LE and sensors, as well as sample code for a 2 wheeldrive ultrasonic robot.

The board is sold on Tindie for $29, but if you live in India, you can purchase it locally instead for 1,875 Rupiah. Visit the product page for a few more details. I could not find more information about the BLE robot, but it appears to be based on off-the-shelf parts.

Tweet Electronut Labs, a startup based in Bangalore, India, has designed Bluey board powered by Nordic Semi nRF52832 Bluetooth LE SoC, and equipped with 3 sensor chips reporting temperature, humidity,…

Vorke Z3 Rockchip RK3399 TV Box Review – Part 2: Android 6.0 Firmware

$
0
0

Vorke Z3 is another mini PC / TV box powered by Rockchip RK3399 hexa core processor with two Cortex A72 cores, and two Cortex A53 cores making it theoretically one of the fastest TV boxes on the market, excluding NVIDIA Shield Android TV which is well ahead of the competition, albeit with poor worldwide availability. I’ve have already shown Vorke Z3 hardware inside out, so in the second part of the review, I’ll focus on testing the firmware including video playback, and the system performance, and see how it compares to the similar Yundoo Y8, which I reviewed last month.

First Boot, Setup, and First Impressions

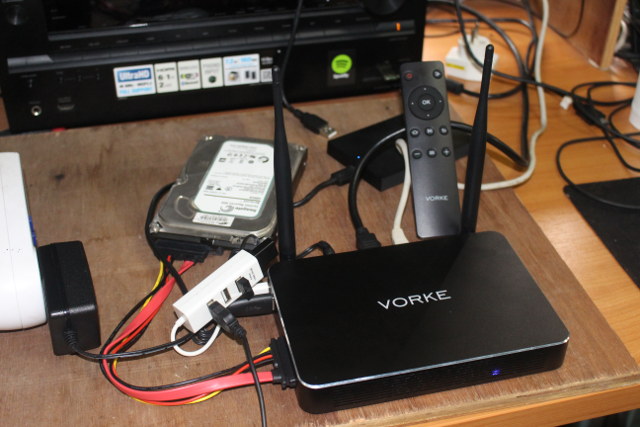
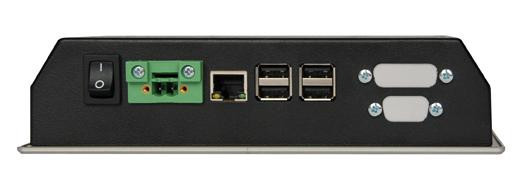
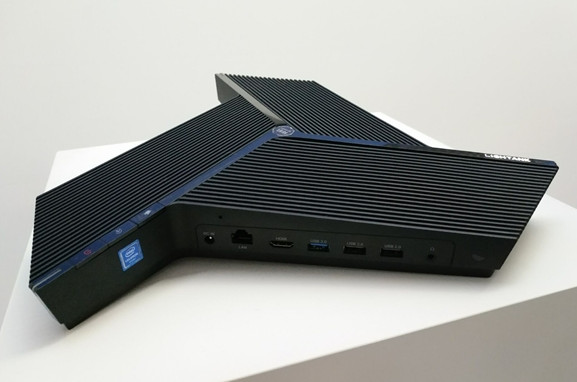
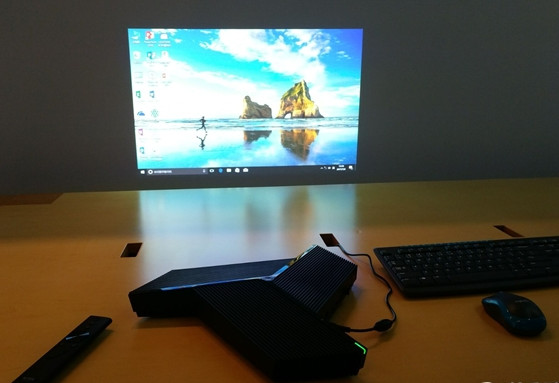
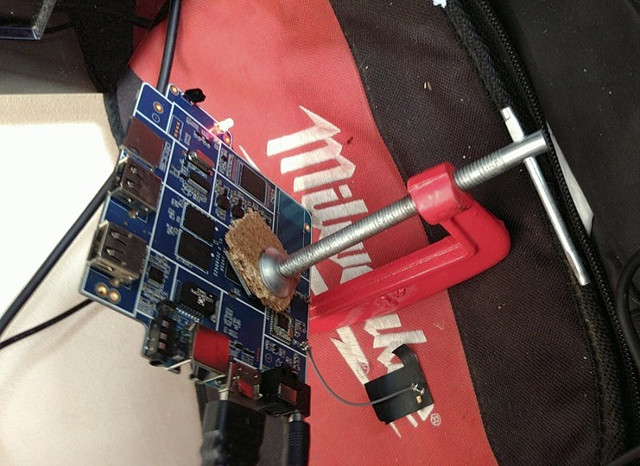
One the selling point of Vorke Z3 is its SATA connector, so I connected a 1TB 3.5″ SATA drive first, as well as Seagate USB 3.0 drive (1TB) to the USB 3.0 port, I also added a USB hub to connect a USB keyboard, as well as two USB RF dongles for Tronsmart Mars G01 gamepad. and MINIX NEO A2 Lite air mouse. I did not use the USC type C port at that point, but we’ll see later that it can be used for firmware update, remote storage access, and video output.  I completed the hardware setup by plugging in Ethernet, HDMI, and power cables.

Click to Enlarge

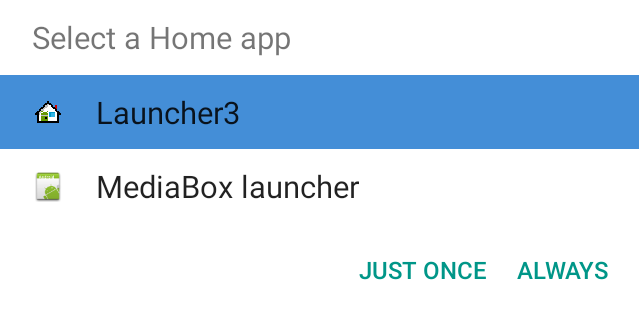
Press the mechanical power switch on the rear panel in order to start the box, with a typical boot taking around 30 seconds. That’s acceptable, but I was expecting a faster boot with the high end eMMC flash used together with the powerful processor. The first time, you may be asked to choose between Launcher3 (Stock Android Home screen similar to what you get on your phone) better if you are close to the screen using the box as a mini PC,
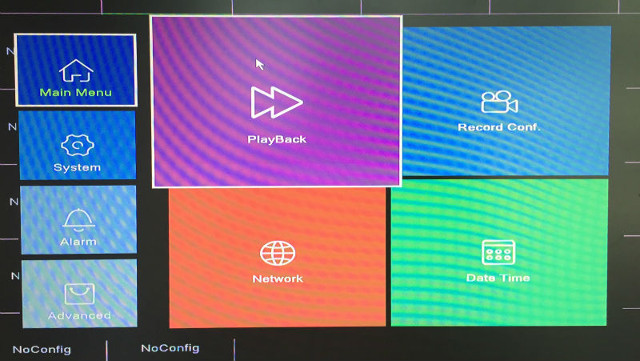
or the familiar MediaBox Launcher better suited to TV use, if you are seated a few meters from the screen.

Click for Original Size

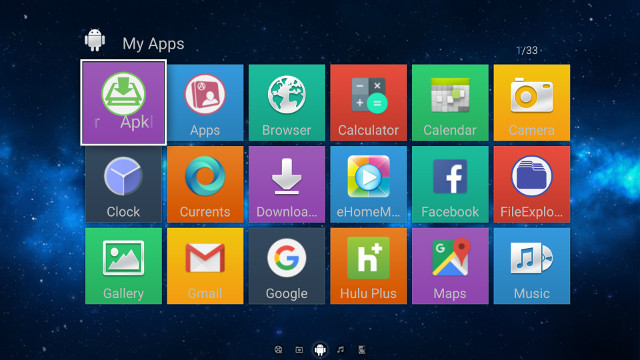
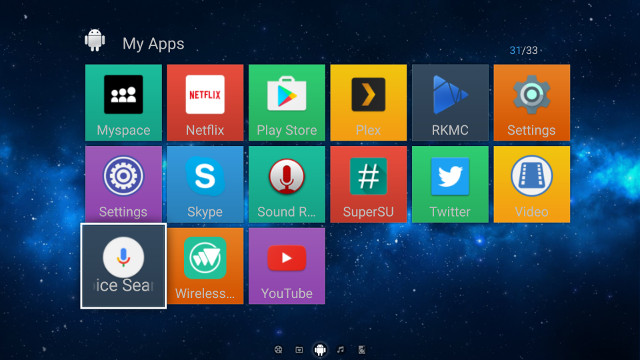
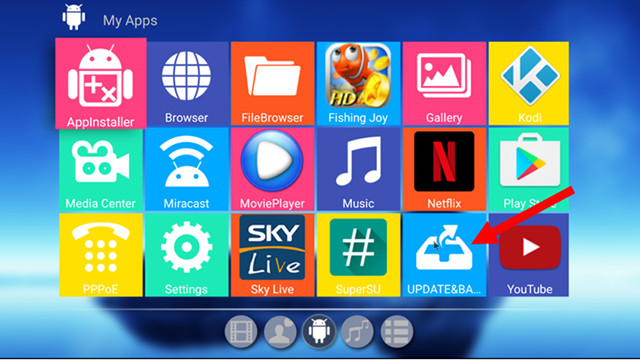
Below are the pre-installed app (minus RKMC which I installed manually) in the stock firmware.

YouTube, Hulu Plus, and Netflix are installed, but you’ll notice Kodi is missing, and there’s a good reason for this as we’ll find out below…

Click to Enlarge

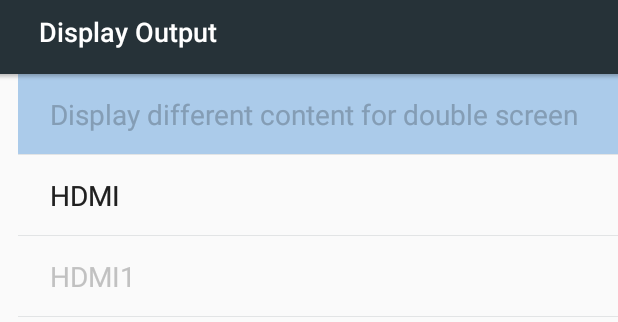
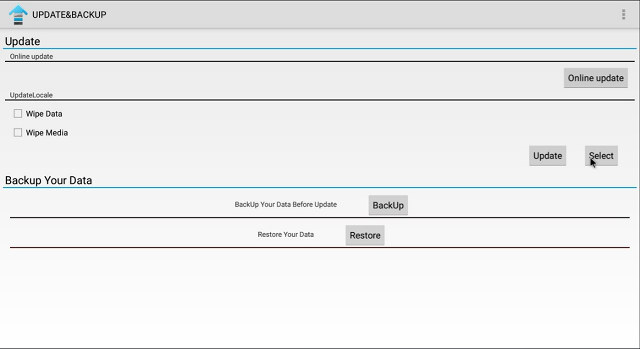
The Settings are pretty much standard, but when you go to Display Output, you’ll see HDMI and HDMI1 output, because the mini PC can handle two display if you connect a compatible USB type C to HDMI dock to the device, and you can either mirror the displays, or extend the desktop. I don’t have such dock, and GeekBuying did not seem interested in sending me one, so I did not test that part, but it’s something to keep in mind.

I could still go to the HDMI section, and configure video output up to 4096×2160 @ 60 Hz. What I found out is that the system will not keep the setting, and it will just jump aroud 4K @ 30 Hz, 1080p60 or 720p60 between reboots. The Sound & Notification section does not include “Sound Devices Manager”, so you can’t enable audio pass-through, so if you want to do that you’d have to use the blue “Settings” app instead. The settings do not have any options for CEC or HDR, with the latter not supported by the hardware.
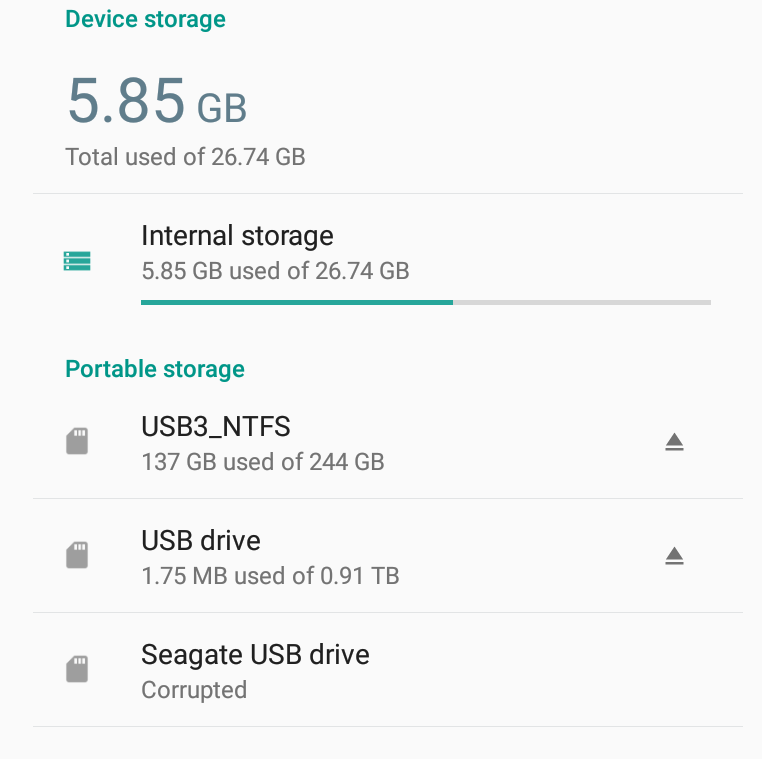
The screenshot above was taken at the end of the review, and I still had plenty of space out of the 26.74GB partition. USB3_NTFS is the NTFS partition of my four partitions USB drive, meaning exFAT, EXT-4 and BTRFS file systems are not supported. “USB Drive” is actually the SATA drive, and is a misnomer as the hardware implementation relies on a PCIe to SATA bridge. In case you planed to use the device as a mini PC connected to your printer, you may want to know Printing settings are missing.
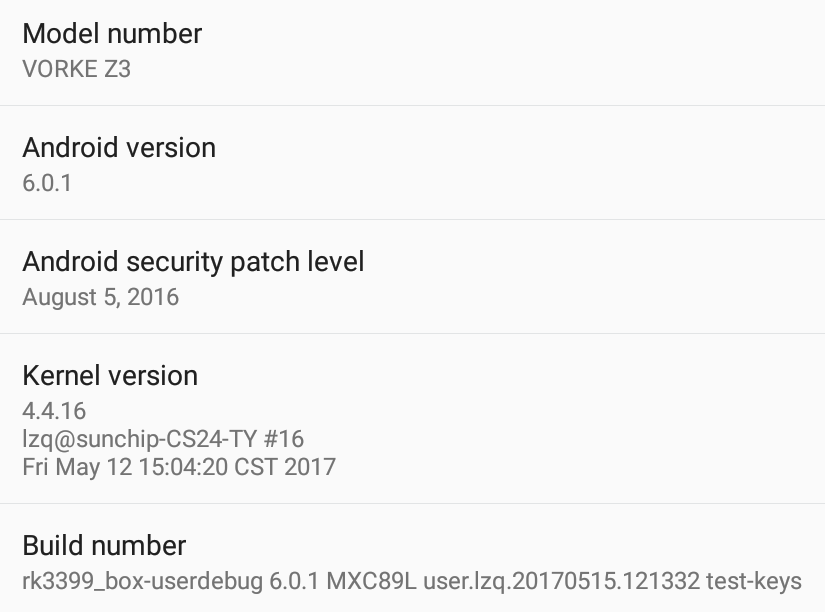
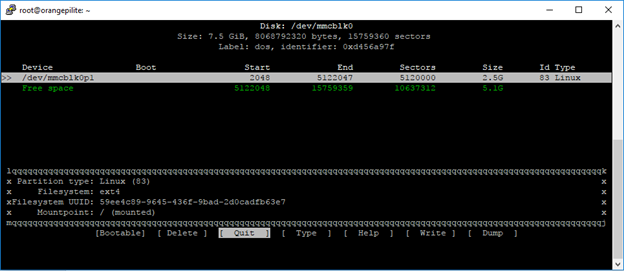
The About section shows the device name is indeed VORKE Z3, and it runs Android 6.0.1 on top of Linux 4.4.166 with the Android security patch dated August 2016. The build machine’s hostname is sunchip-CS24-TY, so it’s quite possible Sunchip is being the software and hardware design. Two versions of the firmware are available with either root or no root, so you could install the one you prefer using AndroidTool (Windows) or upgrade_tool (Linux).

The IR remote control is pretty basic, and I assume most people will used the own input device be it a an air mouse or the smartphone app. It did the job but only up to 4 meters, farther than this, and some key presses will be missed. I had no troubles installing apps via Google Play and Amazon Underground stores.

It’s not possible to cleanly power off the device with the remote control, only the mechanical switch on the back can do this, so instead you can only go in or out of standby.  I measured the power consumption with or without SATA and/or USB hard drive(s) attached in power off, standby, and idle modes:

  • Power off – 0.0 Watt
  • Standby – 5.1 Watts
  • Idle – 5.1 Watts
  • Power off + USB HDD – 0.0 Watt
  • Standby + USB HDD – 8.1 Watts
  • Idle + USB HDD – 9.1 Watts
  • Power off + USB HDD – 0.0 Watt
  • Standby + USB HDD – 10.3 Watts
  • Idle + USB HDD – 11.2 Watts

After playing a 2-hour H.264 video in Kodi, I measured maximum temperatures of 37 and 40°C on the top and bottom of the case with an IR thermometer, but the temperature felt a little higher than that when touching the surface with my hand, maybe it’s made of a material that interferes with measurements. After playing Riptide GP2 for around 15 minutes, the temperatures went up a little to 39 and 42°C, and gameplay was OK overtime, but only similar to what I experience on Yundoo Y8 or Amlogic S912 TV Boxes, and not as smooth as on Xiaomi Mi Box 3 Enhanced. CPU-Z always reports 26 °C, so it’s not usable as an alternative temperature measure. I also noticed the box got quite hot (44 °C with IR thermometer) when I turned off the display, and let the UI in the launcher doing nothing. I did not notice any sharp drop in performance during use, but thermal throttling is happening as we’ll see in the Benchmark section.

I like the SATA port and USB type C port supporting data and video in Vorke Z3, and I found the firmware to be rather stable and very responsive. However, there are many small issues like no clean power off, HDMI setting is not remembered properly, so settings like Printing, CEC, Audio device, and automatic frame rate switching are missing from the main Setting app. The IR remote control does not feel very good either, and range was rather short.

Kodi & RKMC Video Playback, DRM Info, and YouTube

Kodi is not installed so I went to the Google Play store to install Kodi 17.3, and naively expected most videos to play fine. Those are my results for 4K video samples:

  • HD.Club-4K-Chimei-inn-60mbps.mp4 – OK, but not perfectly smooth
  • sintel-2010-4k.mkv – Stays in UI
  • Beauty_3840x2160_120fps_420_8bit_HEVC_MP4.mp4 (H.265) –  OK
  • Bosphorus_3840x2160_120fps_420_8bit_HEVC_MP4.mp4 (H.265) – OK
  • Jockey_3840x2160_120fps_420_8bit_HEVC_TS.ts (H.265) – Stays in UI
  • MHD_2013_2160p_ShowReel_R_9000f_24fps_RMN_QP23_10b.mkv (10-bit HEVC, 24 fps) – OK
  • phfx_4KHD_VP9TestFootage.webm (VP9) – ~5 fps (software decode)
  • BT.2020.20140602.ts (Rec.2020 compliant video) – Stays in UI
  • big_buck_bunny_4k_H264_30fps.mp4 – OK
  • big_buck_bunny_4k_H264_60fps.mp4 – Slideshow + audio delay  (4K H.264 @ 60 fps is not supported by the VPU in Rockchip RK3399 SoC)
  • Fifa_WorldCup2014_Uruguay-Colombia_4K-x265.mp4 (4K, H.265, 60 fps) – OK
  • Samsung_UHD_Dubai_10-bit_HEVC_51.4Mbps.ts (10-bit HEVC / MPEG-4 AAC) – Stays in UI
  • Astra-11479_V_22000-Canal+ UHD Demo 42.6 Mbps bitrate.ts (10-bit H.265 from DVB-S2 stream) – Stays in UI
  • 暗流涌动-4K.mp4 (10-bit H.264; 120 Mbps) – First try: Kodi hangs; Second try: ~2fps + artifacts (software decode)
  • Ducks Take Off [2160p a 243 Mbps].mkv (4K H.264 @ 29.97 fps; 243 Mbps; no audio) – HDD: OK
  • tara-no9-vp9.webm (4K VP9 YouTube video @ 60 fps, Vorbis audio) – ~5 fps, massive artifacts (software decode)
  • The.Curvature.of.Earth.4K.60FPS-YT-UceRgEyfSsc.VP9.3840×2160.OPUS.160K.webm (4K VP9 @ 60 fps + opus audio) – ~5 fps, massive artifacts (software decode)

Wow… I don’t think I can remember any platform that failed that badly. But I usually use the pre-installed Kodi app, which in this case was missing, so maybe that’s why. I’ll give up on Kodi 17.3 for now, but I remember somebody mentioned RKMC 16.1 would work better on Rockchip device. I did some research, and installed RKMC in the box. I made some mistake doing so, reinstalled the firmware and lost all my screenshots in the process. So maybe sure you backup any files before messing with the system partition or config files.

But what about the results with RKMC and my 4K videos samples?:

  • HD.Club-4K-Chimei-inn-60mbps.mp4 – OK, but not perfectly smooth
  • sintel-2010-4k.mkv – OK, but not perfectly smooth
  • Beauty_3840x2160_120fps_420_8bit_HEVC_MP4.mp4 (H.265) –  Crash
  • Bosphorus_3840x2160_120fps_420_8bit_HEVC_MP4.mp4 (H.265) – Crash
  • Jockey_3840x2160_120fps_420_8bit_HEVC_TS.ts (H.265) – Stays in UI + hang
  • MHD_2013_2160p_ShowReel_R_9000f_24fps_RMN_QP23_10b.mkv (10-bit HEVC, 24 fps) – Crash
  • phfx_4KHD_VP9TestFootage.webm (VP9) – ~5 fps (software decode)
  • BT.2020.20140602.ts (Rec.2020 compliant video) – Stays in UI + hang
  • big_buck_bunny_4k_H264_30fps.mp4 – OK
  • big_buck_bunny_4k_H264_60fps.mp4 – Almost smooth + audio delay  (4K H.264 @ 60 fps is not supported by the VPU in Rockchip RK3399 SoC)
  • Fifa_WorldCup2014_Uruguay-Colombia_4K-x265.mp4 (4K, H.265, 60 fps) – Crash
  • Samsung_UHD_Dubai_10-bit_HEVC_51.4Mbps.ts (10-bit HEVC / MPEG-4 AAC) – Stays in UI + audio
  • Astra-11479_V_22000-Canal+ UHD Demo 42.6 Mbps bitrate.ts (10-bit H.265 from DVB-S2 stream) – Stays in UI + audio
  • 暗流涌动-4K.mp4 (10-bit H.264; 120 Mbps) – OK (hardware decode)
  • Ducks Take Off [2160p a 243 Mbps].mkv (4K H.264 @ 29.97 fps; 243 Mbps; no audio) – HDD: OK
  • tara-no9-vp9.webm (4K VP9 YouTube video @ 60 fps, Vorbis audio) – ~5 fps, massive artifacts (software decode)
  • The.Curvature.of.Earth.4K.60FPS-YT-UceRgEyfSsc.VP9.3840×2160.OPUS.160K.webm (4K VP9 @ 60 fps + opus audio) – ~5 fps, massive artifacts (software decode)

So H.265 video won’t play, VP9 will, but are unwatchable with software decode, and only H.264 videos are playing relatively well.

I got more insights in my RKMC post with Superceleron commenting:

Well don’t expect miracles, besides that is a old kodi fork dont have python 2.7 and it have subtitles security flaw.
On my tests, on A7 version of rk sdk use kodi 18 nightly it will play ok almost all codecs. (i just made a custom rom for A95X-R2 so i know it plays it ok)
On A6 forget it, i had to make some mix custom roms to make it work with FTMC.. it now plays almost all codecs (it crashes with RKCodec on H264 10bits, but mediacodec play ok but max 720p)
Rockchip never learns….

and

Yes need to wait for it, or simple try one of my roms for 3399 like for the Yundoo Y8 or H96 Max.
It will work lot better than stock, i fixed the play of VP9 in Hw in FTMC but still crash in H264 10bits, and cant play Youtube 4k due to codec issue!

So at this stage, I’d recommend not to buy any Rockchip RK3399 TV box if you want to play videos in Kodi, and wait for Android 7.1 firmware which is expected sometimes in the next few weeks or months. If you already have one, and/or are ready to waste some time, you could try TVMC that works somewhat in Yundoo Y8, or use one of the aforementioned ROMs on Freaktab.

I’ll skip video testing in this review, and if time permits perform tests again once Android 7.1 firmware and Kodi 18.0 are released.

Click to Enlarge

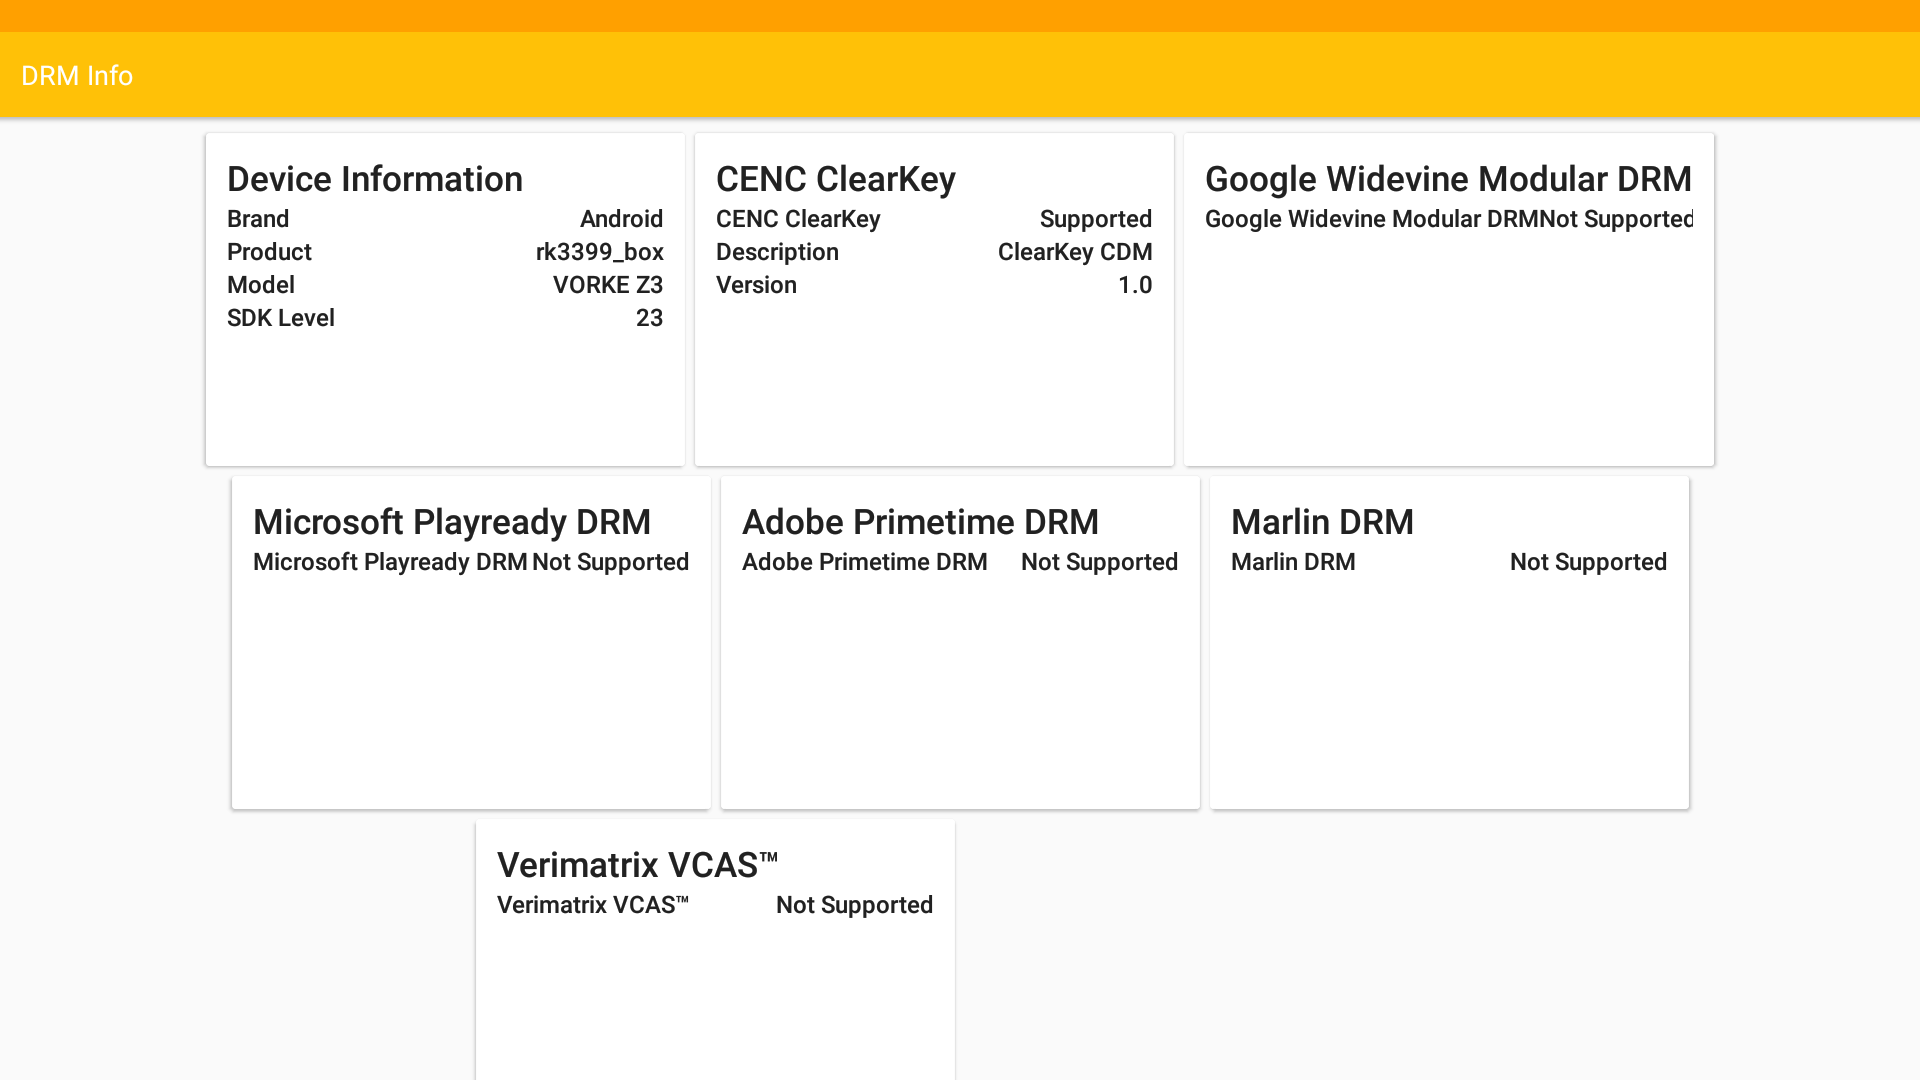
I still checked DRM info, and there’s no DRM support at all, except for something called CENC ClearKey.

YouTube worked well for me up to 1080p. Video is rendered to the framebuffer (I can take screenshot of it), which should explain the resolution limitation, and mean that it’s likely using software decode.

Network Performance (Wi-Fi and Ethernet)

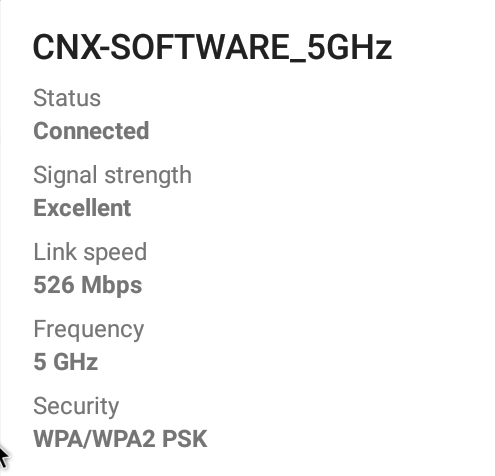
As I connected to my 802.11ac router, I noticed the Link Speed was 526 Mbps when I checked, so better than the usual 433 Mbps you get on most other devices.
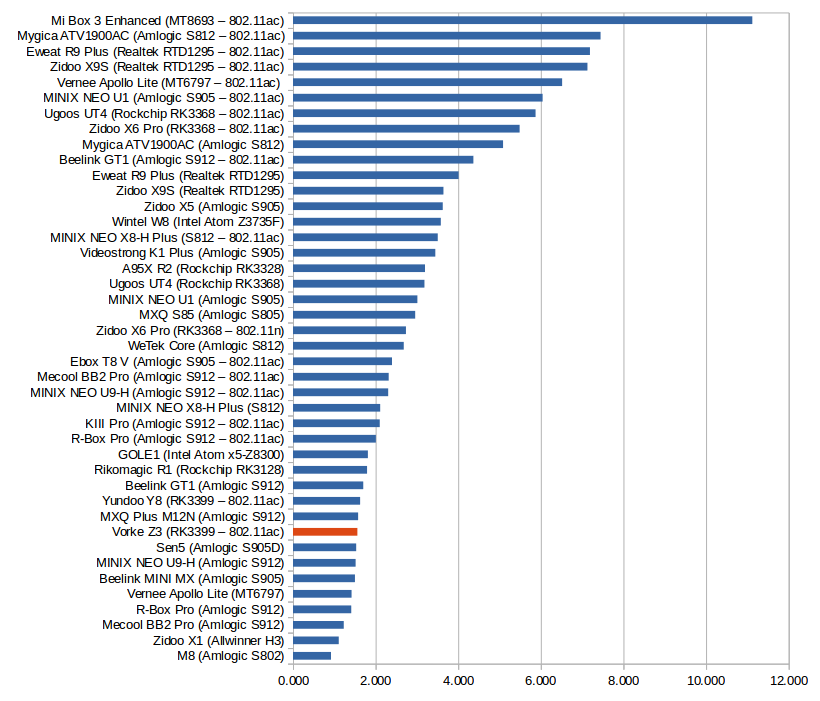
I first tested WiFi 802.11ac throughput by transferring a 278MB file beetween SAMBA and the internal flash and vice versa using ES File Explorer. There’s again a serious problem with SAMBA implementation, as download speed was fairly good @ 3.00 MB/s, but upload speed drop to 1.06 MB/s only, leading to a well below average average speed.

Throughput in MB/s

But iperf tests below show 802.11ac performance is actually quite good in both directions, so the real problem is with SAMBA implementation/configuration in the firmware.

WiFi 802.11ac upload:

[ 5] local 192.168.0.104 port 5001 connected with 192.168.0.111 port 49644

[ 5] 0.0-60.0 sec 1.12 GBytes 160 Mbits/sec

WiFi 802.11ac download:

1

2

3

4

5

6

Client connecting to 192.168.0.111, TCP port 5001

TCP window size: 85.0 KByte (default)

[ 3] local 192.168.0.104 port 49450 connected with 192.168.0.111 port 5001

[ ID] Interval Transfer Bandwidth

[ 3] 0.0-60.0 sec 1.55 GBytes 222 Mbits/sec

I repeated the SAMBA test with a larger 885 MB file over Gigabit Ethernet, and I confirmed the same issue as it took 49 seconds to upload the file from the server, and 1 minute and 52 seconds to upload the file.

I also run iperf again for Gigabit Ethernet using full duplex option:

1

2

3

4

5

6

7

Client connecting to 192.168.0.112, TCP port 5001

TCP window size: 382 KByte (default)

[ 6] local 192.168.0.104 port 49838 connected with 192.168.0.112 port 5001

[ ID] Interval Transfer Bandwidth

[ 6] 0.0-60.0 sec 2.44 GBytes 349 Mbits/sec

[ 4] 0.0-60.0 sec 4.65 GBytes 666 Mbits/sec

I was expecting higher numbers, but those values will be good enough for most people.

Storage Performance

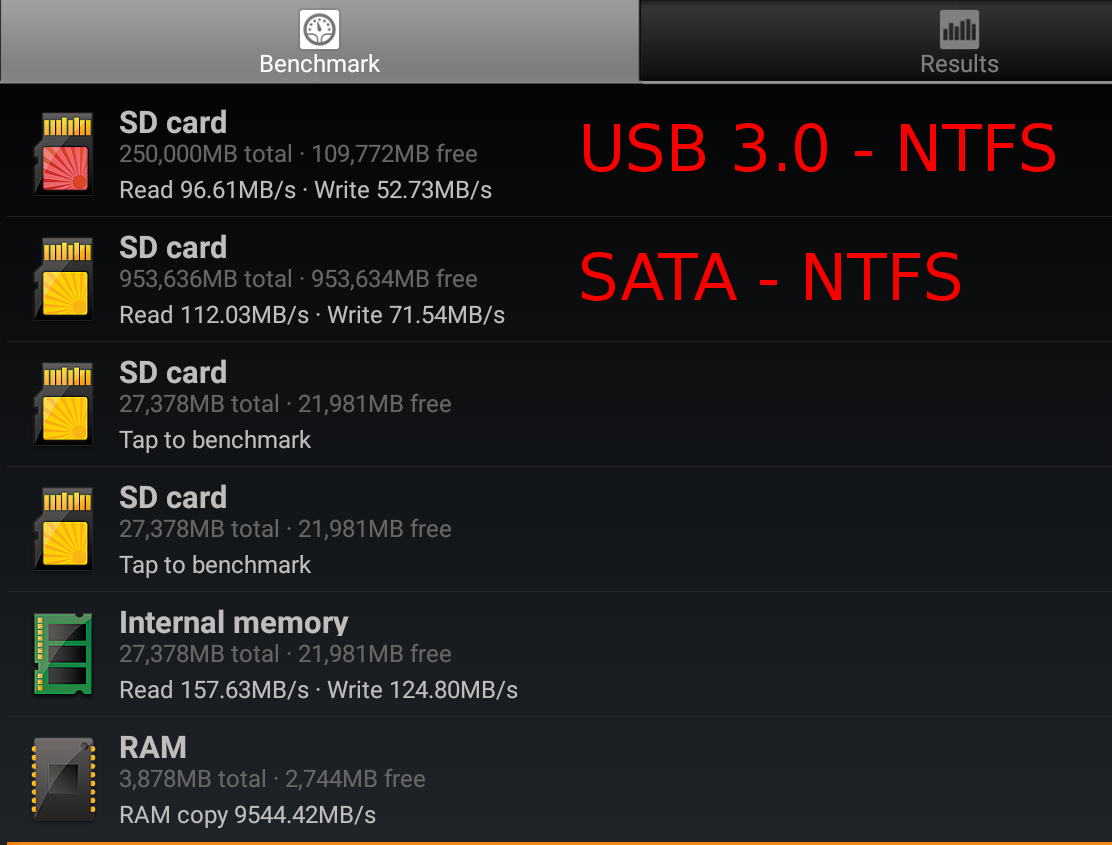
I used A1SD Bench to evaluate sequential performance of internal storage, USB 3.0 and SATA interfaces.

Click to Enlarge

In theory, the Samsung eMMC flash used is very good, and results from the benchmark confirm this with 157.63 MB/s read speed, and 124.80 MB/s write speed. That’s the best performance I’ve ever gotten from an Android device.
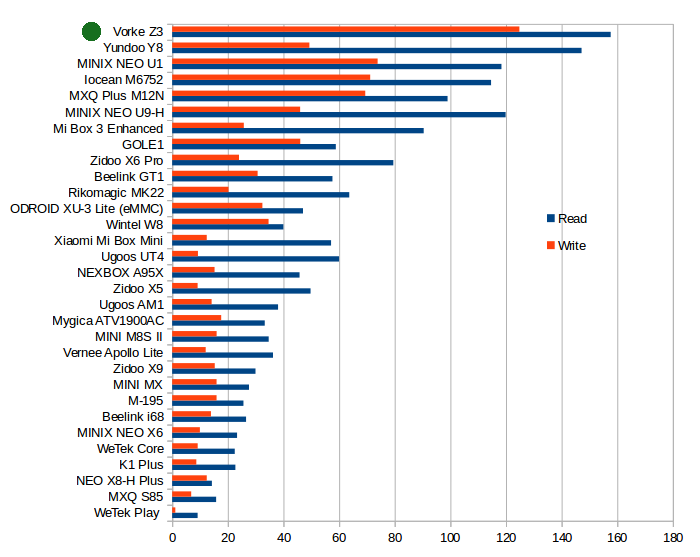
Read & Write Speeds in MB/s – Click to Enlarge

Sure enough, I never had troubles with “app is not responding” or app beings slow to load.

USB 3.0 and SATA performance is also pretty solid, especially sequential read speed. Write speed was actually 100 MB/s the first time I tried with SATA, but after I had to reinstall the firmware, I never managed to get back to that result with the speed limited to around 72 MB/s.
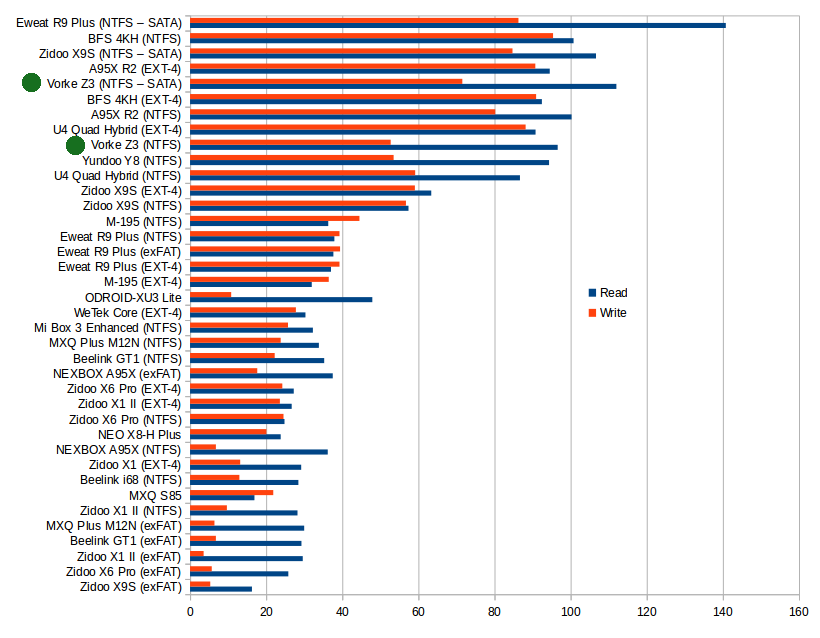
Read & Write Speeds in MB/s – Click to Enlarge

Nevertheless, results are fairly good, and SATA should provide a little more performance than USB 3.0.

Vorke Z3 Benchmark & System Info

CPU-Z reports a dual cluster “RK3066” processor with two Cortex A72 cores @ 1.99 GHz, and four Cortex A53 cores @ 1.51 GHz, and an ARM Mali-T860 GPU.

Click to Enlarge

VORKE Z3 (rk3399_box) uses a 1920×1080 framebuffer resolution, comes with 3878MB total RAM (the rest being used by hardware buffers), and 26.74 GB interface storage.

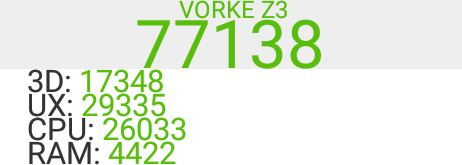
Antutu 6.x score varies a lot between 69k and 78k due to thermal throttling. But if I run the benchmark right after boot, I get the result below, roughly the same as Yundoo Y8 one (76,819 points).

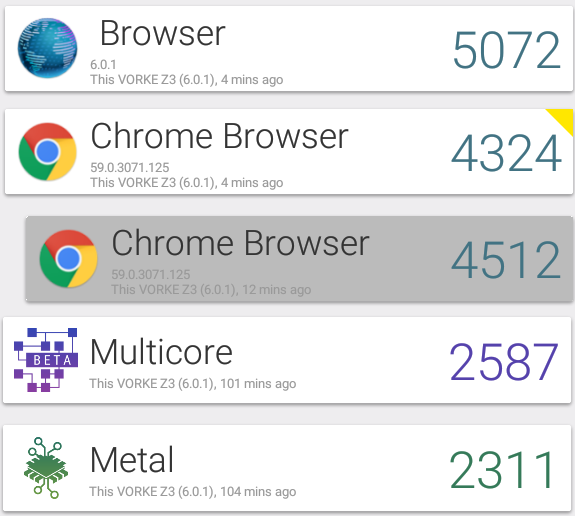
Vellamo 2.x results would also varies due to thermal throttling, but also because for some reasons SunSpider test would fail to run from time to time, as shown by the yellow mark on the first Chrome Browser test.
For some reasons, Chrome Browser result is much lower (4,512) compared to the 5,275 points I got with Yundoo Y8, but Multicore (2,587 vs 2,492) and Metal (2,311 vs 2,332) results are roughly the same.

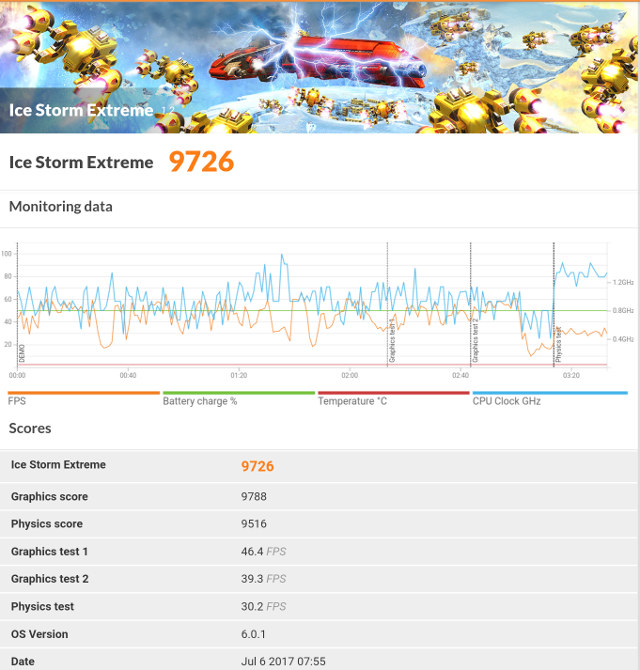
3DMark’s Ice Storm Extreme results was also slightly lower with 9,726 points compared to 9,906 points for Yundoo Y8.

Click to Enlarge

At one point I only got 6,7xx points, but it was not because of overheating, and was instead due to the system randomly changing resolution and refresh rate, with the video output set to 3840×2160 @ 30 Hz at the time, limiting the framerate to 30 fps max.

Conclusion

I did not have the best experience with Vorke Z3 due to my struggle with Kodi and RKMC, and various smaller issues like HDMI output resolution & framerate randomly changing between reboots, lack of proper power off mode, some overheating, etc… But there are also some positives like excellent internal storage performance, good USB 3.0 and SATA performance, a USB type C port supporting data, and video output, and very good WiFi performance, so I’m hoping the upcoming Android 7.1 Nougat firmware will greatly improve the device usefulness.

PROS

  • Good overall performance and stable firmware
  • Fastest internal storage I’ve seen in any TV box
  • Fast USB 3.0 and SATA interfaces for external storage
  • Very good 802.11ac WiFi performance
  • USB type C port with support for data and video output (via an external dock).
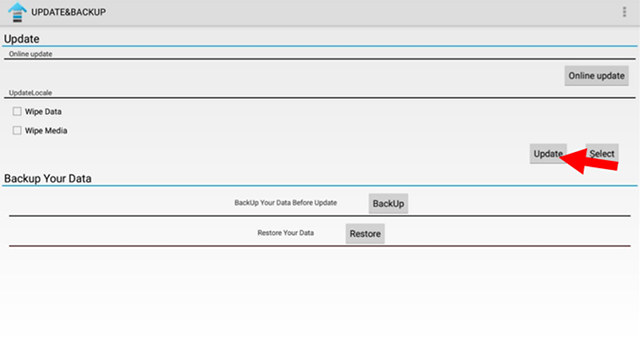
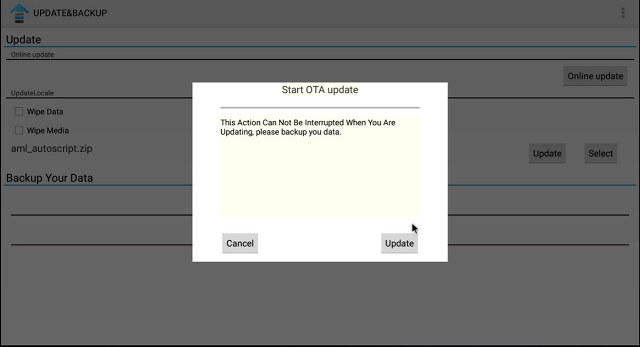
  • OTA firmware update appears to be supported

CONS

  • The device is unusable with Kodi 17.3, or RKMC with most videos failing to play properly
  • Overheating leading to CPU / GPU throttling (The performance degradation is noticeable in benchmarks, but I have not really experienced it during normal use after playing a 2-hour video, or playing games for 15 minutes)
  • HDMI video output setting is not properly remembered, and it may be 720p, 4K30, 1080p60 at next boot.
  • No clean power off mode (mechanical switch only)
  • Only NTFS and FAT32 files systems are supported, no EXT-4, no exFAT
  • Lack of DRM support
  • Poor upload speed to SAMBA server

GeekBuying sent the device for review, and in case you are interested you could buy Vorke Z3 for $158.99 shipped on their website. You’ll also find the device from various sellers on Aliexpress.

Tweet Vorke Z3 is another mini PC / TV box powered by Rockchip RK3399 hexa core processor with two Cortex A72 cores, and two Cortex A53 cores making it theoretically…

MASS RPI 07 is a 7″ Industrial Touch Panel PC Based on Raspberry Pi 3

$
0
0

MASS GmbH has launched RPI 07, a touch panel PC with a 7″ 800×480 display powered by a Raspberry Pi 3 board, and designed for industrial applications thanks to a 12V to 24V variable power input, aluminum housing, DIO with optocouplers, an optional CAN Bus and more.

MASS RPI-07 specifications:

  • SoC – Broadcom BCM2837 quad core ARM Cortex A53 processor @ up to 1.2 GHz with VideoCore IV GPU
  • System Memory – 1GB LPDDR2
  • Storage – 16GB micro SD SDHC Class 10
  • Display – 7″ WVGA 800×480 touchscreen display with 250cd/m² brightness, 500:1 contrast, 10-point touch
  • Connectivity – 1x 10/100Mbps Ethernet, 802.11 b/g/n WiFi and Bluetooth 4.2 LE
  • USB – 4x USB 2.0
  • Optional Interfaces – Real-time clock (RTC), DIO with optocouplers, I²C, CAN, RS232
  • Power supply – 12 to 24V DC (15W max) via 2-pin terminal with on/off switch
  • Dimensions – 200 x 118 x 48mm (powder coated metal housing)
  • Weight – 900 grams
  • Certifications – CE

Hardware options include VESA 75 mount with pivot arm or foot,holding clamp for mounting in consoles, control cabinet doors or wall recessing, digital input card 8-bit with optocouplers, digital output 8-bit card with optocouplers, analog input card 5 channel 10-bit, and analog output card 4 channel 10-bit.

The company supports Raspbian and Microsoft Windows IoT Core for the panel PC, with other operating systems available on requests.

The company has not released availability and pricing information for the RPI 07. You may find more details on the product page.

Via LinuxGizmos

Tweet MASS GmbH has launched RPI 07, a touch panel PC with a 7″ 800×480 display powered by a Raspberry Pi 3 board, and designed for industrial applications thanks to…

$89 Sapphire BP-LX210KL Board is Powered by AMD G-Series LX Dual Core Processor

$
0
0

Mentor Embedded will regularly organize webinars to show how to use or leverage their embedded Linux distribution, but their latest upcoming webinar entitled “Deploying Embedded Linux on an AMD LX-based sub-$100 Sapphire LX210 board” caught my eyes simply because there aren’t that many low cost AMD boards. The only ones I can think of are Gizmo 2 board sold for $200, as well as some PC Engines boards starting at $106 and mainly designed for headless applications.

It took me several attempts on DuckDuckGo and Google, before finding Sapphire LX 210 product page. It’s even unclear how the board is called, as the company refers to it as BP-LX210KL at times, and BP-FT3bGS or BP-210KL in other instances. Preliminary specifications:

  • SoC – AMD G-series LX210 dual core processor with Radeon GPU supporting DirectX 11.1, OpenGL 4.2 and OpenCL.2 manufactured using 28nm process technology
  • System Memory – 2x DDR3 SO-DIMM up to 16GB (Non-ECC)
  • Storage – 1x mSATA
  • Video Output – Dual HDMI outputs with support for 2 simultaneous (independent) displays
  • Audio – Via HDMI, 1x combo audio jack
  • Connectivity – Gigabit Ethernet via Realtek RTL8111F PCIe chip
  • USB – 2x USB 3.0 ports, 2x USB 2.0 ports
  • Expansion – 1x mini PCIe slot
  • Misc – RTC with battery
  • Power Supply – 19V/3.42A
  • Dimensions – 100 x 100m (4″ x 4″)

BP-LX210KL is said to be “ideal” for very cost sensitive applications like thin clients, POS terminals, media players, digital signage, kiosks and industrial displays. Two versions of the board are available:

  • 52053-25-40G – Motherboard with heatsink, driver DVD, quick installation guide, Mentor Linux postcard?, and Mentor Linux document
  • 52053-26-40G – Same as above plus 4GB DDR3 @ 1600 MHz,  19V/3.42A power supply, US type power cord, and 16GB USB pen drive

The company is serious about cooling with that very large heatsink, so I wonder what kind of TDP the processor has.. There’s no actual “AMD LX210KL” processor that I could find, so I checked AMD G-Series LX product brief, and either that’s a new unannounced processor, or they are using AMD GX-210KL dual core processor shown in the table below.

Click to Enlarge

However, that’s a 4.5W TDP SoC so the heatsink seems to be quite oversized, and the max DDR3 speed is 1333 MHz, so maybe it could be a new SoC from LX family after all. They’ll provide an overview of the board in the webinar on July 19th, so we’ll certainly know more at that time.

The price of the board is said to be $89 only, to which you’d need to add you own storage and memory. G-Series LX family is an update to AMD Geode LX family, so you should not expect mazing performance, but the price, and I/Os still make it an interesting board.

Tweet Mentor Embedded will regularly organize webinars to show how to use or leverage their embedded Linux distribution, but their latest upcoming webinar entitled “Deploying Embedded Linux on an AMD…

Qualcomm Snapdragon 212 Boards – Intrinsyc Open-Q 212 and Kaynes Technology SKATE-212

$
0
0

Qualcomm Snapdragon 212 (APQ8009) quad core Cortex A7 processor is used in entry-level smartphones, but it’s also one of the processors which the company expects to use in their Smart Speaker Platform leveraging Google Assistant, Amazon Alexa, and other A.I. voice services. Two company has designed single board computers that can be used for this purpose: Intrisync Open-Q 212 and Kaynes Technology SKATE-212.

Intrisync Open-Q 212 SBC Development Board

Contrary to some other Open-Q board, but not all, Open-Q 212 is not comprise of a baseboard and a system-on-module, as everything is soldered on a single PCB. Open-Q 212 specifications:

  • SoC – Qualcomm Snapdragon 212 (APQ8009) quad core ARM Cortex A7 processor @ 1.267GHz with Adreno 304 GPU, QDSP6 DSP
  • System Memory – 1GB LPDDR3
  • Storage – 8GB eMMC (non-POP) flash and micro SD card socket
  • Connectivity – Ethernet,  pre-scanned Wi-Fi 802.11n 2.4Ghz (WCN3610) with chip and U.FL antennas, Bluetooth 4.1 LE
  • Display – Up to 720p LCD; up to 720p HDMI Type A
  • Video Codec – [email protected] playback; up to 720p playback with H.264 (AVC) and H.265 (HVEC); up to 720p H.264 (AVC) capture
  • udio
    • WCD9326 audio codec
    • 4x microphone inputs
    • 2x amplified speaker outputs, 2x stereo line outputs
    • Qualcomm Fluence HD with Noise Cancellation, Qualcomm Snapdragon Voice Activation, Qualcomm Snapdragon Voice+
  • Cameras – Up to 8MP over 2-lane MIPI CSI
  • Misc – Serial,  RTC, I2S, GPIO, Sensor header
  • Power Supply
    • 12V/3A or single-cell Li-Ion battery
    • PMIC (PM8208) and Li-Ion battery support (SMB1357/STC3117)
  • Dimensions – 120mm x 120mm (Nano-ITX form factor)
  • Temperature Range – 0oC to +70oC

The board support Android 7 Nougat by default, but you’d have to give them call to ask for Linux support, and possibly pay some NRE fees.

Intrinsyc is not exactly known for their cheap development boards and SBCs, and while they call it a low cost board, it’s sold for $595 without LCD, microphones, and cameras, and with shipping scheduled for the end of July. You’ll find more info on the product page.

Kaynes Technology SKATE-212 SBC

Click to Enlarge

SKATE-212, made by an Indian embedded systems and manufacturing company, is likely to be quite cheaper, but I could not find any picture for now, only the block diagram above, and the specifications:

  • SoC –  Qualcomm Snapdragon 212 quad core Cortex A7 @ 1.3GHz with Adreno 304 GPU supporting OpenGL ES 3.0, OpenCL, DirectX
  • System Memory – 1 GB LPDDR3 (Expandable upto 2GB)
  • Storage – 8 GB eMMC flash (Expandable upto 16GB) +  micro SD slot
  • Video Output / Display  – 7″ capacitive touchscreen, full size HDMI port (Only one or the other can be used at a given time)
  • Connectivity – 10/100M Ethernet, 802.11 b/g/n WiFi + Bluetooth 4.x LE, GPS with optional GLONASS support
  • USB – 1x micro USB device port (Can not be used at the same time as Ethernet, and other USB host ports), 2x USB 2.0 host ports, 1x micro USB debug console
  • Camera –  8 MP primary camera; 2MP secondary camera
  • Audio
    • Mono loudspeaker output
    • 3.5mm stereo audio jack with mic
    • On board single (default)or dual microphone
  • Sensors – 6-axis MEMS gyroscope & Accelerometer;3-axis Magnetometer
  • Power supply – 12VDC power adapter or optional 3.7V/2,500 mAh battery
  • Dimensions – 90 x 70 mm

The company explains the board is well suited for Android or Linux based applications for industrial, medical, IIoT, mission critical and surveillance verticals. The 7″ LCD display and 8MP OV8865 camera module will be sold as options.

Availability and price are not known at this stage. You may want visit the product page for a few more details, and possibly request more documents by email via the Documents tab on the page.

Tweet Qualcomm Snapdragon 212 (APQ8009) quad core Cortex A7 processor is used in entry-level smartphones, but it’s also one of the processors which the company expects to use in their…


HT-01 “Helping Hand” Soldering Stand Comes with 6 Arms, a USB powered Fan

$
0
0
Home > Hardware > HT-01 “Helping Hand” Soldering Stand Comes with 6 Arms, a USB powered Fan

HT-01 “Helping Hand” Soldering Stand Comes with 6 Arms, a USB powered Fan

I have a “helping hand” in my office with two flexible arms and alligator clamps, and a magnifier that I use sometimes to solder or unsolder components more easily. The metallic arm are not always easy to put in the right position, and the base is not always heavy enough, but it does the job most of the time. But I’ve just come across with a helping hand station with 6 flexible gooseneck arms that may allow for more positions and easier setup, as well as hold a USB powered fan to such out fumes or blow them away, and/or a lamp.

HT-01 soldering station features:

  • Aluminum alloy base – 140 x 100 x 12mm (purple or black)
  • 6x universal joint pipe of 300mm length with alligator clip
  • 1  5V USB output regulator plate with two USB ports up to 5V/3A to connect fans
  • 1x 5V USB Fan
  • 1x Soldering Iron Holder
  • Power Input  for battery?
  • Product weight – 580g

I first found it on GeekBuying for $41.99 shipped, but there are similar designs minus the USB ports, on Amazon US and Banggood. The video shows an unboxing and short test of the model sold on Banggood.
[embedded content]

Tweet I have a “helping hand” in my office with two flexible arms and alligator clamps, and a magnifier that I use sometimes to solder or unsolder components more easily….

1btn is a Battery Powered Open Source ESP8266 WiFi Button

$
0
0

If you have some WiFi power switch like Sonoff TH16 at home, you’d normally control them using a mobile app or a web interface. This is all good, but getting your phone, unlocking it, and launching the app to turn on or off an appliance is not the most efficient way to operate, and in some cases, some people in the household may not know how to use a smartphone. Physical WiFi buttons are the solution, but there aren’t so many for sale. We’ve seen previously it was possible to hack an Amazon Dash, but it’s not really that flexible, and 1btn could potentially be a better option, as it’s open source and based on Espressif ESP8266 WiSoC.

1btn specifications:

  • WiFi Module – ESP-12F based on Espressif ESP8266
  • MCU – Microchip Atmel ATmegaxx8 AVR MCU
  • Connectivity – 802.11 b/g/b WiFi up to ~50 meter range
  • USB – 1x USB port for charging and programming (via on-board USB to Serial chip)
  • Misc – User button, multi-color LED, power on/off switch
  • Expansion –
    • AVR MCU – 2x 8-pin headers with ADC, I2C, SPI, RESET, 3.3V, and GND signals
    • ESP8266 – 1x 8-pin header with GPIO, Tx/Rx signals, 3.3V and GND signals
  • Battery – Rechargeable 3.7V/500mAh battery
  • Dimensions – Around 60 mm side to side
  • Weight – ~50 grams

The hardware design files, mechanical design, and NodeMCU (Lua) based firmware can all be found on Github, releases under an MIT license. The button can be used to send an email, text message (via Twilio SMS), or a tweet, as well as invoke an URL action allowing to use all sort of APIs and services such as IFTTT.

[embedded content]
The Atmel MCU is used to keep battery life under check, as the button will only connect to WiFi then you press the button. It takes about 5 to 7 seconds to wake up from sleep, and send the message, after which the button goes back to sleep. The battery will last around 300 presses before it needs to be recharged, or about 5 months if you use the button twice a day.

1btn sells on Tindie for $40 plus shipping. That’s a little more than expected, so tried to look for alternative beside Amazon Dash, and I found “ESP8266 IFTTT WiFI Button Dev Kit” – aka Abutton – on Aliexpress going for $13.43 shipped. The button can be re-programmed with custom firmware, and is based on Apixel  ESP8266 dev board with an ESP8266, but not MCU, so it has to rely on ESP8266 low power mode, so battery life is likely to be quite lower than 1btn. Talking about batteries, there are none, and instead there’s a compartment for 2 AA batteries. The Arduino or NodeMCU source code for Abutton can also be found on Github.

Click to Enlarge

WiFi is not exactly the ideal wireless solution for this, that’s maybe why Bluetooth buttons are much more common, and quite cheaper, so maybe having a ESP32 wireless power switch with WiFi and Bluetooth, plus a BT button would be both a better and cheaper solution. The only problem is that AFAIK ESP32 wireless switches don’t exist right now, except in board form factor, and not in a neatly packaged product like the Sonoff switch.

Tweet If you have some WiFi power switch like Sonoff TH16 at home, you’d normally control them using a mobile app or a web interface. This is all good, but…

Jolla Tablet Take 2 – Youyouta Tablet Runs Linux Based Sailfish OS 2.1 Operating System (Crowdfunding)

$
0
0

Jolla Tablet running Linux based Sailfish OS was launched in 2014 via Indiegogo, and the campaign was initially very successful having raised over 2.5 million dollars, but eventually it became a disaster as the company had some financial issues, and the tablet was canceled with on a few backers having received their tablet. The company eventually organized a refund program, so it did not end up being as bad as it first seemed. But there’s now a “new” SailFish OS tablet – Youyouta tablet – that has been launched on Indiegogo last month.

Jolla is not handling the manufacturing and campaign, and instead it’s done by a third party who is paying license fees to Jolla for Sailfish OS. They re-used most parts of the hardware design from original Jolla tablet plus a few modifications like option for higher storage capacity:

  • SoC – Intel Atom Z3735F quad core “Bay Trail” Processor  @ 1.33/1.83 GHz with Intel HD Graphics
  • System Memory – 2GB DDR3L-RS
  • Storage – 32GB or 64GB eMMC + micro SD slot up to 256 GB (ext-4)
  • Display – 7.85″ IPS display, 2048 x 1536 resolution, 5-point capacitive touch
  • Camera – 5.0MP rear camera with 1080p video capture, 2.0MP front-facing camera
  • Audio – 3.5mm audio jack + speaker(s)
  • Connectivity – Dual band 802.11 a/b/g/n Wi-Fi, Bluetooth 4.0, GPS with A-GPS and GLONASS
  • USB – 1x micro USB OTG port
  • Sensors – Accelerometer, light sensor, gyroscope, compass, and hall sensor
  • Battery – 4,500 mAh
  • Dimensions – 203 x 137 x 8.3 mm
  • Weight – 385 grams

The tablet runs the latest Sailfish OS 2.1  operating system with support for Android apps, Microsoft Exchange Active Sync, text prediction, gesture control, and multitasking.

While the crowdfunding campaign has not been quite as successful as the previous one, as some people have been burned once, and the hardware is rather low-end in 2017, the campaign has already surpassed the $50,000 funding target with around $60,000 raised with 12 days to go, so mass production – by Foxconn – will go ahead. a $199 pledge should get your a black tablet with 32GB flash, while you’d need to pledge $219 to get the red or black version with 64GB flash. Other rewards are available with bundles include a Bluetooth keyboard, and protective cover. Shipping adds $30, and the tablet is expected to ship right after the crowfunding campaign is over in September 2017.

Tweet Jolla Tablet running Linux based Sailfish OS was launched in 2014 via Indiegogo, and the campaign was initially very successful having raised over 2.5 million dollars, but eventually it…

Opus 1.2 Allows for High Quality Stereo Music @ 32 Kbps, Speech @ 12 Kbps

$
0
0

The Xiph.Org Foundation has recently announced the release of Opus 1.2 open source audio codec with ever lower high-quality audio bitrate for music (32 Kbps) and speech (12 Kbps), faster encoding and decoding, and other tweaks to the standard and library. If you’ve never heard about Opus or need to refresh your memory, you may want to read my previous article about Opus Open Source Audio Codec.

The developers improve music quality by “adjusting the bit allocation trim, improving tonality analysis with better frequency resolution, and improving quality  on signals with a few very powerful tones”. You can compare Opus 1.0, 1.1 and 1.2, and MP3 at different bitrates with the samples below. You’ll need a browser that support Opus and MP3 in HTML5 for this to work (Chrome, Firefox and Opera do), or you may hear another samples as if Opus support is missing the file will be played as a very high bitrate MP3, and if MP3 support is missing, a very high bitrate Opus transcode will play instead.

Your browser does not support the audio tag.

Select codec/version

  • MP3 (LAME)
  • Opus 1.0
  • Opus 1.1
  • Opus 1.2
  • Uncompressed

Select bitrate

  • 32 kb/s
  • 48 kb/s
  • 64 kb/s
  • 96 kb/s

Select where to start playing when selecting a new sample


Speech has different requirements from music, and the developers improved the SILK and CELT encoders respectively handling up to 8 kHz, and 8 to 20 kHz in what they call hybrid mode. Opus 1.2 is said to add hybrid-specific tuning for both spreading and time-frequency resolution switching, and disables the use of the allocation trim. You can check out the samples below by yourself in browsers that support Speech and Opus.

Your browser does not support the audio tag.

Select codec/version

  • Speex
  • Opus 1.0
  • Opus 1.1
  • Opus 1.2
  • Uncompressed

Select bitrate

  • 12 kb/s
  • 16 kb/s
  • 24 kb/s
  • 32 kb/s

Select where to start playing when selecting a new sample


Beside improvements in quality at the same bitrate, or lower bitrate with the same quality, the encoder and decoders now operate faster on both ARM and x86 targets in most cases.

If you’d like to try it yourself, you can build the library and sample by adapting Opus build instructions to libopus 1.2.1.

Via XDA Developers

Tweet The Xiph.Org Foundation has recently announced the release of Opus 1.2 open source audio codec with ever lower high-quality audio bitrate for music (32 Kbps) and speech (12 Kbps),…

Lightank W100 is a Windows 10 Apollo Lake mini PC with Projector Sold in China

$
0
0

We’ve previously seen Windows 10 mini PCs with a projector based on Intel Cherry Trail processor such as Sunty SP-001 and Partaker M3, but there’s now an Apollo Lake model coming soon, at least in China, in an interesting form factor.LighTank W100 specifications:

  • SoC – Intel Celeron N3350 dual core Apollo Lake processor @ 1.10 / 2.40 GHz with 12EU Intel HD graphics 500 @ 200 / 650 MHz; (6W TDP)
  • System Memory – 4GB RAM
  • Storage – 32GB eMMC flash
  • Video Output – HDMI output
  • Audio – HDMI, stereo audio jack, microphone array
  • Projector – 1280×800 native resolution; 1000 ANSI lumens; 30,000 hours LED lifetime
  • Connectivity – Ethernet, WiFi and Bluetooth
  • USB – 1x USB 3.0 port, 2x USB 2.0 ports
  • Dimensions – 345 x 338 x 57 mm
  • Weight – 1.5 kg

The projector comes pre-isntalled with Windows 10 and Office365, and boots in 30 seconds. It ships with a keyboard, and mouse. There also appears to be a USB miracast adpater that you can connect to your laptop to easily mirror your display on the projector. The microphone array allows to use Skype for business or other videoconference applications in meeting.

The promotion video (in Chinese) shows some of the use cases and features of the projector.

[embedded content]

Lightank W100 will start selling for 4,999 RMB ($735) on JD.com on the 12th of July, but eventually it might be possible to purchase online worldwide via other e-retailers.

Via Liliputing, GizmoChina & Mydrivers

Tweet We’ve previously seen Windows 10 mini PCs with a projector based on Intel Cherry Trail processor such as Sunty SP-001 and Partaker M3, but there’s now an Apollo Lake…

Flic Hub Controls WiFi, Bluetooth, and IR Devices with Bluetooth LE Buttons (Crowdfunding)

$
0
0

This week-end, I wrote about 1btn open source WiFi button that can allow you directly control WiFi appliances, and/or set scenes without the need for a smartphone. We also discussed limitations of WiFi due to high power consumption, security issues and the one-way aspect of RF communication, and that Bluetooth 5 may be a better option for range and battery life if possible. Flic Hub is another way to approach the issue, as it combines Bluetooth LE buttons with a gateway supporting WiFi, Bluetooth, and infrared.

Flic Hub gateway specifications:

  • Connectivity – Bluetooth Classic, Bluetooth LE, WiFi, Ethernet, IR via optional add-on accessory.
  • Audio – 3.5mm audio out/mic in
  • Power Supply – 5V via micro USB
  • Power Consumption – 1.5W typ.
  • Security – SPARKE2+ Bluetooth encryption
  • Dimensions – 85 x 50 x 15 mm
  • Weight – 99 grams

Users can configure workflows by setting up Flic with IFTTT, Zapier, Microsoft Flow or even the HTTP request function in their apps. A Flic SDK for iOS and Android is also available, The Flib Hub runs Linux, and they encourage hacking it to fit your project/application.

You can control individual devices with the Hub, but also set scenes such as turning off light, blinds, and aircon, as well as locking with the door when you leaving by pressing once, and cancel this mode with two clicks when you comeback. It can also be used to order items online with one to multiple press, and short and long presses.

The Flic button has actually been around for a little while, as it was launched in 2015 via Indiegogo, and initially relied on your smartphone to act as a gateway. They added to Flic Hub to control more than just Bluetooth devices, and offer a more capable gateway working without smartphone, so for example you can now use up to 60 buttons, instead of just 8 with a smartphone, and anybody in your home can easily use the buttons.

The Flic buttons battery life has also been increased to up to 3 years. You can find reviews of the first Flic buttons without hub on sites like CNET, as well as somewhat mixed customers’ reviews on Amazon.

Flic Hub is now on Indiegogo with 10 days to go, and over $300,000 raised. If you already own some Flic buttons, you can pledge $69 to get the Flic Hub only, and if you plan to control IR devices too, then you’ll want to add the infrared accessory for a total of $79. If you are new to Flic, you may prefer option for Flic Hub with 3 buttons for $109, or $124 with the IR accessory. They also offer glow in the dark buttons for $59 (2 buttons) or $99 (4 buttons) that could be very useful in some situations. Shipping is free to the US, $10 to the European Union, and $15 to the rest of the world. Delivery is scheduled for October 2017.

Thanks to Leon for the tip.

Tweet This week-end, I wrote about 1btn open source WiFi button that can allow you directly control WiFi appliances, and/or set scenes without the need for a smartphone. We also…

U-blox SARA-R410M-02B Module Supports LTE Cat M1 and Cat NB1 in a Single Package

$
0
0

We previously covered U-blox SARA-R4 LTE Cat M1 and SARA M2 NB-IoT (Cat NB1) modules, but in case you need support for LTE Cat M1 and Cat NB1, instead of just one or the other, in your product, U-blox launched a new SARA-R4 model with SARA-R410M-02B module supporting both standards.

U-blox SARA-R410M-02B module specifications:

  • LPWAN connectivity
    • LTE Cat M1 Half-duplex: 375 kb/s DL and UL
    • LTE Cat NB1 Half-duplex: 27.2 kb/s DL, 62.5 UL
    • Shared bands – 1, 2, 3, 4, 5, 8, 12, 13, 17, 18, 19, 20, 25, 26, 28;  Cat M1-only band – 39
    • Coverage enhancement Mode A and Mode B (in upcoming firmware),
    • 3GPP Rel 13 e-DRX  (Extended Discontinuous Reception) supported in upcoming firmware
    • SMS support – MT/MO PDU / Text mode; SMS over SG/NAS
    • Voice – VoLTE (Cat M1) using AMR-WB codec
    • (U)SIM supporting 1.8 and 3V
  • GNSS/GPS support with CellLocate and Hybrid positioning coming in new firmware version
  • I/Os – 1x UART, 1x USB 2.0 HS, 1x SDIO master, 1x DDC (I2C), 1x SPI, up to 6 GPIOs
  • Power Supply – 3.3 to 4.3V; 3.8V nominal
  • Power Consumption – Power save mode: 8 μA; active mode: 8 mA; LTE connected mode: 105 to 125 mA
  • Package – 96 pin LGA;  26.0 x 16.0 x 2.5 mm; < 3 grams
  • Extended temperature range: –40 to +85°C
  • Certifications – FCC, ISED, IFETEL, GCF, RCM, CCC, SRRC, NCC, RED, PTCRB, Verizon, AT&T, Telstra, GMA (Global M2M Association). Deployed bands: 2, 3, 4, 5, 8, 12, 13, 20, 28

The other advantage of this model is that it’s configurable and works worldwide, instead of just USA, Noth America or ANZ + North America for the other 3 modules, meaning you could make one product and sell it worldwide without having to make variants for different locales. The module integrate IPv4 and IPv6 stacks, as well as a range a network protocols ranging from TCP/IP to MQTT and TLS. Device management is done through OMA LWM2M, and firmware update works either via USB or FOTA.

SARA-R4 modules can be used in various applications such as gas/water/electricity meters, city street lighting, building automation, HVAC, industrial monitoring and control, telematics, insurance, asset & vehicle tracking, security systems, alarm panels, outpatient monitoring and  consumer wearables.

The company did not provide pricing information, but mentioned product samples are available on request. You may find futher details on SARA-R4 Series product page.

Via ElectronicsWeekly

Tweet We previously covered U-blox SARA-R4 LTE Cat M1 and SARA M2 NB-IoT (Cat NB1) modules, but in case you need support for LTE Cat M1 and Cat NB1, instead…


MA8-4K is a $19 Android TV Box based on Rockchip RK3229 Processor (Promo)

$
0
0

MA8-4K is yet another TV box running Android 5.1 on Rockchip RK3229 quad core Cortex A7 processor, but it might one of the cheapest right now, as GearBest offers it for $18.99 shipped with GBMA87 coupon instead of $27.99 “flash sale” price. This is likely valid for only a few hundred boxes.

MA8-4K specifications:

  • SoC – Rockchip RK3229 quad core ARM Cortex A7 processor @ 1.5 GHz with ARM Mali-400MP2 GPU
  • System Memory – 1GB DDR3
  • Storage – 8GB flash + micro SD card slot up to 32GB
  • Video Output – HDMI 2.0 up to 4K2K @ 60 fps, and 3.5mm AV output (composite)
  • Audio Output – HDMI, AV, and coaxial S/PDIF
  • Connectivity – 10/100 Mbps Ethernet, 802.11 b/g/n WiFi (AP6051 chip); Bluetooth is mentioned in title, but not in description, so it’s unclear whether it’s implemented.
  • USB – 2x USB 2.0 host ports
  • Power Supply – 5V/1.5A
  • Dimensions – 11.20 x 11.20 x 2.30 cm
  • Weight – 107 grams

The box runs Android 5.1, ships with a power adapter and a user’s manual in English. The remote control is not part of the package list, but they do mention “The remote control is powered by 2 x AAA batteries (not included) in the list of main features.

There’s no mention of Kodi support in the description, so it’s unclear whether there’s a custom Kodi version pre-installed. Kodi 17.3 from the Google Play Store will not work well on anything below Android 7.1 for Rockchip device, as my experience with Vorke Z3 has shown. So I would not purchase as a Kodi box, at least if you plan on using the latest version. I previously reviewed two Rockchip RK3229 with MXQ 4K and Zidoo X1 II. I abandoned the review for the former since the firmware was unusable, but Zidoo X1 II worked fairly well for H.265 and H.264 videos and audio pass-through.

Talking about cheap devices, sometimes I sell samples locally after reviews, and I’ve got several reports with cheap models (around $30) that they work fine… for about 2 or 3 months, and then just die, and people come back for a better and more expensive model.

Pressing the CPU with a Clamp allegedly extended the life of the TV box by around one month…

Maybe it’s because of the hot and humid climate here, but it’s something to keep in mind, as “buy cheap, buy twice” may be at play here.

Via AndroidPC.es

Tweet MA8-4K is yet another TV box running Android 5.1 on Rockchip RK3229 quad core Cortex A7 processor, but it might one of the cheapest right now, as GearBest offers…

How to Use Octoprint on Orange Pi Lite Board, Amlogic S905X and S912 TV Boxes

$
0
0

Karl here. This was article originally going to be how to setup Octoprint 3D printer server on an Orange Pi Lite. But after looking and running through the instructions it seemed like it would be too much so I created an img to simplify things. I also explored running Octoprint on an Amlogic S905x or S912 device and it turned out to be an even better solution. You get a case, power supply, and eMMC flash storage.

What is Octoprint?

I use Octoprint mainly for its ability to start and stop prints without having to use an sd card. Time lapse is also a nice feature. And one last thing is that I setup a pushbullet notification when it is complete. For a full list of features check out http://octoprint.org/.

What is needed?

Orange Pi Lite Kit – Click to Enlarge

Octoprint Setup

Common Instructions

  • Download Orange Pi Lite img from here and Amlogic img from here.
  • Burn to your micro SD card with Win32DiskImager, dd, or Etcher..

Credentials

Login: root password: octoprint
Login: cnx password: cnx

Hostname

Orange Pi Lite: orangeocto.local
Amlogic: amlogicocto.local

Amlogic Instructions

  1. Boot and find the update app
  2. Click Select
  3. Choose the aml_autoscript.zip
  4. Click Update
  5. Then Update again
  6. Once it boots log in with root and run “sudo /root/install.sh”
  7. Now we need to see if WiFi is working. Run “nmtui”. This should be self explanatory, and if you see your access point stop. Don’t bother to connect. Exit run “shutdown” wait for it shutdown, remove the SD card, and pull the power and power back on. You can skip the next few steps in this section.
  8. If you did not see your access point exit out of “nmtui” and run the command “sudo modprobe wifi_dummy” repeat looking for access point in step 7.
  9. If you still don’t see your access point run the command “sudo modprobe dhd” repeat looking for the access point in step 7.
  10. If you have to modprobe either to get wifi working once you boot from the internal storage log in with root and run the command “sudo nano /etc/rc.local” and add your “sudo modprobe xxxxxx“ command before exit 0. Cntrl X then y then enter to exit nano and save. Reboot and continue.

Orange Pi Lite Instructions

  1. Connect a keyboard and connect to a monitor or tv
  2. Login with root
  3. Run the command “sudo cfdisk /dev/mmcblk0”
  4. Delete /dev/mmcblk0p1 with the arrow keys
  5. Make a new one and it should fill in the full size of your sd card.
  6. Then finally write. It will prompt you are you sure and type out yes.
  7. Arrow over to quit and enter.
  8. Reboot with the command “sudo reboot” and wait for the Orange Pi to reboot.
  9. Log back in with root and run the command “sudo resize2fs /dev/mmcblk0p1
  10. Reboot again with the command “sudo reboot” and wait for the Orange Pi to reboot.

Remaining Octoprint detup instructions common to all devices

  1. Log back in and run the command “nmtui” to connect to your network. This should be self explanatory. After connecting to wifi if you choose to set a static IP address quit and go back in to nmtui and edit the connection to set the IP address. When setting the IP address suffix the IP address with a /24 to denote a 255.255.255.0 subnet mask
  2. Finally quit and run the command “shutdown” and wait for it to turn off.
  3. Move the Octoprint server and connect to your printer.
  4. To log in open your browser and navigate to http://x.x.x.x:5000 or orangeocto.local:5000 or amlogicocto.local:5000.
  5. Run through the setup it is self explanatory and in settings add /home/pi/OctoPrint/ as your git update path.

Notes

I really recommend setting static IP addresses through your router if it has the ability. Or you can use the .local address above if you have zeroconf/avahi on your machines .

I also recommend the Amlogic server. You get a board, enclosure, power supply, and eMMC flash to run off of. You still need an SD card to get started, but it is not permanent. I ran into trouble on Orange Pi Lite, but it does work. I think the Orange Pi Lite board I received is flakey.

You have a lot of headroom on these to provide other services, e.g.. home automation, media server with no transcoding, NAS, Minecraft server, or anything else that runs on Linux.

Big thanks to balbes for making Linux work,  Jean-Luc, and Armbian forum members who tested Orange Pi Lite version.

Tested on

  • X96 1/8 S905X with wifi dummy
  • X96 2/16 S905X with wifi dummy
  • Tanix TX 5 Pro S905X with dhd
  • Yoka KB2 S912 with wifi dummy

It looks like Realtek (RTLxxxx) WiFi chips need the wifi dummy, and Ampak (apxxxx) chips need the dhd.

Cura

Cura 2.6 came out just just recently with the ability to connect directly to Octoprint. It is really cool feature.

To setup login to octoprint and grab API key.

Then open Cura 2.6 and go to manage printers. Highlight printer and press Connect Octoprint.

Add an Octoprint instance, set preferences, and input API key.

Now you can start prints directly from Cura and monitor prints.

Click to Enlarge

I would really like to thank Gearbest for sending the Orange Pi Lite board, power supply, and SD card, as well as Amlogic boxes and 3D printers from previous reviews. If you decide to do this project yourself, please think about ordering from Gearbest through our links. It helps us out to continue to experiment with different hardware and provide these articles.

Tweet Karl here. This was article originally going to be how to setup Octoprint 3D printer server on an Orange Pi Lite. But after looking and running through the instructions…

NetBSD is Now Running on Allwinner H3 Boards

$
0
0

Most people will run Linux kernel on development boards because it does the job, and that’s usually the only option. But others have been working on NetBSD kernel for Allwinner H3 boards, and it’s now running on various H3 boards with serial console, USB, Ethernet, SD card, and eMMC flash working.


Jared McNeill explains they first had to deal with low-level code to initialize the CPU and MMU, before using a U-boot layer to disguise NetBSD as the Linux kernel in order to load kernel and device tree file. The code then jumps to the generic ARM FDT implementation of initarm to relocate DTB data and perform other steps, and finally they can enumerated devices. This is explained in greater details in the aforelinked blog post on NetBSD website.

Jared tested the implementation on NanoPi NEO and Orange Pi Plus 2E, but others have reported success on various hardware based on Allwinner H3 processor. Other ARM development boards have been supported since 2015 by NetBSD 7.0 and greater with Raspberry Pi 2, ODROID-C2, BegleBone Black. Allwinner A20/A31, and others, but the work done on Allwinner H3 is different, as it’s the first implementation to use device tree, and eventually it should be possible to ship a single GENERIC evbarm kernel for all boards.

Thanks to Geokon for the tip.

Tweet Most people will run Linux kernel on development boards because it does the job, and that’s usually the only option. But others have been working on NetBSD kernel for…

Microsoft Releases Raspberry Pi 3 Web Simulator Working with Azure IoT Cloud

$
0
0

If you were already following this blog when the first Raspberry Pi launched, you may have tried to emulate a Raspberry Pi and run Fedora in QEMU, as getting a board was a challenge at that time. Microsoft has launched its own Raspberry Pi (3) simulator running in web browsers, connecting to virtual sensors and components using Fritzing, and interfacing with the company’s Azure IoT cloud service.

Click to Enlarge

The preview version of the simulator does not allow you customize components on the breadboard, something you’ll be able to do in the release version, so we are stuck with a BMP280 sensor and red LED in the assembly window. on the left. On the top right, we’ve got sample source code written using Node.js to read temperature data from the sensor, push it to an Azure IoT Hub, and blink the LED in the coding area, and finally the integrated console window can be seen on the bottom right corner.

To do anything useful, you’ll need to create a new IoT Hub in Azure, at which point you’ll need to register an account, and provide a mobile phone number and credit card info for authentication, so I stopped there. The company does say “you will not be charged unless you explicitly transition to a paid offer”, so it should be free to try.

You’ll find the full simulator doc here, and the project is open source with all files released in Github.

Via Eddy Lab’s G+ Community

Tweet If you were already following this blog when the first Raspberry Pi launched, you may have tried to emulate a Raspberry Pi and run Fedora in QEMU, as getting…

Xnano X5 4K TV Box with Gigabit Ethernet, HDMI Input, USB 3.0, and SATA Goes for $68 and Up

$
0
0

Realtek RTD1295 processor allows for 4K TV boxes with DVR and PiP function through HDMI input, and USB 3.0 and SATA 3.0 storage interfaces. I previously reviewed Zidoo X9S and EWEAT R9 Plus based on the solution, and I especially liked support with NAS function through OpenWrt running side-by-side with Android 6.0. Those are high-end devices that cost well over $100, but we’ve recently seen cheaper models, likely with less refined firmware, no metal case, and possibly lacking OpenWrt that go as low as $78 shipped with LAKE I Home Cloud TV box. We can now get an even cheaper model, albeit with just 1GB RAM and 8GB flash, thanks to Xano X5 sold for $68.32 including shipping on Aliexpress. There’s also a 2GB/16GB version on the same page going for $82.76.

Xnano X5 Smart Box specifications:

  • SoC – Realtek RTD1295 quad core Cortex A53 processor with ARM Mali-T820 MP3 GPU
  • System Memory – 1 or 2GB DDR4
  • Storage – 8 or 16GB eMMC flash, SATA 3.0 connector for external drives, micro SD card slot up to 64GB
  • Video I/O – HDMI 2.0a output with HDR support, AV output (composite), and HDMI input
  • Audio I/O – HDMI in and out, AV out (stereo audio), 1x S/PDIF output
  • Video Playback – 10-bit HEVC/H.265 up to 4K @ 60fps, H.264 up to 4K @ 24 fps, VP9 up to 4K @ 30 fps
  • Audio Features – 7.1 channel audio pass-through
  • Connectivity – Gigabit Ethernet, dual band 802.11 b/g/n/ac WiFi and Bluetooth 4.0 with one 5dB external antenna
  • USB – 1x USB 3.0 port, 1x USB 2.0 port
  • Misc – IR receiver, front panel display, RTC with battery
  • Power Supply – 12V/2A
  • Dimensions – 132 x 85 x 19 mm

Based on the documentation on the Aliexpress page, the box appears to run both Android 6.0 and OpenWrt, and ships with a HDMI cable, an IR remote control, a user’s manual, a high gain WiFi antenna, and a power adapter. HDMI input support DVR, Broadcasting over UDP, and PiP functions.

The company also published a picture of the board, and for people who want to develop U-boot or Linux on the board (mainline for RTD1295 is in progress), the 4-pin header on the right between the USB 3.0 port and micro SD slot could the UART header to access the serial console. We’ve previously seen USB 3.0, SATA, and Gigabit Ethernet performance is excellent on such box, so it could also make an interesting Linux device/board if more people work on it.

Other Aliexpress sellers offer the box for a few dollars higher, GearBest is not quite as competitive here, as it sells the device for $78 including worldwide shipping [Update: GBCNA coupon brings that down to $67.19].  If you do a group buy of at least five, DHGate sells it for  $62.29 per unit including DHL shipping.

Thanks to Danman for the tip.

Tweet Realtek RTD1295 processor allows for 4K TV boxes with DVR and PiP function through HDMI input, and USB 3.0 and SATA 3.0 storage interfaces. I previously reviewed Zidoo X9S…

Viewing all 2336 articles
Browse latest View live