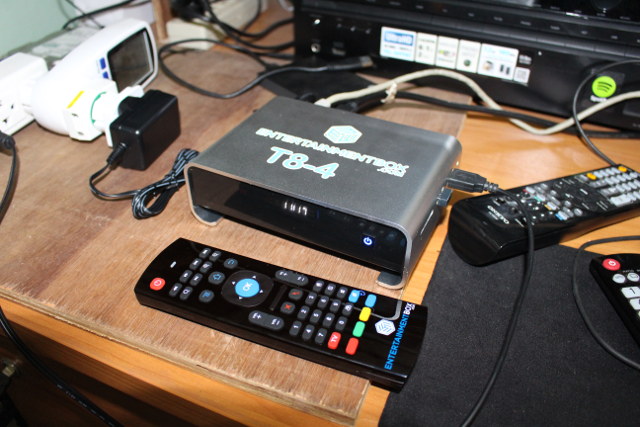
I’ve already taken some pictures of the device and board in part 1 of EBox T8-4 review, so today, I’m going to report my experience with the Android 5.1 firmware for this Amlogic S905 TV box, air mouse, and wireless gamepad, specifically targetted to users leaving in the United Kingdom, but since the hardware is based on Zoomtak T8V, it may also be informative to international users, although the firmware, mostly launcher and IPTV services, will be different.
EBox T8-4 Setup Wizard & Configuration
Since I’ve already inserted an internal SSD into the SATA bay of the device, I did not connect an external USB harddrive, and only connected HDMI and Ethernet cables, plus the RF dongle for the included air mouse, a USB keyboard to easily take screenshots, and of course the power cord. The power button will be red at this stage. If you want to start the TV box, you either need to press the button on the box, or the power button on the remote control, the power button LED will change to blue, and the display will show “boot”.
![Click to Enlarge]()
Click to Enlarge
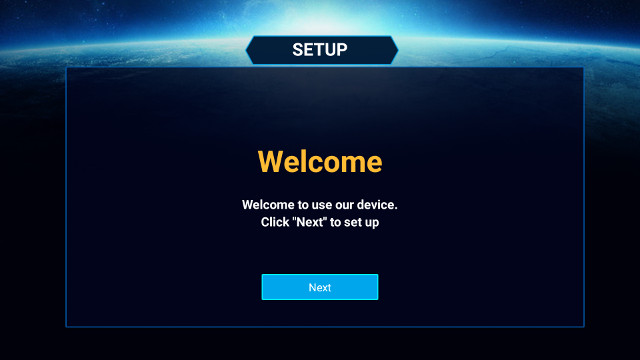
A typical boot takes around one minute, but for the very first boot, you’ll be asked to go through setup wizard similar to what we find in few others boxes like WeTek Core or ARNU Box.![EBox_T8-4_Setup_Wizard]()
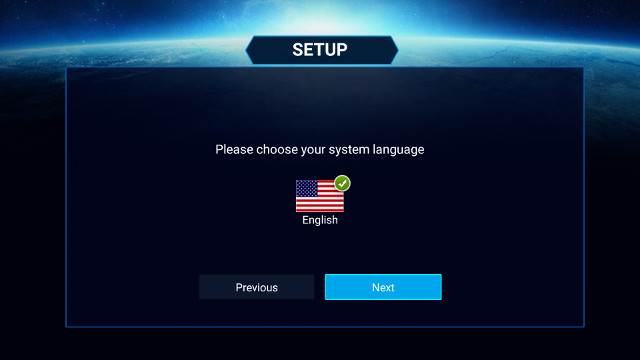
Click Next to “select” your language.. English only for now.
![EBox_T8-4_Language_Selection]()
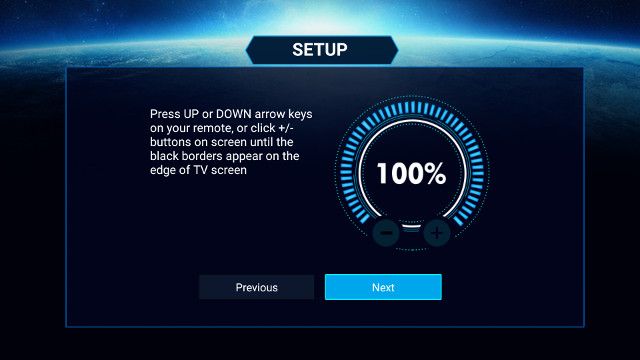
Next window is to adjust the screen in order to remove any black orders on the edges of the screen. If you are using HDMI output, most TV should have a setting to underscan. For example it is called “Just Scan” on LG televisions. That way you don’t need to adjust the screen at all, and you can keep it at 100%.
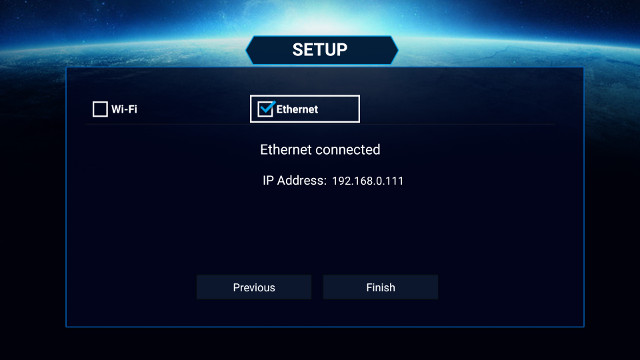
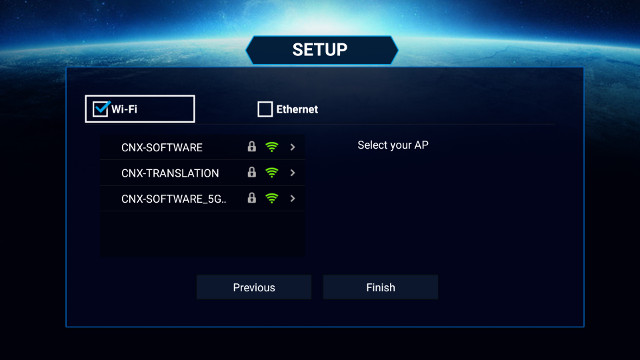
![EBox_T8-4_Adjust_Screen]() The next step is for network configuration for either Ethernet or WiFi.
The next step is for network configuration for either Ethernet or WiFi.
![EBox_T8-4_Setup_Wizard_Ethernet_Configuration]()
![EBox_T8-4_Setup_Wizard_WiFi_Configuration]() The system correctly detected my three access points @ 2.4 GHz and 5.0 GHz, but I carry on with Gigabit Ethernet, and click on Finish button to access the main user interface.
The system correctly detected my three access points @ 2.4 GHz and 5.0 GHz, but I carry on with Gigabit Ethernet, and click on Finish button to access the main user interface.
![Click to Enlarge]()
Click to Enlarge
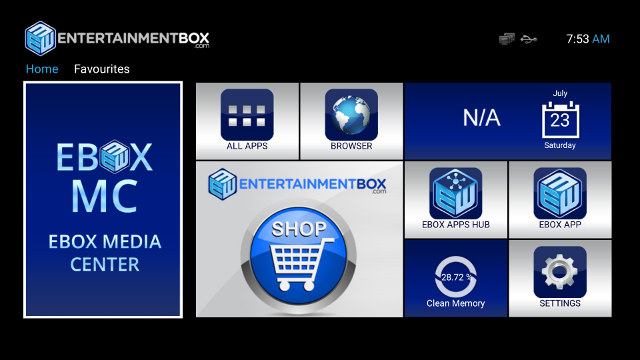
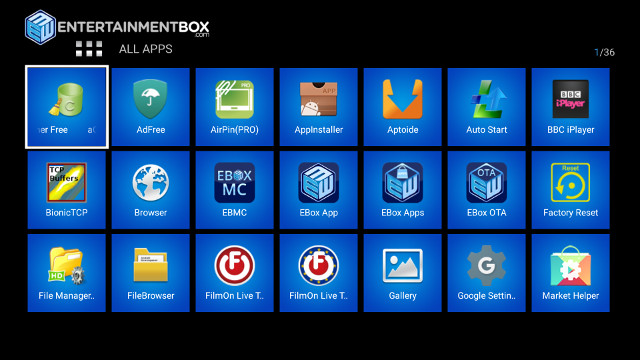
The launcher include EBOX MC fork of Kodi 16.1, EBOX APPS Hub folder with custom apps from the company including EBox App to access support channels, EBox Apps app store, EBox OTA for firmware update, etc…, as well as icons to access all apps, the browser, settings, and to clean the memory.
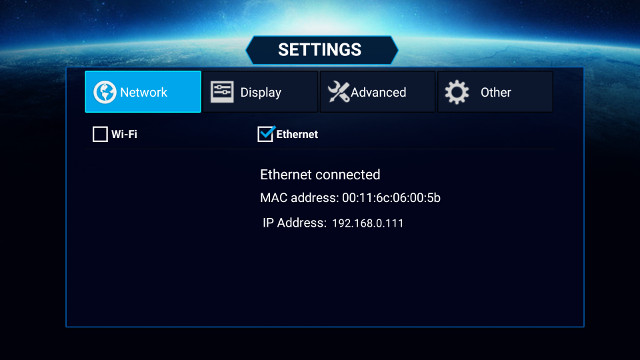
Sadly, that’s another wizard that does not ask you to set your timezone, but maybe in that case it is understable since it’s designed for the British public and already set to the right timezone. Any I went through the settings, which looks quite similar as other Amlogic TV boxes.
![EBox_T8-4_Settings_Network]()
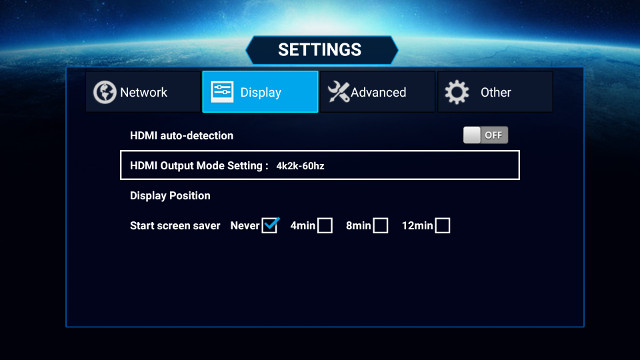
You can change network configuration as needed, as well as display settings.![EBox_T8-4_Settings_Display]()
HDMI auto-detection is ON by default, and it set the resolution to 1080p50 by default, so I disabled it and manually selected 4k2k-60Hz mode. Sadly it looks like it does not always remember that setting after a reboot.![EBox_T8-4_Settings_Advanced]()
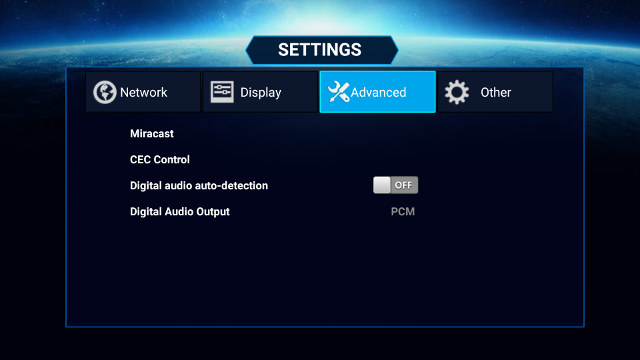
Advanced options are for Miracast, CEC Control is not working for me (same results as with all other Amlogic TV boxes I’ve tested), and you can also configure audio output to PCM, SPDIF or HDMI.![EBox_T8-4_Settings_Others]()
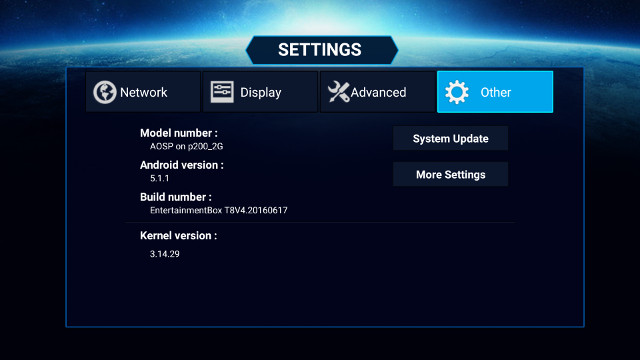
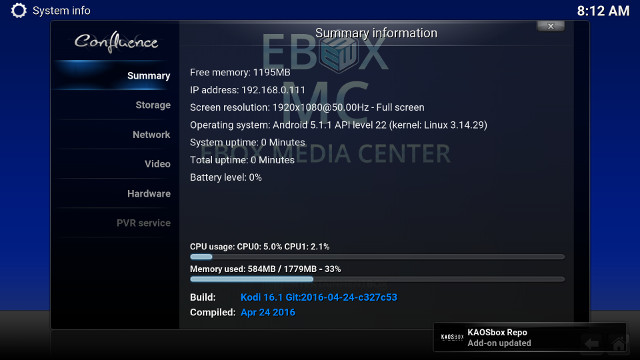
Other settings show some system information: Android 5.1.1 on top of Linux 3.14.29 running on p200_2G platform. More Settings lead to another familiar setup menu.
![EBox_T8-4_Settings]()
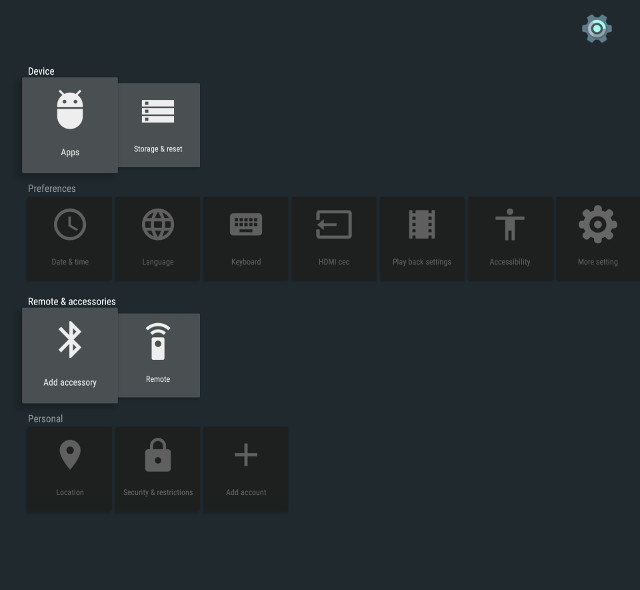
This is where I enabled HDMI adaptation (automatic refresh rate) via Play back settings, and set the correct timezone (Date & Time). You can access Android Lollipop settings by selecting “More setting”, so you’ve got three different settings user interfaces, which should really be unnecessary….
EBox T8-4 OTA Firmware
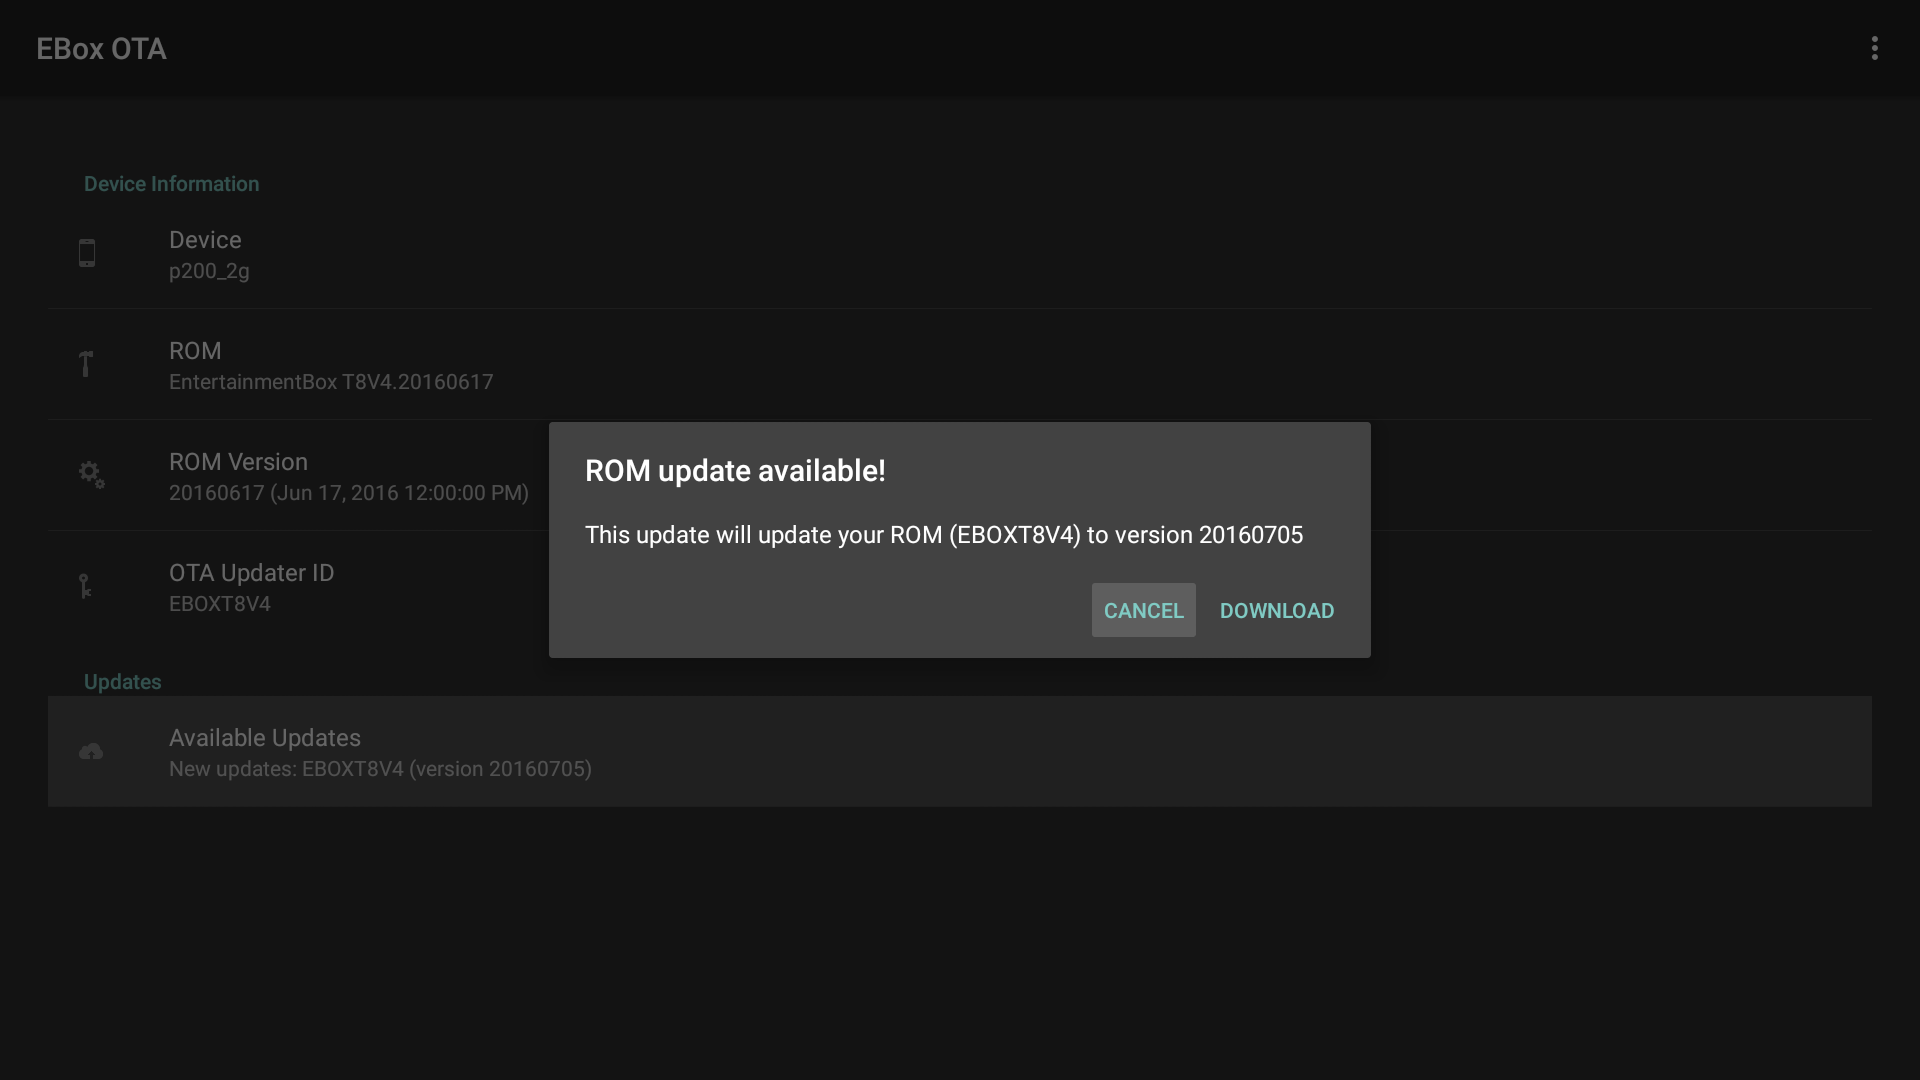
The company informed me by email of a new firmware update, so I updated it right before going further, by entering the System Update menu, but you can click on EBox OTA to enter the update app too. After clicking to check updates, I got a popup window “ROM update available”.
![EBox_OTA_Firmware_Update]()
Click to Enlarge
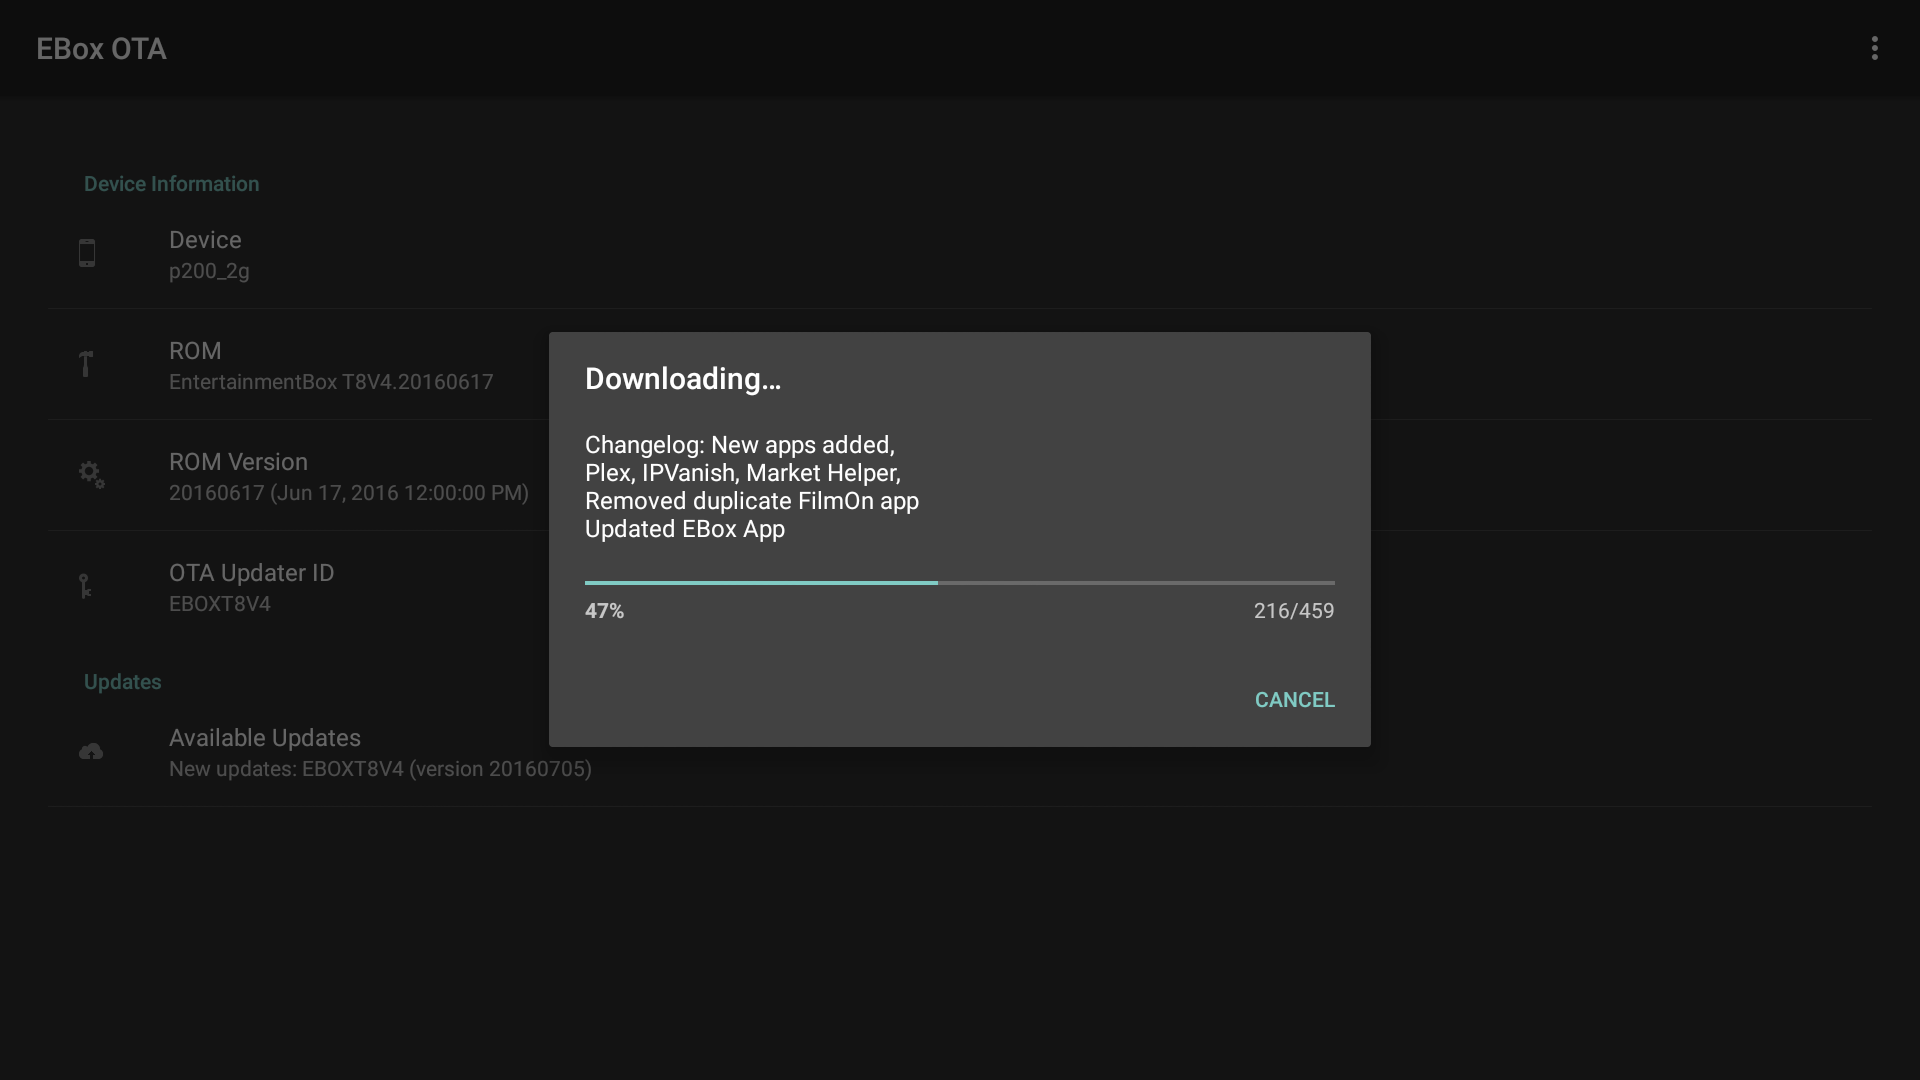
So I start the download…
![EBox_OTA_Firmware_Download]()
Click to Enlarge
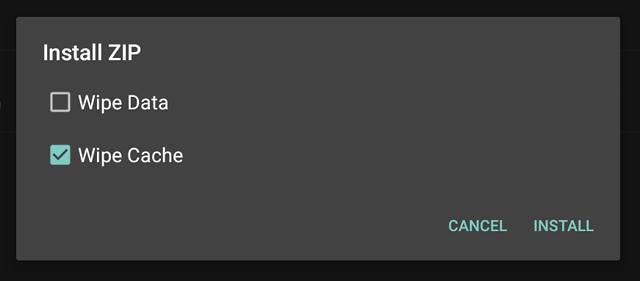
Which was reasonably fast, and been asked whether I want to Wipe Data and/or Wipe Cache when installing the firmware. I always wipe the cache, but I avoid wiping the data since I like to keep my data (screenshots) and apps installed via Google Play.
![EBox_T8-4_Wipe_Data_Wipe_Cache]()
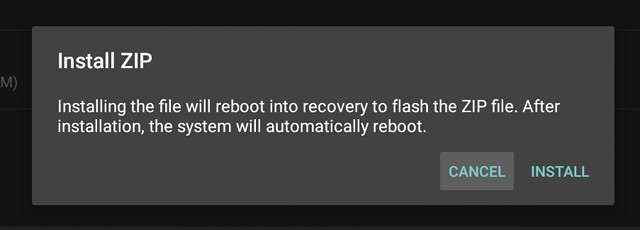
Once I click on Install, I get another window explaining the box will reboot into recovery mode, flash the ZIP file, and automatically reboot.
![EBox_T8-4_Install_Firmware]()
So I click in Install against and this time the box reboots, shows me an animation with a green Android logo amd a progress board, and after 3 to 5 minutes, reboot the the main launcher and the update is complete. That part was flawless.
Entertainmentbox.com Customer Support
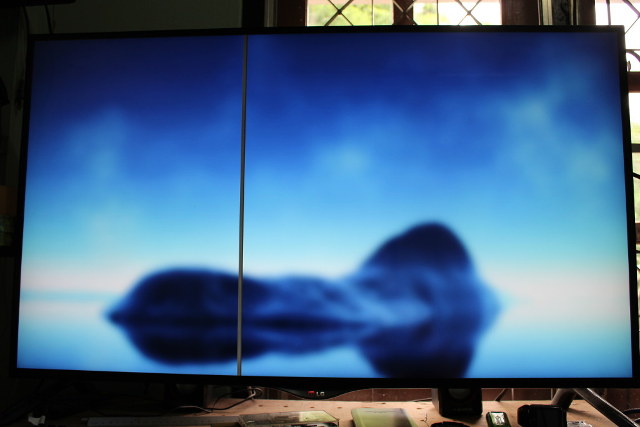
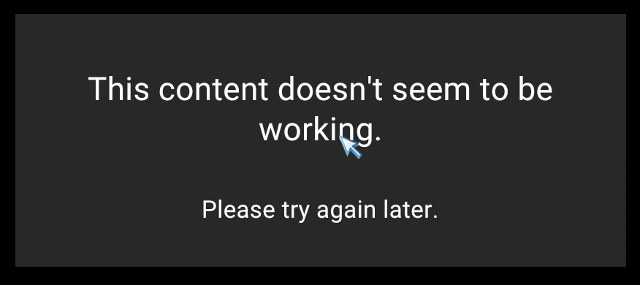
However, I had a big hiccup with the firmware, after spending much time taking screenshoot, and testing apps, I tested on and off, and power consumption, and all of a sudden the device would not boot to the launcher, and all I could see if a blueish background photo (the vertical line is just an issue with my TV).
![EBox-T8-4_Dead]() I sent an email to my contact in the company about the issue, but since it was a Saturday, I was not sure when I’d get an answer, so I went to their website, and saw a “Chat Now – Online” section on the bottom right of the page, so I decided to give it a try and asked my question about the box being stuck at boot time.
I sent an email to my contact in the company about the issue, but since it was a Saturday, I was not sure when I’d get an answer, so I went to their website, and saw a “Chat Now – Online” section on the bottom right of the page, so I decided to give it a try and asked my question about the box being stuck at boot time.
Within a few seconds, a support person called Vikram told me to try to factory rest the box, and provide a link with detailed instructions, and the chat was over in about one minute. I followed the instructions, which involved wiping the data, but I tried to only wipe the cache as I wanted to keep my data, and I did not work.
I wanted to try to re-install the firmware without wiping out the data instead. So I went back to start a new chat to ask about the firmware since I could not find T8-4 on their firmware page. Again Vikram answered within a few seconds, and said he was aware of the issue, and forwarded to the persons in charge. Again efficient, polite and to the point, so my experience with support was very positive, although my problem was not resolved.
Eventually, I got answer from my contact, as they had uploaded T8-4 firmware with clear instructions. So I copied the file to a USB flash drive, went into recovery, and flashed the firmware apparently successfully, but it did not resolve my issue. So I ended up wiping out the data, and lost all my files and installed app, wasting a few hours of work.
The reasons was that EBox Play app (now removed from the firmware) that allows you to play retro games was not compatible with Android 5.1, and messed up with the firmware.
Anyway, while I was clearly not happy about that annoying firmware bug and wasted time, Entertainmentbox.com customer support appears to be very good. They also have support forums.
Installed Apps and IPTV Streaming
The TV box comes with some interesting apps including popular video streaming and on-demand app in the UK such as BBC iPlayer, FilmOn, and TVCatchUp.
![EBox_T8-4_App_List_1]() BionicTCP should be interesting too on other devices, especially if you have troubles with streaming videos, as it allows you to tweak TCP buffers to allow for larger buffers possibly improve the streaming experience.
BionicTCP should be interesting too on other devices, especially if you have troubles with streaming videos, as it allows you to tweak TCP buffers to allow for larger buffers possibly improve the streaming experience.
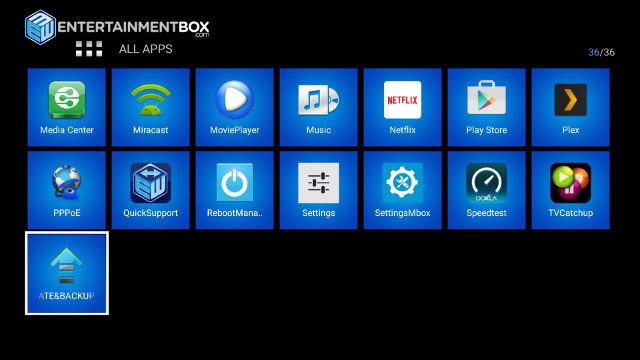
![EBox_T8-4_App_List_2]()
So I had a quick try of the IPTV apps, although I’m not based in the UK.
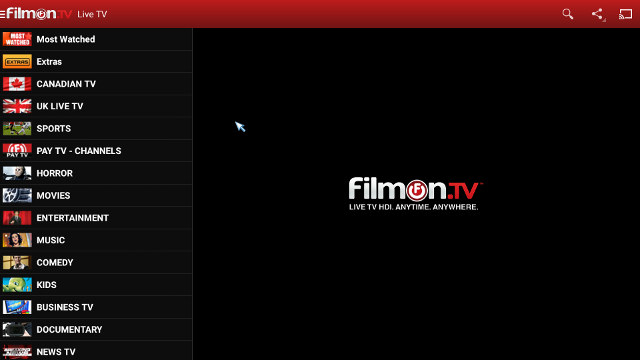
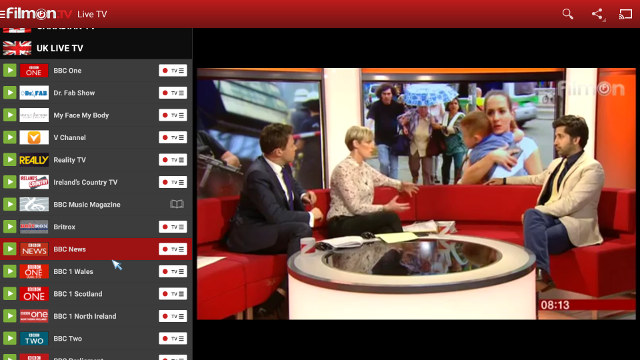
Let’s start with Filmon.TV app which sorts live TV streams by country or categories.
![Click to Enlarge]()
Click to Enlarge
You can then select one category, and a stream from the list to watch live TV, in full screen or within the interface.
![Click to Enlarge]()
Click to Enlarge
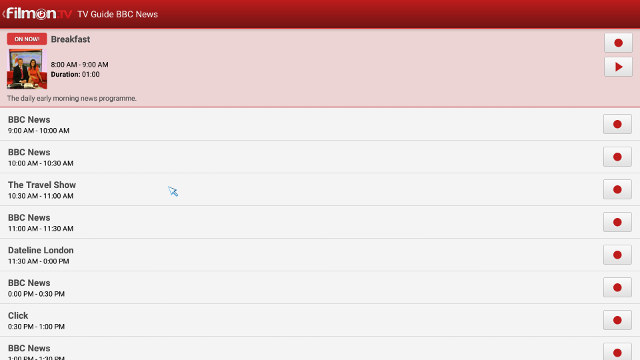
There’s also an online TV guide (EPG) available from the app.
![Click to Enlarge]()
Click to Enlarge
After a while, the app will ask you to register. I think it’s free to watch SD channels, but you may have to pay to watch HD TV. (TBC)
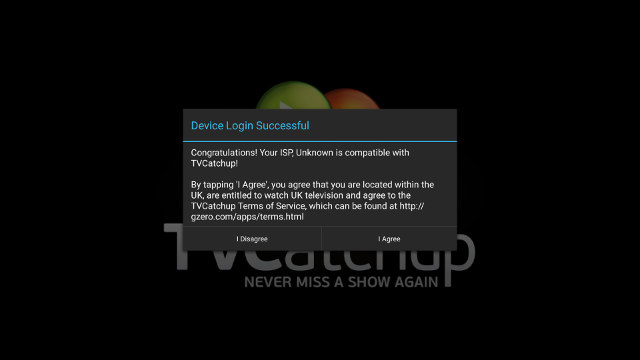
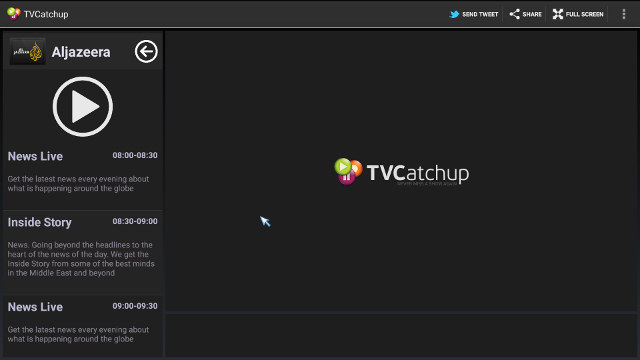
TVCatchup is a service that allows to watch live TV even if you missed the right time when it was broadcasted. When the app start I’ve been asked to confirm I’m indeed based on the UK… to which I agreed…
![Click to Enlarge]()
Click to Enlarge
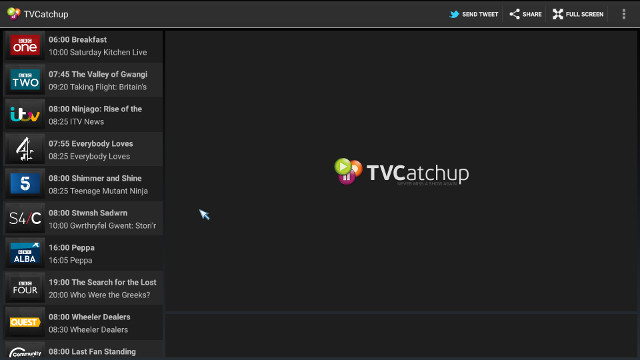
I could get the list of channels, and programs, but was unable to play any videos, most probably because I’m not actually in the UK…
![TVcatchUp_Channels]() You can also access the EPG from the app. You’d think free channels like Aljazeera would work from anywhere, but it did not play either.
You can also access the EPG from the app. You’d think free channels like Aljazeera would work from anywhere, but it did not play either.
![Click to Enlarge]()
Click to Enlarge
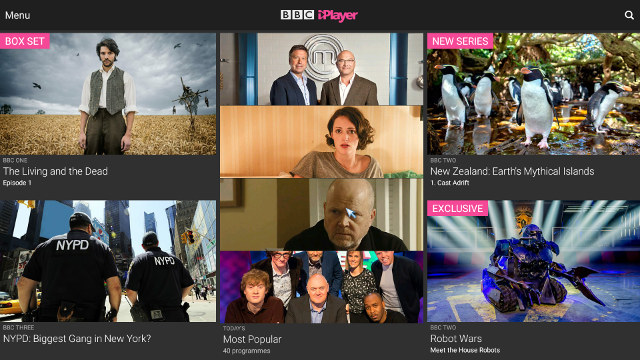
Finally, BBC iPlayer.. It asked me to install BBC Media Player, which I did, but then I could not stream any video due to geo-blocking.
![BBC_iPLayer]()
![BBC_iPLayer_Content_Not_Working]() So the pre-installed app are interesting if you are based in the UK, and wants something easy to setup. If you live overseas, you’d have to use a VPN, or some DNS services like StrongDNS.
So the pre-installed app are interesting if you are based in the UK, and wants something easy to setup. If you live overseas, you’d have to use a VPN, or some DNS services like StrongDNS.
Video and Audio Support in EBOX MC (Kodi 16.1)
EBOX MC (EBMC) used Confluence skin with a different background image.
![Click to Enlarge]()
Click to Enlarge
It is based on Kodi 16.1 with possible some customizations under the hood.
![Click to Enlarge]()
Click to Enlarge
Since I’ve reviewed so many Amlogic S905 TV boxes, I’ll just try 4K videos, and audio capabilities (e.g. HDMI pass-through). All files will be played from a SAMBA share.
4K video samples:
- HD.Club-4K-Chimei-inn-60mbps.mp4 – OK
- sintel-2010-4k.mkv – OK
- Beauty_3840x2160_120fps_420_8bit_HEVC_MP4.mp4 (H.265 @ 30 fps) – OK
- Bosphorus_3840x2160_120fps_420_8bit_HEVC_MP4.mp4 (H.265 @ 30 fps) – OK
- Jockey_3840x2160_120fps_420_8bit_HEVC_TS.ts (H.265 @ 30 fps) – OK
- MHD_2013_2160p_ShowReel_R_9000f_24fps_RMN_QP23_10b.mkv (10-bit HEVC) – OK
- BT.2020.20140602.ts (Rec.2020 compliant video; 36 Mbps) – OK
- big_buck_bunny_4k_H264_30fps.mp4 – OK
- Fifa_WorldCup2014_Uruguay-Colombia_4K-x265.mp4 (4K, H.265, 60 fps) – OK
- Samsung_UHD_Dubai_10-bit_HEVC_51.4Mbps.ts (10-bit HEVC / MPEG-4 AAC) – OK
- Astra-11479_V_22000-Canal+ UHD Demo 42.6 Mbps bitrate.ts (10-bit H.265 from DVB-S2 stream) – OK
- Ducks Take Off [2160p a 243 Mbps].mkv (4K H.264 @ 30 fps; 243 Mbps; no audio) – Won’t start to play, and stays in UI.
So no problem playing most 4K video samples with the codecs supported by Amlogic S905 SoC (i.e. excluding H.264 4K @ 60 fps, and 10-bit H.264) expect a very high bitrate H.264 video. However, please note that automatic refresh rate switching is not working, even after it is configured in both the system and EBMC.
Time to test audio.
| Video |
PCM 2.0 Output
(Kodi/EBMC) |
PCM 2.0 Output
(Video player) |
HDMI Pass-through
(Kodi/EBMC) |
| AC3 / Dolby Digital 5.1 |
Audio OK but video not smooth |
No audio |
Audio OK but video not smooth |
| E-AC-3 / Dolby Digital+ 5.1 |
OK |
No audio |
Dolby D 5.1 (OK), but frequent short noise |
| Dolby Digital+ 7.1 |
OK |
No audio |
PCM 2.0 |
| TrueHD 5.1 |
OK |
No audio |
PCM 2.0 |
| TrueHD 7.1 |
OK |
No audio |
PCM 2.0 |
| Dolby Atmos 7.1 |
OK |
No audio |
PCM 2.0 |
| DTS HD Master |
OK |
No audio |
DTS 5.1 with frequent short (0.5s) noise |
| DTS HD High Resolution |
OK |
No audio |
DTS 5.1 with frequent short (0.5s) noise |
| DTS:X |
OK |
No audio |
DTS 5.1 with frequent short (0.5s) noise |
As expected Ebox T8-4 does not have the DTS and Dolby licenses for audio down-mixing since it’s using Amlogic S905, and not S905-H, but that’s a disappointment to find out that HDMI pass-through is basically unusable even for 5.1 channel audio due to a short noise that happens every 5 to 10 seconds, at least with Onkyo TX-NR636 receiver.
Gaming with Ipega PG-9028 Bluetooth game controller
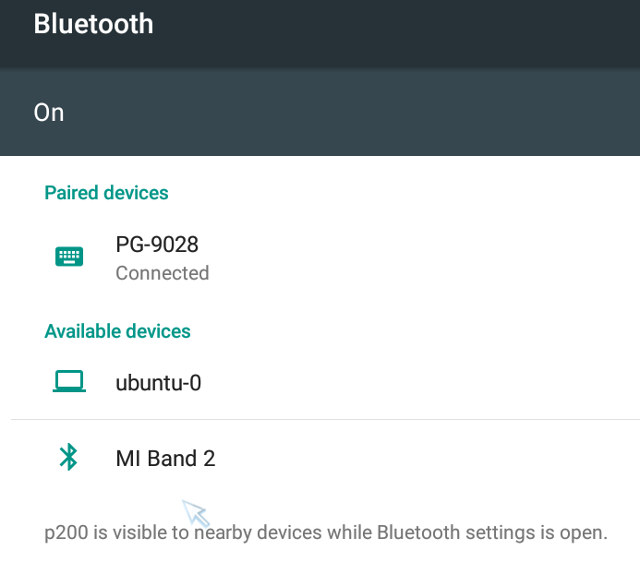
I’m normally using Tronsmart Mars G01 RF gamepad in my review, but since the bundle I received includes a Bluetooth gamepad, that’s what I used with Riptide GP2 installed from Amazon Underground. At first, I had troubles pairing the gamepad as I only pressed the Home key, but then I was asked to press Home and X blue buttons together, and the gamepad would show a new device Bluetooth MAC address, and once paired show it as PG-9028.
![PG-9028_Bluetooth_Pairing]() Subsequently, you’ll just need to press the Home button to connect the gamepad to the TV box. I had then no issue navigating the user interface with B button for “Back”, A button for “Accept”, and the top left joystick to move around the launcher, and start Riptide GP2.
Subsequently, you’ll just need to press the Home button to connect the gamepad to the TV box. I had then no issue navigating the user interface with B button for “Back”, A button for “Accept”, and the top left joystick to move around the launcher, and start Riptide GP2.
The game was a fluid as on other good Amlogic S905 TV boxes, so I set the graphics setting to the maximum, and played for over 15 minutes without any degradation of performance over time. The device stayed cool at all time, and the top and bottom temperatures of the case were respectively 36° C, and 39° C.
Other interesting features of the gamepad include the touchpad area to control the mouse pointer, and the five buttons at the bottom for volume, play/pause, back and next, which makes it suitable to control Kodi/EBMC. It is also possible to place your smartphone on top of the gamepad, if you want to play games on the phone instead of the TV box. You’ll find detailed pictures of the controller in the first part of the review.
EBox T8-4 Benchmarks – Antutu, Storage and Networking
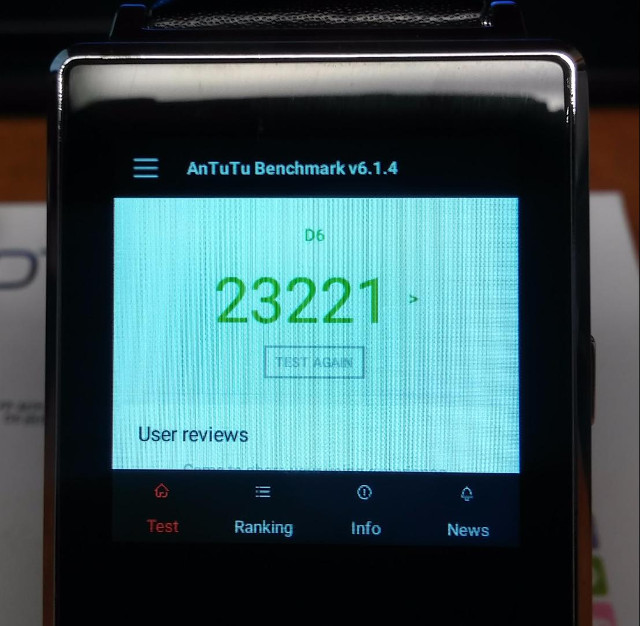
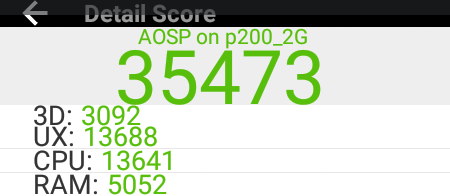
Amlogic S905 is a now extremely well known platform, so I just ran Antutu 6.1.4 to double check there wasn’t any issue.
![EBox_T8-4_Antutu]()
35,473 point is typical for this kind of device. All good.
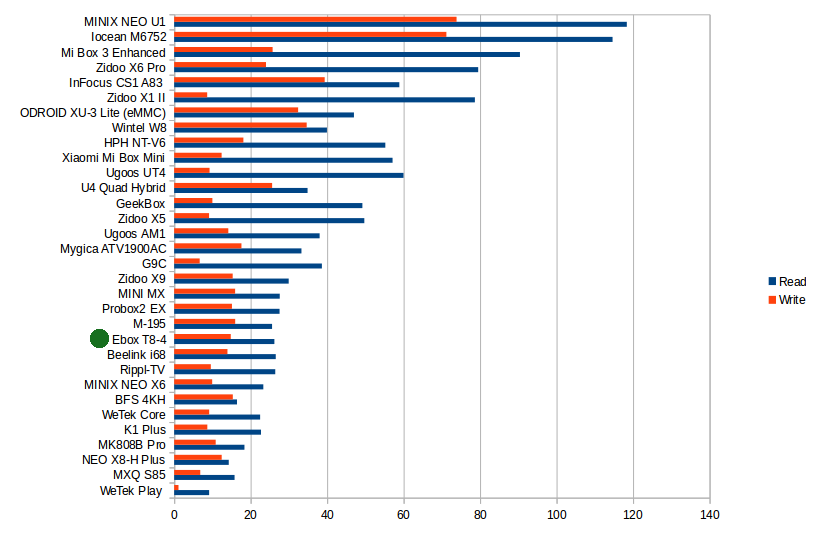
I also tested internal storage performance A1SD bench, and the eMMC flash is reasonable fast @ 26.21 MB/s for sequential read, and 14.80 MB/s for sequential write.
![Read/Write Speed in MB/s]()
Read/Write Speed in MB/s
One of the key selling point of the device is the presence of an internal 2.5″ SATA bay. I started by inserting an SSD with both NTFS and EXT-4 partitions, but it was mounted as a USB device with 0 MB size, so I switched another 1TB hard drive formatted with NTFS inside a Linux machine, which was a little loose in the SATA bay but still inserted to the SATA connector, and this time it was not detected at all. When I removed it, it was warm so I assume it got power. It’s quite possible the hard drive needs to be prepared inside a Windows computer to work with the box, based on a video for their older T8-3 box. That part was very disappointing.
Let’s switch to network performance with Gigabit Ethernet and iperf -t 60 -c server_ip -d command for full duplex transfer.
|
|
––––––––––––––––––––––––––––––
Client connecting to 192.168.0.112, TCP port 5001
TCP window size: 85.0 KByte (default)
––––––––––––––––––––––––––––––
[ 6] local 192.168.0.104 port 43101 connected with 192.168.0.112 port 5001
[ 6] 0.0-60.0 sec 6.53 GBytes 935 Mbits/sec
[ 4] 0.0-60.6 sec 93.5 MBytes 12.9 Mbits/sec
|
So the system cannot handle full duplex transfer very well, with the speed in one direction very fast (as it should), but very slow in the other direction. That test is worse case scenario though, and unless you plan to use the box as a server too, it should not be an issue, and I had no problem streaming 60 Mbps+ videos.
I’ve tested 802.11ac by transferring a 278MB file from SAMBA to the flash and vice versa 3 times using ES File explorer. For some reasons download was much faster than upload @ 5.67 MB/s vs 2.89 MB/s, and on average the transfer rate was a decent 4.27 MB/s.
![Throughput in MB/s]()
Throughput in MB/s
Other remarks
The included air mouse is very convenient with mouse mode, remote side, and QWERTY keyboard side, and while usually I have to switch to the IR remote control to power on other devices, T8-4 can be powered on with that air mouse too. The air mouse function works well, the keyboard includes the media player keys (play/pause, etc..), and the only two downsides I found is the lack of tabulation key, and Alt key Blue on black markings are hard to read, at least with my eyesight (I need to remove my glasses to read them).
Power handling have been properly implemented too, but with only power on and power off modes. Power consumption is 0.2 watts in power off mode, 5.0 watts at idle with SSD, and 5.2 watts at with (non-detected) HDD.
I had no problem at all with Google Play with free and paid app, and Amazon Underground.
Conclusion
EBox T8-4 Android TV box performs well over time (no overheating), delivers good video playback performance in Kodi (EBMC), include pre-installed IPTV streaming app for the UK, and provide a good overall user experience, but there are still some issues that need to be fixed such as very poor HDMI pass-through implementation, and problems with internal SATA bay.
PROS
- Complete easy to setup and use bundle with TV box, air mouse, and wireless Bluetooth gamepad
- Stable and responsive firmware
- Good 4K video playback performance in Kodi with both H.264 and H.265 videos
- (Legal) pre-installed IPTV app for the UK market like BBC iPlayer, Filmon, and TVCatchup
- Gigabit Ethernet and good 802.11ac WiFi performance
- 2.5″ internal SATA bay (see CONS too!)
- OTA firmware update
- Good customer support with Live chat, forums, and online documentation
CONS
- HDMI audio pass-through is not working well, with only 5.1 channel audio support, and I got short white noise for almost all videos.
- No Dolby / DTS licenses
- My 2.5″ SSD (NTFS + EXT-4) and HDD (NTFS) were not recognized by the system
- DRM support limited to Widewine Level 3
- (Minor) Settings are spread over 3 menus
- (Minor) Somewhat slow boot (One minute)
- I loss all my data and installed apps after a while due to a bug in the firmware (But it should be now be fixed, and I could not reproduce the issue).
The main thing I like about EBox T8-4 bundle is that it’s easy to setup and comes with everything you may need to watch local and live TV (in the UK), the included air mouse and Bluetooth gamepad just work out of the box, without headache due to potential interoperability issues.
EBox T8-4 + S77 Pro air mouse + Ipega Bluetooth gamepad bundle I reviewed can be purchased for 108.33 GBP exc. VAT ($142 US), but you can also purchase the box alone for 79.16 GBP exc. VAT (~$104 US), or select other bundles with different input devices and/or an included 1TB hard drive (which could mitigate the issues I had).
Tweet I’ve already taken some pictures of the device and board in part 1 of EBox T8-4 review, so today, I’m going to report my experience with the Android 5.1…
 M9S Z8 specifications: