Quantcast
Channel: Developers » Visit CNX Software
Viewing all 2336 articles
Browse latest View live

Orange Pi PC Board is now selling for $8.57 Shipped (Promo)

$
0
0

[update: the flash sale is over]

Orange Pi PC is an ARM Linux development board based on Allwinner H3 processor, that is relatively popular thanks to its low price/features ratio, and decent Linux support mostly thanks to the combined work of linux-sunxi and armbian communities. The board normally sells for $15 + shipping on Aliexpress, but GearBest appears to have a promotion for $8.57 shipped.

Orange_Pi_PC-Promotion

Before you go ahead with any purchase. You’ll notice the board is shown for $9.23 in China and US-LA warehouses, but $24.35 in their European warehouse. The price (china warehouse) goes down to $8.57 once you had it to the cart. It could be a genuine promotion, but it could also be a mistake. If the latter, you’ll get a refund or possibly a voucher of the same value for future purchases.  I’ve asked my contact at GearBest, but no answer yet. GearBest confirmed it is a “big promotion” lasting as long as there’s stock. The page has been updated and the price is now $8.57 from the China warehouse only.

Thanks to Thomas for the tip.

Tweet [update: the flash sale is over] Orange Pi PC is an ARM Linux development board based on Allwinner H3 processor, that is relatively popular thanks to its low price/features…


Intel Apollo Lake NUC6CAYS & NUC6CAYH NUC mini PCs Specifications Released

$
0
0

Intel Apollo Lake is the next generation of low power processor family that should replace Braswell Celeron processors, and Fanlesstech got hold of the specifications for two upcoming “Arches Canyon” NUC6CAYS and NUC6CAYH NUCs (Next Unit of Computing) mini PCs based on the processors, as well as the 2016-2018 roadmap for the complete (consumer grade) Intel NUC family.

Intel_Apollo_Lake_mini_PCThe only differences between the two models are that NUC6CAYH is a barebone model without memory or storage, nor operating system. So I’ll just list NUC6CAYS specifications:

  • SoC – Intel Celeron Jxxx quad core processor @ x GHz to y GHz (burst) with Intel HD graphics up to z MHz (10W TDP)
  • System Memory – 2GB DDR3L-xxxx SO-DIMM (dual channel), upgradeable up to 8GB DDR3L-1866
  • Storage – 32GB eMMC flash, 2.5″ SATA3 bay for 9.5mm hard drives, SDXC slot with UHS-I support
  • Video Output – HDMI 2.0 (4K @ 60 Hz), VGA
  • Audio – Up to 7.1 channels via HDMI, 3.5mm headset jack, 3.5mm rear speaker/TOSLINK combo jacl
  • Connectivity – Gigabit Ethernet (RJ45), Intel Wireless AC-316x M.2 module for 802.11ac 1×1 WiFi and Bluetooth 4.2 with internal antennas
  • USB – 2x front USB 3.0 ports at the front (yellow one for charging), 2x rear USB 3.0 ports, 2x internal USB 2.0 ports via header
  • Misc – IR receiver, Kensington lock
  • Power Supply – 12~19V DC input (65W wall-wart power supply included)
  • Dimensions – 115 x 111 x 51 (plastic casing with inner metal structure)

Intel_Apollo_Lake_NUCNUC6AYS will include Windows 10 Home x64 and Intel Remote Keyboard. Other features include multi-color front panel LED light ring, built-in dual array microphones, VESA mounting plate, front-panel and AUX_PWR internal headers. The NUCs will come with a 3 year warranty. Intel does not appear ready to give the complete SKU and operating frequency of the processors, but the good news is that Apollo Lake will be the first low power Intel processors to support HDMI 2.0 allowing for 4K output at 60 Hz.

Click to Enlarge

Click to Enlarge

The 2016-2018 NUC roadmap above was also “leaked” with more powerful Core i3, Core i5 and Core i7 NUCs. The first Apollo Lake NUC will be released in Q4 2016 with Windows 10, and the barebone version in Q1 2017.

Tweet Intel Apollo Lake is the next generation of low power processor family that should replace Braswell Celeron processors, and Fanlesstech got hold of the specifications for two upcoming “Arches…

Intel Atom C3000 “Denverton” Processor Targets Low Power Servers

$
0
0

Intel Atom “Avoton” server processors are the equivalent of Bay Trail processor for mini PCs, laptops and tablets, and with the upcoming release of Apollo Lake processors, Intel has a matching family codenamed “Denverton” that will be used in servers and NAS. Information about the new processors is scarce, but Anandtech spotted an early Gigabyte motherboard prototype last month at Computex.

Click to Enlarge

Click to Enlarge

Gigabyte MA10-ST0 motherboard main specifications:Intel_Atom_C3000

  • SoC – Intel Atom C3000 “Denverton” processor with 4 to 16 cores @ 1.8 GHz; QKP2 code; 14nm process
  • System Memory – 4x RDIMM/UDIMM slots for DDR4 @ 2400 MHz
  • Storage – 4x SATA 3.0 breakout ports supporting up to 16 drives (8x shared with PCIe slot); 32GB eMMC flash
  • Video Output – VGA
  • Connectivity – 2x 10GbE SFP+ ports; 2x Gigabit Ethernet RJ45 ports (via Intel I210); 1x extra RJ45 port (for management?)
  • USB – 2x USB 2.0 host ports
  • Expansion – 1x PCIe 3.0 x8 slot
  • Misc – Aspeed AST2400 board management controller
  • Power Supply – ATX connector
  • Dimensions – 170 x 170 mm (Mini-ITX form factor)

SATA_Breakout_port_Atom_C3000_Motherboard

Intel Atom “Denverton” single core performance is expected to be slightly better than Avoton, but the power consumption should be quite lower be core.

Anandtech expects more information including specifications and pricing at IDF (Intel Developer Forum) next month, or possibly at SC16 in November.

Tweet Intel Atom “Avoton” server processors are the equivalent of Bay Trail processor for mini PCs, laptops and tablets, and with the upcoming release of Apollo Lake processors, Intel has…

Wanscam HW0029-4 is a Solar Powered All Weather IP Security Camera with WiFi, 3G/4G Connectivity

$
0
0

I’ve just watched a video on ARMDevices.net about Enlaps Tikee solar powered device designed to take timelapses over several days and transfer the pictures / video over WiFi, 3G, or 4G. The project has been fully funded on Indiegogo at the beginning of the year, and shipping is scheduled for Q4 2016. It looks like an interesting device for a niche market, but since I’ve noticed some products launched on Kickstarter already exists in one form or another in China, I’ve decided to have a look on Aliexpress, and I found Wanscan HW00269-4 solar powered camera with 3G/4G connectivity, and while it addresses a completely different need, as a 720p IP security camera, I still decided to have a closer look.

Solar_powered_security_cameraWanscam HW0029-4 specifications:

  • SoC – Hisilicon Hi3518E ARM9 processor @ 440 MHz
  • Storage – Built-in 16GB, expandable to 128GB
  • Camera / video recording
    • 1/2 1MP Star light CMOS sensor
    • 8mm high definition lens
    • Build-in IR-cut, no color cast; night visual range is up to 80/100 meters
    • H.264 main profile encoding up to 1280 x 720 @ 30 fps; second stream: 640×352 or 320×176
    • Motion detection with up to 4 independent detection areas, night vision, real-time video capture and recording
  • Connectivity – 10/100M Ethernet, WiFi 802.11b/g/n AP mode, 3G/4G support, ONVIF protocol support
  • Battery
    • 2x 12,000 mAh battery
    • Battery life – no sunshine: 32 hours, rainy days: 20 hours, temperature!? above 33 degrees the camera can work continuously.
  • Power Supply – 5V/2A (as backup?)
  • Dimensions – 370x290x110  mm
  • Weight – 3.7 kg
  • IP Rating – IP66
  • Operating Temperature  Range – -10 to 70 degrees Celsius

The IP Camera runs embedded Linux and ships with a bracket, a power adapter, an antenna, an Ethernet cable, a disk and 4 screws, as well as a user’s manual in English. It can be configured via a web interface from your PC, as well as “e-view7” mobile app for Android or iOS, but reviews rather mixed on Google Play. There’s very little info about 3G/4G support, and GearBest staff  – in their “customer questions & answers” (which is not always correct to say the least) – answered there’s no support for SIM card to one of their customers, so it could be that you’d need to connect a 3G or LTE USB dongle if you need this option.

e-view 7 app screenshots - Click to Enlarge

e-view 7 app screenshots – Click to Enlarge

The IP camera is sold for about $570 on Aliexpress including Fedex shipping, but I also found it on GearBest for around $400, and at first I thought one seller sold it for $239 on eBay, but then I realized there are HW0029, HW0029-3, and HW0029-4 models… with some differences in IR filter, connectivity (no 3G/4G), etc.., and HW0029-4 is usually $200 more, so it could mean 3G/4G is really built-in, as I don’t see much other features that would warrant the large price difference.

More details for HW0029 and HW0029-3 models (not not HW0029-4) can be found on Wanscam outdoor IP camera page.

Tweet I’ve just watched a video on ARMDevices.net about Enlaps Tikee solar powered device designed to take timelapses over several days and transfer the pictures / video over WiFi, 3G,…

LibreELEC 7.0 Ported to Amlogic S905 TV Boxes & ODROID-C2 Board

$
0
0

Most TV boxes are now sold pre-loaded with Android, but there’s still a fair amount of people who only want to play videos in their box, or only run Kodi, so they may prefer a Linux experience. Some companies provide ready-to-use solution such as ARNU Box Mach 10 64-bit Pure Linux, but in some cases it’s also possible to side-load OpenELEC or LibreELEC, with the main advantage being that it is usually quite cheaper at the cost of being a bit more complicated.

LibreELEC_AmlogicThanks to a comment by Sabai, I discovered LibreELEC 7.0.0 had been (unofficially) ported to Amlogic S905 TV boxes, and tested one devices such as NEXBOX A95X (S905), WeTek Hub, Beelink S905 Mini MXIII, MXQ Pro 4K, and others. If you own an ODROID-C2 board, you can load another LibreELEC 7.0.0 image.

If you are unsure whether your Android TV box is supported, you should first try the SD card method by copying  aml_autoscript, kernel.img,  SYSTEM and 2 md5 files to the root of the SD card, and enter recovery. This is all explained in details in the forum post linked above, and this will not affect your Android installation nor data.

If you’re happy with the results, and don’t plan to use Android anymore, you can flash LibreELEC to the NAND/eMMC flash. The procedure is the same as the SD card method, except the files are different, and you’ll have to copy aml_autoscript, factory_update_param.aml and an update zip file containing LibreELEC firmware to the SD card.

The developers have already fixed many bugs, but at the time of writing there are still a few known issues for the TV box version:

  • Reboot and poweroff may take a long time or don’t work at all when using Broadcom WiFi
  • No multichannel PCM audio
  • Jerky playback of some 29.97fps videos and some Live TV channels
  • CEC is still a bit buggy

There are also some unsupported features such as SSV6051 WiFi, front LED/segment displays, and built-in DVB tuners.

You can report other bugs on LibreELEC forums. If you’ve tried it on your own Amlogic S905 TV boxes, it might be nice to report success or failure in comments too.

Tweet Most TV boxes are now sold pre-loaded with Android, but there’s still a fair amount of people who only want to play videos in their box, or only run…

ArduCAM has designed a Tiny Coin-Sized Raspberry Pi Compatible Module

$
0
0

Now you can design your own custom hardware and leverage Raspberry Pi software, by integrating Raspberry Pi Compute module (and soon Raspberry Pi 3 Compute module) into your custom designed baseboard. But if you’d like something more compact, and even more compact than a Raspberry Pi Zero or RPi Compute module, ArduCAM has been developing a 24x24mm Raspberry Pi compatible system-on-module powered by Broadcom BCM2835 processor.

ArduCAMNanoPi_Module_Raspberry_Pi_Zero_Raspberry_Pi_Compute

ArduCAM “NanoPi” Module vs Raspberry Pi Zero and Raspberry Pi Compute Module

ArduCAM has also designed a small adapter board “UC-343 Rev. A” for the module with the following specifications:

  • SoC – Broadcom BCM2835 ARM11 Processor @ 700 MHz (or 1GHz?) with Videocore IV GPU
  • System Memory – 256MB/512MB LPDDR2
  • Storage – micro SD card slot
  • USB – 2x micro USB ports including one for power only
  • Camera – 1x MIPI CSI connector supporting 5MP or 8MP Pi cameras (dual camera support)
  • Expansion –
    • AV output header
    • 16-pin and 8-pin headers (unpopulated) with GPIOs, 2x I2C, UART, 2x SPI
  • Misc – Power LED
  • Power – 5V via micro USB port, or battery header
  • Dimensions – 36x36mm (Module only: 24mm x 24mm)
  • Weight – 5 grams
Click to Enlarge

Click to Enlarge

Since it’s compatible, it should run any operating system or program supported by Raspberry Pi Model B, Zero, and Compute module. They have even posted a demo video last month using the module connected to UC-343 demo baseboard.

[embedded content]

I’ve not been able to find availability nor pricing information, but since it’s starting to show up on some shops without price, it should be available very soon. ArduCAM website only seem to have the announcement, but no further details. If the module gets a little too popular, it could also end up being killed, just as what happened to ODROID-W board, as Broadcom may refuse to sell the processor.

Via Amornthep on Facebook.

Tweet Now you can design your own custom hardware and leverage Raspberry Pi software, by integrating Raspberry Pi Compute module (and soon Raspberry Pi 3 Compute module) into your custom…

MXQ Pro (G9CX) Android 6.0 TV Box Review – Part 1: Specs, Unboxing and Teardown

$
0
0

Most people probably don’t know Shenzhen Shiningworth Technology, but if you’ve ever bought a low cost Android TV box, it may have been made by them. Companies such as Eny Technology, Acemax, Shenzhen Tomato and other are relying on Shenzhen Shiningworth for some of their products, including the popular MXQ series (although other companies are also using MXQ “brand”), and in the past I often found their MAC address in products I reviewed. But this time, the company decided to send their latest product for review directly with MXQ Pro G9CX. I’ll write a two part review starting with specs and pictures, before testing the firmware and providing the second part of the review in a few weeks.

G9CX Specifications

Let’s start with the technical specifications:

  • SoC –  Amlogic S905X quad core ARM Cortex-A53 @ up to 2.0GHz with  penta-core Mali-450MP GPU up to 750MHz+
  • System Memory – 1GB DDR3
  • Storage – 8GB eMMC flash + micro SD card slot
  • Video Output – HDMI 2.0, AV
  • Video Codecs – 1080p/4k2k H.264, H.265, VP9; HD AVC/VC-1, HD MPEG1/2/4, RM/RMVB, Xvid/DivX 3/4/5/6, RealVideo 8/9/10
  • Audio – HDMI, AV, coaxial S/PDIF
  • Connectivity – 10/100M Ethernet, 02.11 b/g/n Wi-Fi @ 2.4GHz
  • USB – 2x USB 2.0 host ports
  • Power Supply –  DC 5V/2A
  • Dimensions – 125 x 120 x 20 mm

The device runs Android 6.0.

MXQ Pro G9CX Unboxing

The package shows the name MXQ Pro with some logos showing 64-bit processor, HDR10 and 4K support. There’s nothing that’s trademarked, so I would not expect problem with customs.
MXQ_Pro_Package
The device ships with an HDMI cable, an IR remote control taking two AAA battery, a 5V/2A power supply, and a user’s manual in English

Click to Enlarge

Click to Enlarge

The company also provides a separate wireless gamepad with an RF dongle and USB cable in a separate white box.
G9CX_Gamepad

When I looked at the device itself, it felt very familiar, as the case is exactly the same as the one used for Acemax G9C, and which I later reviewed as Tomato G9C

Click to Enlarge

Click to Enlarge

The front of the device as two LEDs and the IR receiver windows, one side include the microSD slot, and two USB 2.0 ports, while the rear panel features AV and HDMI video outputs, Ethernet, optical S/PDIF and the power jack. You may have noticed that the top cover is slightly lifted, but please ignore this, because I had to retake the side pictures after the teardown, as they were too dark the first time…

Click to Enlarge

Click to Enlarge

If we look on the bottom of the case, we’ll find MXQ PRO OTT TV BOX marking, G9CX model number, and C4:4E:AC MAC address prefix used by Shenzhen Shiningworth.

MXQ Pro G9CX Teardown

The method to open the device is exactly the same as for G9C TV box, there aren’t any screws, and you just need to gently lift the top cover, and remove some of the glue with a thin tool.

Click to Enlarge

Click to Enlarge

At this point you just have the large “LED” to lit up the MXQ sign. We’ll need to loosen four screws to access the main board.

Click to Enlarge

Click to Enlarge

Cooling is achieved with a thick metal place, and a black thermal pad covering the processor, which I’ve teared up to get a better view at Amlogic S905X processor.

Click to Enlarge

Click to Enlarge

The board, named G9CX_V0.95, also includes an 8GB Samsung KLM8G1WEPD-B031 eMMC flash, and two Nanya NT5CB256M16DP-EK DDR3 chips (1GB RAM in total), as well as PPT1615 magnetics for Ethernet, and a Realtek RTL8189ETV module for WiFi connectivity. There’s also a small chip under the board sticker: 4558D JRC dual high-gain operational amplifier probably for the audio jack.

Click to Enlarge

Click to Enlarge

Finally I had to loosen three more screws to check out the back of the board, but there’s not much there.

That’s all for the first part of the review. If you are interested in purchasing this product or a slightly modified version (different RAM/storage…) in quantities, you can contact Shenzhen Shiningworth through their website (warning: annoying chat pop-up showing up for each page load). MXQ Pro G9CX does not appear to be for sale at the retail level just yet.

Tweet Most people probably don’t know Shenzhen Shiningworth Technology, but if you’ve ever bought a low cost Android TV box, it may have been made by them. Companies such as…

$16 Bluetooth 4.0 LE Bracelet Monitors Babies’ Temperature

$
0
0
Home > Android, Hardware > $16 Bluetooth 4.0 LE Bracelet Monitors Babies’ Temperature

$16 Bluetooth 4.0 LE Bracelet Monitors Babies’ Temperature

With electronics getting cheaper and smaller everyday, I’m expecting medical diagnostic / monitoring tools with become more convenient and affordable,  and products from the more advanced Scanadu, to much simpler Bluetooth blood pressure monitors will help people better monitor their health themselves. I’ll also getting frequent request about the availability of soon-to-be FDA approved Omron Project Zero blood pressure smartwatch. Today I’ve come across a simple $16.51 Bluetooth Smart bracelet that could be useful to monitor the temperature of sick babies or very young children.

Bluetooth_Temperature_BraceletTechnical specifications:

  • Connectivity – Bluetooth 4.0 LE with up 18 meters range
  • Sensor – Temperature between 32 and 43 degree Celsius with -/+ 0.1 deg. accuracy
  • Smartphone compatibility – Android 4.3+ or IOS 7.0+
  • Functions – Thermometer; Temperature Alarm; Medical Records; Health Management, Cloud Backup.
  • Power Supply – CR2032 battery
  • Wristband Length – 14~19cm
  • Weight – 19 g

CR2032_Battery_Smartband

The band must be worn in such as way that the temperature probe is placed under the armpit. I could not find links to the app yet. That type of product is actually pretty common, and some – such as Vipose i-Fever – also include an LCD display.

Tweet With electronics getting cheaper and smaller everyday, I’m expecting medical diagnostic / monitoring tools with become more convenient and affordable,  and products from the more advanced Scanadu, to much…


Raspberry Pi Bootloader License Precludes it to Run on Competing Broadcom BCM283x Boards

$
0
0

Yesterday I wrote about ArduCAM Raspberry Pi compatible module, that packs most of the features of Raspberry Pi Zero or Pi Compute module into a 24x24mm board, and is based on Broadcom BCM2835 processor. One person also started a thread on Raspberry Pi forums about the tiny module, and one of the Raspberry Pi engineer and forum moderator replied that will would breach the bootloader license.

Raspberry_Pi_Bootloader_LicenseThe important part is the sentence highlighted above:

This software may only be used for the purpose of developing for, running or using a Raspberry Pi device.

ArduCAM module is only Raspberry Pi compatible, so it would indeed breach the license, and you can get into troubles if you planned to use that module in a commercial project, especially in countries where IP protection is taking seriously.

This raises a few questions. First why did the Raspberry Pi foundation chose that restrictive license? The obvious answer would be to protect there investment, but it’s also possible that since the bootloader and firmware is related to the GPU, video codec license may also have been a part of the decision.

The other issues is that after ordering 5K Broadcom BCM2835 processors for the first run of their ODROID-W module, Broadcom decided not to sell the processor anymore to Hardkernel subsequently. The exact reason is not known, but there are speculations that it was because of the Raspberry Pi foundation, and the license above may have been a reason for it. So could this also happen to ArduCAM? In theory yes, but If I’m not mistaken the company is based in China, and there are multiple smaller distributors, but it may not be quite as easy for Broadcom to block them.

The final question I has is whether it could possible to legally use the board without using the bootloader. Maybe… thanks to Kristina Brooks work on an open source bootloader for Raspberry Pi, released under BSD and GPLv2+, and not including any “Raspberry Pi only” conditions. There are some serious caveats such as no support for video codecs (licenses are part of it too), and while it can boot Linux, some things are broken.

If you are based in mainland China, and your customers are all based there, you probably don’t have to care about any of this, but in the western world, commercial projects should probably keep using official Raspberry Pi parts, or other solutions not involving Broadcom processors, nor official Raspberry Pi OS images.

Tweet Yesterday I wrote about ArduCAM Raspberry Pi compatible module, that packs most of the features of Raspberry Pi Zero or Pi Compute module into a 24x24mm board, and is…

Sunty SP-001 Portable Windows 10 mini PC Features a 7″ Touchscreen Display, an HD Projector

$
0
0

Sunty SP-001 mini PC looks quite similar to GOLE1, but comes with a large 7″ touchscreen display, and adds a TI 720p DLP projector. You can also carry it around thanks to its 6,500 mAh, and the brain of the device consists of an Intel Atom x5-Z8300 processor coupled with 2GB RAM and 32GB flash.

Sunty-SP-001Sunty SP-001 specifications:

  • SoC – Intel Atom x5-Z8300 “Cherry Trail” quad core processor @ 1.44 GHz / 1.84 GHz with Intel Gen8 HD graphics (2W SDP)
  • System Memory –  2GB DDR3L
  • Storage – 32GB eMMC flash + micro SD slot up
  • Display – 7″ capacitive touchscreen display with 1280×800 resolution
  • Video input – HDMI 1.4 port
  • Audio I/O – HDMI, 3.5mm headphone jack, speakers, built-in microphone
  • Projector – 0.3” TI DMD, DLPC3438/DLPA3000/DLP3010 DLP, 720p resolution, 200 Lumen brightness, 5000:1 contrast ratio, 20 to 300” screen size, autofocus, and 3000 hours life;
  • Connectivity – Dual band 802.11 b/g/n/ac Wi-Fi (Intel Wireles AC-3165module)
  • USB – 1x USB 3.0 host port
  • Misc – Power and volume buttons
  • Battery – 6,500 mAh battery good about about 2 hours of typical use
  • Power Supply – 12V
  • Dimensions & weight – N/A

The miniPC / tablet / pico projector combo runs Windows 10 Home.

Windows_10_mini_PC_Projector
The device is not available yet, but is expected to sell for $400 to $450. NetbookItalia interviewed the company which showcased the device a couple of months ago. The second part of the video also shows another battery-less 5″ modelthat connects to a projector unit and power bank, resulting in a much thicker device, but allowing you to take the mini PC away with you without the projector.
[embedded content]

Via miniPC DB and AndroidPC.es

Tweet Sunty SP-001 mini PC looks quite similar to GOLE1, but comes with a large 7″ touchscreen display, and adds a TI 720p DLP projector. You can also carry it…

Setting a VoIP SIP user agent with Embedded Linux

$
0
0

This is a guest post by Leonardo Graboski Veiga, working for Toradex.

Introduction

This article’s main goals are: to cross-compile the PJSIP libraries and the PJSUA API reference implementation; deploy it to the target system; give an overview about the SIP protocol; and explore the reference implementation features, regarding audio only. For this purpose, a Computer on Module (CoM) from Toradex was chosen in the following configuration: Colibri iMX6DL* + Colibri Evaluation Board. The evaluation board and CoM are displayed in Figures 1 and 2, respectively.

Figure 1 -

Figure 1 – Colibri Evaluation Board


Figure 2 -

Figure 2 – Colibri iMX6DL

VOIP or Voice over IP, is a term designed to refer to a set of methods and technologies targeted for the implementation of telephony services over the Internet. For the purpose of this article, the scope will be limited to the use of a reference implementation built upon the SIP communication handling protocol by means of the PJSIP libraries and PJSUA2 API. If you wish to gather more information about VOIP itself, there is a website that labels itself “A reference guide to all things VOIP” and it holds comprehensive information on the matter.

SIP is the Session Initiation Protocol – a protocol used for signaling and handling communication sessions. This protocol is sometimes referred to as the de facto standard for VOIP implementations. It is an IETF (Internet Engineering Task Force) standard even though there are other options to SIP, such as IAX2. SIP employs the RTP protocol for data transmission which itself is encapsulated in TCP or UDP and can be encrypted by using TLS.

PJSIP is a set of libraries that implements the SIP and related protocols such as RTP and STUN, among others in C language. Some of its advantages are that it is free, open source, and highly portable. It was started in 2005 and is still being maintained and improved with wide documentation and the advantage of having a high level API named PJSUA2 for easily building custom applications. The PJSUA2 even has an online book for its official documentation.

Cross-compilation

The first step to cross-compile the PJSIP libraries and the test/sample application is to have the toolchain set. To do it, we can follow the toolchain for hard float calling convention section of this article. Note that if you are willing to use your own cross-compilation toolchain, according to this PJSIP documentation, you are required to have the following GNU tools: GNU make (other make will not work), GNU binutils, and GNU gcc for the target.

If the basic rootfs provided by Linaro doesn’t have some ALSA headers and the library needed to compile PJSIP, we will download and compile these libraries from the ALSA project website. In this article, the alsa-lib version downloaded was 1.1.1. then we will install the headers and library to the Linaro rootfs.

Install the toolchain Linaro:

cd

wget -c https://releases.linaro.org/components/toolchain/binaries/5.2-2015.11-2/arm-linux-gnueabihf/gcc-linaro-5.2-2015.11-2-x86_64_arm-linux-gnueabihf.tar.xz

tar xvf gcc-linaro-5.2-2015.11-2-x86_64_arm-linux-gnueabihf.tar.xz

ln -s gcc-linaro-5.2-2015.11-2-x86_64_arm-linux-gnueabihf gcc-linaro

Export the environment variables:

export ARCH=arm

export PATH=~/gcc-linaro/bin/:$PATH

export CROSS_COMPILE=arm-linux-gnueabihf-

Download and unpack the ALSA lib:

wget ftp://ftp.alsa-project.org/pub/lib/alsa-lib-1.1.1.tar.bz2

tar xjvf alsa-lib-1.1.1.tar.bz2

cd alsa-lib-1.1.1/

Before compiling the ALSA lib source codes, it is necessary to run the autoconf script with the CFLAGS, LDFLAGS and prefix variables pointing to the rootfs from the Linaro toolchain:

1

./configure host=arm-linux-gnueabihf CC=arm-linux-gnueabihf-gcc CFLAGS=“-mfloat-abi=hard -mfpu=neon –sysroot=/home/leonardo/gcc-linaro/arm-linux-gnueabihf/libc” LDFLAGS=“-mfloat-abi=hard -mfpu=neon –sysroot=/home/leonardo/gcc-linaro/arm-linux-gnueabihf/libc” prefix=/home/leonardo/gcc-linaro/arm-linux-gnueabihf/libc/usr/

Then just build and install. After the make command, the compilation will fail at some point; but it doesn’t matter because the headers and library we need will have been compiled.

make

make install

Having the toolchain configured, it is time to download and extract the PJSIP source codes to the host machine and then go into the directory that holds the unpacked content. At the time this article was written, PJSIP version was 2.5.1.

cd

wget http://www.pjsip.org/release/2.5.1/pjproject-2.5.1.tar.bz2

tar xvjf pjproject-2.5.1.tar.bz2

cd pjproject-2.5

Before compiling the PJSIP source codes, it is necessary to run the autoconf script pointing to the previously modified rootfs from the Linaro toolchain. It is almost the same way we did to compile the ALSA libraries, except for the fact that the directory where we want the compiled libraries to be installed is a directory we will compress and deploy to the target machine.

1

./configure host=arm-linux-gnueabihf CC=arm-linux-gnueabihf-gcc CFLAGS=“-mfloat-abi=hard -mfpu=neon –sysroot=/home/leonardo/gcc-linaro/arm-linux-gnueabihf/libc” LDFLAGS=“-mfloat-abi=hard -mfpu=neon –sysroot=/home/leonardo/gcc-linaro/arm-linux-gnueabihf/libc” prefix=/home/leonardo/deploy

Then we are able to compile the libraries and also copy the reference implementation executable to the installation folder:

make dep

make

make install

cp pjsip-apps/bin/pjsua-arm-unknown-linux-gnueabihf ../deploy/

cd ..

The next steps are to compress the folder and copy it to the Colibri iMX6. To discover the iMX6 IP, you can issue the ifconfig command:

tar cjvf deploy.tar.bz2 deploy/

scp deploy.tar.bz2 root@192.168.10.5

Finally, log into the Colibri iMX6:

cd

tar xjvf deploy.tar.bz2

mv pjsua-arm-unknown-linux-gnueabihf .

cp -a deploy/. /usr/

rm -r deploy

Now, we have the PJSIP deployed to the target – although it isn’t necessary for our next steps, since we will be using a binary only, you may find it useful somehow while developing applications of your own. We are also ready to start using the reference implementation, but first, let’s check some other things.

Audio check and configuration

The PJSIP library uses ALSA (Advanced Linux Sound Architecture) resources, which is also the audio subsystem used by the Toradex embedded system BSPs. Before starting, make sure you plug a headphone/speakers and a microphone into the carrier board with the system powered-off, as illustrated in the Figure 3.

Figure 3 -

Figure 3 – Connecting the mic/headphones/speakers to the Evaluation Board

Then you can use the alsamixer application to adjust the audio options according to your system.

1

root@colibri-imx6:~# alsamixer

The configuration used is illustrated in the Figure 4 and you should notice that adjusting the microphone’s amplification too loud can cause distortion, thus, it is good to experiment with the settings. Even adjusting the mic option to zero won’t mute your microphone; it just means there will be no amplification, or in other words 0dB gain. Another important point to notice is that if you force power-off the system, the configurations you made might be lost, therefore reboot or shutdown from the command line the first time you make your changes.

root@colibri-imx6:~# reboot

or

root@colibri-imx6:~# shutdown -h now

Figure 4 -

Figure 4 – Alsamixer configuration (Click to Enlarge)

To test the audio input (microphone) and, subsequently the output (headphones/speakers), we will record some audio by using the arecord command and then play it by using the aplay command. Notice that for the arecord there are some options that we need to set: -V displays a VU meter so you have visual feedback whether your mic configuration is good or not; mono is passed since microphone is mono; -r is the sampling rate; -f is the format and -d is the duration in seconds. For more information regarding arecord, you can use the –help option, or if you want to know more about audio on the Colibri iMX6, you can go to the Toradex developer related page.

root@colibri-imx6:~# arecord -V mono -r 8000 -f S16_LE -d 15 Capture8kHz.wav

root@colibri-imx6:~# aplay Capture8kHz.wav

If you can hear yourself well, we are ready to go ahead. Otherwise, check the connectors and the audio configuration.

SIP protocol overview

SIP is the session initiation protocol standardized by the IETF and used for VOIP and other types of multimedia sessions, such as messaging and video. It is text-based and uses the UTF-8 encoding, usually choosing UDP or TCP over port 5060 as a transport protocol. The information provided here about this protocol is mostly based on information provided here.

The protocol has methods defined in its RFC and method extensions defined in other RFCs. A few of them are:

  • ACK: used in some situations for handshake
  • BYE: session hang up
  • CANCEL: cancel an invite
  • INVITE: add another user agent to a session
  • SUBSCRIBE: request information about the status of a session
  • NOTIFY: sent from time to time by the gateway, must be answered with 200 OK
  • MESSAGE: used to allow and transport instant messages

There are also response codes, each with a specific meaning, that consist of 3 digit values:

  • 1xx: provisional – request received and still needs to process e.g. 100 trying, 180 ringing
  • 2xx: success – action successfully received and accepted e.g. 200 ok
  • 3xx: redirection – there is still some action needed to complete the request e.g. 300 multiple choices; 305 use proxy
  • 4xx: client error – server cannot process request or the client sent invalid e.g. 400 bad request; 404 not found
  • 5xx: server error – server cannot process a valid request e.g. 500 server internal error
  • 6xx: global failure – no server can fulfill the request e.g. 600 busy everywhere; 603 decline

It is important to notice that the SIP protocol doesn’t carry the audio information. Instead, it uses the RTP protocol encoded usually in UDP or TCP transport. For a better understanding, the Figure 5 explains how the transaction between two user agents is done for a simple call.

Figure 5: Example of a simple SIP call between user agents

Figure 5: Example of a simple SIP call between user agents

To make calls, a SIP URI is needed. It is a form of identifying a communication resource. A complete SIP URI has the format sip:user:[email protected]:port;uri-parameters?headers, but there are systems which can operate even with a SIP URI that provides only the host.

PJSUA reference implementation

The PJSUA API reference implementation is a command-line based application which uses the PJSIP, PJMEDIA, and PJNATH libraries and implements a user agent, also known as softphone. Its source-code can be found here and is a useful starting point to developing your own solution. The full documentation regarding the use of the PJSUA application can be found here.

Before starting to test, find the IP address for both your embedded system and your PC/notebook. You must have both of them in the same LAN, because we are not worried about using a proxy server or anything like that, therefore our connection between devices will be made point-to-point.

eonardo@leonardo:~$ ifconfig

root@colibri-imx6:~# ifconfig

In this article, we will assume IP address 192.168.10.5 for the Colibri iMX6 and 192.168.10.1 for the PC. You also must have softphone software installed in your PC – it can even be the same reference application, if you want to compile it for your machine – this article will use the Linphone open-source softphone for Ubuntu 14.04 LTS. To start PJSUA in the embedded system use the following command. The PJSUA command line interface that you are expected to see is described in the Figure 6.

1

root@colibri-imx6:~# ./pjsua-arm-unknown-linux-gnueabihf

Figure 6: PJSUA command-line interface (Click to Enlarge)

Figure 6: PJSUA command-line interface (Click to Enlarge)

To make a new call from the embedded system to the PC, type “m” and then enter the simplest SIP URI possible which consists of passing only the softphone IP in the format sip:192.168.10.1. The process of making the call is illustrated in the Figure 7 and the answered call in the PC is illustrated in the Figure 8. To hang up, use the command “h”.

Figure 7: Making a call from PJSUA

Figure 7: Making a call from PJSUA

Figure 8: Linphone positive answer – in progress

Figure 8: Linphone positive answer – in progress

In order to send instant messages, type “i”, the SIP URI of the destination and the message, almost like the way we did to start a call. In your PC softphone, you should see the message. Try to send some message to the iMX6 by using the GUI. The Figure 9 displays the Linphone messaging interface with some messages exchanged between devices, while Figure 10 illustrates a message received by the Colibri iMX6 embedded system.

Figure 9: Message exchange between the Colibri iMX6 and the PC/notebook

Figure 9: Message exchange between the Colibri iMX6 and the PC/notebook

Figure 10: Message received by the Colibri iMX6 embedded system

Figure 10: Message received by the Colibri iMX6 embedded system

Additional configuration

In this subsection, some of the options for the PJSUA command-line application will be presented. They can be found here. Firstly, create a file named .pjsua-conf in the embedded system with the following contents:

stereo

auto-answer=200

duration=60

color

add-buddy=sip:192.168.10.1

The stereo configuration lets the audio output to be played on both the headphone’s speakers, while omitting it just makes the application to output the sound to only one of them. The auto-answer option lets you configure an answer code for incoming calls – in this case, the answer is 200, which means the call is accepted – and this can be useful in situations where the embedded system endpoint doesn’t has a human interface. Duration sets a maximum call duration in seconds, and this may be useful in applications such as debugging purposes. Color makes some log messages such as warnings and errors be colored, which helps identifying specific situations. Lastly, the add-buddy option lets you add SIP URIs so that you don’t have to add them manually every time you restart the application neither do you have to type the URI every time you want to make a call to the corresponding buddy (you may specify this option more than once for multiple buddies).

Passing the configuration file to the application:

1

root@colibri-imx6:~# ./pjsua-arm-unknown-linux-gnueabihf –config-file=.pjsua-conf

Among the various options available, there are two that are nice for testing purposes: rx-drop-pct=PCT and tx-drop-pct=PCT. They both simulate packet loss by adjusting its percentage (PCT). It was tested with a package loss for both Rx and Tx of 10%, 20% and 30%, respectively, while monitoring the call quality average displayed by Linphone, which ranges from 0 to 5. The quality went from almost 5.0 without loss to 3.3, 2.3, and 0.6, respectively. Figure 11 shows the Linphone screen capture for the last situation (30% loss).

Figure 11: Quality for Rx and Tx packet loss of 30%

Figure 11: Quality for Rx and Tx packet loss of 30%

There you go! Now you have a VOIP implementation for the Colibri iMX6 running and a starting point to develop your own application according to your needs. Some additional information will be presented in the next chapter: network monitoring in order to see the SIP packets and some transactions being made.

Network monitoring for SIP packets

In order to see the SIP transactions being made between devices, the Wireshark software will be employed. You must notice that there is a third IP address 192.168.0.20 in the transactions and that is because the notebook was used as a DHCP server for the iMX6. Therefore, the notebook has two IP addresses. Still, no further investigation on why or how the SIP application is accessing the second IP address.

The sequence of operations made while capturing the network is described below:

  1. Call from Colibri iMX6 and reject from the notebook
  2. Call from Colibri iMX6 and accept from the notebook
  3. Colibri iMX6 hang up
  4. Call from the notebook and accept from Colibri iMX6
  5. Colibri iMX6 puts on hold
  6. Colibri iMX6 resumes the call
  7. Colibri iMX6 sends UPDATE
  8. Colibri iMX6 sends instant message
  9. Notebook sends instant message
  10. SUBSCRIBE/NOTIFY

The Figure 12 displays only the SIP protocol packets exchanged during the capture, with the highlighted lines corresponding to the start of the situations described above. Hence, 10 lines are highlighted. Notice that there is a SUBSCRIBE/NOTIFY handshake a moment before the third operation listed above.

Figure 12 - Network monitoring for SIP protocol packets only (click to enlarge)

Figure 12 – Network monitoring for SIP protocol packets only (Click to enlarge)

In the Figure 13, there is a capture of a very brief conversation (~4s) SIP and RTP packets. Notice that while the notebook uses the IP address 192.168.10.1 to send data to the embedded system, this one replies to the IP address 192.168.0.20.

Figure 13: Network monitoring for SIP and RTP packets for a brief call (Click to Enlarge)

Figure 13: Network monitoring for SIP and RTP packets for a brief call (Click to Enlarge)

With the information gathered, this is a way to confirm in practice some of the information presented in the previous chapter SIP protocol overview.

This is the end of the article that goes through implementing the PJSUA console-based application on a Toradex Colibri iMX6 and Evaluation Board running embedded Linux. Thank you for reading and I hope it was a useful article!

* for T20 based modules, mfpu=neon could generate incompatible binaries.

Tweet This is a guest post by Leonardo Graboski Veiga, working for Toradex. Introduction This article’s main goals are: to cross-compile the PJSIP libraries and the PJSUA API reference implementation;…

Tencent and Skyworth Have Launched Rockchip RK3288 based miniStation Game Console in China

$
0
0

Tencent, the company behind the popular QQ chat program, and Skyworth a TV and audio visual manufacturer have worked together to launch a second version of miniStation game console powered by Rokchip RK3288 processor for $499 CNY ($75 US) in China.ministation_game_consoleminiStation game console specifications:

  • SoC – Rockchip RK3288 quad core ARM Cortex-A17 @ 1.8 GHz with Mali-T720 GPU
  • System Memory – 2GB DDR3
  • Storage – 8GB eMMC Flash, and micro SD card slot up to 128 GB
  • Video & Audio Output – HDMI up to 4K resolution
  • Connectivity – Gigabit Ethernet, dual band Wi-Fi
  • USB – 2x USB 2.0 host ports
  • Power Supply – 5V/2A

Rockchip_RK3288_Game_Console

The console runs TencentOS based on Android, and ships with an HDMI cable, a power cable, and a user’s manual. A bundle is a wireless gamepad is also offered for 100 RMB ($15) more.

ministation_GamepadSupported (or re-loaded?)  games include Nova 3, Asphalt 8, Modern Combat 5, and others. The console also provide access to various movies, series, and other TV shows, in similar fashion to what Xiaomi Mi Box 3 offers, with likely Geo-restrictions outside of China so it may opr may not be suitable for oversea Chinese.

Via IloveRochip

Tweet Tencent, the company behind the popular QQ chat program, and Skyworth a TV and audio visual manufacturer have worked together to launch a second version of miniStation game console…

Onion Omega2 is a $5 Linux WiFi IoT Board (Crowdfunding)

$
0
0

Onion Omega board was first introduced in 2015. The tiny OpenWrt Linux board featured an Atheros AR9331 processor with GPIO headers, and various baseboards and add-ons. The company has now launched a Kickstarter campaign for the second versions – Omega2 & Omega2 Plus – with a faster processor @ 580 MHz, compatible with docks and add-ons boards used for Omega, and a much lower price with $5 for the Omega2, and $9 for Omega2 Plus with more storage and memory.

Omega vs Omega2 / Omega2 Plus Board

Omega vs Omega2

Omega2 & Omega2 Plus specifications:

  • WiSoC – 580 MHz processor, possibly Mediatek MT7688 MIPS processor used in LinkIt Smart 7688
  • System Memory
    • Omega2 – 64MB
    • Omega2 Plus – 128MB
  • Storage
    • Omage2 – 16MB flash
    • Omega 2 Plus – 32MB flash + micro SD slot
  • Connectivity
    • Built-in – 802.11 b/g/n WiFi with on-board and external antenna support
    • Via add-on boards – Bluetooth 4.0 LE, GPS, and 2G/3G
  • Expansion – 15x GPIO, 2x PWM, 2x UART, 1x I2C, 1x SPI, 1xI2S
  • Power Supply –
  • Dimensions – A fourth the size of the Raspberry Pi, and less than a third the size of the Arduino UNO
Omega2 with Dock and Arduino Shield

Omega2 with Dock and Arduino Shield

Although the module can be used own its own, it’s much easier and fun to use with docks with the Expansion dock, mini dock,  power dock, or Arduino dock shown above, and combined with one or more add-on boards adding relays, OLED displays, servo board, Ethernet, Bluetooth, GPS, or 2G/3G cellular connectivity. The developers also partnered with ControlEverything to provide for sensors add-ons.

Omega2_ProgrammingOmega2 runs Linux, likely OpenWrt, and can be programming with visual editor like Node-RED, as well as programming languages like C, C++, Node.js, Python, and php. You can checkout their github repositories to see what they’ve done for the original Omega board.

The campaign has reached its funding target within a few hours. Beside Omega2 and Omega2 Plus board, you may also consider get a bundle with a dock of your choice for $20 or $24, and various other kits are also offered as rewards. Please note that shipping is not included, and they’ll ask you to pay shipping later when the board is ready to ship with the price for the board only expected to be around $2 for most people, but it can be as high as $15 to some countries. Delivery is scheduled for November 2016.

Thanks to Freire & Nanik for the tip.

Tweet Onion Omega board was first introduced in 2015. The tiny OpenWrt Linux board featured an Atheros AR9331 processor with GPIO headers, and various baseboards and add-ons. The company has…

Getting Started with NanoPi NEO Development Board – Ubuntu Core Firmware

$
0
0

boot0 version : 4.0.0���������������������������������������������������������v

boot0 commit : 182eb92ae6fac135787d4fc7bfd0e02aa445155c

fel_flag = 0x00000000

rtc[0] value = 0x00000000

rtc[1] value = 0x00000000

rtc[2] value = 0x00000000

rtc[3] value = 0x00000000

rtc[4] value = 0x00000000

rtc[5] value = 0x00000000

rtc[6] value = 0x00000000

rtc[7] value = 0x00000000

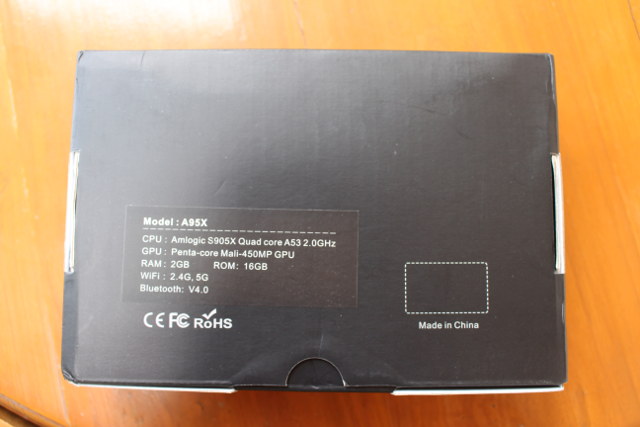
DRAM DRIVE INFO: V1.3

the chip id is 0x00000081

the chip id is 0x00000081

the chip id is 0x00000081

the chip id is 0x00000081

the chip id is 0x00000081

READ DQS LCDL = 002d2d2d

DRAM Type = 3 (2:DDR2,3:DDR3,6:LPDDR2,7:LPDDR3)

DRAM CLK = 432 MHz

DRAM zq value: 003b3bfb

DRAM dram para1: 10f20200

DRAM dram para2: 00000001

DRAM workmode1: 000009f4

DRAM SIZE =512 M

odt delay

dram size =512

card boot number = 0

card no is 0

sdcard 0 line count 4

[mmc]: mmc driver ver 2015-04-13 16:07:39

[mmc]: ***Try SD card 0***

[mmc]: SD/MMC Card: 4bit, capacity: 7580MB

[mmc]: vendor: Man 00035344 Snr 49731d92

[mmc]: product: SL08G

[mmc]: revision: 8.0

[mmc]: ***SD/MMC 0 init OK!!!***

sdcard 0 init ok

The size of uboot is 000e4000.

sum=2a2e0058

src_sum=2a2e0058

Succeed in loading uboot from sdmmc flash.

Ready to disable icache.

Jump to secend Boot.

SUNXI_NORMAL_MODE

[      0.415]e mode

U-Boot 2011.09-rc1-00000-g182eb92 (Jul 04 2016 - 10:10:53) Allwinner Technology

[      0.424]version: 1.1.0

[      0.426]uboot commit : 182eb92ae6fac135787d4fc7bfd0e02aa445155c

normal mode

[      0.437]pmbus:   ready

not set main pmu id

axp_probe error

[board_vendor] vid_used not used

[      0.477]PMU: pll1 1008 Mhz,PLL6=600 Mhz

AXI=336 Mhz,AHB=200 Mhz, APB1=100 Mhz

sid read already

fel key new mode

run key detect

no key found

no key input

dram_para_set start

dram_para_set end

normal mode

[      0.508]DRAM:  512 MiB

relocation Offset is: 15af2000

[box standby] read rtc = 0x0

[box_start_os] mag be start_type no use

user_gpio config

user_gpio ok

gic: normal or no secure os mode

workmode = 0

MMC:     0

[      0.592][mmc]: mmc driver ver 2015-04-13 14:50:00

[      0.597][mmc]: get sdc_phy_wipe fail.

[      0.601][mmc]: get sdc0 sdc_erase fail.

[      0.605][mmc]: get sdc_f_max fail,use default 50000000Hz

[      0.610][mmc]: get sdc_ex_dly_used fail,use default dly

[      0.616][mmc]: SUNXI SD/MMC: 0

[      0.629][mmc]: *Try SD card 0*

[      0.678][mmc]: CID 0x3534453 0x4c303847 0x8049731d 0x9201063d

[      0.683][mmc]: mmc clk 50000000

[      0.687][mmc]: SD/MMC Card: 4bit, capacity: 7580MB

[      0.691][mmc]: boot0 capacity: 0KB,boot1 capacity: 0KB

[      0.697][mmc]: ***SD/MMC 0 init OK!!!***

[      0.701][mmc]: erase_grp_size:0x1WrBlk * 0x200 = 0x200 Byte

[      0.707][mmc]: secure_feature 0x0

[      0.710][mmc]: secure_removal_type  0x0

[      0.714]sunxi flash init ok

script config pll_de to 864 Mhz

Not Found clk pll_video1 in script

script config pll_video to 297 Mhz

script config pll_periph0 to 600 Mhz

DRV_DISP_Init end

[disk_read_fs] no the partition

error: open tv_vdid.fex, maybe it is not exist

[disk_read_fs] no the partition

error: open disp_rsl.fex, maybe it is not exist

[disk_read_fs] no the partition

error: open disp_rsl.fex, maybe it is not exist

boot_disp.auto_hpd=1

auto hpd check has 100 times!

auto check no any connected, the output_type is 4

[      1.861]finally, output_type=0x4, output_mode=0x4, screen_id=0x0, disp_par0

try to read logic blk 0 without env partition

*** Warning - bad CRC, using default environment

In:    serial

Out:   serial

Err:   serial

fastboot partitions

mbr not exist

base bootcmd=run setargs_mmc boot_normal

bootcmd set setargs_mmc

key 0

cant find rcvy value

cant find fstbt value

no misc partition is found

to be run cmd=run setargs_mmc boot_normal

[      1.909][mmc]: MMC Device 2 not found

[      1.913][mmc]: Can not find mmc dev

[      1.916][mmc]: read first backup failed in fun sdmmc_secure_storage_read l4

sunxi_secstorage_read fail

get secure storage map err

check user data form private

the private part isnt exist

WORK_MODE_BOOT

adver not need show

sunxi_bmp_logo_display

[disk_read_fs] no the partition

error: open bootlogo.bmp, maybe it is not exist

sunxi bmp info error : unable to open logo file bootlogo.bmp

[      1.952]Hit any key to stop autoboot:  0

## Booting kernel from Legacy Image at 40007800 …

Image Name:   Linux-3.4.39-h3

Image Type:   ARM Linux Kernel Image (uncompressed)

Data Size:    4511456 Bytes = 4.3 MiB

Load Address: 40008000

Entry Point:  40008000

Verifying Checksum ... OK

Loading Kernel Image ... OK

OK

[      4.424][mmc]: MMC Device 2 not found

[      4.428][mmc]:  mmc  not find,so not exit

[      4.432]

Starting kernel ...

[sun8i_fixup]: From boot, get meminfo:

Start:  0x40000000

Size:   512MB

ion_carveout reserve: 160m@0 256m@0 130m@1 200m@1

ion_reserve_select: ion chipid  [0x2c00081!

ion_reserve_common: ion reserve: [0x56000000, 0x60000000]!

[    0.000000] Booting Linux on physical CPU 0

[    0.000000] Initializing cgroup subsys cpuset

[    0.000000] Initializing cgroup subsys cpu

[    0.000000] Linux version 3.4.39-h3 (root@wwd-ubuntu) (gcc version 4.6.3 2016

[    0.000000] cma: CMA: reserved 160 MiB at 56000000

[    0.000000] PERCPU: Embedded 8 pages/cpu @c0eca000 s11840 r8192 d12736 u32768

[    0.000000] Kernel command line: console=ttyS0,115200 console=tty0 root=/devt

[    0.000000] PID hash table entries: 2048 (order: 1, 8192 bytes)

[    0.000000] Dentry cache hash table entries: 65536 (order: 6, 262144 bytes)

[    0.000000] Inode-cache hash table entries: 32768 (order: 5, 131072 bytes)

[    0.000000] allocated 1048576 bytes of page_cgroup

[    0.000000] please try ‘cgroup_disable=memory’ option if you dont want memos

[    0.000000] Memory: 512MB = 512MB total

[    0.000000] Memory: 343172k/343172k available, 181116k reserved, 0K highmem

[    0.000000] Virtual kernel memory layout:

[    0.000000]     vector  : 0xffff0000 - 0xffff1000   (   4 kB)

[    0.000000]     fixmap  : 0xfff00000 - 0xfffe0000   ( 896 kB)

[    0.000000]     vmalloc : 0xe0800000 - 0xff000000   ( 488 MB)

[    0.000000]     lowmem  : 0xc0000000 - 0xe0000000   ( 512 MB)

[    0.000000]     pkmap   : 0xbfe00000 - 0xc0000000   (   2 MB)

[    0.000000]     modules : 0xbf000000 - 0xbfe00000   (  14 MB)

[    0.000000]       .text : 0xc0008000 - 0xc0897764   (8766 kB)

[    0.000000]       .init : 0xc0898000 - 0xc08e7e40   ( 320 kB)

[    0.000000]       .data : 0xc08e8000 - 0xc09622b8   ( 489 kB)

[    0.000000]        .bss : 0xc0962a6c - 0xc0a37630   ( 851 kB)

[    0.000000] Preemptible hierarchical RCU implementation.

[    0.000000]  Additional per-CPU info printed with stalls.

[    0.000000] NR_IRQS:544

[    0.000000] Architected local timer running at 24.00MHz.

[    0.000000] Switching to timer-based delay loop

[    0.000000] sched_clock: 32 bits at 24MHz, resolution 41ns, wraps every 1789s

[    0.000000] Console: colour dummy device 80×30

[    0.000000] console [tty0] enabled

[    0.001002] Calibrating delay loop (skipped), value calculated using timer f)

[    0.001072] pid_max: default: 32768 minimum: 301

[    0.001455] Mount-cache hash table entries: 512

[    0.002570] Initializing cgroup subsys cpuacct

[    0.002615] Initializing cgroup subsys memory

[    0.002688] Initializing cgroup subsys devices

[    0.002720] Initializing cgroup subsys freezer

[    0.002750] Initializing cgroup subsys blkio

[    0.002794] Initializing cgroup subsys perf_event

[    0.002877] CPU: Testing write buffer coherency: ok

[    0.002959] ftrace: allocating 24050 entries in 71 pages

[    0.030362] CPU0: thread -1, cpu 0, socket 0, mpidr 80000000

[    0.030417] [sunxi_smp_prepare_cpus] enter

[    0.030478] Setting up static identity map for 0x4061b9a0 - 0x4061b9f8

[    0.031604] CPU1: thread -1, cpu 1, socket 0, mpidr 80000001

[    0.031743] CPU2: thread -1, cpu 2, socket 0, mpidr 80000002

[    0.040264] CPU3: thread -1, cpu 3, socket 0, mpidr 80000003

[    0.040387] Brought up 4 CPUs

[    0.040387] SMP: Total of 4 processors activated (19200.00 BogoMIPS).

[    0.041102] devtmpfs: initialized

[    0.043889] wakeup src cnt is : 2.

[    0.043988] sunxi pm init

[    0.044143] pinctrl core: initialized pinctrl subsystem

[    0.056423] NET: Registered protocol family 16

[    0.057275] DMA: preallocated 2048 KiB pool for atomic coherent allocations

[    0.057275] script_sysfs_init success

[    0.057275] gpiochip_add: registered GPIOs 0 to 383 on device: sunxi-pinctrl

[    0.057275] sunxi-pinctrl sunxi-pinctrl: initialized sunXi PIO driver

[    0.057275] hw-breakpoint: found 5 (+1 reserved) breakpoint and 4 watchpoint.

[    0.057275] hw-breakpoint: maximum watchpoint size is 8 bytes.

[    0.057275] script config pll_video to 297 Mhz

[    0.057275] script config pll_de to 864 Mhz

[    0.057275] script config pll_ve to 402 Mhz

[    0.064130] bio: create slab <bio-0> at 0

[    0.070083] [ARISC] :sunxi-arisc driver v1.04

[    0.080315] [ARISC] :arisc version: [v0.1.58]

[    0.178051] [ARISC] :sunxi-arisc driver v1.04 startup succeeded

[    0.178187] pwm module init!

[    0.180481] SCSI subsystem initialized

[    0.180711] usbcore: registered new interface driver usbfs

[    0.180805] usbcore: registered new interface driver hub

[    0.190048] usbcore: registered new device driver usb

[    0.190188] twi_chan_cfg()340 - [twi0] has no twi_regulator.

[    0.190218] twi_chan_cfg()340 - [twi1] has no twi_regulator.

[    0.190244] twi_chan_cfg()340 - [twi2] has no twi_regulator.

[    0.191483] Linux video capture interface: v2.00

[    0.191781] Advanced Linux Sound Architecture Driver Version 1.0.25.

[    0.192397] Bluetooth: Core ver 2.16

[    0.192466] NET: Registered protocol family 31

[    0.192492] Bluetooth: HCI device and connection manager initialized

[    0.192521] Bluetooth: HCI socket layer initialized

[    0.192544] Bluetooth: L2CAP socket layer initialized

[    0.192580] Bluetooth: SCO socket layer initialized

[    0.192838] Switching to clocksource arch_sys_counter

[    0.204285] FS-Cache: Loaded

[    0.204663] CacheFiles: Loaded

[    0.216765] NET: Registered protocol family 2

[    0.217101] IP route cache hash table entries: 4096 (order: 2, 16384 bytes)

[    0.217711] TCP established hash table entries: 16384 (order: 5, 131072 byte)

[    0.218005] TCP bind hash table entries: 16384 (order: 5, 196608 bytes)

[    0.218267] TCP: Hash tables configured (established 16384 bind 16384)

[    0.218295] TCP: reno registered

[    0.218319] UDP hash table entries: 256 (order: 1, 8192 bytes)

[    0.218361] UDP-Lite hash table entries: 256 (order: 1, 8192 bytes)

[    0.218681] NET: Registered protocol family 1

[    0.219108] RPC: Registered named UNIX socket transport module.

[    0.219139] RPC: Registered udp transport module.

[    0.219161] RPC: Registered tcp transport module.

[    0.219182] RPC: Registered tcp NFSv4.1 backchannel transport module.

[    0.219693] hw perfevents: enabled with ARMv7 Cortex_A7 PMU driver, 5 countee

[    0.219834] sunxi_reg_init enter

[    0.220664] audit: initializing netlink socket (disabled)

[    0.220733] type=2000 audit(0.220:1): initialized

[    0.223217] NTFS driver 2.1.30 [Flags: R/W].

[    0.223546] fuse init (API version 7.18)

[    0.223909] msgmni has been set to 990

[    0.225401] Block layer SCSI generic (bsg) driver version 0.4 loaded (major )

[    0.225456] io scheduler noop registered

[    0.225476] io scheduler deadline registered

[    0.225553] io scheduler cfq registered (default)

[    0.226044] [DISP]disp_module_init

[    0.226376] cmdline,init_disp=

[    0.226421] cmdline,disp=

[    0.239068] [DISP] Fb_map_kernel_logo,line:926:Fb_map_kernel_logo failed!

[    0.254339] Console: switching to colour frame buffer device 160×45

[    0.270814] [DISP]disp_module_init finish

[    0.271166] sw_uart_get_devinfo()1503 - uart0 has no uart_regulator.

[    0.271345] sw_uart_get_devinfo()1503 - uart1 has no uart_regulator.

[    0.271519] sw_uart_get_devinfo()1503 - uart2 has no uart_regulator.

[    0.271693] sw_uart_get_devinfo()1503 - uart3 has no uart_regulator.

[    0.272473] uart0: ttyS0 at MMIO 0x1c28000 (irq = 32) is a SUNXI

[    0.272645] sw_uart_pm()890 - uart0 clk is already enable

[    0.272801] sw_console_setup()1233 - console setup baud 115200 parity n bitsn

[    0.383750] console [ttyS0] enabled

[    1.315415] uart1: ttyS1 at MMIO 0x1c28400 (irq = 33) is a SUNXI

[    1.474688] uart2: ttyS2 at MMIO 0x1c28800 (irq = 34) is a SUNXI

[    1.486102] uart3: ttyS3 at MMIO 0x1c28c00 (irq = 35) is a SUNXI

[    1.498070] [drm] Initialized drm 1.1.0 20060810

[    1.511839] loop: module loaded

[    1.519960] sunxi_spi_chan_cfg()1383 - [spi-0] has no spi_regulator.

[    1.531531] sunxi_spi_chan_cfg()1383 - [spi-1] has no spi_regulator.

[    1.543634] spi spi0: master is unqueued, this is deprecated

[    1.554689] tun: Universal TUN/TAP device driver, 1.6

[    1.564669] tun: (C) 1999-2004 Max Krasnyansky <maxk@qualcomm.com>

[    1.576883] PPP generic driver version 2.4.2

[    1.586170] PPP BSD Compression module registered

[    1.595694] PPP Deflate Compression module registered

[    1.606516] PPP MPPE Compression module registered

[    1.616137] NET: Registered protocol family 24

[    1.625330] PPTP driver version 0.8.5

[    1.633861] ehci_hcd: USB 2.0 ‘Enhanced’ Host Controller (EHCI) Driver

[    1.665586] sunxi-ehci sunxi-ehci.1: SW USB2.0 ‘Enhanced’ Host Controller (Er

[    1.679018] sunxi-ehci sunxi-ehci.1: new USB bus registered, assigned bus nu1

[    1.692631] sunxi-ehci sunxi-ehci.1: irq 104, io mem 0xf1c1a000

[    1.720040] sunxi-ehci sunxi-ehci.1: USB 0.0 started, EHCI 1.00

[    1.731689] hub 1-0:1.0: USB hub found

[    1.740174] hub 1-0:1.0: 1 port detected

[    1.769197] sunxi-ehci sunxi-ehci.2: SW USB2.0 ‘Enhanced’ Host Controller (Er

[    1.782526] sunxi-ehci sunxi-ehci.2: new USB bus registered, assigned bus nu2

[    1.795882] sunxi-ehci sunxi-ehci.2: irq 106, io mem 0xf1c1b000

[    1.820036] sunxi-ehci sunxi-ehci.2: USB 0.0 started, EHCI 1.00

[    1.831581] hub 2-0:1.0: USB hub found

[    1.840104] hub 2-0:1.0: 1 port detected

[    1.869145] sunxi-ehci sunxi-ehci.3: SW USB2.0 ‘Enhanced’ Host Controller (Er

[    1.882546] sunxi-ehci sunxi-ehci.3: new USB bus registered, assigned bus nu3

[    1.895964] sunxi-ehci sunxi-ehci.3: irq 108, io mem 0xf1c1c000

[    1.920045] sunxi-ehci sunxi-ehci.3: USB 0.0 started, EHCI 1.00

[    1.931743] hub 3-0:1.0: USB hub found

[    1.940430] hub 3-0:1.0: 1 port detected

[    1.969506] sunxi-ehci sunxi-ehci.4: SW USB2.0 ‘Enhanced’ Host Controller (Er

[    1.982926] sunxi-ehci sunxi-ehci.4: new USB bus registered, assigned bus nu4

[    1.996312] sunxi-ehci sunxi-ehci.4: irq 110, io mem 0xf1c1d000

[    2.020042] sunxi-ehci sunxi-ehci.4: USB 0.0 started, EHCI 1.00

[    2.031715] hub 4-0:1.0: USB hub found

[    2.040573] hub 4-0:1.0: 1 port detected

[    2.049844] ohci_hcd: USB 1.1 ‘Open’ Host Controller (OHCI) Driver

[    2.081391] sunxi-ohci sunxi-ohci.1: SW USB2.0 ‘Open’ Host Controller (OHCI)r

[    2.094575] sunxi-ohci sunxi-ohci.1: new USB bus registered, assigned bus nu5

[    2.107611] sunxi-ohci sunxi-ohci.1: irq 105, io mem 0xf1c1a400

[    2.174566] hub 5-0:1.0: USB hub found

[    2.183332] hub 5-0:1.0: 1 port detected

[    2.212691] sunxi-ohci sunxi-ohci.2: SW USB2.0 ‘Open’ Host Controller (OHCI)r

[    2.225947] sunxi-ohci sunxi-ohci.2: new USB bus registered, assigned bus nu6

[    2.239127] sunxi-ohci sunxi-ohci.2: irq 107, io mem 0xf1c1b400

[    2.314578] hub 6-0:1.0: USB hub found

[    2.323489] hub 6-0:1.0: 1 port detected

[    2.352873] sunxi-ohci sunxi-ohci.3: SW USB2.0 ‘Open’ Host Controller (OHCI)r

[    2.366187] sunxi-ohci sunxi-ohci.3: new USB bus registered, assigned bus nu7

[    2.379403] sunxi-ohci sunxi-ohci.3: irq 109, io mem 0xf1c1c400

[    2.454581] hub 7-0:1.0: USB hub found

[    2.463472] hub 7-0:1.0: 1 port detected

[    2.492879] sunxi-ohci sunxi-ohci.4: SW USB2.0 ‘Open’ Host Controller (OHCI)r

[    2.506221] sunxi-ohci sunxi-ohci.4: new USB bus registered, assigned bus nu8

[    2.519492] sunxi-ohci sunxi-ohci.4: irq 111, io mem 0xf1c1d400

[    2.594576] hub 8-0:1.0: USB hub found

[    2.603502] hub 8-0:1.0: 1 port detected

[    2.612892] Initializing USB Mass Storage driver...

[    2.623184] usbcore: registered new interface driver usb-storage

[    2.634532] USB Mass Storage support registered.

[    2.644412] usbcore: registered new interface driver ums-alauda

[    2.655762] usbcore: registered new interface driver ums-cypress

[    2.667193] usbcore: registered new interface driver ums-datafab

[    2.678492] usbcore: registered new interface driver ums_eneub6250

[    2.689914] usbcore: registered new interface driver ums-freecom

[    2.701074] usbcore: registered new interface driver ums-isd200

[    2.712153] usbcore: registered new interface driver ums-jumpshot

[    2.723300] usbcore: registered new interface driver ums-karma

[    2.734141] usbcore: registered new interface driver ums-onetouch

[    2.745161] usbcore: registered new interface driver ums-realtek

[    2.755982] usbcore: registered new interface driver ums-sddr09

[    2.766635] usbcore: registered new interface driver ums-sddr55

[    2.777251] usbcore: registered new interface driver ums-usbat

[    2.787763] usbcore: registered new interface driver usbserial

[    2.798133] usbserial: USB Serial Driver core

[    2.806813] usbcore: registered new interface driver option

[    2.816853] USB Serial support registered for GSM modem (1-port)

[    2.828034] file system registered

[    2.837371] android_usb gadget: Mass Storage Function, version: 2009/09/11

[    2.848974] android_usb gadget: Number of LUNs=3

[    2.858019]  lun0: LUN: removable file: (no medium)

[    2.867330]  lun1: LUN: removable file: (no medium)

[    2.876504]  lun2: LUN: removable file: (no medium)

[    2.885928] android_usb gadget: android_usb ready

[    2.895711] mousedev: PS/2 mouse device common for all mice

[    2.906659] ls_fetch_sysconfig_para: ls_unused.

[    2.915845] [RTC] WARNING: Rtc time will be wrong!!

[    2.924927] [RTC] WARNING: use *internal OSC* as clock source

[    2.935232] sunxi-rtc sunxi-rtc: rtc core: registered sunxi-rtc as rtc0

[    2.946335] i2c /dev entries driver

[    2.954416] IR RC5(x) protocol handler initialized

[    2.963665] tscdev_init: tsc driver is disabled

[    2.972781] Driver for 1-wire Dallas network protocol.

[    2.982265] sunxi_wdt_init_module: sunxi WatchDog Timer Driver v1.0

[    2.993101] sunxi_wdt_probe: devm_ioremap return wdt_reg 0xf1c20ca0, res->stf

[    3.004544] sunxi_wdt_probe: initialized (g_timeout=16s, g_nowayout=0)

[    3.019533] wdt_enable, write reg 0xf1c20cb8 val 0x00000000

[    3.029598] timeout_to_interv, line 167

[    3.037695] interv_to_timeout, line 189

[    3.045779] wdt_set_tmout, write 0x000000b0 to mode reg 0xf1c20cb8, actual tc

[    3.059001] device-mapper: uevent: version 1.0.3

[    3.068375] device-mapper: ioctl: 4.22.0-ioctl (2011-10-19) initialised: dm-m

[    3.081924] Bluetooth: HCI UART driver ver 2.2

[    3.091009] [cpu_freq] ERR:get cpu extremity frequency from sysconfig failedq

[    3.107010] no red_led, ignore it!

[    3.117104] usbcore: registered new interface driver usbhid

[    3.127606] usbhid: USB HID core driver

[    3.137590] script_get_item audio_pa_ctrl not found

[    3.152286] asoc: sndcodec <-> sunxi-codec mapping ok

[    3.167832] asoc: sndhdmi <-> sunxi-hdmiaudio.0 mapping ok

[    3.179765] oprofile: using arm/armv7-ca7

[    3.189030] u32 classifier

[    3.196637]     Actions configured

[    3.205076] Netfilter messages via NETLINK v0.30.

[    3.214709] nf_conntrack version 0.5.0 (7922 buckets, 31688 max)

[    3.226251] ctnetlink v0.93: registering with nfnetlink.

[    3.236698] NF_TPROXY: Transparent proxy support initialized, version 4.1.0

[    3.249054] NF_TPROXY: Copyright (c) 2006-2007 BalaBit IT Ltd.

[    3.260572] xt_time: kernel timezone is -0000

[    3.269851] IPv4 over IPv4 tunneling driver

[    3.279289] gre: GRE over IPv4 demultiplexor driver

[    3.288992] ip_gre: GRE over IPv4 tunneling driver

[    3.299247] ip_tables: (C) 2000-2006 Netfilter Core Team

[    3.309581] arp_tables: (C) 2002 David S. Miller

[    3.319009] TCP: cubic registered

[    3.326878] Initializing XFRM netlink socket

[    3.336138] NET: Registered protocol family 10

[    3.345475] mmc0: new high speed SDHC card at address aaaa

[    3.355905] Mobile IPv6

[    3.363030] ip6_tables: (C) 2000-2006 Netfilter Core Team

[    3.363062] mmcblk0: mmc0:aaaa SL08G 7.40 GiB

[    3.382689]  mmcblk0: p1 p2

[    3.382835] IPv6 over IPv4 tunneling driver

[    3.384038] NET: Registered protocol family 17

[    3.384083] NET: Registered protocol family 15

[    3.384311] Bluetooth: RFCOMM TTY layer initialized

[    3.384328] Bluetooth: RFCOMM socket layer initialized

[    3.384335] Bluetooth: RFCOMM ver 1.11

[    3.384343] Bluetooth: BNEP (Ethernet Emulation) ver 1.3

[    3.384350] Bluetooth: BNEP filters: protocol multicast

[    3.384359] Bluetooth: HIDP (Human Interface Emulation) ver 1.2

[    3.384481] L2TP core driver, V2.0

[    3.384505] PPPoL2TP kernel driver, V2.0

[    3.384511] L2TP IP encapsulation support (L2TPv3)

[    3.499135] L2TP netlink interface

[    3.500054] *******************sd init ok*******************

[    3.516605] L2TP ethernet pseudowire support (L2TPv3)

[    3.526037] VFP support v0.3: implementor 41 architecture 2 part 30 variant 5

[    3.538225] ThumbEE CPU extension supported.

[    3.546572] Registering SWP/SWPB emulation handler

[    3.556940] sunxi-rtc sunxi-rtc: setting system clock to 1970-01-01 00:00:08)

[    3.569263] ths_fetch_sysconfig_para: type err  device_used = 1.

[    3.581076] CPU Budget:Register notifier

[    3.589130] CPU Budget:register Success

[    3.597047] sunxi-budget-cooling sunxi-budget-cooling: Cooling device regist0

[    3.613963] ALSA device list:

[    3.621093]   #0: audiocodec

[    3.628038]   #1: sndhdmi

[    3.669665] EXT4-fs (mmcblk0p2): mounted filesystem with ordered data mode. )

[    3.682674] VFS: Mounted root (ext4 filesystem) on device 179:2.

[    3.693520] Freeing init memory: 316K

[    3.929911] systemd[1]: Failed to insert module ‘kdbus’: Function not implemd

[    4.460446] systemd[1]: systemd 225 running in system mode. (+PAM +AUDIT +SE)

[    4.502165] systemd[1]: Detected architecture arm.

[    4.552618] systemd[1]: Set hostname to <FriendlyARM>.

[    4.807091] systemd[1]: display-manager.service: Cannot add dependency job, .

[    4.829365] systemd[1]: Reached target Encrypted Volumes.

[    4.845042] systemd[1]: Reached target Swap.

[    4.859310] systemd[1]: Started Dispatch Password Requests to Console Direct.

[    4.877891] systemd[1]: Created slice Root Slice.

[    4.892959] systemd[1]: Listening on udev Kernel Socket.

[    4.908947] systemd[1]: Listening on Journal Socket.

[    4.924633] systemd[1]: Listening on /dev/initctl Compatibility Named Pipe.

[    4.942931] systemd[1]: Started Forward Password Requests to Wall Directory .

[    4.962308] systemd[1]: Reached target Paths.

[    4.978340] systemd[1]: Created slice System Slice.

[    4.995081] systemd[1]: Created slice system-getty.slice.

[    5.012422] systemd[1]: Created slice system-serialx2dgetty.slice.

[    5.100571] systemd[1]: Mounting Debug File System...

[    5.261128] systemd[1]: Starting Load Kernel Modules...

[    5.381053] systemd[1]: Starting Remount Root and Kernel File Systems...

[    5.470500] systemd[1]: Created slice User and Session Slice.

[    5.490350] systemd[1]: Reached target Slices.

[    5.508606] systemd[1]: Listening on Journal Audit Socket.

[    5.536063] systemd[1]: Listening on Journal Socket (/dev/log).

[    5.650633] systemd[1]: Starting Journal Service...

[    5.668334] systemd[1]: Reached target Remote File Systems (Pre).

[    5.740888] systemd[1]: Starting Create list of required static device nodes.

[    5.765081] systemd[1]: Listening on udev Control Socket.

[    5.880752] systemd[1]: Starting udev Coldplug all Devices...

[    5.974433] systemd[1]: Mounted Debug File System.

[    5.996267] systemd[1]: Started Journal Service.

Ubuntu 15.10 FriendlyARM ttyS0

FriendlyARM login: root

Password:

root@FriendlyARM:~#

Gateworks Ventana GW5530 SBC is Designed for Drones, Robots, and Digital Signage

$
0
0

Gateworks Ventana is a family of boards based on NXP i.MX6 processor designed for embedded applications, and often include one or more mini PCIe ports for expansion. Their latest single board computer – Ventana GW5530 –  is powered by an NXP i.MX 6Dual processor coupled with 512MB RAM, 256MB storage, a mini PCIe port, a micro SD / SIM card slot, micro HDMI output, and some I/Os.

Click to Enlarge

Click to Enlarge

Ventana GW5530 specifications:

  • SoC – NXP i.MX6 Dual Core ARM Cortex-A9 processor @ 800MHz with Vivante 2D and 3D GPUs
  • System Memory – 512MB DDR3 (Up to 2GB as option)
  • Storage – 256MB flash (Up to 2GB as option), micro SD/SIM card slot, serial configuration EEPROM
  • Video & Audio Output – micro HDMI 1.4 port
  • Connectivity – Optional u-blox EVA-M8M GPS Receiver with MMCX or u.FL Antenna Connector
  • USB – 1x micro USB 2.0 OTG Port
  • Sensors – 9-axis inertial module (accelerometer/gyro/magnetometer)
  • Expansion
    • High-Power Gen 2.0 mini-PCIe Socket with USB 2.0 Support
    • SIM socket (shared with micro SD card)
    • Video input header for CVBS, Y/C, YPrPb
    • Digital and serial I/O header
  • Debugging – JTAG connector
  • Misc – RTC with battery backup, voltage and temperature monitor, programmable watchdog timer, reset header, LED header
  • Power Supply – 8 to 60V DC input via 2-pin header; Reverse voltage protection
  • Power Consumption – [email protected] (typical); 7W Available for mini-PCIe socket
  • Dimensions – 100x35x13 mm
  • Weight – 28 grams
  • Temperature Range – -40°C to +85°C
    Click to Enlarge

    Click to Enlarge

The company can provide OpenWrt, Android, Yocto Linux, and OpenEmbedded board support packages (BSP) for the board. Some documentation can be found on Ventana wiki. The boards targets “small embedded applications such as Man Portable Units (MPUs), Unmanned Aerial Vehicles (UAV) equipment, digital signage, and robotics”.

Block Diagram

Block Diagram

The board is available now, with pricing not disclosed, and 1 year warranty. Gateworks GW11038 development kit with GW5530 SBC, OpenWrt BSP, USB and video cables, power supply, and a JTAG programmer can also be purchased for evaluation. More details can be found on Gateworks Ventana GW5530 product page.

Tweet Gateworks Ventana is a family of boards based on NXP i.MX6 processor designed for embedded applications, and often include one or more mini PCIe ports for expansion. Their latest…


Google Research PRUDAQ is a 40MSPS ADC Data Acquisition (DAQ) Cape for BeagleBone Black & Green

$
0
0

Engineers at Google Research wanted to measure the strength of a carrier signals without having to use a bulky oscilloscope or DAQ (Data Acquisition) system,  so they looked into several makers boards to achieve this task, eventually decided to go with BeagleBone Black / Green, and created their own PRUDAQ cape capable of sampling 40 million samples per second, and open source it all.

PRUDAQPRUDAQ cape specifications:

  • Dual-channel simultaneously-sampled 10-bit ADC (Analog Devices AD9201)
  • Up to 20MSPS per channel (40MSPS total) theoretical
  • 0-2V input voltage range (DC coupled)
  • 4:1 analog switches in front of each channel provide a total of 8 single-ended analog inputs. (See here for differential input)
  • SMA jacks for direct access to the 2 ADC channels
  • Flexible clock options:
    • External input via SMA jack
    • Internal on-board 10MHz oscillator
    • Programmable clock from BeagleBone GPIO pins
  • Powered via BeagleBone headers – no external power needed
  • Fully exposed BeagleBone headers on top to connect/stack more electronics or another cape
  • Dimensions – 87mm x 56mm (+/- 1mm)
  • Weight – 29 grams

The complete software and hardware documentation can be found on the Wiki and source code and design files in Github. The software is based on BeagleLogic logic analyzer, and you can retrieve and analyze the data on your computer using the command line with a typical output looking like:

Actual GPIO clock speed is 2000.00Hz
0000000 00000 00000 00001 00513 00001 00513 00001 00513
0000010 00001 00513 00001 00513 00001 00513 00001 00513
0000020 00001 00513 00001 00513 00001 00513 00001 00513
0000030 00001 00513 00001 00513 00001 00513 00001 00513
0000040 00001 00513 00001 00513 00001 00513 00001 00514
0000050 00001 00513 00001 00513 00001 00513 00001 00513
0000060 00001 00513 00001 00513 00001 00513 00001 00513
0000070 00001 00513 00001 00513 00001 00513 00001 00513
0000080 00001 00513 00001 00513 00001 00513 00001 00513
0000090 00001 00513 00001 00513 00001 00513 00001 00513
5256 bytes / second. 5256B written, 5256B read.

1

2

3

4

5

6

7

8

9

10

11

12

13

14

15

16

17

$ sudo ./prudaq_capture -i 0 -q 4 -f 2000 pru0.bin pru1.bin | hexdump -d -v | head

2097152B of shared DDR available.

Physical (PRU-side) address:91800000

Virtual (linux-side) address: 0xb6b9a000

Actual GPIO clock speed is 2000.00Hz

0000000   00000   00000   00001   00513   00001   00513   00001   00513

0000010   00001   00513   00001   00513   00001   00513   00001   00513

0000020   00001   00513   00001   00513   00001   00513   00001   00513

0000030   00001   00513   00001   00513   00001   00513   00001   00513

0000040   00001   00513   00001   00513   00001   00513   00001   00514

0000050   00001   00513   00001   00513   00001   00513   00001   00513

0000060   00001   00513   00001   00513   00001   00513   00001   00513

0000070   00001   00513   00001   00513   00001   00513   00001   00513

0000080   00001   00513   00001   00513   00001   00513   00001   00513

0000090   00001   00513   00001   00513   00001   00513   00001   00513

    5256 bytes / second. 5256B written, 5256B read.

The Beaglebone Black already has an ADC input, but PRUDAQ allows for much faster sampling, suitable to capture radio waves for example. Bear in mind that it’s not really suitable to be used as an oscilloscope due to limitations such as 0 to 2V range, and others. Any specific questions about PRUDAQ project can be asked on PRUDAQ users Google Group.

While the add-on board has been designed by Google Research engineers, it is not a Google product, and it’s made by GetLab, and currently sold on GroupSets for $79 for the cape only, or $159 as a bundle with a BeagleBone Black, PRUDAQ cape, an 8GB micro SD card pre-loaded with BeagleLogic image, one 64GB USB 3.0 Thumb Drive, one BNC-M to SMA-M RG-58 Cable, a USB mini cable, and 3 jumpers.

Tweet Engineers at Google Research wanted to measure the strength of a carrier signals without having to use a bulky oscilloscope or DAQ (Data Acquisition) system,  so they looked into…

Review of GOLE1 mini PC with 5″ Display – Part 1: Unboxing and Teardown

$
0
0

GOLE1 is a portable mini PC running Windows 10 and Android 5.1, featuring a 5″ touchsceen display, and powered by an Intel Atom x5-Z8300 “Cherry Trail” processor. The device was launched on Indiegogo, and the project raised close to $300,000. I’ve now received an early sample with 4GB RAM and 64GB storage for review, with – I was told – a 1,800 mAh battery instead of the 2,600 mAh battey backers will receive. I’ll do a 2 or 3 parts review, starting by checking out the hardware, before testing both Windows 10 and Android 5.1 on the platform.

GOLE1 Unboxing

The device is packed into a simple white box with “GOLE1 Designed by GOLE” string.
GOLE1_Package

The mini PC ships with a 5V/3A power supply which should be powerful enough to connect a USB 3.0 hard drive, an HDMI cable, and a user’s manual in English.

Click to Enlarge

Click to Enlarge

The device looks a little like a mini portable TV because of its shape an antenna. The top features the 5″ touchscreen display, as well as volume, Home/Windows, and power buttons. A micro USB port, USB 2.0 & USB 3.0 ports, and a micro SD slot can be found on one of the sides, while the rear panel includes the WiFi antenna, a 3.5mm audio jack, HDMI 1.4 output, two more USB 2.0 ports, a Fast Ethernet port, and the DC jack.

Click to Enlarge

Click to Enlarge

I planned to show a quick boot demo with Windows 10 and Android 5.1 in the unboxing video, but the battery was depleted, so the unboxing / hands-on video is little less interesting than expected.

[embedded content]

GOLE1 Teardown

GOLE1 metallic enclosure can be opened by taking out of four rubber pad on the bottom, and loosening four screws. The bottom cover does not come off that easily, so I used a sharp tool and inserted into one of the ventilation holes to gently lift it up.

Click to Enlarge

Click to Enlarge

Cooling is achieved with a large heatsink covering Atom processor, the memory and a Samsung eMMC flash. Finally, I did get a 2,600 mAh battery if the markings are to be believed [Update: the company has now double confirmed I truly got a 1,800 mAh battery, but they applied the mass production sticker on it]. I wanted to completely remove the board from the case, so I removed the battery, and loosened 6 more screws, but I did not come easily, and I did not want to risk damaging the unit at this early stage.

Click to Enlarge

Click to Enlarge

We can still have a closer look at the board and check out some of the chips. WiFi and Bluetooth connectivity is achieved via an Ampak AP6234 module supporting dual band WiFi 802.11b/g/n and BT 4.0, with an external antenna plugged into a connector (i.e. not soldered). Davicom DM9621ANP USB 2.0 to Fast Ethernet controller is used in conjunction with PHC SMD-16003NL transformer to provide wired network connectivity. Other ICs includes Genesys Logic GL850G USB 2.0 hub controller, and ATMLH602-46D which should an I2C EEPROM to store data like the MAC address.

If you’ve missed the crowdfunding campaign, you can (pre-) purchase GOLE1 mini PC starting at $99 with 2GB RAM / 32GB flash, and up to $144 with 4GB/64GB on GearBest (GBGF4 coupon may lower the price further). I have not found the device for sale on other websites yet.

Tweet GOLE1 is a portable mini PC running Windows 10 and Android 5.1, featuring a 5″ touchsceen display, and powered by an Intel Atom x5-Z8300 “Cherry Trail” processor. The device…

Superbook turns your Android smartphone in to a laptop for $99 (Crowdfunding)

$
0
0

Using a laptop shell with a smartphone is not a new concept, but products like Motorola Lapdock were eventually phased out. But some people think there’s a market here, that Lapdock may just have been ahead of it time, and with smartphone faster than ever, it now makes more sense to use them as laptop too. That’s probably why the Superbook, allowing you to connect your smartphone to a larger screen and keyboard via a USB OTG cable, has just launched on Kickstarter.

SuperbookSuperbook specifications:

  • Display – 11.6″ LCD display; 1366×768 resolution
  • Keyboard – QWERTY keyboard with multi-touch trackpad
  • USB – USB type-C port (smartphone with micro B USB  are also supported via an adapter)
  • Misc – Android-specific navigation keys (Home, Back, Menu, Recent)
  • Custom Charging Port w/ Standard US charger
  • Battery – Good for 8 hours or more
  • Dimensions – 19.3 x 28.7 x 1.8cm

Superbook also charges your smartphone. You’ll need a phone with Android 5.0 or greater, a dual core processor, at least 1.5GB RAM, a type-C or micro B connector, and 25MB free storage (100MB recommended). Why does it have minimum requirements? Because you’ll need to install Andromium OS app which provides a desktop-like interface to Android when connected to Superbook.

If you are an Android app developer, Andromium will also release an SDK to optimize your app for the platform.

The project has already raised closed to $300,000 after about half-day since the launch. You can pledge $99 to get the Superbook with a custom USB OTG cable, and a charging adapter. Shipping is not included though, and add $20 to the US, $40 to the rest of the world. Delivery is scheduled for February 2017.

Tweet Using a laptop shell with a smartphone is not a new concept, but products like Motorola Lapdock were eventually phased out. But some people think there’s a market here,…

FriendlyARM NanoPi NEO Board Benchmarks

$
0
0

We’ve already seen how to setup NanoPi NEO with Ubuntu Core, and while it’s mostly designed as an IoT node, for example to control relays over Ethernet or the Internet, I’ve still decided to see how it would perform under load by running Phoronix benchmarks, and then network and storage (micro SD card provided by FriendlyARM). It’s a small board, so we should expect it to heat a lot under load, especially it does not come with an heatsink by default. Also bear in mind that performance may dramatically change depending on the software implementation, and for the test, I’m using the company’s Ubuntu Core firmware.

Before start the benchmark, I noticed that QTe-Demo was running in the background, probably because it was used on their other board with video output or LCD. but it’s taking some CPU usage, and is absolutely not needed here.

To disable it, edit /etc/rc.local, and comment out one line as follows:

1

#/opt/QtE-Demo/run.sh&

I also planned to install RPi-Monitor, which is very easy to install in armbian, but I could not find a quick way for the Ubuntu core image, so I skipped it for now, instead manually checking the temperature.

Let’s install Phoronix Test Suite:

apt install php5-cli php5-gd

wget http://phoronix-test-suite.com/releases/repo/pts.debian/files/phoronix-test-suite_6.2.1_all.deb

dpkg -i phoronix-test-suite_6.2.1_all.deb

and run the benchmark against Orange Pi, Banana Pi, Raspberry Pi, etc… boards results.

1

phoronix-test-suite benchmark 1604204-GA-1604082GA37

Since it will take a while (4 to 5 hours) checking the terminal output while the benchmark is running may be informative:

Test Results:
368
320
304
301
292
295

Average: 313 Real C/S

1

2

3

4

5

6

7

8

9

10

11

12

13

14

15

16

17

18

19

20

21

22

John The Ripper 1.8.0:                                                          

    pts/john-the-ripper-1.5.1 [Test: Blowfish]                                  

    Test 1 of 7                                                                

    Estimated Trial Run Count:    3                                            

    Estimated Test Run-Time:      5 Minutes                                    

    Estimated Time To Completion: 32 Minutes (08:13 UTC)                        

        Started Run 1 @ 07:41:35                                                

        Started Run 2 @ 07:42:31                                                

        Started Run 3 @ 07:43:28  [Std. Dev: 10.07%]                            

        Started Run 4 @ 07:44:24  [Std. Dev: 9.58%]                            

        Started Run 5 @ 07:45:21  [Std. Dev: 9.54%]                            

        Started Run 6 @ 07:46:17  [Std. Dev: 9.10%]                            


    Test Results:                                                              

        368                                                                    

        320                                                                    

        304                                                                    

        301                                                                    

        292                                                                    

        295                                                                    


    Average: 313 Real C/S    

Phoronix will run the same test several times, and in theory, every iteration of the test should have roughly the same results, but in practice, modern processors do overheat, and either reduce frequency or cut the number of cores to keep the temperature below the (safe) junction temperature. The results here don’t look good, because they become slower overtime. A temperature check with an IR thermometer after one hour or so, shows the CPU is getting really hot.
NanoPi_NEO_CPU_TemperatureWe can also verify this in the command line by reading one of the temperature sensor:

cat /sys/class/thermal/thermal_zone1/temp

80

It’s hot, and the temperature tops at 80 C, and sometimes drops down to 76 C, before getting back to 80C, so the system is clearly throlling and the final results made that clear (ARMv7 rev 5 is NanoPi NEO without heatsink). Please also note that all 6 boards included below are using the same governor settings (interactive or ondemand). However, NaniPi NEO’s Ubuntu core Linux kernel is configured to run the RAM at the lower frequency to either decrease power consumption or heat generation.

Click to Enlarge

Click to Enlarge

John the Ripper is a multi-threaded password cracker, and in theory NaniPi NEO should have about the same performance as Orange Pi One, but there’s clearly a massive drop in performance.

Click to Enlarge

Click to Enlarge

Same thing for single threaded FLAC audio encoding, where NanoPi NEO is almost 50% slower than Orange Pi One, and about the same as Raspberry Pi 2.

So let’s check what happens is we had an heatsink. I glued the largish heatsink (for that board) by putting thermal paste on Allwinner H3 and the Samsung DDR3 SDRAM chip. It is not centered on the board because the Ethernet jack pins prevent this. You could add some thermal pads to work around this.

NanoPi_NEO_Heatsink_Thermal_Paste

So let’s start again phoronix-test-suite to see if this improves anything:

1

phoronix-test-suite benchmark 1607218-GA-1605224GA81

Terminal output for the first benchmark:

Test Results:
461
456
438

Average: 452 Real C/S

1

2

3

4

5

6

7

8

9

10

11

12

13

14

15

16

John The Ripper 1.8.0:                                                          

    pts/john-the-ripper-1.5.1 [Test: Blowfish]                                  

    Test 1 of 7                                                                 

    Estimated Trial Run Count:    3                                             

    Estimated Test Run-Time:      5 Minutes                                     

    Estimated Time To Completion: 3 Hours, 40 Minutes (05:50 UTC)               

        Started Run 1 @ 02:10:39                                                

        Started Run 2 @ 02:11:35                                                

        Started Run 3 @ 02:12:31  [Std. Dev: 2.68%]                             

    Test Results:                                                               

        461                                                                     

        456                                                                     

        438                                                                     

    Average: 452 Real C/S                                                         

We can see the results are both higher, and more stable, so that’s a good sign.

The heatsink temperature is about 54 C after around one or two hours.

NanoPi_NEO_Heatsink_TemperatureBut the CPU temperature is still high, and topping at 80 C from time to time:

cat /sys/class/thermal/thermal_zone1/temp

80

Nevertheless the final results are way better. I repeated the test with heatsink twice to some issue with uploading the results the first time…

Click to Enlarge

Click to Enlarge

FLAC audio encoding is now just as good as on Orange Pi One.

Click to Enlarge

Click to Enlarge

John the Ripper is still a bit lower on NanoPi NEO, which could either be because of RAM clock or overheating despite the heatsink. The multi-threaded performance is still better than on Raspberry Pi 2 however.

So if you want to want NanoPi NEO to control some relays, you probably don’t need to care at all about this, but if you plan to use it as part as a cluster or build farm, you’d have to consider using a heatsink and possibly a fan to get optimal performance, as well as make sure the board does not die prematurely…

Let’s switch to Ethernet performance, but running iperf server on the board:

1

iperf -s

and running iperf client on a computer running Ubuntu 14.04 to test dual duplex performance:

Client connecting to 192.168.0.104, TCP port 5001
TCP window size: 74.4 KByte (default)
————————————————————
[ 6] local 192.168.0.109 port 42860 connected with 192.168.0.104 port 5001
Waiting for server threads to complete. Interrupt again to force quit.
[ 6] 0.0-60.1 sec 672 MBytes 93.8 Mbits/sec
[ 5] 0.0-60.1 sec 185 MBytes 25.8 Mbits/sec

1

2

3

4

5

6

7

8

9

iperf -t 60 -c 192.168.0.109 -d

Client connecting to 192.168.0.104, TCP port 5001                               

TCP window size: 74.4 KByte (default)                                           


[  6] local 192.168.0.109 port 42860 connected with 192.168.0.104 port 5001     

Waiting for server threads to complete. Interrupt again to force quit.          

[  6]  0.0-60.1 sec   672 MBytes  93.8 Mbits/sec                                

[  5]  0.0-60.1 sec   185 MBytes  25.8 Mbits/sec

So the download speed is all good at 93.8 Mbps, but the upload speed is not quite up to the task at 25.8 Mbps. Remember that a dual duplex test is a worse case scenario with heavy traffic going in both directions at the same, and it does not mean upload speed is limited to 25 Mbps in more typical scenarios.

NanoPi NEO does not come with any storage, and you can use any micro SD card you want, but FriendlyARM sells and recommend Sandisk Ultra 8GB SD micro card,  so it would interesting to see how the one they’ve sent me performs.

For that purpose I’ve installed iozone to test the micro SD card performance. You’ll need to edit /etc/apt/source.list to add multiverse at the end of the first two lines, and then:

apt update

apt install iozone3

I’ve run iozone3 with armbian community command line options, so that it can be compared to other SD cards:

Iozone: Performance Test of File I/O
Version $Revision: 3.429 $
Compiled for 32 bit mode.
Build: linux
Include fsync in write timing
O_DIRECT feature enabled
Auto Mode
File size set to 102400 kB

Command line used: iozone -e -I -a -s 100M -r 4k -r 16k -r 512k -r 10242
Output is in kBytes/sec
Time Resolution = 0.000001 seconds.
Processor cache size set to 1024 kBytes.
Processor cache line size set to 32 bytes.
File stride size set to 17 * record size.
random random
kB reclen write rewrite read reread read write d
102400 4 1955 2352 7864 7863 7761 736
102400 16 7564 7279 15509 15645 15571 99
102400 512 7570 11354 22914 22631 22909 2503
102400 1024 9598 10864 22947 22948 22894 5094
102400 16384 9689 9647 23075 22742 23069 9709

iozone test complete.

1

2

3

4

5

6

7

8

9

10

11

12

13

14

15

16

17

18

19

20

21

22

23

24

25

26

iozone -e -I -a -s 100M -r 4k -r 16k -r 512k -r 1024k -r 16384k -i 0 -i 1 -i 2

       Iozone: Performance Test of File I/O

                Version $Revision: 3.429 $

                Compiled for 32 bit mode.

                Build: linux                                                                            

        Include fsync in write timing                                           

        O_DIRECT feature enabled                                                

        Auto Mode                                                               

        File size set to 102400 kB                                              

        Command line used: iozone -e -I -a -s 100M -r 4k -r 16k -r 512k -r 10242

        Output is in kBytes/sec                                                 

        Time Resolution = 0.000001 seconds.                                     

        Processor cache size set to 1024 kBytes.                                

        Processor cache line size set to 32 bytes.                              

        File stride size set to 17 * record size.                               

                                                              random    random  

              kB  reclen    write  rewrite    read    reread    read     write d

          102400       4     1955     2352     7864     7863     7761      736  

          102400      16     7564     7279    15509    15645    15571       99  

          102400     512     7570    11354    22914    22631    22909     2503  

          102400    1024     9598    10864    22947    22948    22894     5094  

          102400   16384     9689     9647    23075    22742    23069     9709  

iozone test complete.

So it’s not quite the fastest around, especially in terms of random write for some files, and if you want a board that boot very fast (i.e. faster than the 10 seconds boot I got), and your application is I/O depend you may want to get something better like Samsung EVO 32GB.

Tweet We’ve already seen how to setup NanoPi NEO with Ubuntu Core, and while it’s mostly designed as an IoT node, for example to control relays over Ethernet or the…

NEXBOX A95X (S905X) Android TV Box Review – Part 1: Unboxing and Teardown

$
0
0

NEXBOX A95X is an Android TV box that first launched with Amlogic S905 processor, the company thought it was a good idea to make multiple models with the same name with a combination of memory capacity (1 or 2GB), storage capacity (8 or 16GB), and even processor, as you may get a box with Amlogic S905, or Amlogic S905X processor adding 4K VP9 and HDR support. So you should be careful befoire your place an order, and check you got the right model when you receive it. The company now sent me their “high-end” A95X Android 6.0 model with Amlogic S905X processor, 2GB RAM, and 16GB storage, as well as Fast Ethernet and dual band WiFi 802.11 b/g/n support. In the first part of the review I’ll check out the hardware, including the board itself, before testing the firmware in more details in the second part.

NEXBOX A95X Unboxing

The box ships in the black package with no apparent trademarked logos or names.NEXBOX_A95X_PackageYou can double-checked the main specifications on the bottom of the package, and you’ll also notice the CE / FCC / RoHS markings which could matter when you import the device.

NEXBOX_A95X_Specifications_CE_FCC

Click to Enlarge

Click to Enlarge

The TV box ships with an IR remote control taking two AAA batteries and supporting IR learning function for 5 keys, a 5V/2A power supply, an HDMI cable, and  “Android TV User Manual”.

Click to Enlarge

Click to Enlarge

The device itself is really small, although not quite as tiny as WeTek Hub. We have a micro SD slot and two USB 2.0 ports on one side, and the power jack, HDMI 2.0 and AV outputs, Ethernet, and coaxial S/PDIF on the rear panel.

click to

Click to Enlarge

NEXBOX A95X Teardown

The bottom of the case list the main specs, and shows a MAC address starting with C4:4E:21, which looks up to… nothing. So either the MAC address space has been recently registered, or it’s just been (semi-)randomly selected….

Click to Enlarge

Click to Enlarge

Let’s open the thing. There aren’t any screws, but you’ll notice a tiny opening on the top center, and that’s where you’ll want to start working your way to open the case.

Click to Enlarge

Click to Enlarge

Thermal design looks decent with an heatsink on top of the Amlogic processor, itself in contact with a thermal pad connected to a thick metal plate.

Click to Enlarge

Click to Enlarge

The board is named A7_S905X_v2.0, and includes two SKhynix H5TQ4G63CFR DDR3 SDRAM (1GB), a 16GB Samsung KLMAG2WEPD-B031 eMMC 5.0 flash, Ampak AP6330 module for dual band WiFi and Bluetooth 4.0, as well as H1102NL Fast Ethernet magnetics (The Ethernet transceiver is built-in S905X processor). There’s also a smaller “DID2133 16-12 F1” IC close the AV jack that should be an amplifier. The serial console should be accessible via the four pins close to the two USB ports.

Click to Enlarge

Click to Enlarge

Loosening four screws will allow you to completely remove the board, and check out the back where we’ll find two more RAM chips bringing the total to 2GB, as well as sticker with board name, storage/memory/wifi module, a serial number, and the manufacturing date. The board is basically fresh from the oven, as it was made on July 16th, 2016.

I’d like to thank NEXBOX for sending the device for review, and if you are interested in purchasing in quantity, you can contact them via their website. NEXBOX A95X featured in this post (S905X, 2GB RAM, 16GB flash) is sold for $43.99 on Banggood (group buy), and $51.32 on GearBest. You’ll also find a cheaper (~$43) version with just 8GB flash on both sites, and on GeekBuying. Finally, if you don’t care about VP9, and HDR, the first NEXBOX A95 model with Amlogic S905 processor sells for as low as $23 with 1GB RAM.

Tweet NEXBOX A95X is an Android TV box that first launched with Amlogic S905 processor, the company thought it was a good idea to make multiple models with the same…

Viewing all 2336 articles
Browse latest View live