Quantcast
Channel: Developers » Visit CNX Software
Viewing all 2336 articles
Browse latest View live

HF10 is a 2-in-1 Android 6.0 TV Box & Bluetooth Speaker Powered by Amlogic S905X Processor

$
0
0

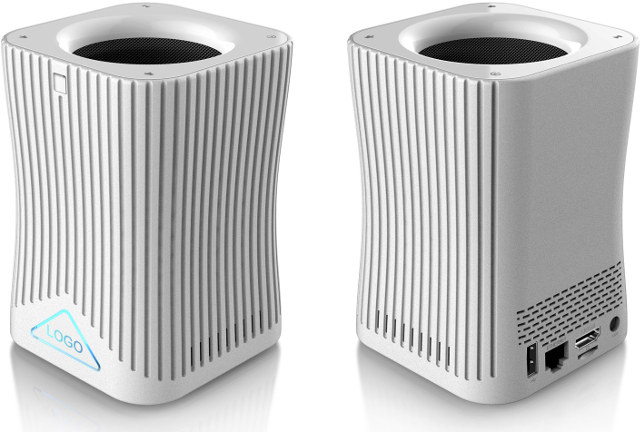
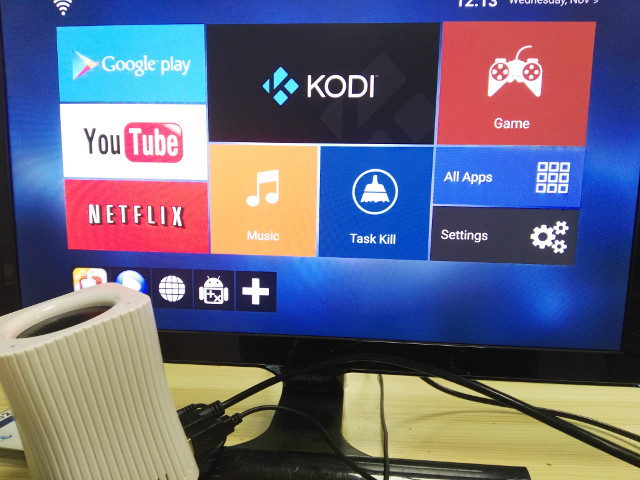
We’ve previously seen CS668 TV box combining an Android TV box, a Bluetooth Speaker, and a power bank into a single device, but audio quality is likely to be mediocre on such as small device. Eny Technology HF10 is slightly different as it combines an Amlogic S905X Android TV box with a larger 10 Watt speaker with a class-D amplifier, and can also used as a Bluetooth speaker.

Click to Enlarge

Click to Enlarge

HF10 specifications:

  • SoC –  Amlogic S905X quad core ARM Cortex-A53 @ up to 1.5 GHz with Mali-450MP GPU
  • System Memory – 1GB DDR3 (option: 2GB)
  • Storage – 8GB eMMC flash (Options: 16 and 32GB) + micro SD slot up to 32 GB
  • Video Output – HDMI 2.0 up to 4K @ 60 Hz
  • Audio
    • HDMI output
    • 2.5″ 10W mono bass speaker with class-D amplifier
  • Connectivity – 10/100M Ethernet, 802.11 b/g/n/ac Wi-Fi, and Bluetooth 4.0
  • USB – 1x USB 2.0 host port
  • Misc – Power & Play/Pause combo button, and volume buttons
  • Power Supply –  TBD
  • Dimensions & Weight – TBD

I’ve been told the audio quality via the bass speaker should be better than your typical TV. The device will run Android 6.0.1 with Kodi 16.1, and the specs also mention Widewine and PlayReady DRM, but I would not count on it. They’ll probably put it there for their ODM/OEM customers who may request it. They also told me they plan to do a version compatible with Google Home later on.

HF10 is still under development, and price is not available yet. You may find some more details on the product page.

Tweet We’ve previously seen CS668 TV box combining an Android TV box, a Bluetooth Speaker, and a power bank into a single device, but audio quality is likely to be…


Allwinner H2 Linux & Android SDK, and Allwinner XR819 WiFi Driver Released

$
0
0
Home > Allwinner H-Series, Android, Linux, Programming > Allwinner H2 Linux & Android SDK, and Allwinner XR819 WiFi Driver Released

Allwinner H2 Linux & Android SDK, and Allwinner XR819 WiFi Driver Released

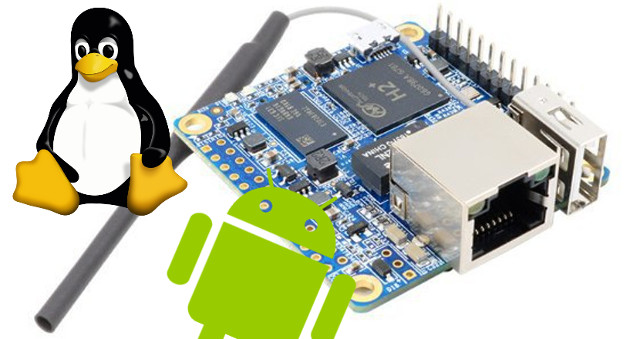
Orange Pi Zero is an interesting little ARM Linux board thanks to its low price, but also because it features a new Allwinner H2 / H2+ quad core Cortex A7 processor very similar to Allwinner H3 minus the 4K video decoding part, as well as Allwinner XR819 WiFi module, which I have not seen on any other boards so far.

allwinner-h2-linux-android

But hardware without software is pretty much useless, so developers will be happy to find out that Allwinner H2 SDK with Linux (lichee) and Android has been released or leaked, and it also includes the Allwinner XR819 WiFi driver.

You’ll find the SDK on Zoobab server with three main directory / files:

  • Android folder – Android 4.4.2 SDK
  • lichee folder – Linux 3.4 SDK
  • H2-V1.2.tar.gz – The tar file with both Android and lichee folder in case you want to download the full SDK on your computer

If another hardware comes with Allwinner XR819 WiFi module and you just need the Linux driver, you’ll find it in linux-3.4/drivers/net/wireless/xradio directory.

tkaiser managed to enable XR819 on armbian after disabling dhd driver:

tk@orangepizero:~$ nmcli dev wifi list
* SSID MODE CHAN RATE SIGNAL BARS SECURITY
Snort-Honeynet Infra 1 54 Mbit/s 92 ▂▄▆█ WPA2
EasyBox-116D28 Infra 9 54 Mbit/s 84 ▂▄▆█ WPA1 WPA2
FRITZ!Box Fon WLAN 7360 Infra 1 54 Mbit/s 67 ▂▄▆_ WPA1 WPA2
DISTORTEDPEOPLE Infra 9 54 Mbit/s 55 ▂▄__ WPA1 WPA2
CubaLibre Infra 1 54 Mbit/s 45 ▂▄__ WPA2

tk@orangepizero:~$ cat /etc/modprobe.d/dhd.conf
blacklist dhd

tk@orangepizero:~$ ls -la /system/etc/firmware/
total 140
drwxr-xr-x 2 root root 4096 Nov 9 13:57 .
drwxr-xr-x 3 root root 4096 Nov 9 13:55 ..
-rw-r–r– 1 tk tk 2308 Nov 9 13:57 boot_xr819.bin
-rw-r–r– 1 tk tk 126416 Nov 9 13:57 fw_xr819.bin
-rw-r–r– 1 tk tk 744 Nov 9 13:57 sdd_xr819.bin

1

2

3

4

5

6

7

8

9

10

11

12

13

14

15

16

17

18

19

20

21

22

23

24

25

26

27

28

tk@orangepizero:~$ iwconfig wlan0

wlan0     IEEE 802.11bgn  ESSID:“Snort-Honeynet”  

          Mode:Managed  Frequency:2.412 GHz  Access Point: BC:05:43:BE:C1:E7   

          Bit Rate=39 Mb/s   Tx-Power=20 dBm   

          Retry  long limit:7   RTS thr:off   Fragment thr:off

          Power Management:on

          Link Quality=66/70  Signal level=-44 dBm  

          Rx invalid nwid:0  Rx invalid crypt:0  Rx invalid frag:0

          Tx excessive retries:1  Invalid misc:0   Missed beacon:0

tk@orangepizero:~$ nmcli dev wifi list

*  SSID                     MODE   CHAN  RATE       SIGNAL  BARS  SECURITY  

   Snort-Honeynet           Infra  1     54 Mbit/s  92      ▂▄▆█  WPA2      

   EasyBox-116D28           Infra  9     54 Mbit/s  84      ▂▄▆█  WPA1 WPA2 

   FRITZ!Box Fon WLAN 7360  Infra  1     54 Mbit/s  67      ▂▄▆_  WPA1 WPA2 

   DISTORTEDPEOPLE          Infra  9     54 Mbit/s  55      ▂▄__  WPA1 WPA2 

   CubaLibre                Infra  1     54 Mbit/s  45      ▂▄__  WPA2      

tk@orangepizero:~$ cat /etc/modprobe.d/dhd.conf

blacklist dhd

tk@orangepizero:~$ ls -la /system/etc/firmware/

total 140

drwxr-xr-x 2 root root   4096 Nov  9 13:57 .

drwxr-xr-x 3 root root   4096 Nov  9 13:55 ..

-rw-rr 1 tk   tk     2308 Nov  9 13:57 boot_xr819.bin

-rw-rr 1 tk   tk   126416 Nov  9 13:57 fw_xr819.bin

-rw-rr 1 tk   tk      744 Nov  9 13:57 sdd_xr819.bin

Tweet Orange Pi Zero is an interesting little ARM Linux board thanks to its low price, but also because it features a new Allwinner H2 / H2+ quad core Cortex…

Marvin is a Plug and Play, Arduino Compatible, LoRa USB IoT Development Board (Crowdfunding)

$
0
0

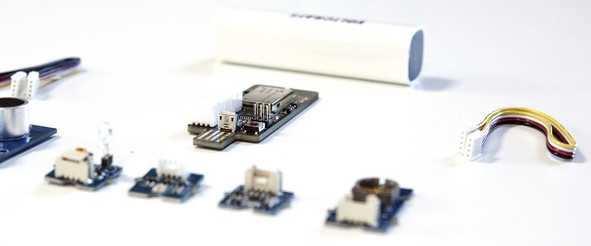
LoRa appears to be one of the most popular LPWAN standards so far, with hobbyist development boards such as LoPy or LoRaONE, and we’ll soon have at least one more choice thanks to Marvin, a LoRa development board with a full size USB port.

marvin-loraMarvin board specifications:

  • MCU – Atmel/Microchip ATmega32u AVR MCU (same as Arduino Leonardo board)
  • Connectivity – LoRa via Microchip RN2483; Supports both 868 MHz and 433 MHz frequency bands, on-board antenna
  • USB – 1x USB, 1x micro USB port for power and programming
  • Debugging – USB, and ISP header
  • Expansion – 5x Grove connectors
  • Power Supply – 5V via USB port
  • Dimensions – N/A, but similar to USB flash drive

The board can be programmed with the Arduino IDE, and they mention IBM Bluemix platform, and Node-RED, but overall details about documentation and software are scarce right now. One of the advantage of this form factor is that you can program it directly into your computer, and once you’re done you can plug it into a power bank easily without having to bother with any cables in the process.

lora-sensorsThe board is based on  RN2483 chip with 868 & 434 MHz frequency bands, so it will work in many countries in Europe, but it won’t work with LoRa networks in the US, Japan, New Zealand, etc.. where other frequency bands are used. You could use two Marvin for points to points communication in those countries, but you’d have to make sure 868 Mhz is not used by something else… LoRA is designed for low power long range communication for IoT project, and if you send messages of about 50 bytes at around 5000bit/sec, you’d be able to send about 300 messages per day. The LOS range is about 10 to 20 km.

The project been launched on Kickstarter yesterday, and the developers have already surpassed their 10,000 Euros funding target with close to 16,000 Euros raised so far. All 60 Euros early bird rewards are gone, but you can still get the board for 70 Euros, as well as full suitcases with some Grove sensors and multiple Marvin boards. Most rewards will only ship to Europe, probably due to limitations discussed above, but somehow if you order a Marvin development suitcase (825 Euros) it will ship anywhere in the world. Shipping is included in the pledge, and delivery is scheduled for February 2017.

Tweet LoRa appears to be one of the most popular LPWAN standards so far, with hobbyist development boards such as LoPy or LoRaONE, and we’ll soon have at least one…

Microchip Atmel ATtiny417/814/816/817 tinyAVR MCUs Include Core Independent Peripherals (CIPs)

$
0
0

Microchip’s latest Atmel tinyAVR MCUs combine Atmel 8-bit AVR core with CIPS (Core Independent Peripherals) normally found in the company’s PIC MCUs. Since Atmel’s purchase by Microchip, I believe this is the first time the company leverages features from both MCU families.

microchip-atmel-attiny-cip

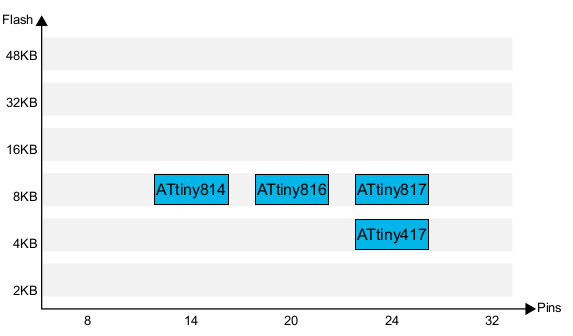
The four new ATtiny MCUs come with 4 to 8 KB flash, and up to 24 pins:

  • ATtiny4178-bit Atmel AVR MCU with 4KB Flash, 256 bytes SRAM, 128 bytes EEPROM, 20MHz/20 MIPS, two 16-bit timer/counters, one 12-bit timer/counter, RTC, USART, SPI, Two-wire Interface (I2C), 10-bit ADC, 8-bit DAC, analog comparator, accurate internal oscillators and multiple calibrated voltage references, Custom Logic, 10-bytes unique ID, and 24 pins
  • ATtiny814 – Same as above but with 8KB flash, 512 bytes SRAM, Peripheral Touch Controll (PTC), and 14 pins
  • ATtiny816 – Same key features as ATtiny814 but with a 20-pin package with more I/Os
  • ATtiny817 – Same key features as ATtiny814 but with a 24-pin package with more I/Os
Click to Enlarge

Click to Enlarge

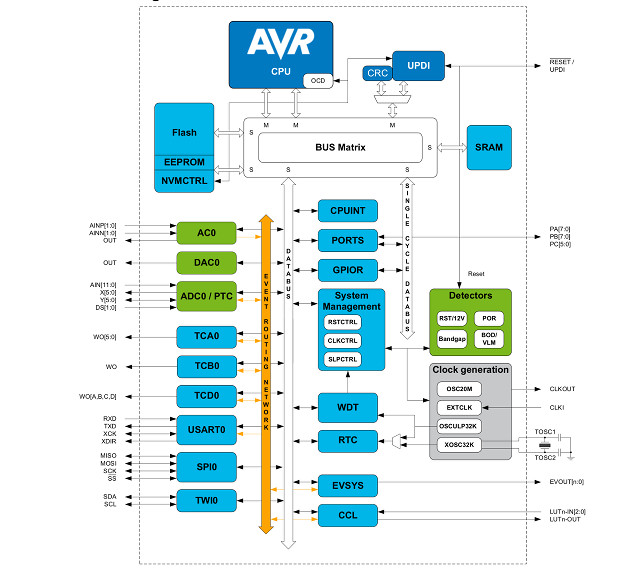
“Core Independent Peripheral” is pretty much self-explanatory, but Microchip description can be useful nonetheless:

CIPs allow the peripherals to operate independently of the core, including serial communication and analog peripherals. Together with the Event System, that allows peripherals to communicate without using the CPU, applications can be optimized at a system level. This lowers power consumption and increases throughput and system reliability.

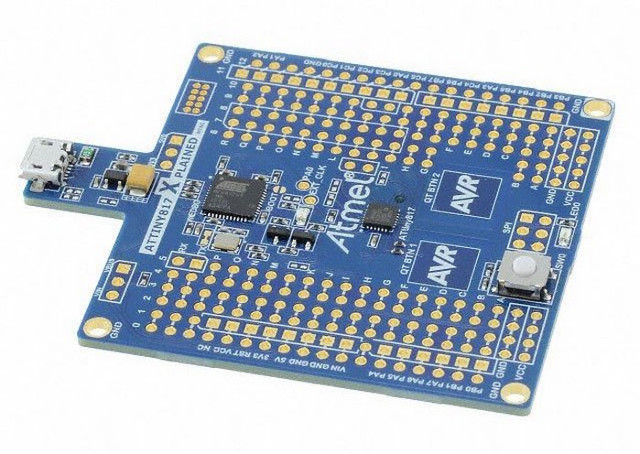
The new MCUs will be supported by Atmel START, an “online tool for intuitive, graphical configuration of embedded software projects”, as well as Atmel Studio 7 software development tools. You’ll be able to experiment pretty quickly thanks to ATtiny817 Xplained Mini Kit with a micro USB port for power and programming, a button, and access to all I/Os from the MCU. The board is also said to be compatible with Arduino ecosystem.

attiny817-xplained-boardThe new 8-bit tinyAVR MCUs are available now in QFN and SOIC packages with pricing starting at $0.43 for 10K units. Xplained Mini Kit can be purchased for $8.89 on Digikey. Visit Atmel tinyAVR product page for full technical details about the new MCUs.

Thanks to Nanik for the tip.

Tweet Microchip’s latest Atmel tinyAVR MCUs combine Atmel 8-bit AVR core with CIPS (Core Independent Peripherals) normally found in the company’s PIC MCUs. Since Atmel’s purchase by Microchip, I believe…

V-Bridge Muses DTV Modulator and Video Encoder Review – Part 2: Muses-β Turnkey Solution Demo

$
0
0

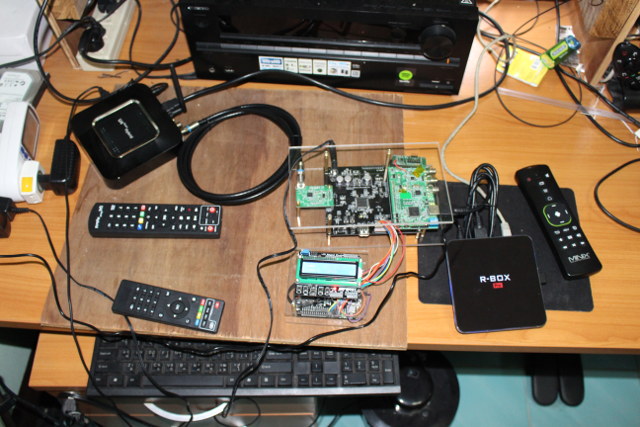
V-Bridge Muses-α and Muses-β boards can be used to respectively broadcast video to DTV standard from your PC, and as a turnkey solution taking any HDMI, CVBS, or USB inputs. The VATek SoC used in those  board support various DTV standards including DVB-T, DVB-C, ATSC/QAM, DTMB, ISDB-T/TB up to full HD resolution. I’ve received an early prototype for each, and I’ve already taken pictures and show how to assemble both Muses-α and Muses-β kits in the first part of the review. Today, I’ll show a demo with Muses-β turnkey solution taking HDMI input from an Android TV box (R-Box Pro), encoding and modulating the video to DVB-T, before broadcast it to an Android STB with a DVB-T/T2 tuner (U4 Quad Hybrid). This tool could be useful to test STB featuring ATSC or ISDB-T too, as those two standards are not supported in my country, and I could instead generate signals within my office.

muses-beta-video-encoder-dtv-demodulator-demo

U4 Quad Hybrid (Left), Muses-Beta Kit (Center) and R-Box Pro TV box (left)

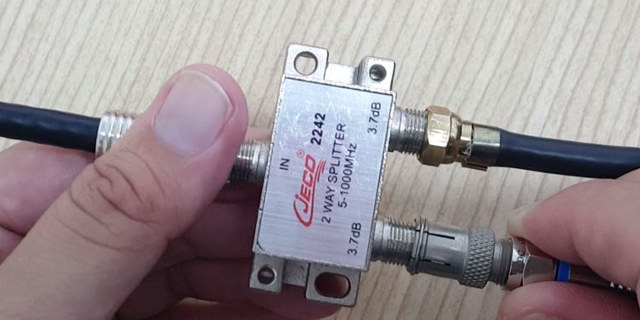
You could also connect it directly to your TV, but for this review it was easier to show with an external device, and my TV is using a coaxial input instead of a female F-connector, so that made it easier. If you connect it to your TV, you could still combine your local TV station signal with Muses-Beta signal by using a 2-way splitter as shown below.

2-way-splitter-antenna

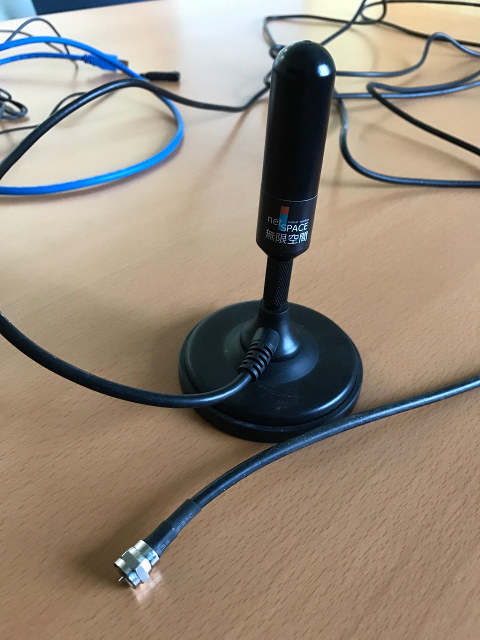
The company provided a cable to connect the RF board to tuner directly, but you could also use the type of antenna shown above instead. The power level is -12dBm, which means it won’t affect others, and should not break any laws in your country. If you need longer range you’d need to use an amplifier, and check with your local authorities if you need any specific licenses.dtv-antenna

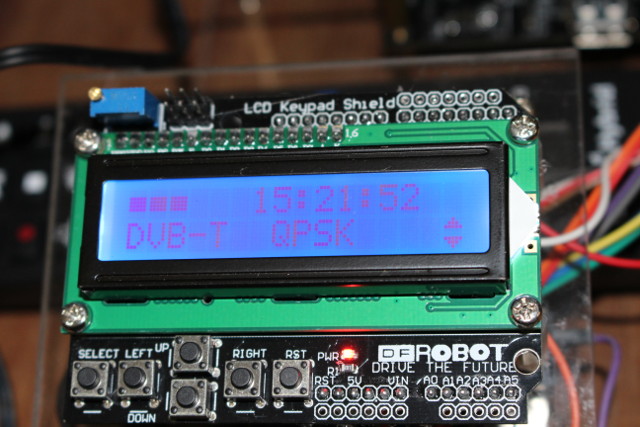
Now that the connection is done, let’s have a look at the LCD display, since it;s used to configure the DTV standard, frequency, and many more options. I did not have to change much for this demo. First I select DVB-T and QPSK modulation.

muses-beta-dvb-t
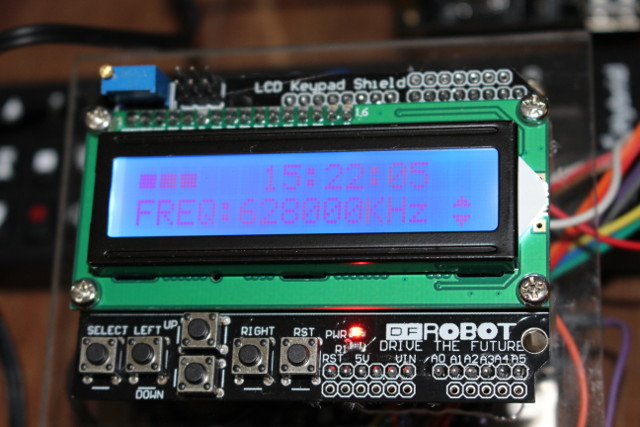
Then set the frequency to 628 MHz as it’s one of the listed frequencies in U4 Quad Hybrid.
muses-beta-dtv-frequency
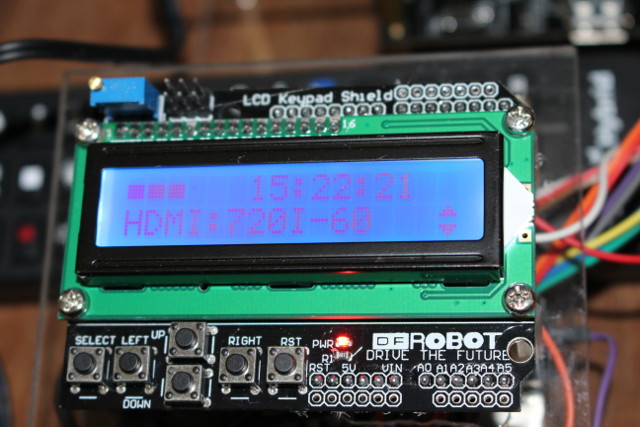
And kept HDMI to 720i-60, as the prototype can only handle HD resolution (720p) smoothly, and while Full HD (1080p) is possible it won’t be that smooth yet, but should be in the final hardware.
muses-beta-hdmi-resolution

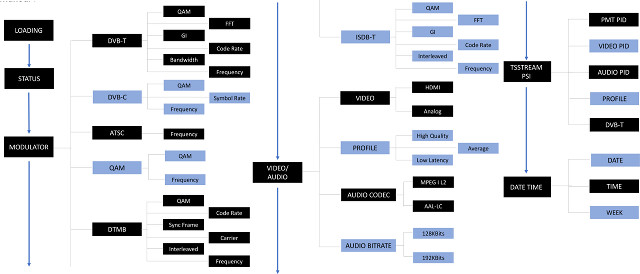
There are many options as shown in the UI chart below.

User Interface State Machine (Click to Enlarge)

LCD User Interface Options (Click to Enlarge)

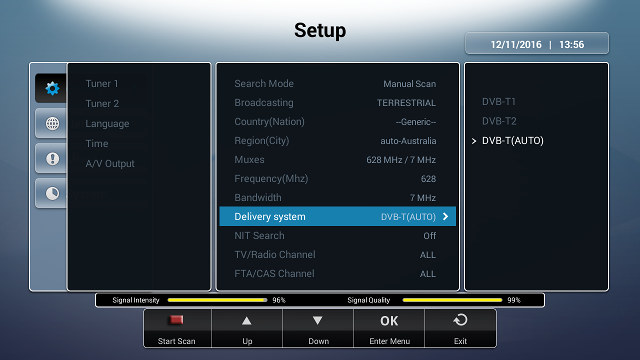
If HDMI input is detected, the LCD should then soon show three full squares on the top left indicating video is being broadcast with whatever standard you’ve chosen. In order to get the signal I had to configure U4 Quad Hybrid set-top box with the frequency, bandwidth, and delivery system  I selected for the modulator.

Click to Enlarge

Click to Enlarge

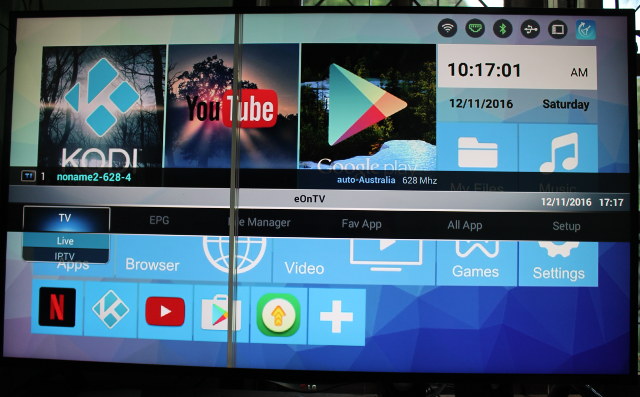
And it worked pretty much out of the box, as you can see from the photo below showing U4 Quad Hybrid menu overlaid over the DVB-T signal showing R-Box Pro user interface. Please ignore the vertical lines, as it’s just a problem with LG 4K TV.

Click to Enlarge

Click to Enlarge

I’ve also shot a video showing the setup, and how well it works. Sadly, the video I selected does not play optimally in R-Box Pro (the video source), but I found it only after the review, and other videos are being broadcast normally without smoothness issues nor audio cuts. But the important in the video is to show how easy it is to configure the system and that it works reasonably well. Quality will obviously suffer a bit compare to the source since its re-encoded and HDMI output is set to 720p.
[embedded content]

Latency & video quality can be adjusted using three profiles: High Quality (500ms), Average (300ms) and Low latency (200ms). You’ll find some more details in the preliminary? Muses Turnkey Product user’s manual.

The kickstarter campaign is still on-going with 21 days to go. Muses-β kit with the LCD control board – as reviewed in this post – requires a $559 pledge, but if you prefer to replace the STM32 Board and LCD display by your own control board (API will be provided), you can get Muses-β board with AV input board and RF board for $399. I’ll test the cheaper $200 Muses-α board connected to a computer in the next few days in part 3 of the review.

Tweet V-Bridge Muses-α and Muses-β boards can be used to respectively broadcast video to DTV standard from your PC, and as a turnkey solution taking any HDMI, CVBS, or USB…

Geniatech Developer Board IV Powered by Qualcomm Snapdragon 410 Features Ethernet, RTC, and More

$
0
0

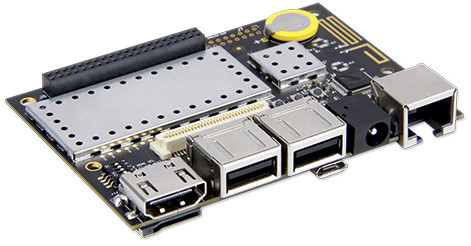
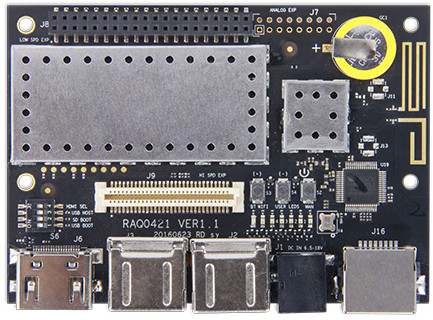
Geniatech is better known for their set-top boxes, and the company also offer development board as well as custom design for system-on-modules based on Amlogic and Qualcomm processor. Their latest board dubbed Developer Board IV looks fairly similar to 96boards compliant Dragonboard 410c board with its Snapdragon 410 processor, but adds an Ethernet port, and an RTC battery.

developer-board-ivDeveloper Board 4 specifications:

  • SoC – Qualcomm Snapdragon 410 (APQ8016) quad-core ARM Cortex A53 processor @ 1.2 GHz with Adreno 306 GPU
  • System Memory – 1 or 2 GB LPDDR3 @ 533MHz
  • Storage – 8 or 16 GB eMMC 5.0 flash + micro SD 3.0 (UHS-I) slot
  • Video Output – HDMI 1.3 up to 1080p @ 30 Hz, 4-lane MIPI-DSI up to 720p60 or 1080p30 for optional (touchscreen) display
  • Connectivity – 10/100M Ethernet, Integrated 802.11 b/g/n, Bluetooth 4.1, GPS with on-board antenna
  • USB – 2x USB 2.0 host ports, 1x micro USB port (device only).
  • Camera – 2x MIPI-CSI: 1x 4-lane, 1x 2-lane up to 13MP
  • Expansion:
    • 1x 40 pin low speed expansion connector – UART, SPI, I2S, 2x I2C, 12x GPIO, DC power
    • 1x 60 pin high speed expansion connector – 4L-MIPI DSI, USB, I2C x2, 2L+4LMIPI CSI
    • Footprint for optional analog expansion connector – Headset, Speaker, FM antenna
  • Misc – Power, reset and volume buttons. 7 LEDS (4x user, 1x Wifi, 1x Bluetooth, 1x Ethernet)
  • Power Supply – 6.5 – 18V DC input
  • Dimensions – 85×60 mm (96Boards CE dimensions: 85×54)
  • Temperature Range – Operating: -25°C to +70°C

96Boards CE specifications only support Ethernet on their 96Board CE Extended specifications with much larger PCB dimensions (85×100 mm), and the dimensions do not comply with either standard or extended specifications. But Geniatech has taken most of 96Boards specifications, and made a mostly compatible with some useful extra features.

snapdragon-410-board-ethernetThe company only list Android 5.1 operating system, but it’s quite likely any operating systems support by Linaro/96Boards, and working on Dragonboard 410c will also work on Developer Board IV.

I could not find any links to purchase the board, and I understand Geniatech is only working with companies for such board, so it’s not an hobbyist board that anybody can buy like DragonBoard 410c. You’ll find a few more details on the product page.

Via AndroidPC.es

Tweet Geniatech is better known for their set-top boxes, and the company also offer development board as well as custom design for system-on-modules based on Amlogic and Qualcomm processor. Their…

iv-Robotics Brings SMT Resistors, Capacitors, LEDs to Breadboards (Crowdfunding)

$
0
0

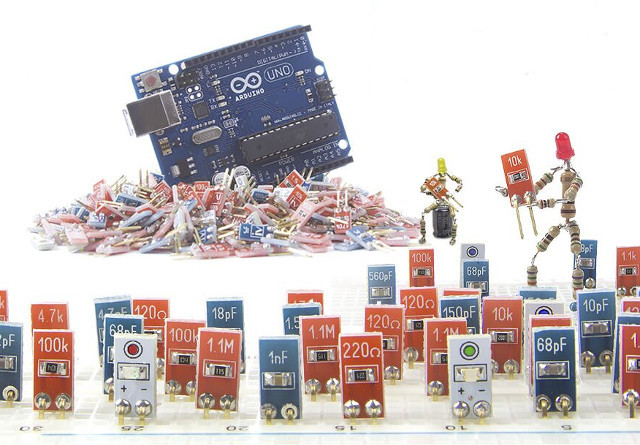
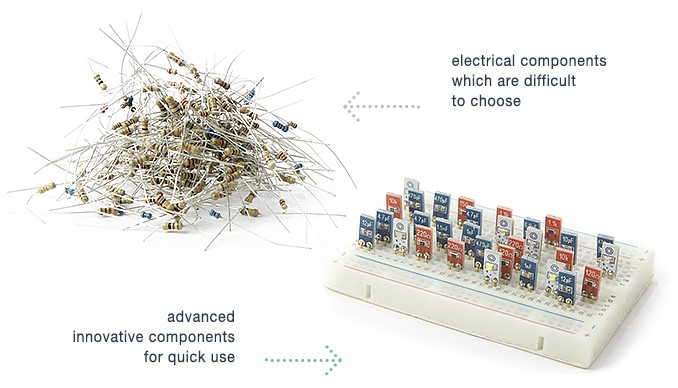
Most people will prototype electronics projects using a breadboard and typical axial resistors and “legged” capacitors & LEDs. This works reasonably well but can be messy, and you need to learn resistor codes to choose the right value. To reduce the number of legs and make it easier for beginner, iv-Robotics has decided to create small boards with SMT resistors, capacitors and LEDs instead with markings to solve those small issues.

smt-components-arduinoThe company calls those iResistor, iCapacitor and iLed components, and offers them in boxes of 50 pieces with various values. Experienced users might also like the fact this it’s easier to store compare to traditional components, but I feel this is really a good idea for education, and kids getting started with electronics.

smt-resistor-capacitors-breadboard

The project is now on Kickstarter, where you can get 50 pieces for $10, 4 boxes of 50 pieces for $35, 8 boxes with iResistors and iCapacitors, plus a free iLED box for 450 pieces in total ($80), as well as larger quantities with up to 450 boxes (12,500 components) for wholesalers. Shipping adds $2 to $160 depending on destination and reward, and delivery is planned for January 2017.

Tweet Most people will prototype electronics projects using a breadboard and typical axial resistors and “legged” capacitors & LEDs. This works reasonably well but can be messy, and you need…

$2 Wisol SFM10R1 & SFM10R2 Sigfox Modules and Evaluation Board

$
0
0

LoRa appears to be one of the most popular long range lower power WAN standards, at least based on the number of hobbyist boards coming to market, but hardware is not exactly cheap with modules such as Microchip RN2483 & RN2903 LoRa modules selling a little over $10, and development board such as LoPy normally going for at least $35. If large scale IoT is ever going to take off, prices will have to go lower, and AFAIK we are still waiting for the promised sub $2 Weightless chips. But if Elettronica In tweet is to be believed some Sigfox modules made by Korean company Wisol are selling for just $2, likely in larger quantities.

sigfox-module-wisol

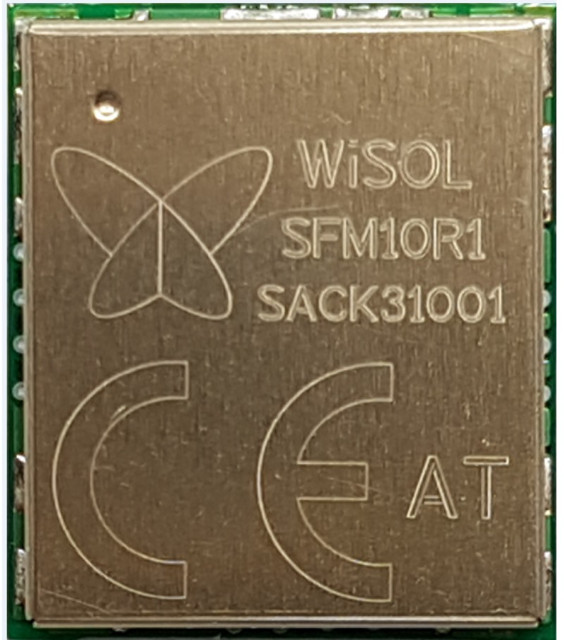
WiSOL SFM10R1 is made with RCZ1 (Radio Configuration Zone 1 – ETSI – Europe), while SFM10R2 module is made for RCZ2 ((Radio Configuration Zone 2 – FCC – North America).

SFM10R1 key features and specifications:

  • Chipset – ON Semiconductor AX-SFEU-1-01 Sigfox Ready RF Transceiver SoC
  • RF
    • Tx Freq./ Data rate : 868.13MHz/ 100bps
    • Rx Freq./ Data rate : 869.525MHz/ 600bps
    • Max Tx Radiated Power: +14 dBm
    • Rx Sensitivity: -127 dBm0
  • Power Supply – 1.8V to 3.6V
  • Power Consumption – Tx: 60 mA (max); Rx: 15 mA (max); Idle: 2 μA
  • Dimensions – 15.0 x 13.0 x 2.21 mm
  • Weight – 0.85 grams

SFM10R2 module specifications:

  • Chipset – ON Semiconductor AX-SFUS-1-01 Sigfox Ready RF Transceiver SoC
  • RF
    • Freq. bands : 902~928MHz
    • Data rate : 600bps
    • Tx Output Power : +24dBm(max.) @600bps
    • Rx Sensitivity : -129dBm(min.) @600bps
  • Power Supply – +2.7V~+3.6V
  • Power Consumption – Tx: 200mA (max), Rx : 40mA (max) @ 3.3V
  • Dimensions – 20.0 x 13.0 x 2.21 mm
  • Weight – 1.1 grams

sigfox-evaluation-development-board

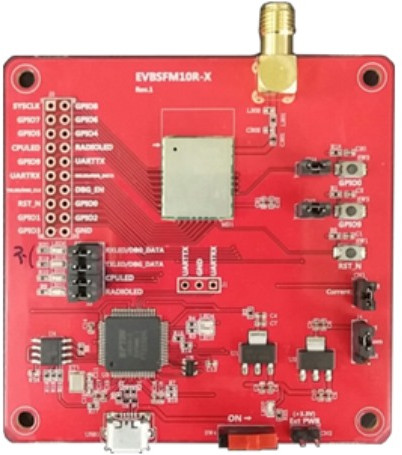
The company also provides two similar evaluation boards: EVBSFM10R1 (RCZ1) or EVBSFM10R2 (RCZ2) with either module with an on-board Debugger, a USB connected UART port, 2 tack-switches and 4 LEDs, an unpopulated header with 6 digital and 4 analog I/Os, as well as an SMA antenna and USB cable for debugging. I don’t have any info about software since you need to register as a company to get the full details.

The European module and evaluation board are now sampling, while the North American hardware is still in under development. There’s no word about the evaluation board price. You’ll find some more details on Sigfox Wisol page, as well as Wisol’s own website.

Tweet LoRa appears to be one of the most popular long range lower power WAN standards, at least based on the number of hobbyist boards coming to market, but hardware…


Voyo V1 Apollo Lake Mini PC is up for Pre-order for $195 and Up

$
0
0

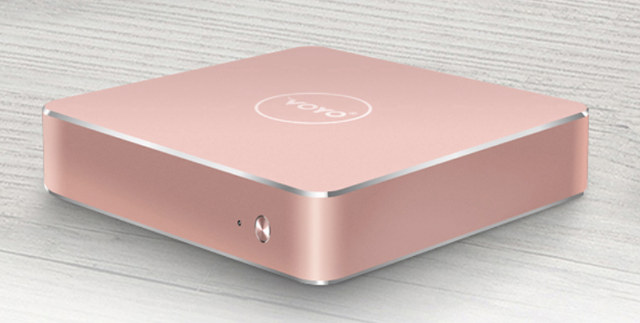
Voyo V1 is the first Apollo Lake mini PC from mainland China manufacturers, and will come with either Celeron N3450 or Pentium N4200 quad core processor combined with 4GB RAM and 32GB eMMC flash, as well as an 128GB SSD.

voyo-v1Voyo V1 specifications:

  • SoC
    • Celeron N3450 quad core processor @ 1.1 GHz / 2.2 GHz (Burst frequency) and 12 EU Intel HD graphics 500 @ 200 MHz / 700 MHz (Burst freq.); 6W TDP
    • Pentium N4200 quad core processor @ 1.1 GHz / 2.5 GHz (Burst frequency) and 18 EU Intel HD graphics 505 @ 200 MHz / 750 MHz (Burst freq.); 6W TDP
  • System Memory – 4GB DDR3L (upgradeable to 8GB)
  • Storage – 32GB eMMC flash + 128MB M.2 SSD + micro SD slot
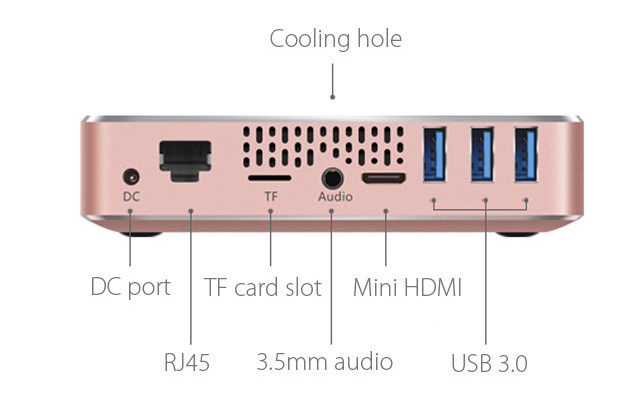
  • Video Output – Mini HDMI 1.4 port limited to 4K @ 30 Hz
  • Audio – HDMI + 3.5mm audio jack
  • Connectivity – Gigabit Ethernet, dual band WiFi, and Bluetooth 4.0
  • USB – 3x USB 3.0 ports
  • Power Supply – TBD
  • Dimensions – 12.00 x 12.00 x 2.80 cm
  • Weight – 400 grams

The mini PC will run Windows 10.1, and ships with an HDMI Cable, a power adapter, a remote control, and a user’s manual in English. It also includes a fan and heatsink for cooling. The 4GB SO-DIMM RAM can be upgraded to 8GB, the SSD up to 512 GB.

voyo-v1-usb-hdmiGearBest takes pre-orders for Voyo V1 as low as $194.95 using GBV1N3  coupon for the Celeron N3450 version, and $222.99 using GBV1N4 coupon for the Pentium N4200 version. If pink is not your favorite color, the computer is also available in blue and gold colors.

Via AndroidPC.es

Tweet Voyo V1 is the first Apollo Lake mini PC from mainland China manufacturers, and will come with either Celeron N3450 or Pentium N4200 quad core processor combined with 4GB…

GR-LoRa is a Reverse-Engineered Open Source Implementation of LoRa PHY

$
0
0

LPWAN standards such as LoRa or Sigfox allow you to transmit data over long distance, at ultra low power (up to 10 years on a AA battery), and for free if your use your own network (P2P or gateway), or a few dollars per years if you go through a network provider. The low cost is possible since those standards rely on 900 MHz ISM bands, meaning nobody has to pay millions of dollars to the government to obtain a license fee. Matt Knight looked at LoRa, and while Level 2 and 3 of the protocol (LoRaWan) has public documentation, Level 1 (LoRa PHY) is proprietary and the standard is proprietary.

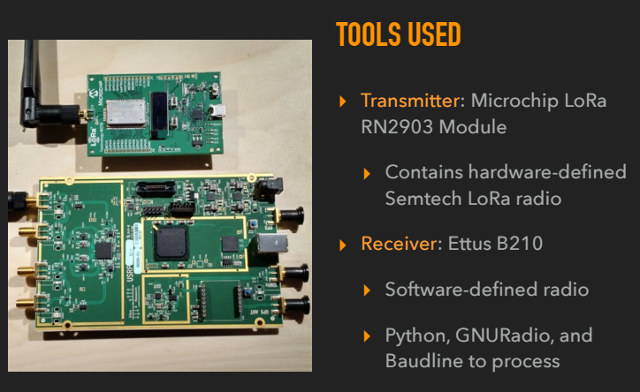
microchip-rm2903-ettus-b210-sdrSo he decided to reverse-engineer LoRa PHY using Microchip RN2903 based LoRa Technology Mote and Ettus B210 USB software defined radio, and software packages and tools such as Python and GNU Radio to successfully deliver GR-LoRa open source “GNU Radio OOT module implementing the LoRa PHY”.  He presented his work at GNU Radio Conference 2016 on September 15, and the video is worth a watch. He first explains why LPWAN IoT standards are awesome, the motivation about reverse-engineering work (mostly security), the hurdle (e.g. lies in documentation), the results, and work to be done.

[embedded content]

You’ll find the presentation and the research paper on Github.

Thanks to Emanuele for the tip.

Tweet LPWAN standards such as LoRa or Sigfox allow you to transmit data over long distance, at ultra low power (up to 10 years on a AA battery), and for…

Meet Body Heat Powered MATRIX PowerWatch, The Activity Tracker You Never Need to Charge (Crowdfunding)

$
0
0

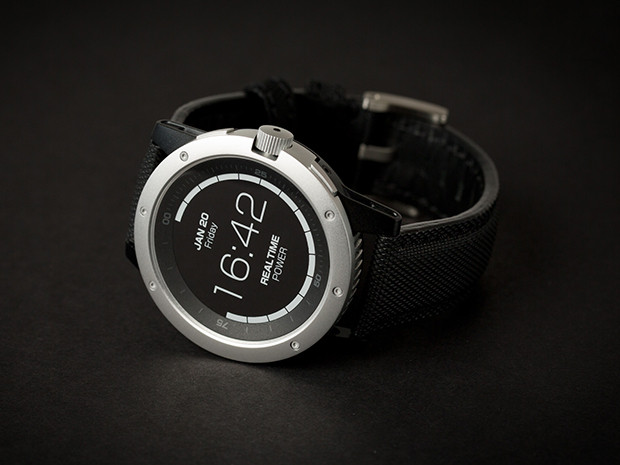
There are currently several issues with wearables that makes it sub-optimal devices, from displays that can’t be always-on, to unreliable sensors, and in my experience pretty poor reliability, as I’ve managed to go through 4 fitness trackers / smartwatches in a year. Another issue is that contrary to typical watches lasting 10 years with a coin cell battery, most wearables require to be charge every few days, weeks, with the very best devices being chargers every few months. MATRIX PowerWatch promises to solve latter, as you will never need to ever charge it since it charges itself by harvesting energy using your body heat.

matrix-powerwatchThe company promotes it as a smartwatch, but it’s closer to an activity tracker, since you can’t keep the Bluetooth LE connection all the time in order to receive notifications to your smartphone. It’s basically used to show time, track your activity and sleep patterns, and you can synchronize the data with your iOS or Android phone when you need it. It does not have to be done often, as the watch can keep up to one year of data. The watch is water-resistant up to 50 meters, and controlled by two buttons (no touchscreen). One extra advantage of the heat body charging mechanism is that it will also allow the watch to accurately track the amount of calories burned, while all other wearables are just making informed guesses. If you don’t wear the watch, a backup battery takes care of power, the watch goes to sleep keeping track of time.

[embedded content]
So how does it convert body heat into energy? The company explains:

Our thermoelectric technology converts heat to electric power. It is based on the Seebeck effect discovered in 1821. In the absence of an applied voltage gradient V, electric current, J, can still be generated if there is a temperature gradient, T: . A thermoelectric material must have a low thermal conductivity and high electrical conductivity to function efficiently. NASA has used this technology to power the Voyager spacecraft and Curiosity, the mars rover.

A thermoelectric module is composed of many tiny semiconductor “legs” that when added together create a large voltage.

Some obvious concerns about the technology is whether it will work as advertised in all conditions. It relies on temperature delta, so what happens when the ambient temperature is close to body temperature, would the watch just go into sleep mode in that case, relying on the backup battery? The comments are also interesting, where we learn the display is apparently a black & white LCD display, and not a low power e-Paper display, and some people are starting to ask features like a color display, GPS support, and BT notifications which may not be a realistic goal… But other aspects of the project also inspire more confidence, as they have allegedly tested 1,000 working prototypes, and Arrow Electronics is involved in the manufacturing of the project.

The watch was launched on Indiegogo yesterday, and the project has already surpassed its $100,000 crowdfunding campaign. If you’ll like to get involved you can still go with an super early bird pledge of $119 for the PowerWatch with a nylon strap. Other rewards are just for various  quantities up to 100. Shipping is free to the US, adds $15 to the rest of the world, and delivery is scheduled for July or September 2017 depending on the rewards.

Via Liliputing and CNET

Tweet There are currently several issues with wearables that makes it sub-optimal devices, from displays that can’t be always-on, to unreliable sensors, and in my experience pretty poor reliability, as…

Siemens SIMATIC IOT2000 UL Approved Educational & Industrial IoT Gateways are Powered by Intel Quark Processor

$
0
0

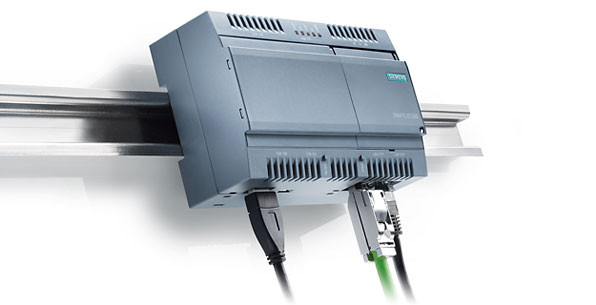
Siemens has recently released SIMATIC IOT2000 series IoT gateways based on Intel Quark X1000/X1020 processor also used in Intel Galileo Gen 2 board with both IOT2020 educational version, and IOT2040 industrial version featuring UL-approval, Arduino headers, and a mini PCIe expansion socket.

simatic-iot2000-industrial-iot-gatewaySIMATIC IOT2040 specifications:

  • SoC – Intel Quark X1020 32-bit processor @ up to 400 MHz with 16KB cache (2.2W TDP)
  • System Memory – 1 GB RAM
  • Storage – micro SD slot
  • Connectivity – 2x Ethernet ports
  • Serial – 2x RS232/485 interfaces
  • USB – 1x USB 2.0 port, 1x micro USB device port
  • Expansion – Arduino UNO compatible headers, mini PCIe socket
  • Misc – Battery-backed RTC
  • Power Supply – 9 to 36V DC wide-range power supply
  • Dimensions – 144x90x54 mm
  • Weight – About 200 grams
  • Temperature Range – 0 °C to up to +50 °C
  • Certificates – CE, UL, FCC, KCC, RCM

The device support wall-mount and DIN rail mounting. The company has not exactly made it easy to find specifications, but SIMATIC IOT2020 is said to feature Quark X1000 processor with 512MB RAM and a single Ethernet port. The gateway runs Linux built with Yocto, and supports both Intel System Studio IoT Edition and Arduino IDE tools, and MindSphere Siemens Cloud infrastructure can also be used. Some people got hold of early sample, and showcased how to use the Arduino IDE with the hardware.
[embedded content]

The forums may be a good place to start to get more information, and you’ll find a bunch of documents on that page.

Siemens IOT2020 gateways are sold through RS Components website, and in the US this redirects to Allied Elec where IoT2020 educational gateway is sold for $120, and IoT2040 industrial gateway for $280. You may also find a few more details on Siemens IOT2000 series product page.

Thanks to Jake for the tip.

Tweet Siemens has recently released SIMATIC IOT2000 series IoT gateways based on Intel Quark X1000/X1020 processor also used in Intel Galileo Gen 2 board with both IOT2020 educational version, and…

Banana Pi M2 Ultra Allwinner R40 Development Board with SATA & GbE Sells for $46

$
0
0

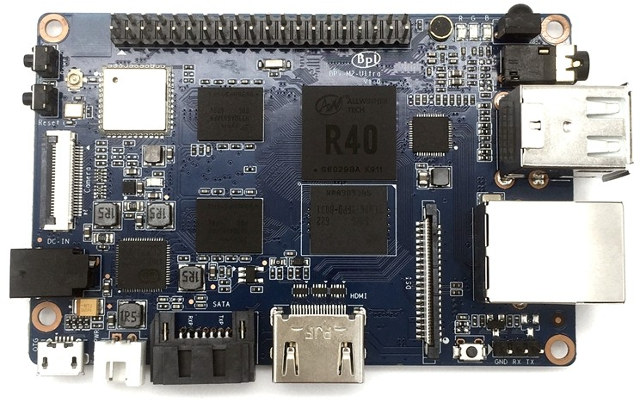
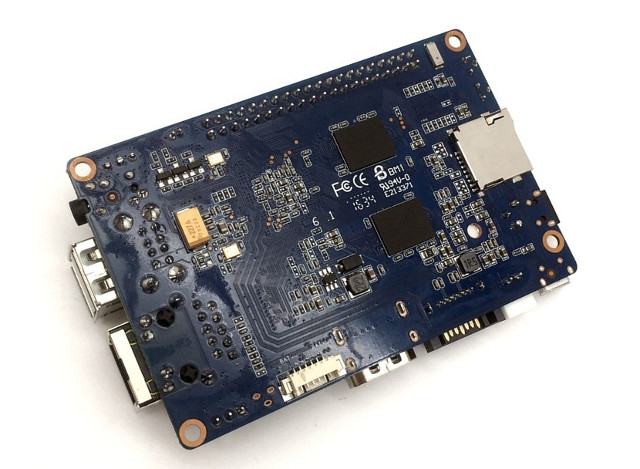
Allwinner A10 and A20 processors have been quite popular in the past, since they could handle Fast or Gigabit Ethernet and SATA natively, included decent multimedia capabilities, and were found in low cost hardware such as Cubieboard 2 or MeLE A1000. Since then we’ve had a few boards with SATA using newer and faster processors without SATA IP, meaning it was usually implemented using a USB 2.0 to SATA bridge leading to mediocre to average performance depending on the implementation and selected bridge. Allwinner R40 is the successor of Allwinner R20 with a faster quad core Cortex A7 processor, but keeping Gigabit Ethernet, SATA, and most features of its predecessor. The good news is that Banana Pi has now launched the promised M2 Ultra development board based on the new processor for $45.80 + shipping on Aliexpress (Total for me: $48.35).

allwinner-r40-development-boardBanana Pi M2 Ultra specifications:

  • SoC – Allwinner R40 quad Core ARM Cortex A7 processor with ARM Mali-400MP2 GPU
  • System Memory – 2G DDR3 SDRAM
  • Storage – 8GB eMMC flash (16, 32 or 64GB as options), SATA interface, micro SD slot up to 256 GB
  • Connectivity – 1x Gigabit Ethernet port, 802.11 b/g/n WiFi and Bluetooth 4.0 (AP6212 module)
  • Video Output – HDMI 1.4 port up to 1080p60, 4-lane MIPI DSI display connector
  • Audio I/O – HDMI, 3.5mm headphone jack, built0in microphone
  • USB – 2x USB 2.0 host ports, 1x micro USB OTG port
  • Camera – CSI camera connector
  • Expansion – 40-pin Raspberry Pi compatible header with GPIOs, I2C, SPI, UART, ID EEPROM, 5V, 3.3V, GND signals.
  • Debugging – 3-pin UART for serial console
  • Misc – Reset, power, and u-boot buttons; IR receiver
  • Power Supply – 5V via barrel connector, or 3.7V Lithium battery via battery connector on the back of the board. AXP221s PMIC
  • Dimensions – 92 x 60 mm

Banana Pi claims BPI-M2 Ultra board run Android, Debian, Ubuntu, Raspbian, and other operating systems. You’ll find some images on the Wiki, and while the Android section link does not work, and you can download a Linux 3.10 + busybox image, Ubuntu 16.04 Xenial minimal, Debian 8 Jessie Mate, Debian 8 Jessie Lite, and Ubuntu MATE 16.04 from either baidu or Google drive links. There’s also a Tina-IOT os section that’s empty right now, as is the “source code on github” section, and a few others. So documentation is work in progress.

banana-pi-m2-ultraI’m expecting Allwinner R40 boards to become popular at least for some communities such as armbian, where some members require  fast storage and networking performance for their project(s). We’ll have to hope Allwinner has improved SATA write performance compared to Allwinner A20, as in my review of Cubietruck (Metal Case), I found that while read speed was very good at up to 180 MB/s, write speed was limited to around 36 MB/s using a SATA SSD.

You may also find some more details on Banana Pi BPI-M2 Ultra product page.

Tweet Allwinner A10 and A20 processors have been quite popular in the past, since they could handle Fast or Gigabit Ethernet and SATA natively, included decent multimedia capabilities, and were…

Make-WiFi-Fast Project Massively Improves WiFi Performance of Busy WiFi Routers

$
0
0

WiFi is a great way to add connectivity to a large group of people, but once everybody tries to connect at the same time, the network often becomes unusable due to very high latency, a problem that can occur on servers on the ISP side too, and that’s usually caused by excessive buffering, Bufferbloat. The Bufferbloat project aims to resolve this issue with both routers using CoDel and fq_codel algorithms, as well as WiFi  via Make-WiFi-Fast project.

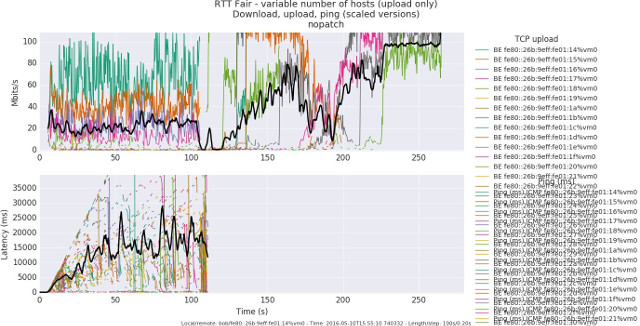
Dave Täht gave a presentation of his work on Make-WiFi-Fast project entitled “Fixing WiFi Latency… Finally“showing how latency was reduced from seconds to milliseconds. It’s quite technical, but two slides of the presentation clearly shows the progress made.

Click to Enlarge

Click to Enlarge

The first chart shows 100 stations connecting to a website using unpatched code with the top of the chart showing the bandwidth per node in MBits/s, while the lower part showing latency in ms. We can see that about 5 stations can download data at up to 100 Mbps, but 95 stations need to wait, many give up, and after two minutes some other stations start to download again. Average bandwidth is 20 Mbits/s and not exactly evenly distributed among stations. Latency is about 15 seconds based on that chart.

Click to Enlarge

Click to Enlarge

The second chart shows the same test with make-wifi-fast patch to the Linux kernel, mainly improving queue handling. Both chart shows many more stations are served with an average of 1 Mbits/s, and latency is slashed to about 150 ms, meaning the vast majority of users get a much better user experience with that “airtime fairness” solution

I understand the tool used to test network connectivity and generate data for the charts above is flent, the FLExible Network Tester. The video below discusses benchmark, make-wifi-fast, and TCP BBR using the presentation slides shared above.

[embedded content]

There’s also an article on LWN.net (reserved to subscribers) discussing about this very topic. Make-wifi-fast project patchsets are queued for  Linux 4.9 and 4.10 already, and yet-to-be submitted patchsets for LEDE (OpenWrt fork) can be found here.

Thanks to Zoobab for the tip.

Tweet WiFi is a great way to add connectivity to a large group of people, but once everybody tries to connect at the same time, the network often becomes unusable…

Xiaomi Introduces Mi Box 3c and 3s TV Boxes with Artificial Intelligence Capabilities

$
0
0

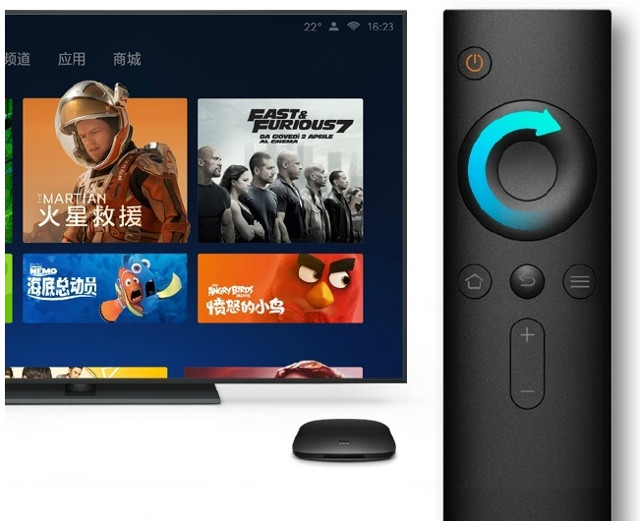
Xiaomi has launched two new upgraded models based on their Mi Box 3 TV box powered by Amlogic S905-H processor, with Mi Box 3s with Amlogic S905X-H and 2GB RAM, and Mi Box 3c with Amlogic S905-H and 1 GB RAM. Beside the box hardware changes, the most significant updates are the replacement of MIUI TV interface by allegedly the first set-top box system with AI in the world, which the company calls Patch Wall, as well as Mi Touch IR remote control which include a touch ring in place of the usual arrow keys (3s only).

xiaomi-patchwall-mi-touch-irXiaomi Mi Box 3s specifications:

  • SoC – Amlogic S905X-H quad core ARM Cortex A53 processor + Mali-450MP GPU
  • System memory – 2GB RAM
  • Storage – 8GB eMMC flash
  • Video Output – HDMI2.0a port with HDR support + AV port
  • Audio – Dolby and DTS support
  • Connectivity – WiFi 802.11ac Dual band 2.4 / 5GHz, Bluetooth 4.1
  • USB – 1x USB 2.0 port

Xiaomi Mi Box 3c specifications:

  • SoC – Amlogic S905-H quad core ARM Cortex A53 processor + Mali-450MP GPU
  • System memory – 1 GB RAM
  • Storage – 4GB  flash
  • Video Output – HDMI2.0 port + AV port
  • Audio – Dolby and DTS support
  • Connectivity – WiFi 802.11ac Dual band 2.4 / 5GHz, Bluetooth 4.1
  • USB – 1x USB 2.0 port
Click to Enlarge

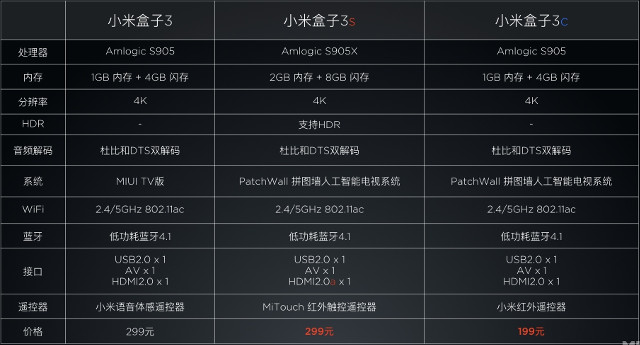
Xiaomi Mi Box 3 vs Mi Box 3s vs Mi Box 3c – Click to Enlarge

The table above shows Xiaomi Mi Box 3 and 3c have the same hardware features, but the new model is cheaper and includes PatchWall. I could find exactly English explanations about the artificial intelligence part, but the video embedded below in Chinese seems to implied the user interface will evolve with your preferences over time using deep learning technology. I’m unclear whether it will be similar to suggested videos in YouTube, or the system is more advanced.
[embedded content]

The two new models are only for the Chinese market, with Xiaomi Mi Box 3c selling for 199 RMB ($29), and 3s for 299 RMB ($44). Since Xiaomi has started to enter the US market with one Xiaomi Mi Box model, it might be possible that Patchwall also get introduced to other markets, and not only China.

Via Liliputing and MIUI Forums.

Tweet Xiaomi has launched two new upgraded models based on their Mi Box 3 TV box powered by Amlogic S905-H processor, with Mi Box 3s with Amlogic S905X-H and 2GB…


Egreat A10 4K Android Media Center Comes with an Internal 3.5″ SATA Bay, an external SATA Port and a USB 3.0 Port

$
0
0

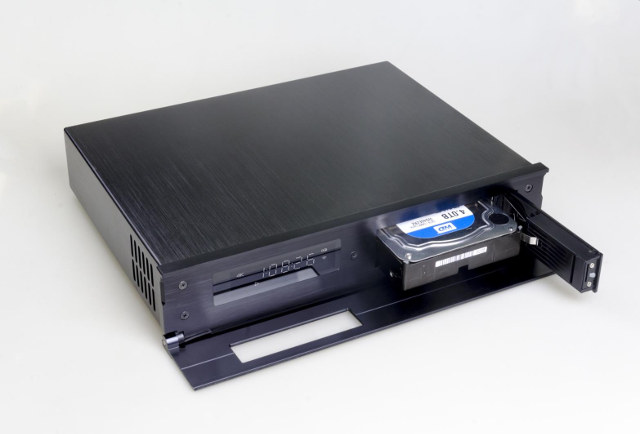
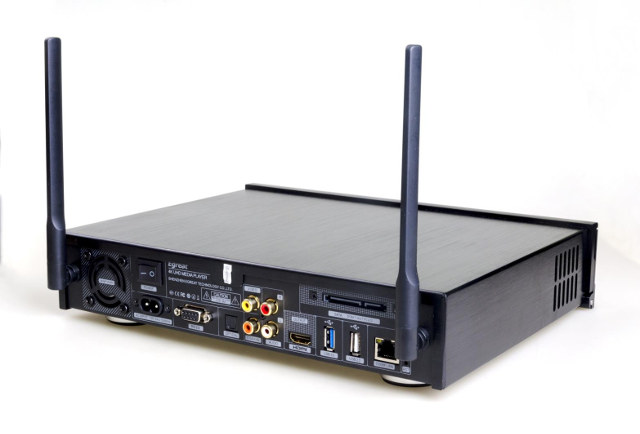
Egreat A10 is an Android TV box powered by Hisilicon Hi3798CV200 processor, coupled with 2GB RAM, 16GB flash, and is an exciting device for people who like to keep the media files on local storage, as it includes an Internal SATA bay for 3.5″ hard drive, an external SATA connector for 2.5″ “laptop” drives, as well as a USB 3.0 port.

Click to Enlarge

Click to Enlarge

Egreat A10 specifications:

  • SoC – HiSilicon Hi3798C V200 quad-core ARM Cortex A53 processor @ up to 2.0 GHz with ARM Mali-T720 GPU
  • System Memory –  2GB DDR3
  • Storage – 16 GB eMMC flash + 3.5″ SATA bay + external SATA interface with support for EXT-3/4, FAT32, NTFS and GPT
  • Video Output – HDMI 2.0a up to 4K2K @ 60 Hz and CVBS output (RCA)
  • Video Codecs – 10-bit H.265/HEVC [email protected], VP9 up to 4K @ 60 Hz, H.264 AVC, H.264/AVC MVC up 1080p30, MPEG-1/2/4 up to 1080p60, VC-1 up to 1080p60, AVS up to 1080p60, VP6/8
  • Video Containers – MKV, MOV, AVI, DAT, WMV, MP4, ISO Blu-ray navigation 3.0, BD-ISO, 3D BD-ISO
  • Audio Output – HDMI, stereo audio (2x RCA), optical and coaxial S/PDIF
  • Audio Support – Dolby Digital/DTS pass-through,  DTS-HD/DTS M6, MP3, Dolby Digital/Digital Plus, AAC-LC, HE AAC, APE, FLAC, OGG, etc…
  • Connectivity – Gigabit Ethernet , 802.11 a/b/g/n/ac WiFi with two external antennas and Bluetooth 4.0
  • USB – 1x USB 3.0 host port, 1x USB 2.0 port
  • Misc – Cooling fan, 1x RS232 DB9 port, 1x power switch, 1x LED white dot matrix panel, 1x LED indicator
  • Power Supply – 110/220V connector
  • Dimensions – 310 x 254 x 66 mm
  • Weight – 2.242 kg
Click to Enlarge

Click to Enlarge

The system runs Android 5.1.1 with Vidon XBMC with features such as  Blu-ray ISO playback & menu navigation, HD audio pass-through, 3D Blu-ray ISO Playback, home sharing server, and OTA update support. The device will ship with an IR remote control plus 2x AAA batteries, an AC power cable, a  SATA cable, HDMI and AV cable, and a user’s manual.

If you like a small device with online video streaming, Egreat A10 is clearly not for you, as it’s pretty big as shown in the video below.

[embedded content]

I could not find Egreat A10 for sale anywhere yet, but considering its little brother Egreat A5 is sold for $205 shipped, you should probably expect a price between $250 and $300.

Tweet Egreat A10 is an Android TV box powered by Hisilicon Hi3798CV200 processor, coupled with 2GB RAM, 16GB flash, and is an exciting device for people who like to keep…

Khadas Vim Amlogic S905X Android and Linux Development Board Sells for $50 and Up

$
0
0

Last summer I wrote about Shenzhen Tomato TVI development board powered by Amlogic S905X processor, and at the time the company focused on business to business customers, but the board is now sold as Khadas Vim through GearBest with 2 GB RAM, 8 or 16 GB flash, and price starting at $49.99 including shipping.

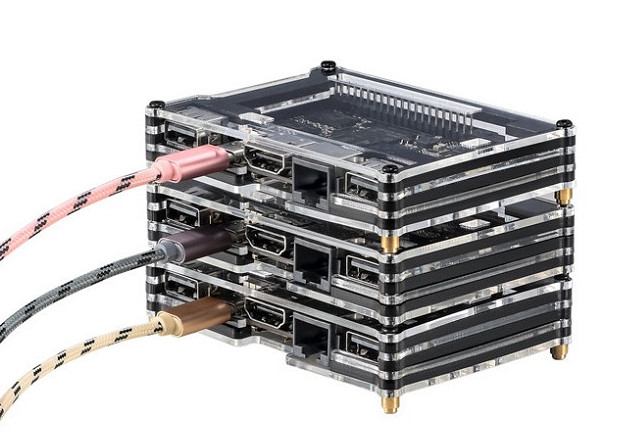
3 Stacked Khadas Vim Boards

3 Stacked Khadas Vim Boards

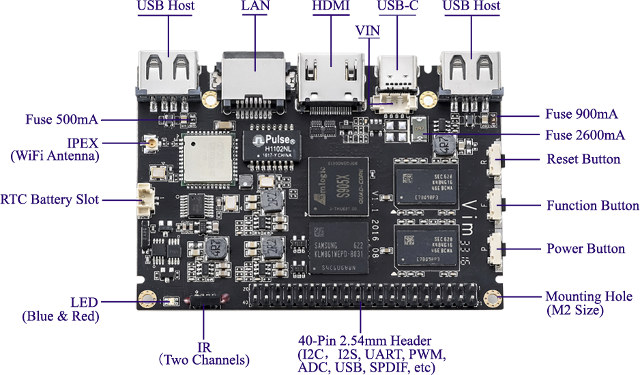
Khadas Vim and Vim Pro boards’ specifications:

  • SoC –  Amlogic S905X quad core ARM Cortex-A53 @ up to 1.5 GHz with penta-core Mali-450MP GPU
  • System Memory – 2 GB DDR3
  • Storage
    • Vim – 8 GB eMMC flash + micro SD slot
    • Vim Pro – 16 GB eMMC flash + micro SD slot
  • Video & Audio  Output – HDMI 2.0a up to 4K @ 60 Hz
  • Connectivity (Wireless part is TBC due to conflicting info on GearBest and the manufacturer’s website)
    • Vim – Fast Ethernet port, 802.11 b/g/n WiFi and Bluetooth 4.0 (AMPAK AP6212 module) with IPEX connector
    • Vim Pro – Fast Ethernet port, dual band 802.11 b/g/n WiFi and Bluetooth 4.2 (Ampak AP6255) with IPEX connector
  • USB – 2x USB 2.0 host ports with 500mA fuses, 1x USB type C port for power and USB devices (no video)
  • Expansion header – 40-pin Raspberry Pi compatible header with USB, UART, I2C, ADC, PWM, JTAG, I2S, and GPIOs
  • Misc – Blue & red LED, dual channel IR, power/function/reset keys, header for RTC battery
  • Power Supply –  5V via USB type C or extra header with 2.6A fuse
  • Dimensions – 82.0 x 57.5 x 11.5 mm
Click to Enlarge

Click to Enlarge

We already knew the board supports Android 6.0, OpenELEC 7.0 and Ubuntu 16.04, we we did not have any details about documentation and source code. You’ll find lot of info include u-boot and Linux 3.14 source code, as well as schematics (PDF) among other things on Khadas’ Github account.

The board is sold as Khadas Vim with 1 GB RAM and 8 GB RAM for $49.99 and Vim Pro with 2GB/16GB configuration for $64.99, which you can purchase on GearBest. The acrylic case shown in the first picture is included with the board, as well as a user’s manual. You may also be interested in the manufacturer’s website (Shenzhen Wesion Tech), where you’ll find not only more info about Vim boards, but discovered the company is also making Rockchip RK3366 based GeekBox board and landingship baseboard.

Tweet Last summer I wrote about Shenzhen Tomato TVI development board powered by Amlogic S905X processor, and at the time the company focused on business to business customers, but the…

Qualcomm Snapdragon 835 Mobile Processor To be Manufactured with Samsung’s 10-nm FinFET Process technology

$
0
0
Home > Qualcomm Snapdragon > Qualcomm Snapdragon 835 Mobile Processor To be Manufactured with Samsung’s 10-nm FinFET Process technology

Qualcomm Snapdragon 835 Mobile Processor To be Manufactured with Samsung’s 10-nm FinFET Process technology

Qualcomm Technologies and Samsung Electronics have jointly announced that the upcoming Qualcomm Snapdragon 835 processor for mobile devices will be manufactured using Samsung’s 10-nanometer (nm) FinFET process technology.

qualcomm_snapdragon_821

Sadly, neither companies provided further details about the processor itself, but they did offer some insights in the performance and power efficiency improvement between 14nm and 10nm processes with Samsung’s 10nm technology allowing up to a 30% increase in area efficiency with 27% higher performance or up to 40% lower power consumption.

Snapdragon 835 is said to be in production now with commercial devices featuring the new processor expected in H1 2017.

Tweet Qualcomm Technologies and Samsung Electronics have jointly announced that the upcoming Qualcomm Snapdragon 835 processor for mobile devices will be manufactured using Samsung’s 10-nanometer (nm) FinFET process technology. Sadly,…

$49 Dashbot Car Dashboard Assistant is Powered by C.H.I.P Pro Allwinner GR8 Module (Crowdfunding)

$
0
0

Most companies specializing in development boards may sell a few accessories for their boards, but usually leave product design to their customers. Next Thing Co. does that too, but the company also produces some products like PocketCHIP portable Linux computer & retro game console, and more recently Dashbot, a voice controller assistant for your car’s dashboard powered by CHIP Pro module.

dashbot

Dashbot hardware specifications:

  • CPU Module – CHIP Pro with Allwinner GR8 ARM Cortex A8 processor @ 1.0 GHz, 512MB NAND flash, 256 DDR3 RAM, 802.11 b/g/n WiFi, Bluetooth 4.2
  • External Storage – micro SD slot
  • Display – Red LED display
  • Audio – 32-bit audio DSP for beamforming & noise suppression; fairfield audio pre-processor with 24-bit ADC; high fidelity MEMS microphone array (106 dB dynamic range)
  • USB – 1x USB host port
  • Power Supply – 5V via USB port or 12V via power port (aka cigarette lighter) + backup LiFePo4 battery
  • Dimensions – 84 x 60 x 28 mm

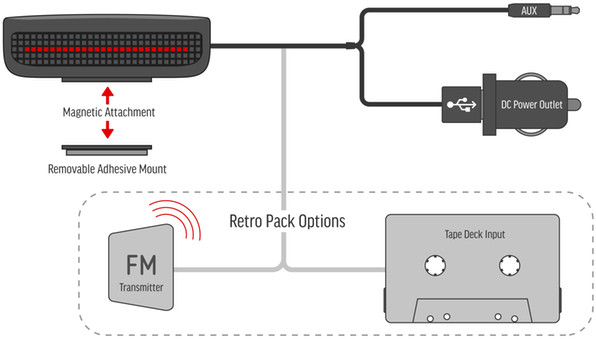
The bot runs mainline Linux, source code will be available, as well as hardware design files making open source hardware (likely minus CHIP Pro module itself). Once you’ve stuck the magnetic adhesive mount to the dashboard, and placed Dashbot on top, you can connect it to your car stereo via Bluetooth or your car’s auxiliary jack. Wait what?  My car does not have any of those two connection methods… But no problem as the company also offers a Retro Pack adding an FM transmitter and cassette adapter for older cars.

dashbot-connection-guideThe main goal of Dashbot is to keep your smartphone in your pocket, and control it with your voice in order to keep your eyes on the road. But you’ll still need your phone, and after installing Dashbot app on your Android 5.0+ or iOS 10+ smartphones, you’ll be able to tell Dashbot to start playing music from online services like Spotify, Soundcloud, Google Play Music, and others, or tell it to “go home” and it will show the directions from Google Maps on the red LED display, and of course you can also answer phone calls, and reply to SMS.

Dashbot “AI powered hands-free car kit” launched on Kickstarter a few hours ago, has already raised over $50,000, and I’m confident it will surpass its $100,000 funding target. A $49 pledge should get you Dashbot, a power port for your cigarette lighter and an AUX cable, but if you have a car with a stereo that does not come with Bluetooth nor an AUX IN jack, you can get the Retro Pack for $65 with an FM radio/cassette player adapter. They also have rewards with an OBD-II dongle, and bundles with multiple Dashbots. Shipping adds $9 or more depending on rewards and destination, and delivery is planned for July 2017.

Tweet Most companies specializing in development boards may sell a few accessories for their boards, but usually leave product design to their customers. Next Thing Co. does that too, but…

Getting Started with Sonoff TH16 ESP8266 Relay and Sensor using the Stock Firmware and eWelink Android App

$
0
0

Sonoff TH16 is a WiFi relay device powered by Espressif ESP8266 WiSoC, able to handle a load up to 16A (3500Watts @ 220V), and including a jack for sensors. The company recently sent me a sample together with  Sonoff AM2301 temperature and humidity sensor, and Sonoff POW power meter device, and in the first part of my Sonoff review I checked out the hardware for all three items. In the second part, I’ll report my experience with Sonoff TH16 and the temperature sensor with a practical example, as I’ve installed it to control a groundwater pump.water-tank-pumps

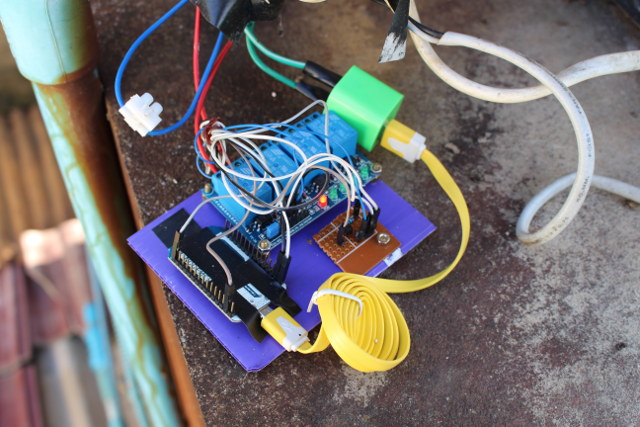
What you see above is a picture of my house water tank with two pumps, the white one keep the pressure in the taps and is always on, and the blue one pumps the water from the ground and is the one I’m going to control. Over the last year or so, I’ve tried two other solutions with SimpleLink self-powered power switch and later a NodeMCU board running NodeMCU firmware and a simple web page to control a relay. The first solution worked as long as the white pump did not start, but if it did the ensuing voltage drop may turn the switch off. The second solution shown below was quickly hacked together and worked fine for many months, but if the WiFi connection was lost, I had to restart NodeMCU board by turning off and on the circuit breaker for the pumps.

Click to Enlarge

NodeMCU + Relay controlling a water pump – Click to Enlarge

As you’ll see from the “Before” side of the first picture, I also kept everything in a plastic box, and using Sonoff TH16 cleaned things up a bit.

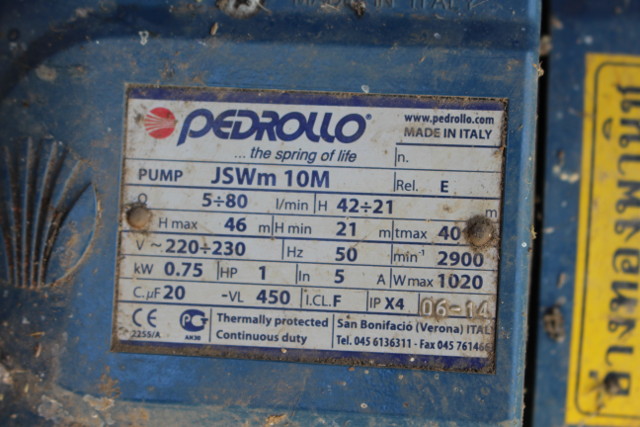
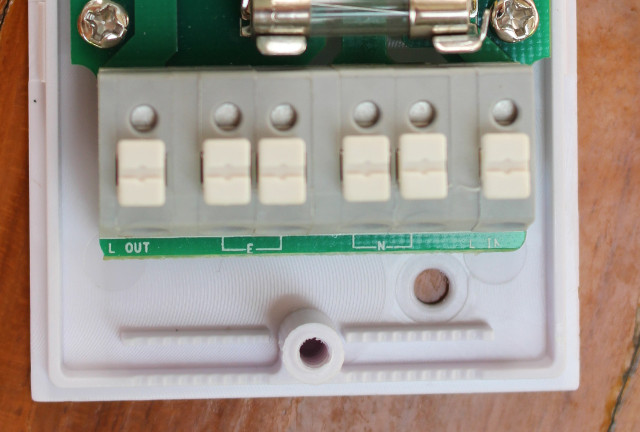
water-pump-parametersFirst let’s make sure the pump parameters are not out of the specs of Sonoff TH16, and there’s indeed no issue as the pump Wmax is 1020W, and it operates at 220 to 230 V AC. Sonoff TH10 & TH16 relays have three outputs and inputs with the ground/earth pins (E), neutral pins (N), and live pins (L) clearly marked once you open the cover.

sonoff-th16-ground-live-neutralWhen you connect a two prong plug into a wall socket, you don’t normally have to care with side you plug it in since we are dealing with alternative current, but for safety reasons it might be a good thing to connect the 110V or 220V live wire into the live IN terminal. One good way to find out the live wire is to put it on your tongue and if it tickles you’ve found the right one. NO! Don’t do it… We are dealing with high voltage here, and electrical shock may kill you, so take precautions, and make sure electricity is off before doing any cabling.

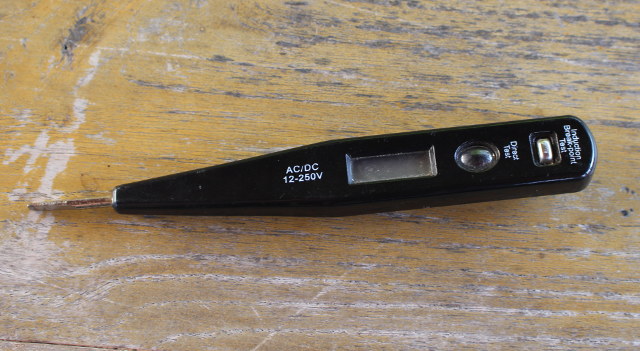
Having said that you’ll still need to check the live wire when the power is up, and you can do it with an electric tester pen as the one shown below.
voltage-tester
Just make sure you are very careful doing so, and my model has an LED which will lit with the Live wire, but not the neutral one. It turns out the black wire is the neutral one, and the white/grey one is the live one as it should be.

Click to Enlarge

Click to Enlarge

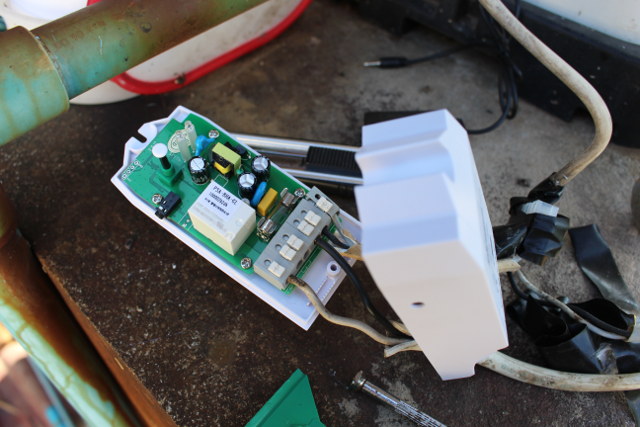
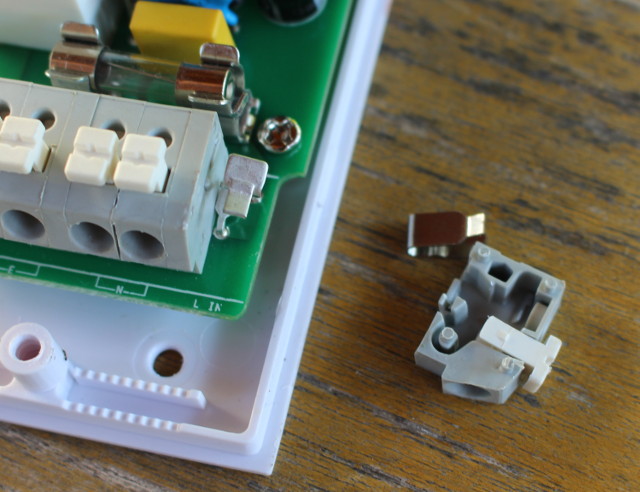
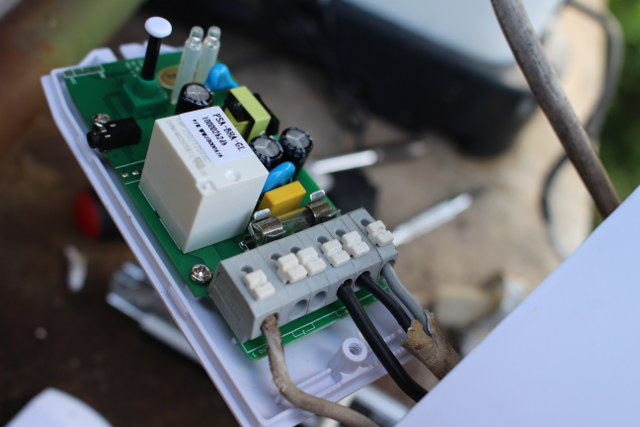
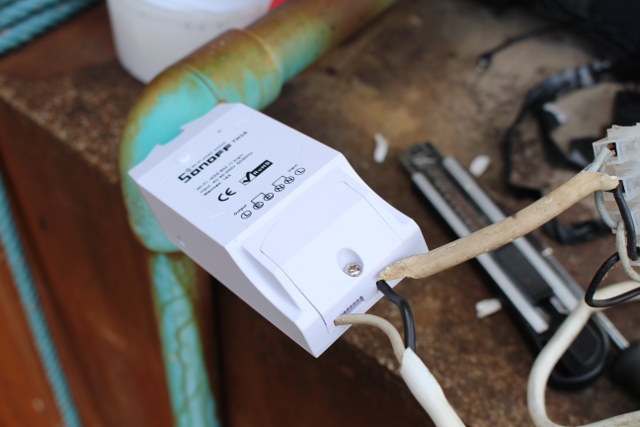
Then  I tried to connect the mains live and neutral cables to L IN and N IN terminals, and do the same for the pump cables. You need to push the button on the terminals don’t but they are quite hard to push, and if only remove the small cover, the live IN and OUT terminal are quite hard to reach. I worked on a ladder, so it complicated slightly the task, but as you can see on the picture above, I managed to dislocate L IN terminal… After that I realize I forgot to pass the cable through the hole in the case, so I pushed hard to remove it, and everything came apart.
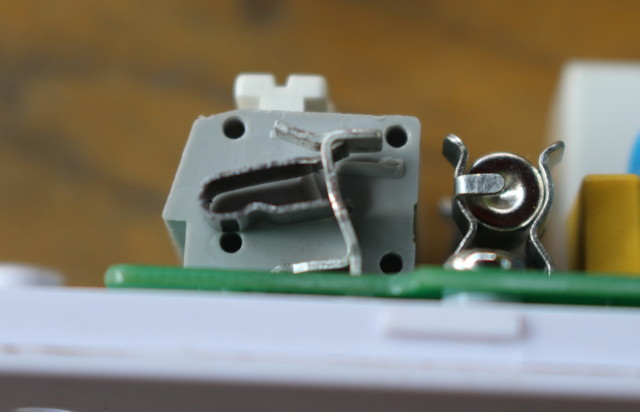
sonoff-th16-broken-terminalIt took me a while to find out how to reassemble it, as I first try to place the metal bit inside the tiny plastic terminal, before I realised I had to insert it in the soldered metal bit first as shown below.
sonoff-th10-th16-terminal-assemblyI then pushed the plastic bit back, and added the white button on top, and could finally complete cabling successfully.

Click to Enlarge

Click to Enlarge

The last steps were to clip back the top part of the case, and screw the small cover on, which nicely pushed the rather hard wires in place.
sonoff-th16-closed
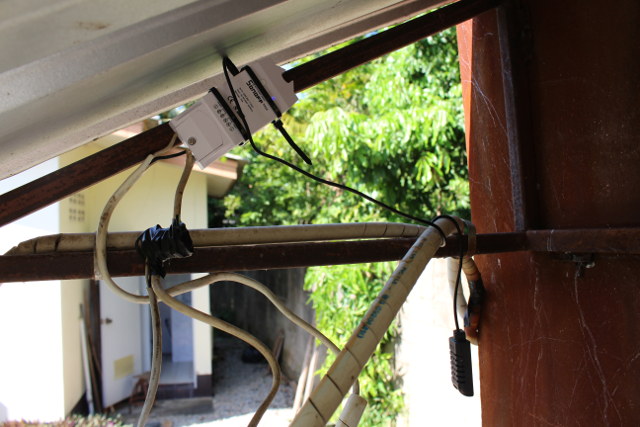
I completed the hardware setup by attaching Sonoff TH16 to the armature of the pump roof, and connected the temperature and humidity sensor and placing it as further as possible from the roof since it can get hot in summer.

Click to Enlarge

Click to Enlarge

The hardware setup took me about one hour mostly due to hard buttons, and average quality terminals.

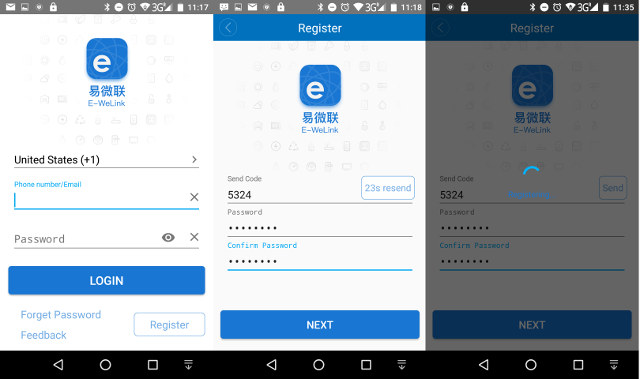
Then I switched to software setup. I first tried to download the apk using the QR Core on the package (coolkit.apk), but the connection to the to server was unstable, and had to repeat the download again… unsuccessfully. So instead I went directly to Google Play to download eWelink app. I should have done that first, as the installation worked beautifully. Then I basically followed the instructions, which started with registration.

Click to Enlarge

Click to Enlarge

The login Window shows “Phone number/Email”, but once you click on Register, you’re only option is to input your mobile phone number. If you don’t like it, you can always install your own firmware on Sonoff TH16 instead. Once you’ve entered your phone number, you’ll be sent a 4-digit code for registration, and be asked to input your password. I did that, and since it took a while, I left the phone unattended for a while, and as you can see from the screenshots above I started at 11:18, but at 11:35 it was still trying to register, so I stopped that, and tried again with the same code, but no luck. So I repeated the task again with a new SMS code, and I could finally registered. At this point, you’ll get the an device window with a “+” sign to add a new device.

Click to Enlarge

Click to Enlarge

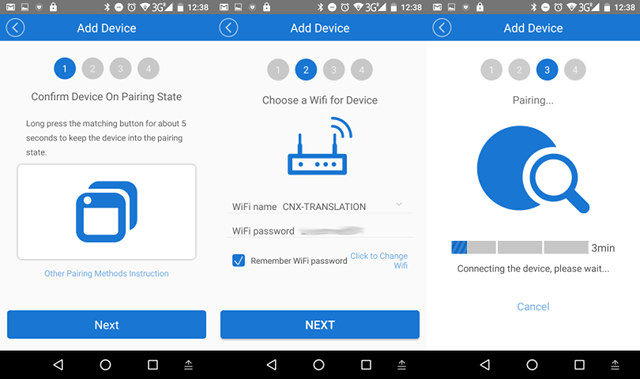
I did that and for the first step I had to climb back on my ladder to press the button on Sonoff TH16 relay for about 5 seconds, and check the LED was blinking regularly to make sure it was in pairing mode. The LED is not particularly bright so outdoor it’s not that easy to check. Anyway, after several attempts I managed, and click Next, inputted my WiFi router password, and after two or three attempts at pairing, I could finally successfully add the device which I named “Water Pump”.

Click to Enlarge

Click to Enlarge

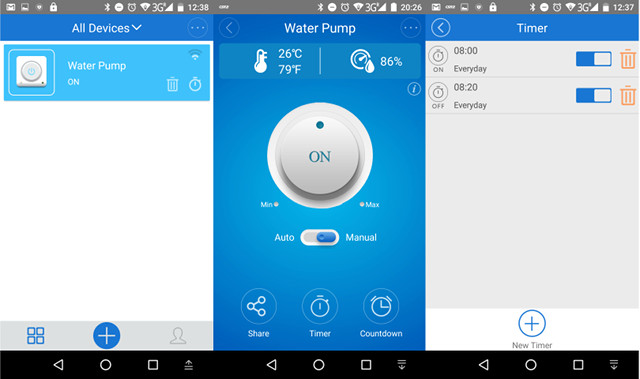
It will show in the device window, and you can control the relay from there tap on the on/off button. You can also tap on the other part of “Water Pump” zone to enter a more detailed menu showing the temperature and humidity (if you’ve connected the sensor), as well as auto and manual modes, a share mode to let other smartphone control the relay (it worked well), as well as timer and countdown mode. Our water usage is pretty regular, so I’ve set a 20 minute timer starting everyday at 8:00 and stopping at 8:20. The water pump itself can be configured to work automatically based on the water tank level, but other people in the house don’t like that since it’s not always reliable, which I why I’m using a WiFi relay.

Click to Enlarge

Click to Enlarge

The temperature and humidity values were realistic and regularly updated. Auto mode allows you to set temperature and/or humidity thresholds to turn on or off the relay, and the Profile section of the app will allow you to send feedback, switching language, check the app version (updated twice from Google Play in one week).

I’ve been using the system for around a week and it works well in normal conditions. If I turn off my broadband provider’s modem, I won’t be able to turn on or off the relay manually even when WiFi is enabled, but the good news is that the timers are local, so even If I disable both Internet and WiFi, the relay turns on and off at the scheduled time. This obviously only works if the relay already got its time from the Internet earlier since there’s no RTC. I’ve also tried to turn on and off the relay out of my home, using my neighbour WiFi and I could control the relay from the Internet. It might not be so useful for a pump, but if you forgot to turn the lights off it’s a very convenient features. So while the setup itself did not go very smoothly, the relay has done its job well so far.

I’ve scanned the relay to check open TCP ports.

Starting Nmap 7.01 ( https://nmap.org ) at 2016-11-13 19:24 ICT
Nmap scan report for 192.168.0.108 (192.168.0.108)
Host is up (0.017s latency).
Not shown: 99 closed ports
PORT STATE SERVICE
80/tcp open http
MAC Address: 60:01:94:07:06:DD (Unknown)

1

2

3

4

5

6

7

8

9

sudo nmap -F 192.168.0.108

Starting Nmap 7.01 ( https://nmap.org ) at 2016-11-13 19:24 ICT

Nmap scan report for 192.168.0.108 (192.168.0.108)

Host is up (0.017s latency).

Not shown: 99 closed ports

PORT   STATE SERVICE

80/tcp open  http

MAC Address: 60:01:94:07:06:DD (Unknown)

TCP port 800 (http) is open, but when I access it directly I don’t get anything, and capturing packets on my phone show some binary payload. I’ve not spend time on it, because there’s probably very little value in reverse-engineering the protocol, simply because of the 4-pin to flash your own firmware. Since it’s based on ESP8266 you could flash Arduino or NodeMCU firmware and write your own web interface, or instead try some home automation firmware like ESPeasy or ESPurna. Just don’t do it while connected to the mains, and instead power the board through the USB to TTL debug board needed for programming. ESPurna has been designed specifically for Sonoff devices, and I can see it supports Sonoff POW, which I have yet to review, so I’ll probably test it in the third part of the review to monitor power consumption of my office.

Sonoff TH16 and AM2301 sensors are be purchased for $8.60 and $4.0 respectively on Sonoff TH page. Shipping is not included, but only adds a few dollars with registered airmail shipping, and a bit more for EMS or DHL Express shipping.

Tweet Sonoff TH16 is a WiFi relay device powered by Espressif ESP8266 WiSoC, able to handle a load up to 16A (3500Watts @ 220V), and including a jack for sensors….
Viewing all 2336 articles
Browse latest View live