Quantcast
Channel: Developers » Visit CNX Software
Viewing all 2336 articles
Browse latest View live

MXQ 4K RK3229 Android TV Box Sells for $29.99 Shipped

$
0
0

This morning I wrote about Sunchip CX-R9 TV box based on Rorkchip RK3229 that is said to be selling for $32, as long as you buy 1,000 pieces, but the new Rockchip SoC might truly disrupt the low-end market, as MXQ 4K RK3299 TV box has just launched on GeekBuying where it is sold for only $29.99 shipped.

MXQ-4K_H.265_VP9_TV_Box

MXQ-4K specifications:

  • SoC – Rockchip RK3229 quad core ARM Cortex A7 processor @ 1.5 GHz with  ARM Mali-400MP2
  • System Memory – 1GB DDR3
  • Storage – 8GB NAND flash + SD card slot up to 32GB
  • Video Output – HDMI 2.0 up to 4K2K @ 60 fps, and 3.5mm AV output (composite)
  • Audio Output – HDMI, AV, and coaxial S/PDIF
  • Connectivity – 100Mbps Ethernet, 802.11 b/g/n WiFi
  • USB – 4x USB 2.0 host ports
  • Power Supply – 5V/2A
  • Dimensions – N/A
MXQ-4KThe device runs Android 4.4 with Kodi 16, and the specs list 10-bit H.264 and H.265, without mention of VP9 (but it should support it up to 4K @ 30 fps), and will ship with an IR remote control, an HDMI cable, a power adapter and a user’s manual.
MXQ-4K_RK3229_Antutu

With a quad core Cortex A7 processor the device won’t be a top of the benchmark charts, and GeekBuying reports 21,134 points in Antutu 6.0, but if you just want to play 4K videos at 60 fps, or even just 10-bit H.264 (Hi10p) videos, you can certainly not beat the price. I hope to get a sample soon to check it’s actual video playback abilities.


PixiePro Board Combines NXP i.MX6Q Processor with WiFi 802.11ac, Bluetooth 4.2, NFC, GPS, and a 3G Modem

$
0
0

Saying that the market provides a wide range of development board is probably an understatement, but Code Ing has found out that most hobbyist boards had limited on-board wireless connectivity with WiFi and Bluetooth basically the best you can expect, with any extra wireless functionality requiring USB dongles. So the company designed PixiePro single board computer powered by NXP i.MX6Q quad core Cortex A9 processor with on-board wireless connectivity including WiFi 802.11ac, Bluetooth 4.2, GPS/GLONASS, NFC and a 3G module.

PixiePro_Board

PixiePro board specifications:

  • SoC – NXP i.MX6Q quad core Cortex A9 processor @ 1 GHz with Vivante 2D and 3D GPUs
  • System Memory – 2GB 64-bit DDR3
  • Storage – 2x UHS-I micro SD card slot up to 104 MB/s
  • Video Output – micro HDMI up to 1080p60
  • Audio Output – HDMI and 3.5mm mini TOSLINK optical port/Line Out
  • Connectivity
    • WiFi 802.11 a/b/g/n/ac 2×2 MIMO with two antenna connectors
    • Bluetooth 4.2 LE, 2.1 + EDR
    • NFC – ISO 14443A/B, 18092, 15693, NFCIP-1, NFC Forum with one antenna connector
    • Cellular – UMTS/HSPA+ 3G module (Quectel UC20) with SIM card slot and 2x 3G antenna connectors (main and RX diversity)
    • GPS/GLONASS with antenna connector
  • USB – 2x USB 2.0 host ports, 1x micro USB OTG port
  • Sensors – 9-axis IMU (accelerometer, gyro and magnetometer)
  • Expansion – Two 60-pin expansion connectors for Gigabit Ethernet, 1x PCIe, SDIO, 2x MIPI, SATA-II, RGB666, USB 2.0 HS, CAN, SPI, 2x UART, 2x I2C, and GPIOs
  • Debugging – 4-pin debug port for serial console
  • Misc – Reset button, RTC + battery
  • Power Supply – 5V DC input
  • Dimensions – 91 x 52 mm
Click to Enlarge

Click to Enlarge

Since the two expansion headers are not exactly convenient for experimentation, the company will design a low cost adapter called PinsBoard that will fit into the 60-pin connector and provide a Raspberry Pi compatible header.

The board currently supports Arch Linux ARM, and they have a Wiki with some documentation, including guides for WiFi, Bluetooth and 3G, as well schematics in PDF. You can also get support via their Forums.

The board was first showcased at FTF 2015 last year, where it was called PixieBoard, so there should already be some out in the wild. The company has launched the board in mid December for $99.50 + shipping, which unless you are based in the US, will add $30 to $50 to the cost. You can find all details on Treats4Geeks.com.

Thanks to Guillaume for the tip.

Phoenix OS is Another Desktop Oriented Android Distribution for ARM and x86

$
0
0

After Light Biz OSRemix OS, and Console OS, here’s another Android distribution that aims at creating better desktop experience in Android. Phoenix OS works on some ARM platforms, namely Nexus 9 and Nexus 10, as well as 64-bit x86 processors and like the x86 version of of Remix OS is based on Android-x86 project.

Phoenix_OS

Just like other alternatives, it adds features usually found in Windows or Linux distributions such as a start menu, a task bar, multi-window support, notification handling via the taskbar, etc…

If you’d like to try it out in a computer with an Intel or AMD computer, you can follow the instructions below from a Windows machine:

  1. Prepare a 4GB+ flash drive
  2. Download the latest Zip file of Phoenix OS (x86) to your PC, currently Phoenix-x86-1.0-32-beta.zip
  3. Download and install USBMaker tool to your PC
  4. Start USBMaker.exe, select the flash drive and Zip file, and press “Write” (写入) to make a bootable device.
  5. Select the USB drive to boot Phoenix OS on your computer, and enjoy

Since I did not feel like running a Windows VM to do that, I investigated ways to do so in Linux, but sadly it did not find a way to create a bootable ISO image using the content of the zip file.

Phoenix_OS_Zip_FileAndroid-x86 ISO file also has some extra files including isolinux directory, and I tried to merge it with Phoenix OS, and create an ISO file with Brasero, but no lock. Since Android-x86 is distributed with an ISO, and Phoenix OS is based on Android-x86 project, it should also be possible to create an ISO, but I have not found a way yet. Checking how Android-x86 source code should help. It’s worth noting that Phoenix OS source code does not seem available.

PhoenixOS_Notifications

Nevertheless, Liliputing tried it on actual computers, and found it looked like very much like Remix OS, and uses persistent mode to save your data in the flash drive, so you don’t need to re-install apps or login to services again next time you boot your computer, or another one, with the flash drive.

You can visit Phoenix OS website for more information.

96Boards Mezzanine Add-on Boards with Sensors, Buttons, Relays, etc.. Are Starting to Show Up

$
0
0

Beside excellent software support, and a great community, the two most popular maker boards on the market, namely Arduino and Raspberry Pi, also have many add-on boards, respectively called Shields and Hats, to expand their user and connect sensors, buttons, displays, and so on… Several Linaro’s 96Boards compliant development board launched last year such as LeMaker Hikey and DragonBoard 410c with support for recent versions of Android and Debian, and recently three Mezzanine add-ons boards, as well as somewhat pricey USB to TLL debug board, have started to show up to make it an even more interesting platform.

Linker mezzanine card starter kit for 96Boards

The first kit is made by LinkSprite and includes Linker Base Mezzanine Card with several sensors and cables.

96Boards_Linker_Base_Mezzanine_CardEight 4-pin connectors with ADC, UART, I2C, and GPIOs allow you connect the eight sensors ad modules provided with the kit:a button module, a red LED module, an light sensor, a thermal module, a linear/slide potentiometer module, a tilt module, a touch sensor module , and a relay module. Eight 20cm cables, and  a plastic case are also provided.

LinkSprite_Mezzanine_Kit_96Boards

You can find the documentation on LinkSprite wiki. Sadly, you can’t buy the kit directly from LinkSprite store, and the only seller appears to be Arrow Electronics, where it is sold for $25 + shipping.

STM32 Sensor mezzanine board

The second mezzanine board is based on STM32F4 ARM Cortex M4 micro-controller.

96Boards_STM32_MezzanineB-F446E-96B01A Mezzanine board specifications:

  • MCU – STMicro STM32F446 ARM Cortex-M4 @ 180MHz MCU in LQFP100 package
  • Connectors – Low Speed and High Speed 96Boards CE connectors
  • Expansion Headers
    • Arduino Uno Revision 3 Headers
    • 8x 4-pin Grove headers with I2C, GPIOs, SPI, UART, etc… ARM®mbed -enabled (see http://mbed.org) planned for the first quarter of 2016
  • Sensors – 9-axis accelerometer/gyroscope/magnetometer, pressure, microphone
  • USB – Micro USB port supporting virtual Com port, mass storage, and debug port
  • Debugging – On-board ST-LINK/V2-1 debugger/programmer
  • Misc – User LEDs and buttons, configuration jumpers
  • Power Supply – Via 96Boards, or external +5V source connected through a Grove or Arduino Uno Revision 3 connector in standalone mode
  • Dimensions – 85 x 55 mm (TBC)
Bottom of STM32F4 Mezzanine Board

Bottom Layout of STM32F4 Mezzanine Board

The board is supported by IAR, Keil, GCC-based IDEs, and ARM mbed online, and documentation and tools can be found on STMicro B-F446E-96B01A product page. Price and availability have not been announced, and according to the diagram above has been designed by Dizic.

96Boards Sensors Mezzanine adapter

The last board is powered by an Atmel ATMega328 MCU and only uses the Low Speed connector of 96Boards platforms.

96Boards_Sensor_Mezzanine_AdapterIt supports up to 18 Grove modules and one Arduino shield, and features two extra SPI headers. The microcontroller can be programmed from the Arduino IDE. Half of the grove sockets are controlled by the MCU, while the other half is managed by the host processor on the main board. A USB-UART interface provides access to the 96Boards baseboard’s serial console.

96Boards_Mezzanine_Low_Speed_LS_ConnectorThe board should be available by the end of January. Pricing has not been released. A few more details can be found on 96Boards Sensor Mezzanine page.

MeLE Star Cloud PCG60 Plus Cherry Trail Mini PC Comes with HDMI and VGA Outputs, Gigabit Ethernet and More

$
0
0

Most Cherry Trail mini PCs on the market features only one video interface, usually HDMI, and only support 10/100M Ethernet. After introducing MeLE PCG03 Plus a few months ago, MeLE is about to launch a new Cherry Trail mini PC called Start Cloud PCG60 Plus that includes both HDMI and VGA video output, two USB 2.0, but also faster networking thanks to Gigabit Ethernet and 802.11ac.

Click to Enlarge

MeLE PCG60 prototype, the final product will include a grey/silver WiFi antenna – Click to Enlarge

MeLE Star Cloud PCG60 specifications (highlights in bold show improvements over MeLE PCG03 Plus):

  • SoC – Intel Atom x5-Z8300 “Bay Trail” quad core processor @ 1.44 GHz / 1.84 GHz (Turbo) with Intel HD Gen8 graphics
  • System Memory – 2 GB DDR3L
  • Storage – 32 GB eMMC + micro SD card slot up to 128 GB
  • Video Output – HDMI 1.4, and VGA
  • Audio I/F – HDMI, 3.5mm earphone jack
  • Connectivity – Gigabit Ethernet, 802.11 b/g/n/ac Wi-Fi, and Bluetooth 4.0
  • USB – 2x USB 3.0 host ports
  • Misc – Power Button, standby and activity LEDs
  • Power Supply – 12V/1A
  • Dimensions – 110 x 110 x 38 mm (Metallic case)

The fanless system run Windows 10 Home 64-bit with a proper license, as MeLE is one of Microsoft’s IP license partners. The company showcased both MeLE PCG03 Plus and PCG60 at CES 2016. Please note since the event, PCG60 has been renamed to PCG60 Plus.

[embedded content]

MeLE’s representative says MeLE PCG60 Plus will be available at the end of the month, but that should be to distributors and resellers, and the company told me that the mini PC will be listed for $169 on Aliexpress in March.

Via Netbook Italia and AndroidPC.es

Ugoos UT4 Android 5.1 TV Box Review

$
0
0

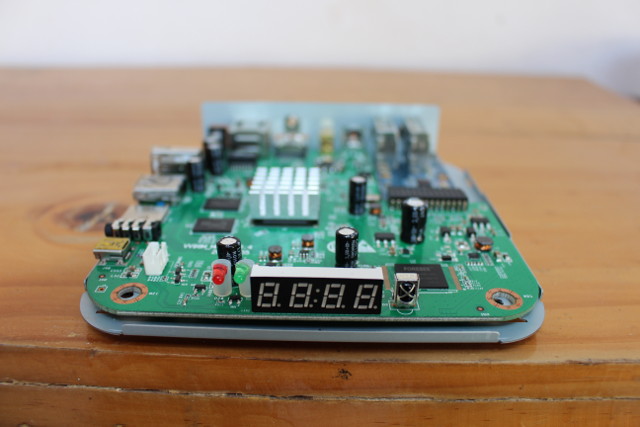
Ugoos UT4 is one of many Rockchip RK3368 TV boxes available on the market today, but it’s one of the model with higher-end specifications including  2 GB RAM, and 16 GB flash, as well as Gigabit Ethernet and 802.11ac WiFi, Ugoos offers regular firmware updates for their devices, and as I found out in Ugoos UT4 specs and teardown post, the mini PC features a fan to keep the device cool at all times. Today, I’ll focus on reviewing the firmware including video playback capabilities, performance and whether advertised features work as they should.

First Boot, Settings and First Impressions

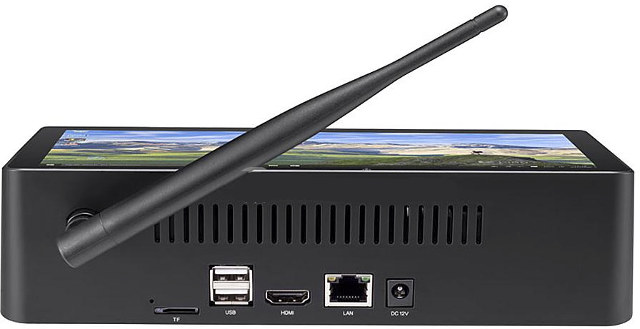
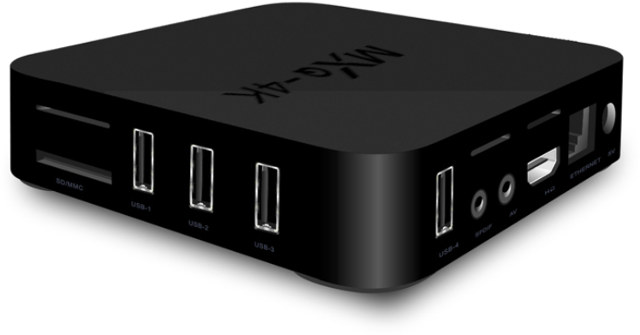
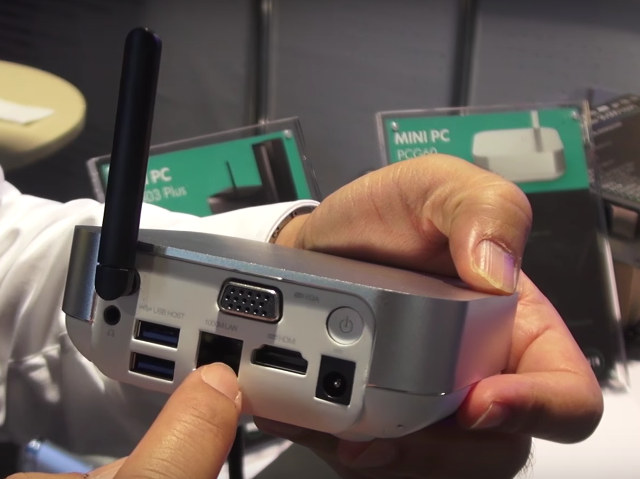
Before powering on the device, I connected some cables (Ethernet, HDMI, optical audio, AV to speakers), and made use of all four USB ports with a USB hard drive, a webcam, a keyboard, and a USB hub with two RF dongles for MINIX NEO A2 Lite air mouse and Tronsmart Mars G01 gamepad, and to power my external speakers that are connected to the AV port. Finally, I inserted the power cable, and UT4 booted automatically with a typical boot time being 25 to 30 seconds, or one of the fastest start-up time I’ve experienced lately.

Click for Original Size

Click for Original Size

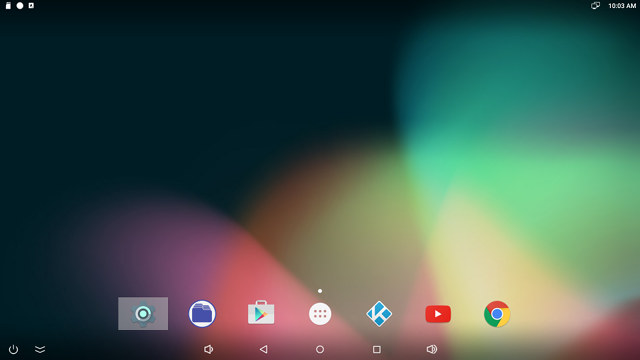
So Ugoos has decided not to include a TV launch with their device, and instead go with the typical Android Home Screen with some pre-installed apps including Settings, a File Manager, the Play Store, the list of Apps, Kodi, YouTube, and Chrome. The status bar can be hidden easily by clicking on the double down arrow icon on the right of the power icon. The notification bar at the top does not get out of the way in all apps, which may annoy some people… But it does disappear in Kodi and the games I tried. There’s also a small display bug when you hide the taskbar, and the gray icon highlighter, shown on the Settings icon in the screenshot above, will be have an incorrect vertical alignment afterwards (too high).

The box automatically detected the TV is HDMI 2.0 capable and set the video output to 2160p @ 60 Hz. However, I noticed later on that the resolution had changed to 1080p60 or even 720p60, so it’s better to go in the settings (Display->HDMI mode) to set this manually. I could also confirm that the AV port worked with my speakers. Both HDMI audio and AV are always enabled.

The most useful options inside Android Lollipop settings include:

  • Wireless & Networks – Wi-Fi, Ethernet, Data usage for Wi-Fi and Ethernet, Bluetooth, and a “More” section with: Airplane mode, Tethering & Tethering & portable hotspot, PPPoE and VPN
  • Device
    • USB – Connect to PC
    • Sound & Notifications – Volume for various sounds, notification settings, and a Sound Device Manager to select Default Output, Spdif Passthrough, or HDMI Bitstream
    • Display
      • Wallpaper, sleep, Daydream, font size, screen rotation
      • Cast Screen
      • Screen Scale
      • Output Interface – HDMI only
      • HDMI Mode:
        • Auto
        • 4096x2160p @ 60Hz (YCbCr420), 50Hz (YCbCr420), 30Hz, 25Hz, or 24Hz
        • 3840x2160p @ 60Hz (YCbCr420), 50Hz (YCbCr420), 30Hz, 25Hz, or 24Hz
        • 1920x1080p @ 60 Hz, 50Hz, 30Hz, 25Hz, 24Hz
        • 1280x720p @ 60 or 50 Hz
        • 720x576p @ 50 Hz
        • 720x480p @ 60 Hz
    • Storage – Two partitions: 3.87 GB “Internal storage” with 3.57GB free, and a  9.12 GB “NAND FLASH” partition

About_Ugoos_UT4While there’s no unified partition in the device, the 3.87GB internal partition should be large enough for most people. Usual settings like Accounts, Language & Input, Printing, accessibility are all enabled.

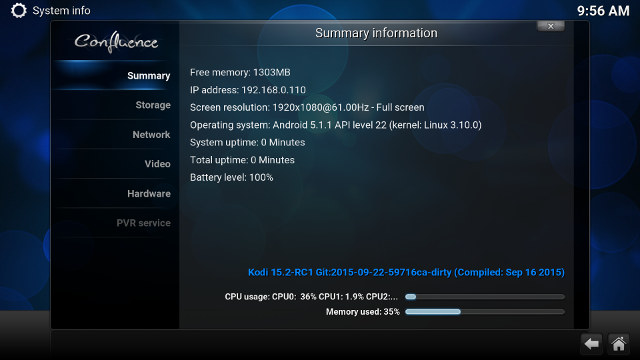
Going into “About device” shows UGOOS-UT4 model number is running Android 5.1.1 on top of Linux 3.10.0. There’s also “vendor software version” reports that’s UGOOS_UT4_V0.0.1.b on my device. OTA firmware updates appear to be working, but my system was detected as being up to date so I could not test it. The firmware is not rooted by default.

While I prefer using air mice like MeLE F10 Deluxe or MINIX NEO A2 Lite with Android TV boxes, an infrared remote control is normally included. So I added two AAA batteries to test the provided remote, and while it works, the range was rather short, and if I stood more than 4 meters away, key presses started to get unreliably detected. I tried with two sets of batteries, and the result was the same.

After successfully registering my Google account, Google Play Store complains I was unauthorized to access my list of apps… But I rebooted, and it worked quite well afterwards. I could install all apps I needed for review, except Hplus Watch for F68 Bluetooth LE smart watch, which I had to sideload. I could also install Riptide GP2 using Amazon Underground app.

At first, power handling appears to be properly implemented, as when you press the power key for a short time it goes into standby / sleep mode, and a long press – or clicking on the power icon in the task bar – pops up a menu with: Power off, Reboot, Sleep, Reboot bootloader. However while Reboot and Sleep modes are working fine, power off  and reboot bootloader modes do not seem to work. The screen does go black, but the power LED is still on, power consumption is high (~7 watts), and there’s no way to power it on again, except by powering cycling the device.

I still tested power consumption, but bear in mind power off mode simply hangs, so the consumption is higher than normal, and hopefully Ugoos can fix it in the next firmware. I tested power consumption without any USB device, and with a USB hard drive:

  • Power off – 4.0 Watts (system hangs)
  • Standby / Sleep  – 1.3 Watt
  • Idle – 4.2 Watts
  • Power off + USB HDD – 6.0 Watt (system hangs)
  • Standby / Sleep + USB HDD – 3.1 Watt
  • Idle + USB HDD – 6.4 Watts

So for the current firmware, I’d recommend to only use Sleep mode. Idle power consumption is also a little higher (1 Watt extra) compared to Kingnovel R8, another RK3368 TV box, and while there could be various reasons for it, the fan is likely the culprit here.

Since I’m talking about the fan, I’d like to mention it is rotating all the time, not only when the processor gets hot. Compared my computer, it’s very silent, but if I turn off my main computer, I can clearly hear the fan, even standing at about 2 meters away. I don’t find it noisy at all or disturbing, but it may be an issue for some people.

The fan clearly helps with temperature, as after running Antutu, the temperature was just 38 and 41°C on the top and bottom of the case, and it only went up to 40 and 44°C after 30 minutes playing Beach Buggy Racing and Riptide GP2.

Beside the power off issue, Ugoos UT4 is a good device with fast boot and app loading, and I only had slowdowns once or twice. So overall it’s a very responsive system, and performance can be sustained over time thanks to the cooling fan. There are also a few display bugs like icon highlight alignment when hiding/showing the task bar, and the notification bar may be an annoyance with some apps.

Video Playback with Kodi

Ugoos UT4 comes pre-loaded with a version Kodi 15.2-rc1 likely modified with specific patchsets to add Dolby TrueHD and DTS HD passthrough to RK3368, and it’s actually been compiled almost the same day as the source code release.
Ugoos_UT4_Kodi_15.2

I’ve played all videos from a SAMBA share in Kodi over Ethernet, unless otherwise noted. I’ve also enabled Automatic frame rate switching in Kodi, but unfortunately it did not work at all, so some videos may suffer from micro stuttering.

Linaro media samples, Elecard H.265 samples, and low resolution VP9 video could all play fairly well, except Real Media videos:

  • H.264 codec / MP4 container (Big Buck Bunny) – 480p/720p/1080p – OK
  • MPEG2 codec / MPG container –  480p/720p/1080p – OK
  • MPEG4 codec, AVI container 480p/720p/1080p – OK
  • VC1 codec (WMV) – 1080p – 480p/720p/1080p – OK
  • Real Media (RMVB), 720p / 5Mbps – Could be a little smoother
  • WebM / VP8 480p/720p/1080p – OK
  • H.265 codec / MPEG TS container  – OK
  • WebM / VP9 (no audio in video) – OK

I then switched to some video with various frame rates

  • ED_HD.avi (1080p MPEG-4 – 10Mbps) – OK
  • big_buck_bunny_1080p_surround.avi (1080p H.264 – 12 Mbps) – OK
  • h264_1080p_hp_4.1_40mbps_birds.mkv (40 Mbps) – OK
  • hddvd_demo_17.5Mbps_1080p_VC1.mkv (17.5Mbps) – Could be smoother
  • Jellyfish-120-Mbps.mkv (120 Mbps video without audio) – OK from the network, except a micro pause occurs after about 2 seconds playback.

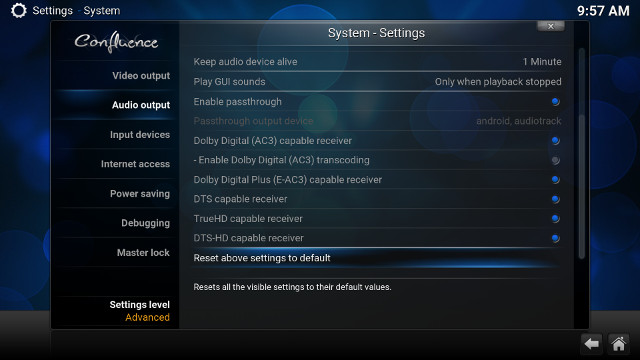
The next step was to test audio capabilities of the device using HDMI and S/PDIF pass-through in Kodi, and PCM output (downmixing) in both Kodi and Video Player.  I selected the output in Android Settings->Sound & Notifications->Sound Device Manager and chose Default Output, Spdif Passthrough, or HDMI Bitstream accordingly. For audio pass-through, I also configured Kodi as shown below.

Click to Enlarge

Click to Enlarge

Video PCM Output
(Kodi)

PCM Output
(Video Player)

HDMI Pass-through
(Kodi)
S/PDIF Pass-through
(Kodi)
AC3 / Dolby Digital 5.1 Audio OK
video 1:1 aspect ratio
No audio OK (Dolby D 5.1) OK (Dolby D 5.1)
E-AC-3 / Dolby Digital+ 5.1 OK No audio OK (Dolby D 5.1) OK (Dolby D 5.1)
Dolby Digital+ 7.1 OK No audio OK (Dolby D+ 7.1) Audio Formats Not Supported over S/PDIF
TrueHD 5.1 OK No audio OK (TrueHD 5.1)
TrueHD 7.1 OK No audio OK (TrueHD 7.1)
Dolby Atmos 7.1 OK No audio OK (TrueHD 7.1)
DTS HD Master OK No audio DTS 5.1 only OK (DTS 5.1)
DTS HD High Resolution OK No audio DTS 5.1 only OK (DTS 5.1)

Audio downmixing and pass-through are working well in Kodi, but since Dolby and DTS licenses are not included most other video players and online video services won’t support Dolby and DTS audio, unless you are passing the audio through an AV receiver.

Some 4K videos can be played, but there are still some issues, and there’s no miracle as VP9 and 10-bit H.265 codecs are not supported by Rockchip RK3368 VPU:

  • HD.Club-4K-Chimei-inn-60mbps.mp4 – OK
  • sintel-2010-4k.mkv – OK most of the time, but a freeze lasting 9 seconds occurred at the 4 seconds mark (apparently not related to buffering).
  • Beauty_3840x2160_120fps_420_8bit_HEVC_MP4.mp4 (H.265) –  OK
  • Bosphorus_3840x2160_120fps_420_8bit_HEVC_MP4.mp4 (H.265) – OK, but a micro pause happened once.
  • Jockey_3840x2160_120fps_420_8bit_HEVC_TS.ts (H.265) – Won’t play, stays in UI
  • MHD_2013_2160p_ShowReel_R_9000f_24fps_RMN_QP23_10b.mkv (10-bit HEVC) – Black screen
  • phfx_4KHD_VP9TestFootage.webm (VP9) – Freeze at the beginning and get stuck there.
  • BT.2020.20140602.ts (Rec.2020 compliant video) – Won’t play, stays in UI
  • big_buck_bunny_4k_H264_30fps.mp4 – OK
  • big_buck_bunny_4k_H264_60fps.mp4 – Not very smooth and massive audio delay (4K H.264 @ 60 fps not supported by RK3368)
  • Fifa_WorldCup2014_Uruguay-Colombia_4K-x265.mp4 (4K, H.265, 60 fps) – OK
  • Samsung_UHD_Dubai_10-bit_HEVC_51.4Mbps.ts (10-bit HEVC / MPEG-4 AAC) – Won’t play, stays in UI
  • Astra-11479_V_22000-Canal+ UHD Demo 42.6 Mbps bitrate.ts (10-bit H.265 from DVB-S2 stream) – Won’t play, stays in UI

Both Sintel-Bluray.iso and amat.iso (Ambra – Prism of Life) Blu-ray ISO could play smoothly, as well as two 1080i video samples.

Hi10p videos have the same problem as on other Android TV boxes in Kodi:

  • [Commie] Steins;Gate – NCED [BD 720p AAC] [10bit] [C706859E].mkv – Audio and subtitles OK, some video artifacts
  • [1080p][16_REF_L5.1][mp3_2.0]Suzumiya Haruhi no Shoushitsu BD OP.mkv – Audio and susbtites OK, more artifacts

This will likely only be possible with the upcoming Rockchip RK3229 and RK3399 SoCs that natively support 10-bit H.264.

LG 42UB820T 4K UHD television does not support 3D, but I still played some 3D videos to check 3D decoding capabilities of Ugoos UT4:

  • bbb_sunflower_1080p_60fps_stereo_abl.mp4 (1080p Over/Under) – Plays in slow motion, and some audio delay
  • bbb_sunflower_2160p_60fps_stereo_abl.mp4 (2160p Over/Under) – Blackscreen with audio only
  • Turbo_Film-DreamWorks_trailer_VO_3D.mp4 (1080p SBS) – OK

Finally, I tested various other videos in my library (VOB/IFO, MKV, AVI, MP4, XViD, DiVX, FLV and MKV), and I did not notice any issues, except for some FLV that could not play.

The stability test consisting of a 2-hour movie was successfully, and the movie played in its entirety reasonably smoothly, but not perfectly due to the mismatch between the video frame rate and the TV refresh rate. I also notice it was impossible to access the zoom menu while playing the video. During my testing, I adjusted the volume to the maximum while playing some videos, only to notice it was reverted back to some other values when playing another video.

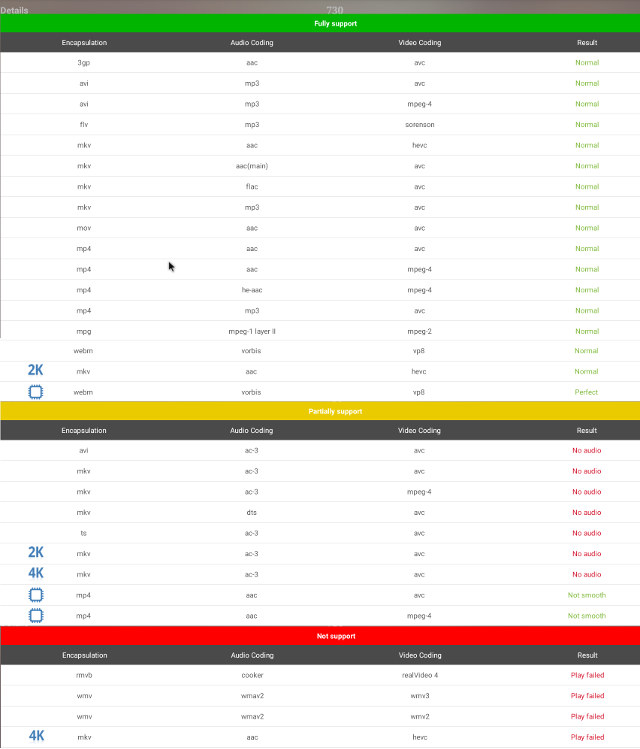
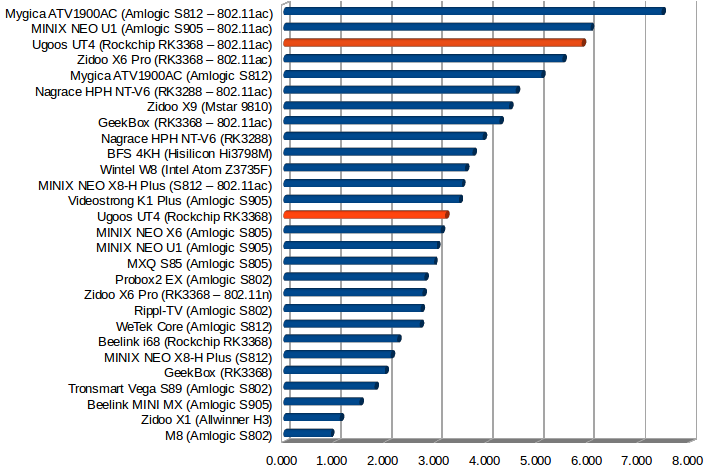
Ugoos UT4 achieved 730 points in Antutu Video Tester 3.0. That’s not quite as high as on Amlogic S905 TV boxes (~900 points), but still a good progress over Beelink i68 (532) or Zidoo X6 Pro (328) scores.

Click to Enlarge

Click to Enlarge

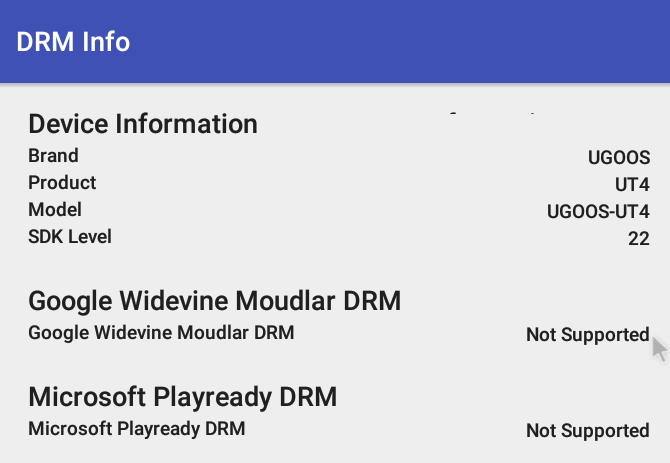
DRM info reports that neither Widewine nor PlayReady DRM are installed.
Ugoos_UT4_DRM_Info
However, since Netflix is now available internationally, I did have a try, and was able to stream a video at SD resolution. So either the lack of DRM for standard definition streaming is not an issue with Netflix, or the app reported incorrect information.

If you want to reproduce most of the tests above, you can download the video samples (mostly in comments section).

Network Performance (Wi-Fi and Ethernet)

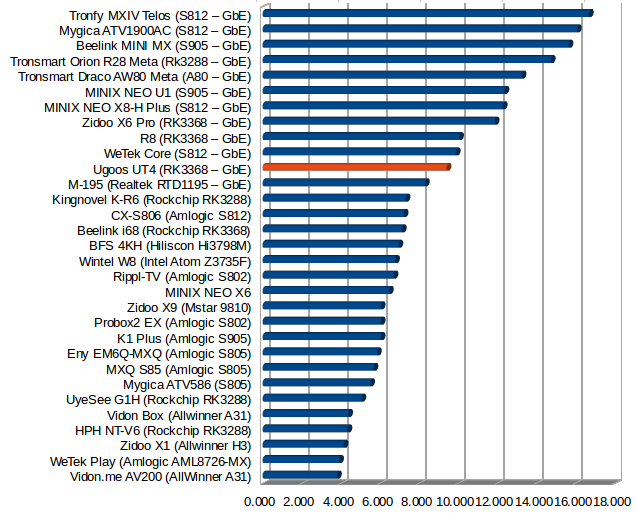
I transfer a 278MB file between a network share (SAMBA) and the internal storage, and vice versa, using ES File Explorer in order to evaluate WiFi performance. The results for Ugoos UT4 are pretty good as 802.11n connection achieved 3.18 MB/s on average, and 802.11ac 5.87 MB/s,  one of the top three results, and about equivalent to MINIX NEO U1 WiFi performance.

Throughput in MB/s

Throughput in MB/s

I repeated the same test with Gigabit Ethernet, but instead of using a larger 885 MB file, and the average transfer rate was 9.4 MB/s, which for some reasons is quite lower than other devices I tested, possibly due to the low write speed of the flash, as we’ll see below. Having said that, it’s not that far from other Rockchip RK3368 based mini PCs file transfer throughput.

Throuput in MB/s

Throughput in MB/s

Since as Gigabit speeds, file transfer rate is likely to be limited by storage performance, it’s important to also test raw network performance, which I did with iperf -t 60 -c “server-ip” -d command in Android.

Throughput in Mbps

Throughput in Mbps

Here the performance is slightly over average, and very similar to other Rockchip RK3368 TV boxes such as Zidoo X6 Pro or Beelink i68.

iperf output:

1

2

3

4

5

6

7

Client connecting to 192.168.0.108, TCP port 5001

TCP window size:  136 KByte (default)

[  6] local 192.168.0.104 port 50039 connected with 192.168.0.108 port 5001

[ ID] Interval       Transfer     Bandwidth

[  6]  0.0-60.0 sec  4.37 GBytes   626 Mbits/sec

[  4]  0.0-60.0 sec  4.49 GBytes   643 Mbits/sec

Miscellaneous Tests

Bluetooth

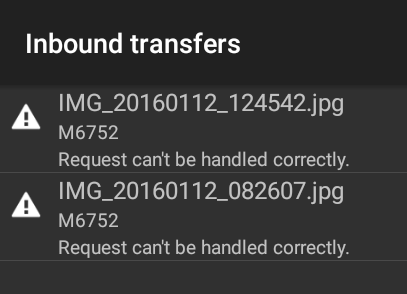
Ugoos UT4 supports Bluetooth 4.0 LE, and shows as rk3368 Bluetooth device like most other device based on the same processor.  While I could pair it with my iocean MT6752 smartphone, and initiate photos transfer, it eventually failed with the message “Request can’t be handled correctly”, on both the device and my phone.Ugoos_UT4_Bluetooth_Issue

I has more luck connecting to a Bluetooth headset that I used to watch a 1080p YouTube video. I also tested Bluetooth LE (BLE) with F68 smartwatch successfully. Since the firmware is not rooted, I skipped the test with my PS3 gamepad clone using Sixaxis Controller app.

Storage

The mini PC could mount NTFS & EXT-4 partitions on my USB hard drive,  as well as an SD card formatted with FAT32, but it could not handle exFAT, nor BTRFS partitions.

File System Read Write
NTFS OK OK
EXT-4 OK OK
exFAT Not mounted Not mounted
BTRFS Not mounted Not mounted
FAT32 OK OK

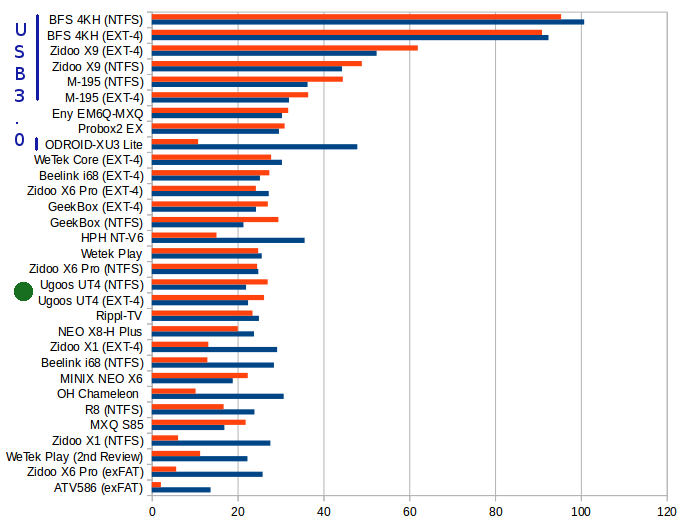
USB storage performance, tested with A1SD bench, is average with respectively 21.98 MB/s and 27.01 MB/s read and write speeds for NTFS, and 22.44 MB/s and 26.17 MB/s for EXT-4.

Read and Write Speeds in MB/s

Read (Blue) and Write (Red) Speeds in MB/s

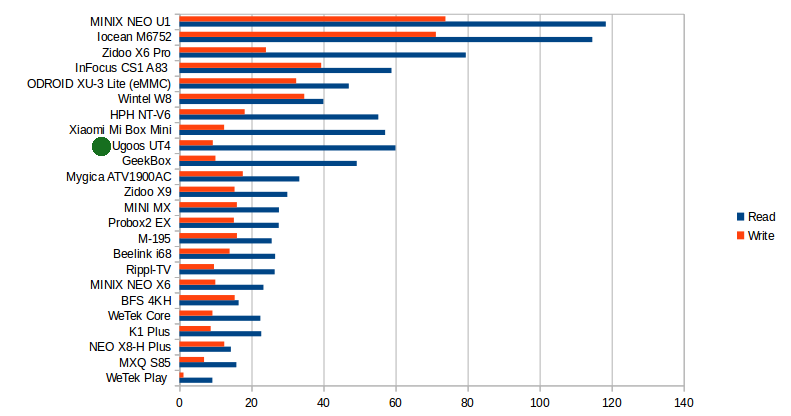
The internal storage (Samsung eMMC 5.0) has a good read speed (~60MB/s), but write speed is limited to less than 10MB/s, which probably explains why I experienced two or three slowdowns during this review.

Read and Write Speed in MB/s

Read and Write Speed in MB/s

Gaming

Candy Crush worked well with NEO A2 Lite air mouse, but that’s not a surprise. I then use a wireless gamepad to play Beach Buggy Racing and Riptide GP2, and both games were very smooth with default settings. I maxed out the graphics settings to “High Resolution”, while Beach Buggy Racing was just as smooth, Riptide GP2 was a little less so, but still very playable, and decided to perform my stability test with those settings. After playing around 15 minutes with Beach Buggy Racing, and then 20 minutes with Riptide GP2, the graphics performance was just the same all the way, so the cooling fan is doing its job.

Ugoos UT4 Benchmarks

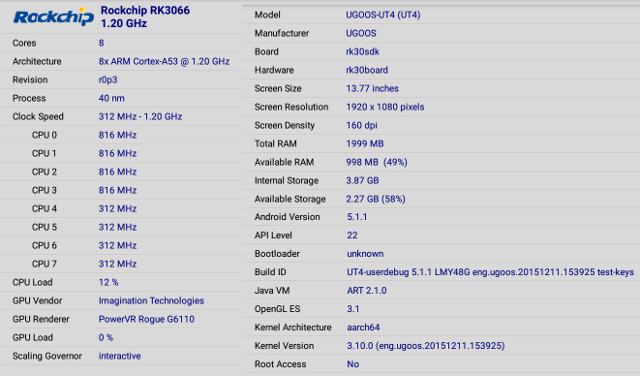
Before running the benchmark, I ran CPU-Z, which detected UGOOS-UT4 model with an octa-core Cortex A53 processor @ 1.20 GHz, and a PowerVR G6110 GPU. So the company did not try to boost the CPU clock frequency despite the presence of the fan.

Click to Enlarge

Click to Enlarge

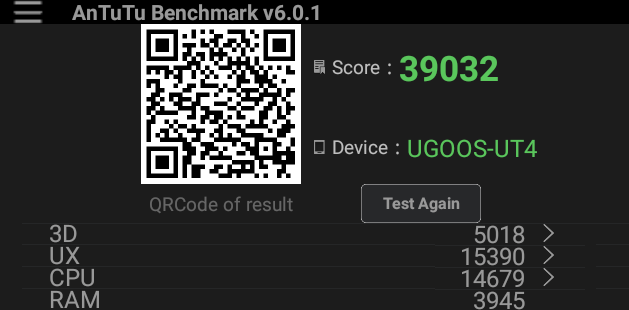
The TV box got 39,032 points in Antutu 6.0.1, and managed to pass all tests, including Marooned graphics.
Ugoos_UT4_Antutu_6.0The score cannot be compared to Antutu 5.x, and the only other scores I have are 38,032 points for MINIX NEO U1 (Amlogic S905) and 35,069 points for GeekBox (Rockchip RK3368). That’s interesting that Ugoos UT4 is over 10% faster in Antutu than GeekBox that is a very a similar platform.
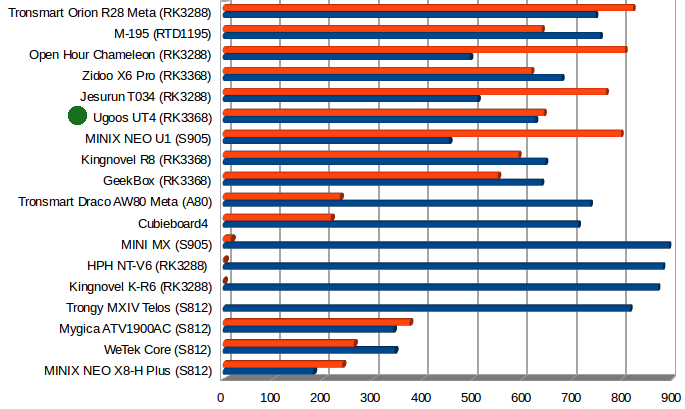
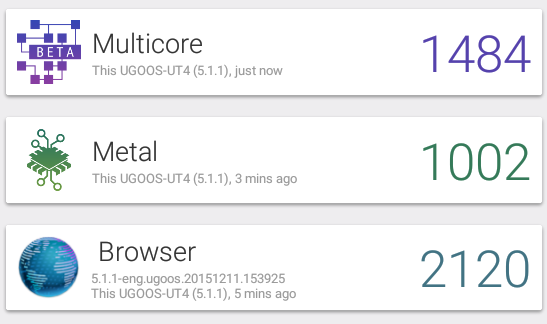
Ugoos_UT4_VellamoI’ve also run Vellamo 3.0, and results confirm a performance boost compared to other Rockchip RK3368 devices such as Beelink i68 or GeekBox in all three tests: Browser, Metal and Multicore.
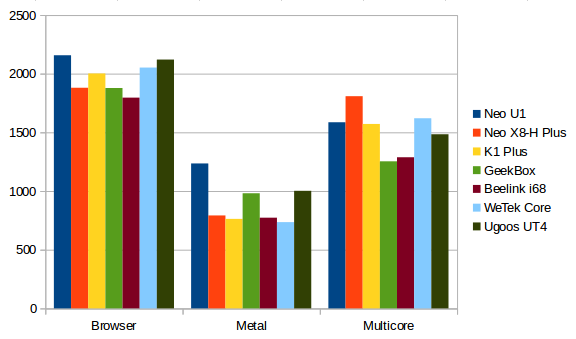
Ugoos_UT4_VellamoOther platforms in the chart are based on Amlogic S905 (Neo U1, and K1 Plus), and Amlogic S812 (WeTek Core and Neo X8-H Plus). So proper cooling appears to provide some performance boost even in benchmark that do not last that long.

Click to Enlarge

Click to Enlarge

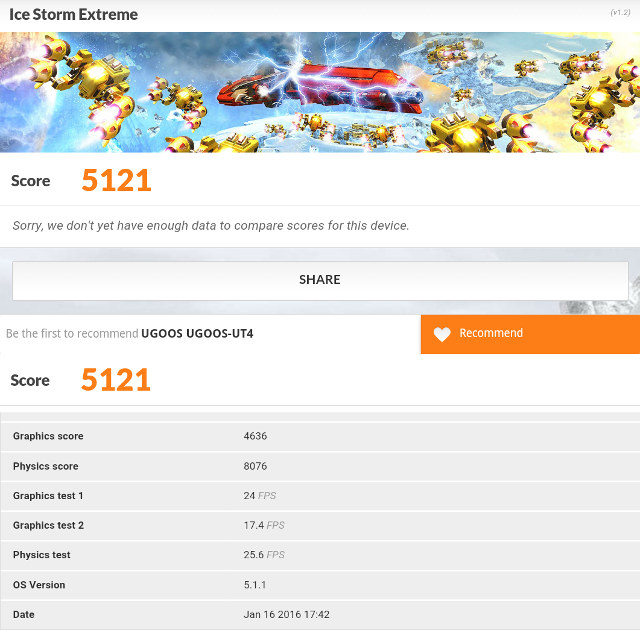
Finally, Ugoos UT4 achieved 5,121 points in 3DMark’s Ice Storm Extreme that compared to 4,248 in Beelink i68 or 4,327 in MINIX NEO U1.

Conclusion

All in all, Ugoos UT4 is a pretty good device with responsive firmware, decent Kodi support including working 4K H.264 and H.265 video playback, and audio pass-through for DTS-HD and Dolby TrueHD, very good WiFi performance for 802.11ac, and thanks to the cooling fan a performance that stays high over time, and allows Ugoos UT4 to outperform other Rockchip RK3368 devices I’ve tested so far. However, it would have been even better if an eMMC flash with a higher writing speed had been chosen to completely eliminate some rare slowdowns, the firmware has still a few bugs, including power off and Bluetooth file transfer that do not work, and the lack of automatic frame rate switching in the pre-installed version of Kodi 15.2.

PROS

  • Stable firmware, and responsive most of the time
  • Constant performance throughout thanks to the cooling fan, which provides better performance than equivalent RK3368 based devices
  • Video Output – HDMI 2.0 up to 2160p 60Hz; 24/25/30/50/60 Hz refresh rates supported, and AV
  • Fairly good Kodi support with working 4K H.265 video playback, and Dolby 5.1, Dolby+7.1, DTS-HD and TrueHD audio pass-through via HDMI and S/PDIF.
  • Very good WiFi performance, especially 802.11ac, and 802.11n is above average.
  • Fast read speed of internal storage, leading to fast boot time (< 30 seconds) and app loading
  • 4 USB ports  allow for good expandability
  • 3D games are running well, even after playing for several minutes

CONS

  • Powering off the device does not work (UT4 appears to hang)
  • Kodi issue – Automatic frame rate switching is not working, some videos will freeze a short time a few seconds after the beginning of the video, most videos don’t have the option to adjust the zoom level.
  • Bluetooth file transfer does not work, at least with my smartphone
  • IR remote control has a relatively short range (4 meters)
  • No Dolby and DTS licenses, so there will be no audio if you use PCM output in some applications (Kodi is OK).
  • Lack of Widewine and PlayReady DRM which might be an issue with some premium video streaming apps, or a least limit their capabilities.
  • Relatively slow write speed of the internal storage may lead to some slowdowns (does not happen often)
  • The fan is always spinning, and audible in quiet room at one or two meters (I don’t really notice it personally, but some people may do).
  • UI bugs – Icon highlight misalignment when hiding or showing the task bar, volume settings may not be remembered

Ugoos sent me the sample for review, and if you are planning in purchasing in quantities, you could contact the company via their Ugoos UT4 product page. Individuals can purchase Ugoos UT4 for $103.90 on Ugoos Aliexpress store, as well as GearBest, GeekBuying, and probably some other online shops.

Renesas GR-PEACH mbed Board Features RZ/A1H Processor with 10MB On-chip Memory

$
0
0

Renesas RZ/A1 ARM Cortex A9 processors were unveiled in 2013, and one of the differentiating feature was the large amount of on-chip SRAM with up to 10MB for RZ/A1H model. The following year, Renesas’ RZ/A1 professional development kit, and some RZ/A1H modules were launched, and I’ve now just seen a tweet about Renesas GR-PEACH development board that is mbed compatible, feature Renesas RZ/A1H processor, and happens to be pink.

GR-PEACH Full (Click to Enlarge)

GR-PEACH Full (Click to Enlarge)

There are actually two models based on the same PCB: GR-PEACH normal without header, and a “WiFi” connector, and GR-PEACH Full with female headers and an Ethernet port. Both basically share the same specifications:

  • SoC – Renesas RZ/A1H ARM Cortex-A9 Core @ 400 MHz with 10MB on-chip RAM, NEON and FPU, and 128KB L2 cache
  • Storage – 8MB FLASH + micro SD slot
  • Connectivity – Normal: Optional BP3595 WiFi module; FULL: 1x 10/100M Ethernet(Microchip LAN8710A); Both: Xbee connector (unpopulated)
  • USB – 2x micro USB Host/Device interfaces
  • Expansion Headers
    • Arduino compatible pin sockets – 1x 6-pin, 2x 8-pin, 1x 10-pin)
    • GR-Shield pin sockets – 1x 5-pin, 1x 6-pin, 3x 8x-pin, and 1x 10-pinx
    • Signals (Not 5V tolerant): 3xSPI, 3xI2C, 8xUART, 7×12-bits ADC, 2xCAN, 2x Camera Input, 1x LCDC(via LVDS)
  • Debugging – Unpopulated RZ/A1H 10-pin JTAG Connector (CoreSight10)
  • Misc – 1x Power LED, 1x user LED, 1x full color LED, reset and user switches
  • Power Supply – 5V via micro USB connector connected to mbed-IF or RZ-A1H, or Vin pin (5.5V to 16V)
  • Dimensions – 67.58 x 53.34 mm
Block Diagram for GR-PEACH (Clock to Enlarge)

Block Diagram for GR-PEACH (Clock to Enlarge)

Both boards support GR-PEACH AUDIO CAMERA Shield with two composite (NTSC) inputs, Line IN and OUT, a USB connector, a 20-pin camera connector, and through holes for extra audio interfaces. The normal version supports Rohm BP3595 WiFi 802.11 b/g/n module.

The board supports mbed.org Online Compiler, and high level C/C++ SDK. More technical details can be found on mbed website as well as Renesas GR-PEACH product page. The board has been listed on mbed website for several months, and it never seemed to be available, but you can now purchase GR-PEACH Full for $119 on Digikey, or if you are based in Japan via one of three local distributors.

JaguarBoard is a $65 Single Board Computer Powered by Intel Atom Z3735G Processor (Crowdfunding)

$
0
0

While we have recently started to see low Intel Atom x5 “Cherry Trail” development boards such as UP Board and LattePanda, we have not really seen any Intel Atom Z3735F/G “Bay Trail” boards despite their popularity in mini PCs and TV sticks. JAGUAR ELECTRONIC H.K. aims to fill that avoid with their JaguarBoard single board computer powered by an Intel Atom Z3735G processor coupled with 16GB flash and 1GB RAM.

JaguarBoard

JaguarBoard specifications:

  • SoC  – Intel Atom Z3735G quad core processor @ 1.33GHz / 1.83GHz (burst) with Intel HD graphics @ 311 MHz / 646 MHz
  • System Memory – 1GB DDR3L RAM
  • Storage – 16GB eMMC flash, 1x micro SD card slot up to 32GB
  • Video Output – HDMI 1.4 @ up to 1080p
  • Audio – HDMI, Line In and Line Out (stereo) 3.5mm jacks
  • Connectivity – 10/100Mbps
  • USB – 3x USB 2.0
  • Expansion Headers
    • 8-pin header with 2x UART and I2C
    • 4-pin header for GPIOs
  • Misc – Volume, power buttons
  • Power Supply – 5V/2A via 2.5mm power barrel; Consumption: 7 to 7.5Watts (Typical)
  • Dimensions – 101.9 x 64.5mm

Intel Atom Z3735G is basically the same as Z3735F expect it only supports 1GB RAM at a lower bandwidth.

JaguarBoard with Heatsink

JaguarBoard with Heatsink

The board is said to support a wide range of operating systems including 64-bit Linux distributions such as Ubuntu 12.02 to 15.04, Debian 8.0 or 8.1, LinuxMint 16 to 17.2, Fedora server 21 & 22, OpenSUSE 13.1 and 13.2, as well as the 32-bit versions of Windows 8.1 and 10. The 16GB internal storage would certainly limit what you can do in Windows. All these Linux distributions are unlikely to be working 100% out of the box, e.g HDMI audio, and all I can see on the download page are Windows drivers, and UEFI “BIOS” for Linux and Windows. The company has setup a Wiki in English and Chinese,  as well as a support forum.

The project is currently listed on Kickstarter with about 3 days to go, with the company having raised close to $20,000, and easily exceeded their lowly $3,000 target. $45 and $50 Early bird rewards are all gone, but you can still pledge $65 to get a JaguarBoard with a 110/220V power supply, a USB hub, and a 16GB micro SD card. A free WiFi dongle will be added if the campaign raises over $30,000. Shipping is free to the US, and $15 to the rest of the world.

Via LinuxGizmos


Tronsmart Ara X5 Plus mini PC Comes with Faster Storage, 802.11ac WiFi, and Higher USB 3.0 Speeds

$
0
0

Tronsmart Ara X5 was one of the first Intel Atom Cherry Trail mini PCs to launch on the market. It came with an Intel Atom x5-Z8700, and the now typical 2GB RAM combined with 32GB flash. But in my review of Tronsmart Ara X5, I found out that the flash was quite slower than other Windows mini PC I tested, and the USB 3.0 port would not recognize my 1TB Seagate USB 3.0 hard drive. The company has now introduced an upgraded model simply called Tronsmart Ara X5 Plus with a faster Samsung eMMC 5.0 flash, faster USB 3.0 read and write speeds (and hopefully better compatibility), 802.11ac WiFi support by replacing Ampak AP6330 module by Intel Wireless-AC 3160 and adding an external antenna, as well as fixed some micro SD card compatibility issues, and an updated UEFI binary that should reduce blue screen of death appearances in Windows.

Tronsmart_Ara_X5_PlusThe main specifications have not really changed however:

  • SoC – Intel Atom x5-Z8300 “Cherry Trail” quad core processor @ 1.44 GHz / 1.84 GHz) with Intel Gen8 HD graphics (2W SDP)
  • System Memory –  2 GB DDR3L
  • Storage – 32 GB Samsung eMMC 5.0 flash + micro SD slot
  • Video Output – HDMI
  • Audio I/O – HDMI, 3.5mm earphone jack
  • Connectivity – 10/100M Ethernet, dual band 802.11 b/g/n/ac Wi-Fi, and Bluetooth 4.0 (via Intel WiFi module)
  • USB – 2x USB 2.0 host ports, 1x USB 3.0 port
  • Misc – Power button and LED, RTC battery
  • Power Supply – 5V/3A
  • Dimensions – 11.81 x 11.4 x 2.7 cm
  • Weight – 210 grams

As we’ve seen in Ara X5 teardown, the board had been designed with a baseboard and a CPU module, so they may have kept the same CPU module (only replacing Sandisk by Samsung eMMC), and updated the baseboard.

Tronsmart_Ara_X5_Plus_ConnectorsThe mini PC still comes pre-loaded with Windows 10 Home (activated), and ships with the power adapter, an HDMI cable, and a user’s manual.

The company appears to have deprecated Tronsmart Ara X5, as it’s not for sale anymore on GeekBuying, with the new model selling for $139.99 including shipping.

WAVIoT LPWAN Technology Powers Low Cost Smart Water and Electricity Meters

$
0
0

With the rise of IoT and M2M applications, more and more Low Power Wide Area Network (LPWAN) standards have been launched or being worked on, such as Sigfox, LoRa, 802.11ah “Hallow”, Weightless, etc… with all promising long range, low power consumption, and support for a high number of nodes. WAVIoT, a US startup founded in 2011, has decided to create its own solution called WAVIoT Nb-Fi (Narrowband Fidelity) that works in ISM bands, offers up to 50km line-of-sight range, supports up to 2 million nodes by gateway, lasts over 20 years on a coin cell, and with WAVIoT said to cost as low as $2 per node. The technology is already available in smart electricy and water meters, and modules as shown in the picture below.

WavIOT_Meter_and_LPWAN_Radio_ModuleHere are some of WAVIoT Nb-Fi technical specifications:

  • DBPSK on physical layer of signal transmission;
  • End-nodes transmit radio signal in 10-500 kHz bandwidth
  • Minimum bit rate of 50 baud+ (8-10 bits per second)
  • Link budget available 184-194 dBm
  • Output power up to 25dBm (with FEM)
  • TX 250mA @ 27Bm, 90mA @ 16dBm, 44mA @ 14dBm
  • Sleep mode with RAM retention and wake-up timer running 1.5 μA
  • RF transceiver operates over a wide frequency range including 315MHz, 433MHz, 470MHz, 868MHz, 915MHz in the license-free Industrial, Scientific and Medical (ISM) frequency bands.

But the best way to see what the standard can do it to compare it to other solutions such as LoRa, Sigfox, LTE-M, WiFi, and Cellular.

Comparison Table

Click to Enlarge

(1) LoRa info source: Link Labs; (2) Sigfox info source: SigFox.

The table above has been provided by the WAVIoT, and while it’s informative, the data shown is likely to show WAVIoT Nb-IF in the best light possible.

You can already setup an ecosystem with WAVIoT, for example using WAVIoT GW200 base station combined with nodes using RM130 transceiver module ($15) supporting both Nb-Fi and LoRa, or smart meters such as SWM-1 smart water meter ($28)  or SEM-1 smart electricity meter ($59).

WAVIoT & LoRa RM-130 Development Kit

WAVIoT & LoRa RM-130 Development Kit

The company also provides a WAVIoT and LoRa development kit based on RM-130 transceiver module with the following hardware specifications:

  • MCU – SiLabs EFM32G210F128 ARM Cortex-M3 MCU @ 32 MHz with 128 KB Flash and 16 KB RAM
  • RF Transceiver – Semtech SX1276 137 MHz to 1020 MHz Low Power Long Range Transceiver
  • Frequency Bands – 866.5 – 916.5 MHz
  • Radio protocols – LoRa, WAVIoT UNB
  • TX Power Range – -2…18.6 dBm, by 1 dBm steps
  • TX Current –  120mA @ 18.6dBm, 90mA @ 16dBm
  • RX Current – 16 mA
  • Sleep Current 10 µA
  • Expansion – 17 through holes for Power signals, as well as GPIO, USB, UART, SPI, I2Cm ADC, analog comparators, pulse counters, etc…
  • Debugging – 20-pin JTAG header, USB-UART interface
  • Power Supply – 5V via USB or 2.5 / 3.8V (selectable by jumper)
  • Dimensions –  80 × 38 × 11mm
  • Operating Temperature – – 40…85 °C

So WAVIoT is just using existing RF solutions, and seems to basically use the same hardware as LoRA, as Semtech SX1276 is featuring a “LoRa long range modem”, and the cost per node is likely lower because of its better scalability. The board supports add-on shields for LCD display, SWR sensor, and more.

The company provides a simple Windows GUI, command-line utilities for Windows, Linux, and Mac OS X, and an open source host-interface abstraction written for PCs and embedded microcontrollers. Several cloud solutions for data management and billing are offered. The development kit sells for $274.99.

You can find more details on WAVIoT website.

Getting Started with NavSpark mini GPS Module

$
0
0

I noticed NavSpark mini GPS module a couple of weeks ago, and since it was free, not including $10 for shipping, I went ahead and ordered. Since the freebie got popular, SkyTraq took some time to ship it, and when they did they provide a “not trackable” tracking number, which I’m not sure what that mean as I could track the parcel from Taiwan to Thailand using 17track website without issues.

The packages included NavSpark mini and a USB to TTL module as described, so I insert both and connect VCC ,GND, and UART as shown on the pictures on the product page.

Click to Enlarge

NavSpark mini (Left) and USB to TTL board (Right) Connected to Breadboard – Click to Enlarge

I also connected the GPS antenna from LinkIt ONE development kit to the uFL connector on NavSpark mini, as well as a micro USB to USB cable to my computer. If you don’t have such antenna, you’ll need to add the $9 GPS/GLONASS antenna on NavSpark website to your order.

The easiest way to get started, and make sure the board works is to use GNSS Viewer program. The downside for a Ubuntu guy like me is that it only runs on Windows. But no problem, I started my  Windows 7 virtual machine in Virtual, enable the USB to TTL port with Devices->USB menu, and installed Prolific drivers. However, I never managed to make the driver works, with Windows 7 complaining that:

Windows cannot verify the digital signature for the drivers required for this device. A recent hardware or software change might have installed a file that is signed incorrectly or damaged, or that might be malicious software from an unknown source. (Code 52)

I did not want to mess with Windows in the evening, so I simply started an old Acer netbook with Windows XP. No problems with drivers, but GNSS Viewer did not like my netbook resolution (1024×600), and the program is poorly written as it does not allow you to resize the window.

So I decided to just use the Arduino IDE in Ubuntu by following the instructions in the User’s guide:

  1. I already had Arduino 1.6.6 installed from https://www.arduino.cc/en/Main/Software
  2. You’ll also need the LEON3 sparc toolchain to be install in /opt:

    tar xvf NavSpark Mini/sparc-elf-3.4.4-33.tar.gz -C /opt

  3. You are also asked to install the 3-bit version of openJDK:

    sudo apt-get update &amp;&amp; sudo apt-get install openjdk-7-jre:i386

  4. Finally, you have to install NavSpark board manager (http://navspark.mybigcommerce.com/content/package_navspark_index.json) and configure the Arduino IDE to use NavSpark mini.
    NavSpark_mini_Arduino
    This looks good, except for the Invalid library found message…
  5. The next step is to find some hello work app to check GPS connectivity, and this is where I stopped, simply because there aren’t any available samples according to the user’s manual, except demo_hello_world_nmea.
    NavSpark_mini_code_sampleBut when you download the samples, they are all there, except the working one :)…

I’ve ask what need to be modified for partially compatible samples on the forums.

Finally, I remembered I still had a Windows 10 TV stick, I tried GNSS Viewer yet again in MeLE PCG01, and I was happy that after 3 hours of messing around, I finally managed to get a signal, and could make sure the board was indeed working.

GNSS_Viewer_NavSpark_mini

Click to Enlarge

All I had to do was to select the COM port for Prolific, and click on Scan All which connect the COM port @ 115,200, and got a very fast fix indoor.

If you are interested in such GPS module, the “freebie” is still available, and you just need to pay for $10 for shipping, and remember to add a u.FL GPS antenna if you don’t have one.

U4 Quad Hybrid Android Set-top Box Supports DVB-S2, DVB-T2/T/C & ATSC Tuners

$
0
0
Home > Android, Hardware, HiSilicon > U4 Quad Hybrid Android Set-top Box Supports DVB-S2, DVB-T2/T/C & ATSC Tuners

U4 Quad Hybrid Android Set-top Box Supports DVB-S2, DVB-T2/T/C & ATSC Tuners

So far most of the Android receiver with digital TV tuners I covered on CNX Software are based on Amlogic processor, with a few exceptions such as Infomir MAG277 based on STMicro STiH301 processor. There’s now another choice with U4 Quad Hybrid, an Android 4.4 TV box powered by Hisilicon Hi3796M quad core Cortex A7 processor that supports DVB-S2, DVB-T2/C, and ATSC tuners.

U4_Quad_Hybrid

U4 Quad Hybrid specifications:

  • SoC – Hisilicon Hi3796M quad core Cortex A7 processor with a Mali-450MP GPU
  • System Memory – 1GB DDR3-1600 MHz
  • Storage – 8GB internal storage and micro SD slot
  • Video Output – HDMI 1.4a up to 4K @ 30Hz + AV port (CBVS)
  • Audio Output – HDMI, AV and coaxial S/PDIF (optical S/PDIF available as an option)
  • Video Decoding – Up to 4K @ 30 fps for H.265, H.264, MPEG-4, AVS, VC-1, VP6/8, etc.. Full HD 3D video (MVC) and blu-ray navigation supported
  • Tuners (one or the other)
    • DVB-S2 – Hi3136 demodulator; freq range: 950 to 2,150 MHz; symbol rate: DVB-S: 1~55 Mbps; DVB-S2: 1~44 Mbps; Input level: -65 to -25 dBm
    • DVB-T2/T/C – AVL6762 demodulator; freq range: 43 to 1,002 MHz; bandwidth: 6/7/8/1.7 MHz; signal level: -80 to -25 dBm
    • ATSC – LG 3306A demodulator; freq rage: 52 to 860 MHz; mode: 8/16 VSB | IT-T J83 Annex B; input level: -86 dBm to +10 dBm
    • ANT IN and LNB IN connectors
  • Connectivity – 10/100M Ethernet, built-in WiFi
  • USB – 1x USB 3.0 host port, 1x USB 2.0 host port
  • Misc – 2x LED, IR/LED connector (looks like mini USB)
  • Power Supply – 12V/1.5A
  • Dimensions – 135 x 135 x 33 mm
  • Weight – 900 grams?

U4_Quad_Hybrid_Android_Set-top-boxThe device runs Android 4.4.2 with “eOn center UI” and Kodi 15.2. The specs also mention a video player capable of handling HLS/TS over UDP and RTP/RTSP/HTSP video player, a Linux front end for Live video, as well as PVR/Time-shifting support. Only FAT32 and NTFS (read-only) file systems are supported, which could be an issue for longer movies. Hopefully the latter is a mistake in the specs.

Hisilicon_STB_user_interface

Shenzhen Vivant Technology, the manufacturer, is selling the set-top box on Aliexpress for $119.99 including shipping by DHL [Update: Another link has it for $106.69 by China Post]. Accessories are not listed on the product page, but I should receive a sample, so I’ll check this out soon…

Tweet So far most of the Android receiver with digital TV tuners I covered on CNX Software are based on Amlogic processor, with a few exceptions such as Infomir MAG277…

PIPO X9S Atom x5 mini PC comes with 4GB RAM, 64GB Storage, and a 8.9″ Touchscreen Display

$
0
0

PIPO has a line of products that few others companies have. They are not really simple mini PCs, not really tablets, and not exactly panel computers, but some mixture of all three. They started their mini PCs with tablet display with PIPO P8 model featuring a Bay Trail processor, and they now have an upgraded version called PIPO X9S that features an Intel Atom x5-Z8300 processor with 4GB memory, 64GB eMMC flash, and a 8.9″ display, and is itself upgrade over PIPO X9 featuring less memory and storage, and an Atom Z3736F processor.

PiPO_X9SPIPO X9S specifications:

  • SoC – Intel Atom x5-Z8300 “Cherry Trail” quad core processor @ 1.44 GHz/1.84 GHz with Intel Gen8 HD graphics
  • System Memory – 4 GB DDR3
  • Storage – 64 GB flash, and micro SD slot up to 64GB
  • Video Output – HDMI 1.4a
  • Audio Output – HDMI, 3.5mm audio jack, and stereo speakers
  • Connectivity – 10/100M Ethernet ports, 802.11 b/g/n Wi-Fi, and Bluetooth 4.0
  • USB – 4x USB 2.0 host ports (N.B.: the micro USB port found on PIPO X9 has been removed).
  • Misc – Power and volume buttons, and reset pinhole.
  • Power Supply – 12V/2.4A
  • Dimensions – 165x133x53mm
  • Weight – 500 grams

PIPO_X9S_ConnectorsThe device runs Windows 10, and I assume that version is activated since Windows is free for device with a display smaller than 9″, which could be why PIPO is making this kind of device. It ships with a power adapter and a user’s manual.

PIPO X9S is currently up for pre-order on GeekBuying for $199.99, but you can lower the price by $15 with 15ESPIPOX9S coupon, bringing it to $184.50. If you like the processor, memory and storage options, but could care less about the display, PIPO X6S might be a better option for the same price (before coupon), as it adds one USB 3.0 port, an internal SATA bay, faster WiFi, and one extra Ethernet port. I’d also not rush pre-ordering PIPO X9S as it’s scheduled to ship on March 15, 2016.

Via AndroidPC.es

Tweet PIPO has a line of products that few others companies have. They are not really simple mini PCs, not really tablets, and not exactly panel computers, but some mixture…

USB Power Delivery Advantages Explained (Video)

$
0
0

USB 3.0 and greater specifications not only promise higher speeds, up to 10Gbps for USB 3.1, but also the ability to deliver up to 100W over USB to power your laptop, display, and printer via equipment, usually a USB hub, that supports USB Power Delivery, or USB PD, via a USB Type C connector. So far very few products appear to support it, and I could only find the Macbook and ChromeBook Pixel, and a few USB PD chargers on Amazon.

USB_PD_ConnectionSo basically in the future, the need for power supplies should decrease sharply, simplifying connections, and decreasing the cost of products and shipping since devices will only need a USB type-C port that’s compatible with USB PD, meaning your computer, printer, and display won’t need an extra power supply as long as they consume less than 100 watts combined.

The reasons I’m writing about this today, is that completely forgot about this until I saw a video by Renesas that explains USB PD in a way easy to understand with 4 main advantages:

  1. One cable achieves both data communication and charging
  2. Simple design for the interconnections between boards
  3. Faster charging
  4. Universal charger

[embedded content]

Beside Renesas, many other companies also provide solutions for USB PD including Microchip, Cypress, NXP, TI, and more, so I assume it’s just a question of time before more devices support USB Power Delivery.

Tweet USB 3.0 and greater specifications not only promise higher speeds, up to 10Gbps for USB 3.1, but also the ability to deliver up to 100W over USB to power…

Vinclu Gatebox is an IoT Gateway using a Hologram Girl as the User Interface

$
0
0

Let’s face it, home automation or IoT gateways are just boring cubic, rectangular or cylindrical boxes without soul that just transmit packets and gather data between different devices. But don’t despair, as Vinclu, a Japanese start-up, has come up with Gatebox an IoT gateway with a virtual girl, named Hikari Aizuma, that welcomes you back home, turns on the TV on request, wakes you up in the morning and gives the day’s weather forecast, and more!
Vinclu_GateboxThe product is still in development, and we don’t known many details, but the Gatebox is said to uses video projection technologies and various sensors, and you’ll be able to select other characters. The company has raised 90 million JPY (~$770,000 US) and is currently recruiting engineers to complete hardware and software development. The device is expected to be launched at the end of the year via a crowdfunding campaign.

Vinclu_Gatebox_Hologram_Girl

You can watch the concept video below. It’s in Japanese, but it still gives a good idea of what they expect it to do.
[embedded content]

Via Nikkei Technology

Tweet Let’s face it, home automation or IoT gateways are just boring cubic, rectangular or cylindrical boxes without soul that just transmit packets and gather data between different devices. But…


This is What a 16 Raspberry Pi Zero Cluster Board Looks Like

$
0
0

Idein, a Japanese startup, has been working with Raspberry Pi compute module to create Actbulb, a multi-functional device for applications using computational sensing and data analysis, and that fits in a regular light bulb socket. But for their internal testing, they’ve decided to create a cluster for 16 Raspberry Pi Zero boards.

Raspberry_Pi_Zero_ClusterPiZero Cluster board has 32 micro USB ports for power and data, two for each Raspberry Pi Zero board, 16 USB type A ports, and 16 Ethernet interfaces. They’ve likely done this board for testing their ActBulb, as Koichi Nakamura, Idein CEO & founder mentioned that:

We are making a sensing device that uses Raspberry Pi compute module. So we need many Pi’s for the development and tests. Since we will use Pi’s GPU for image processing, deep learning, etc. We need real Pis but not just Linux machines. Another reason. It can be used for flashing eMMCs of our devices via USB ports when we have to do that by ourselves.

PiZero_Cluster_BoardYou may have noticed that there’s only one Raspberry Pi Zero in the cluster board, simply because they don’t have more, and the boards are not available for sale. The Raspberry Pi foundation is making more , but they will only allow one per customer for now due to the high demand, so it may take some time until they get their 15 other boards, although I guess friends and family could help…

Tweet Idein, a Japanese startup, has been working with Raspberry Pi compute module to create Actbulb, a multi-functional device for applications using computational sensing and data analysis, and that fits…

U4 Quad Hybrid Android TV Box Unboxing and Teardown with DVB-T2, DVB-S2 and ATSC Tuners

$
0
0

Yesterday, I wrote about U4 Quad Hybrid Android Digital TV receiver based on HiSilicon Hi3796M processor, and supporting for DVB-T2/T/C, DVB-S2, and ATSC standards. Today, I’ve received the device, taken a few pictures, and torn it down to find out more about the hardware. The full review will come out in a few weeks.

U4 Quad Hybrid Unboxing

DHL did their job quickly as I received the set-top box in about two days in the following package.

U4_Quad_Hybrid_PackageThe box comes with a 12V/1.5Am AV and HDMI cables, a WiFi antenna, an IR remote control requiring two AAA batteries (not included), a user’s manual in Korean language only and… a separate tuner…

Click to Enlarge

Click to Enlarge

So let’s check that tuner more in details…

Click to Enlarge

Click to Enlarge

The demodulator chip is LG3390A, so an ATSC tuner is included in the package. Not very useful in Thailand, but it’s good to know it’s included. I also open the cover of the bottom connector.

Click to Enlarge

Click to Enlarge

And if I’m correct, what we have here is Aihora AV2012 DVB-S2 tuner chip, so that little expansion board should support both ATSC and DVB-S2.

Click to Enlarge

Click to Enlarge

The box itself look fairly nice. We’ve got a USB 2.0 host port and a a USB 3.0 host port on the side (both limited to 500 mA), as well as a micro SD slot, the AV port, and a mini USB port for an IR/LED extension cable (not included). The rear panel features ANT IN and LNB IN antenna connectors, coaxial S/PDIF, the WiFi connector, HDMI output, 10/100M Ethernet, and a power jack for the 12V input.  If the antenna ports do not mean much to you, a look to the Korean user’s manual may help, as ANT IN is referred to “Ter In” and LNB IN to “Sat In”, which should be the left connector if for DVB-T2/T/C and the right connector for DVB-S2/T2, and if you want ATSC + DVB-S2, you simply need to insert the ATSC tuner. The sad part is that doing so would void your warranty according to the sticker on the rear panel… So I don’t really get it.

You could also watch the unboxing video for something more visual.

[embedded content]

U4 Quad Hybrid Teardown

You’ll need to remove three screws to open the device. The one on the rear panel above the HDMI port, and two on the bottom of the case.

Click to Enlarge

Click to Enlarge

There’s a sticker in Korean on the bottom about Shenzhen Sosci Technology, which specializes in, you guessed it.. LED aquarium lights! I’m not sure if there are other companies with the same name, and I picked the wrong one, or they simply chose to diversify. The MAC address suffix 00:11:AD points to Shanghai Ruijie Digital Technology, an Internet service provider, and the company that actually sent me the product is called Shenzhen Vivant Technology, so lots of parties involved here!

U4 Quad Hybrid Board (Click to Enlarge)

U4 Quad Hybrid Board (Click to Enlarge)

The board called W96M_MAIN VO.4 feature the HiSilicon processor with a heatsink, an 8GB FORESEE NFEFEH68-08G eMMC flash, two SKhynix H5TQ4G63AFR DDR3 chips (2x 512MB), and Realtek RTL8188ETV Wifi module.

Click to Enlarge

Click to Enlarge

If we zoom in on the tuner area, we can see AVL6762TA DVB-T2/T/C demodulator, and on the main board itself and located on the bottom right of the picture above, Hisilicon Hi3136 is the DVB-S2/S demodulator.

U4_Quad_Hybrid_LCD_Display

There’s also two LEDs, an IR receiver, and a 4-digit LED panel on the front of the board.

Click to Enlarge

Click to Enlarge

There’s basically nothing on the bottom of the board, except S1 switch which should be the firmware recovery button.

I’d like to thanks Shenzhen Vivant Technology for sending a review sample, and you contact them if you wish to purchase in quantities. They also sell U4 Quad Hybrid for $119.99 shipped by DHL on Aliexpress, but a cheaper option is to go with China Post for $106.69 instead.

Tweet Yesterday, I wrote about U4 Quad Hybrid Android Digital TV receiver based on HiSilicon Hi3796M processor, and supporting for DVB-T2/T/C, DVB-S2, and ATSC standards. Today, I’ve received the device,…

NanoPi 2 Fire Board Adds Gigabit Ethernet and Power Management, Drops WiFi and Bluetooth

$
0
0

NanoPi 2 board, based on Samsung S5P4418 quad core Cortex A9 processor with WiFi and Bluetooth, has now gotten a brother, called Nano Pi 2 Fire, with wireless connectivity replaced by Gigabit Ethernet, and a power management IC (PMIC) for software power-off, sleep and wakeup.

Click to Enlarge

Click to Enlarge

NanoPi 2 Fire specifications:

  • SoC – Samsung S5P4418 quad core Cortex A9 processor @ up to 1.4GHz
  • System Memory – 1GB 32bit DDR3
  • Storage – 1x Micro SD Slot
  • Connectivity – Gigabit Ethernet port
  • Video Output / Display I/F- 1x HDMI 1.4a, 0.5 mm pitch SMT FPC seat for full-color LCD (RGB: 8-8-8)
  • Camera – 24-pin DVP interface; 0.5mm pitch
  • USB – 1x USB Host port; 1x micro USB 2.0 OTG port for power and data
  • Expansions Headers – 40-pin Raspberry Pi compatible header with UART, I2C, SPI, GPIOs…
  • Debugging – 4-pin header for serial console
  • Misc – User and reset buttons, power and user LEDs, RTC battery header
  • Power Supply – 5V/2A via micro USB port with AXP228 PMIC
  • Dimension: 75 x 40 mm (6-layer PCB)

NanoPi_Fire_2The board support Android and Debian, and you can find hardware documentation on FriendlyARM’s Wiki (in construction), and software on their Github account. The Wiki should eventually get some software documentation and links to firmware images, just like for NanoPi 2 Wiki.

NanoPi2 Fire will sell for $29 + shipping, and should be listed together with NanoPi2 on the company’s product page.

Tweet NanoPi 2 board, based on Samsung S5P4418 quad core Cortex A9 processor with WiFi and Bluetooth, has now gotten a brother, called Nano Pi 2 Fire, with wireless connectivity…

ACS712 Module Measures Currents up to 30A for as Low as $1 Shipped

$
0
0

Usually, if I buy a high power electric appliance, I like to double check it power consumption either with a Kill-a-watt when possible, and when not, e.g. cable directly hooked to the device or current intensity is too high, I use a digital electric clamp meter. Both methods are quite convenient as you don’t need to cut any wire to measure the current and determine the power consumption, but they don’t allow for data gathering since they don’t connect to the network. Earlier this week, I’ve come across a projects using ESP8266 for a mains energy monitor for a solar panel setup, and measuring mains current, electric meter, and gas meter. They use a photosensor to measure power consumption on their electric meter, which works, but may be problematic if the meter is on the street, and iSnail current sensor, using hall effect just like clamp meter, but instead of showing the current on a display the sensor output 0 to 5V, meaning you can connect it to a micro-controller to handle the data however your like. That’s nice, but while a clamp meter costs about $10, the 25A version of iSnail goes for $40, so I looked for alternatives. I wanted to find an always-on connected hall effect current sensor that either harvest energy or works of a fews with a battery, but did not find any, an instead discovered cheap current sensor modules based on Allegro Systems ACS712 supporting either 5A, 20A or 30A , working easily with analog inputs of Arduino boards, and selling for as low as $1 shipped on eBay for the 5A, while the 20A & 30A versions usually sell for less than $2.

ACS712The hardware specifications are pretty basic:

  • ACS712 Hall-Effect-Based Linear Current Sensor IC (Datasheet)
  • 2-pole terminal for DC or AC load
  • 3-pin header with VCC (5V), GND and OUT pins
  • Input Current and Sensitivity (measurement scale)
    • -/+ 5A – 185 mV/A
    • -/+ 20A – 100 mV/A
    • -/+ 30 A – 66 mv/A
  • Dimensions – 31 x 13mm

Since the IC can measure in both direction, OUT pin outputs VCC/2 (2.5v) when there’s no current, and other values which may be lower and greater than VCC/2 depending on current direction to report the actual current.

ASC712_ArduinoMeasuring DC current is very easily as you just need to take one measurement, subtract VCC/2, and divide this by the sensitivity. Alternative current is only a little more complicated as you have to take many measurement to find the RMS value as explained on Henry’s bench website. Since the board had been available for a few years, there’s plenty of documentation on the web for Arduino. One person (Julian) did a pretty good video showing how it works.

[embedded content]

ACS712 current sensor can also be interfaced with ESP8266, but since the wireless chip’s analog input only takes 0 to 1V, ACS712 output must be reduced leading to a lower accuracy, unless used via an external ADC chip. ESP32 won’t have this problem however as the analog input supports up to 0 to 4V range, although I understand ESP32 may has some built-in functions for energy monitoring.

Tweet Usually, if I buy a high power electric appliance, I like to double check it power consumption either with a Kill-a-watt when possible, and when not, e.g. cable directly…

GOSTICK Intel Atom x7-Z8750 TV Stick Comes with Up to 8GB RAM (Crowdfunding)

$
0
0

After products like MagicStick or MeegoPad T07, GOSTICK is yet another crowdfunding campaign for an Intel Atom Cherry Trail TV stick. The device does have some interesting specifications with an Intel Atom x7-Z8750 quad core processor, 4 to 8 GB RAM, and 64 to 128 eMMC flash.

GOSTICKThere are three version of the stick GOSTICK Standard (4GB RAM/64GB flash), GOSTICK Enhanced (8GB RAM/64GB flash), and GOSTICK Extreme (8GB RAM/128GB flash) that beside different memory and storage capacity basically share the same specifications:

  • SoC – Intel Cherry Trail Atom x7-Z8750 quad core processor @ 1.6 GHz/2.56 GHz (Turbo) with HD Graphics 405
  • System Memory
    • Standard – 4GB RAM
    • Enhanced and Extreme – 8GB RAM
  • Storage
    • Standard and Enhanced – 64GB eMMC flash + micro SD slot up to 128 GB
    • Extreme – 128 GB eMMC flash + micro SD slot up to 128 GB
  • Video Output – HDMI
  • Audio Output – HDMI + 3.5mm audio jack
  • Connectivity – Gigabit Ethernet, WiFi 802.11ac, and Bluetooth 4.0
  • USB – 2x USB 3.0 ports (5Gbps), 1x USB 3.1 type C port (10 Gbps), 1x micro USB port
  • Power Supply – TBD
  • Dimensions – N/A (but it looks fairly big for a stick)

The stick all run Windows 10 Home 64-bit. The specifications are very attractive, but the Indiegogo campaign has at least two red flags: flexible funding, and only 3D renders are provided, without pictures of the actual prototype that is based on x7-Z8700 (since x7-Z8750 is barely available). However, they have uploaded a demo video that’s said to run on GOSTICK with 4GB RAM, 64GB Flash, showing Windows 10 Home Info (it’s activated in the demo), Microsoft Office, Adobe Photoshop CS6, and Blender 3D graphics and animation software.

[embedded content]

A potential backer also asked GO Technologies, the Singapore based company behind the project (third red flash: no working website, and the company can’t be found here), whether they could really get Atom x7-Z8750 in time to deliver on their schedule promise (April 2016), and the company provided a screenshot of an email allegedly coming from Intel showing x7-Z8750 should be available right now with 2 to 4 weeks lead time. He did not exactly do a good job at hiding the Intel’s sales person name though…

Intel_Atom_x7-Z8750_availabilityIn case the project is indeed legit, pricing is quite attractive with GOSTICK Standard going for $169, and Enhanced and Extreme versions for respectively $199 and $219 with all three rewards including worldwide free shipping.

Tweet After products like MagicStick or MeegoPad T07, GOSTICK is yet another crowdfunding campaign for an Intel Atom Cherry Trail TV stick. The device does have some interesting specifications with…

Viewing all 2336 articles
Browse latest View live